2. Get install artifacts from the download site
POC deployment manual chapter. Verified against the 2026.10 mainline; command output follows the installer delivered for that engagement.
Back to overview · Full table of contents · Download full PDF
This chapter: installation needs only two files — the installer and the offline package. This chapter walks through the download site's five steps so those two files match this deployment exactly, and how to verify after download, without installing anything, that they are the right files and not corrupted. The reader is the implementation engineer.
2.1 What the download site provides
The download site (address provided by the delivering party) is an offline-artifact customizer, not a software store. It does three things: assembles the matching offline package from the product, platform, version, and capabilities you choose; prefills non-secret deployment parameters into that package; and prints an on-site install command you can copy and run.
The top of the page has two tabs:
| Tab | Contents |
|---|---|
| Server packages | The installer and offline package for this engagement, in a five-step flow |
| Clients | ZenSwitch and Waner client packages that ship with this version |
Offline package size in the upper right updates as you choose. Use it to see whether extra capabilities were selected.
Note: the customizer site never collects credentials or a license. Database passwords, object-storage access keys, and the license are never filled in here; they are entered only during on-site install. Every prefilled setting on the page may be left blank.
2.2 Step 1: product and platform
Procedure
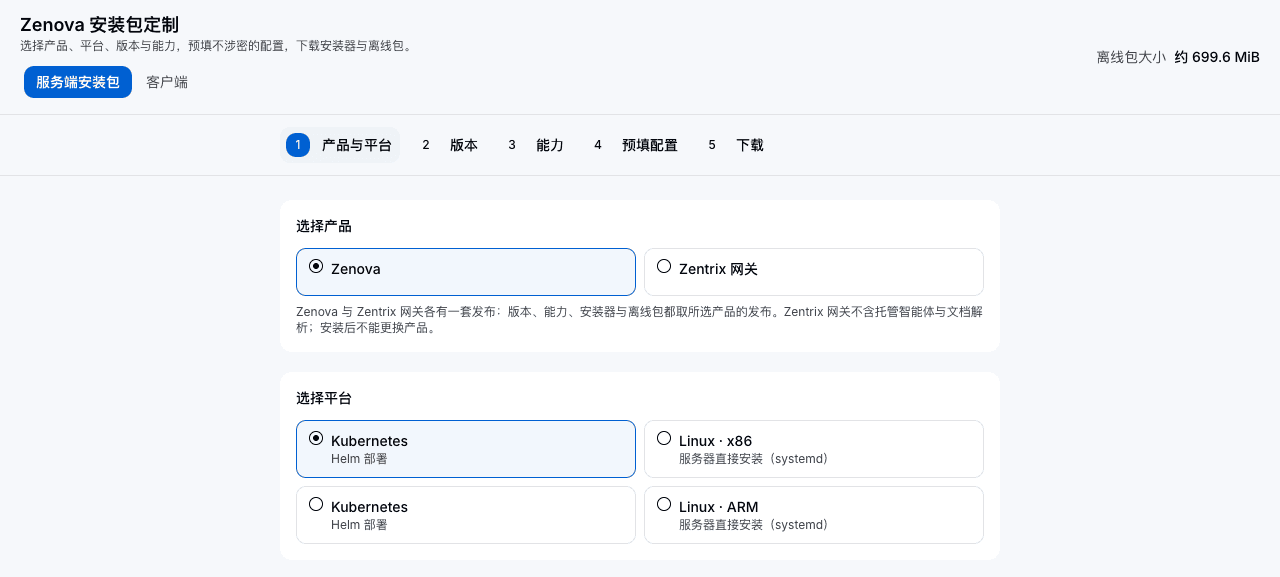
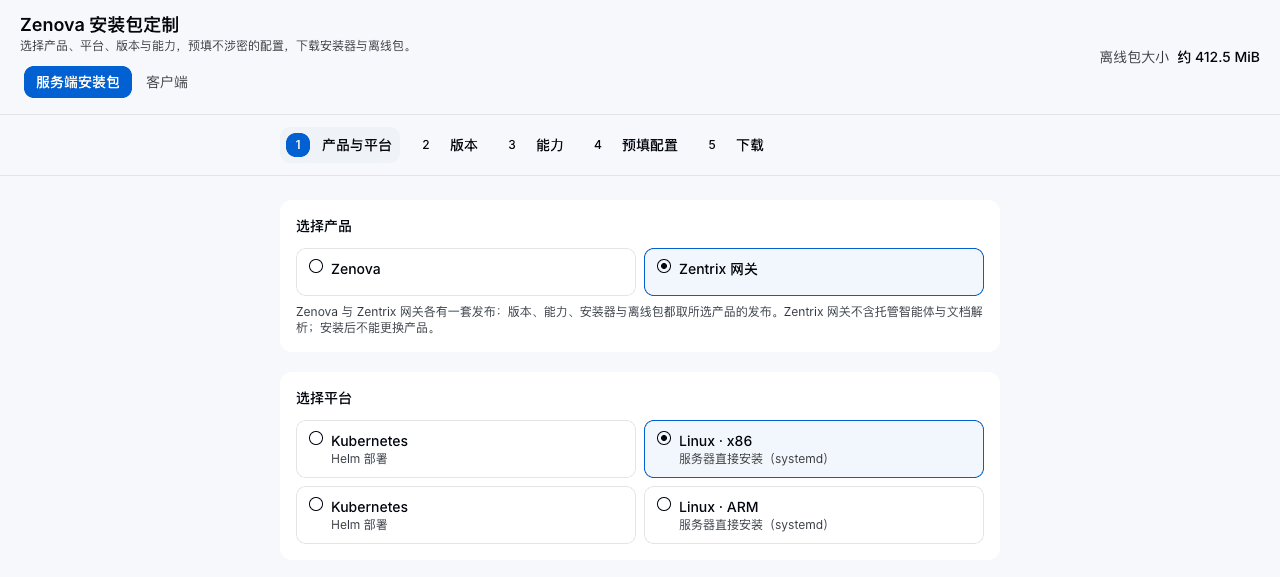
- Under Choose a product, select Zentrix Gateway (the other option is the full edition). The page defaults to the first product; confirm this item as soon as you open the page.
- Under Choose a platform, select the platform. Each item's title is OS · architecture; the subtitle is the deployment form.
| What you see | Meaning |
|---|---|
| Linux · x86 Direct server install (systemd) | Single-host bare-metal install; this is the option this manual uses |
| Linux · ARM Direct server install (systemd) | Single-host bare-metal install on an ARM server |
| Kubernetes Helm deployment | Deploy onto the customer's existing Kubernetes cluster |
- Click Next.
What you will see: Offline package size on the right changes; completed steps show a check mark on the tab, and the current step is highlighted.
Note: choosing the wrong product makes the entire offline package unusable. The installer rejects it; changing an option later does not fix it. Changing product after install requires a wipe-and-reinstall, which deletes all existing data.
Note: the platform list on the page is whatever the release pipeline actually published. If a platform is missing, that version was not built for it. It is not a page error.
2.3 Step 2: choose a version
Procedure
- Open step 2, Version.
- Choose from the version list. Each item is labeled with a channel:
StableorTest. The page defaults to the latest stable version; if that version has no stable build, it selects the top item in the list. - Record the full version number. You will need it when checking the artifacts.
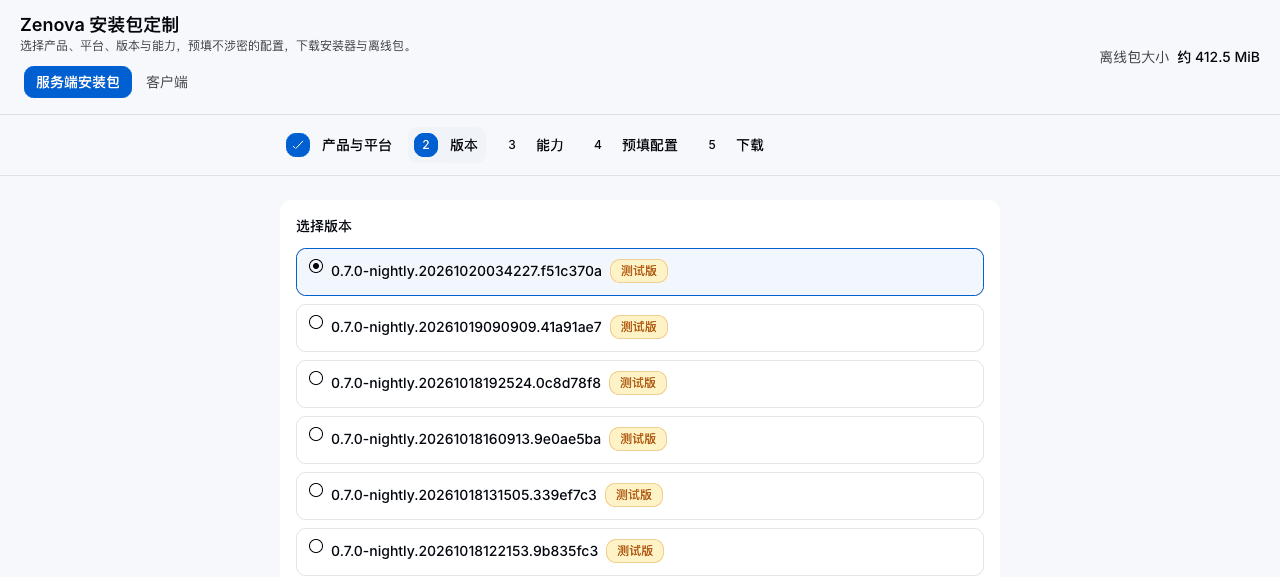
Note: if the list contains only test builds (version numbers like 0.7.0-nightly.20261020034227.f51c370a), this product has no published stable version yet. A POC may use a test build, but write the version number and channel into the handover record; later upgrades and troubleshooting use that identity. The three parts of the version: 0.7.0 is the product version, 20261020034227 is the build time, and the last 8 characters are the build commit.
2.4 Step 3: choose capabilities
Procedure
- Open step 3, Capabilities.
- Select the capabilities to enable this time. Core is always selected and cannot be cleared. Each item shows the size that component occupies.
- To take every capability, click Select everything in the upper right to select all items that can be checked.
- Click Next.
| Capability | Notes |
|---|---|
| Core | Required. Control plane, ingress proxy, central gateway node, data dependencies |
| Knowledge base | Vector search for the knowledge base |
| Hosted agents | Requires a container runtime on the host |
| Document parsing | Parses PDF and Office documents; selecting it also selects Knowledge base |
| Data high availability | Used on multi-host plans; requires a container runtime |
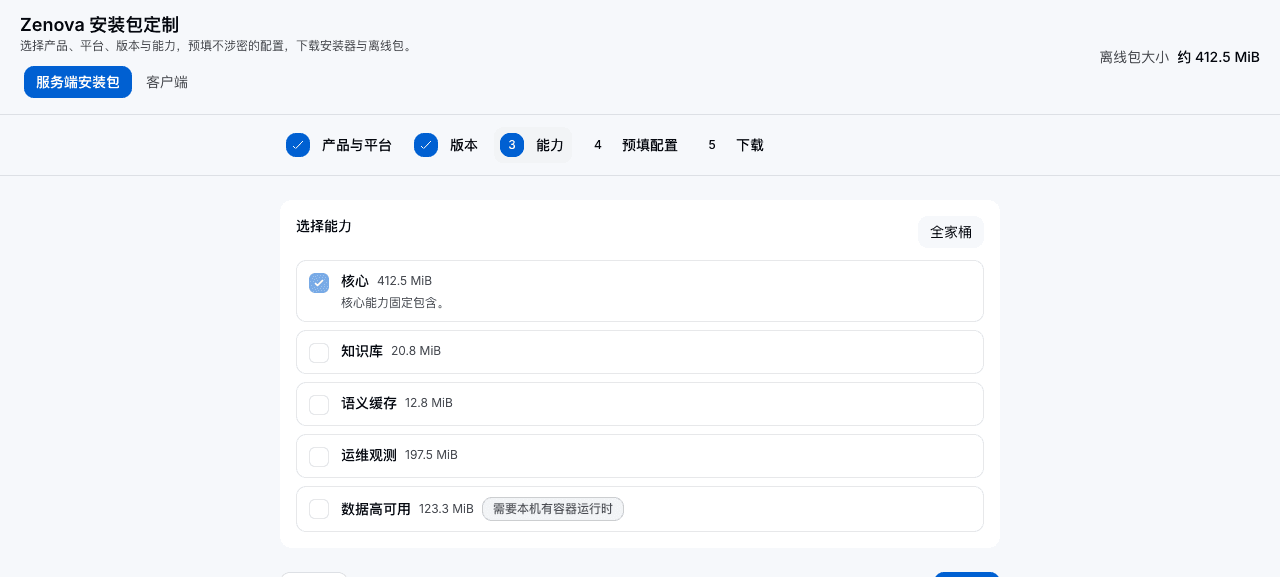
Dependencies between capabilities are linked automatically: selecting Document parsing also selects Knowledge base; clearing one clears the other. The checkboxes only decide which components the offline package carries. At install time you can still choose which of them to enable this run — anything not enabled stays on the host and can be turned on later from System Updates on the console, without downloading again.
Note: some capabilities are greyed out with a reason, for example Not yet available on this platform or Requires a local container runtime. Greyed-out items cannot be selected. That was decided at publish time; do not try to bypass it.
Note: the more you select, the larger the offline package and the higher the disk threshold. For a POC, select only the capabilities this engagement will actually verify. Semantic cache is not a separate capability; it ships with Core, does not need to be selected, and does not deploy any model on this host. How to enable it is in section 7.5.
2.5 Step 4: prefilled settings
Procedure
This entire step can be skipped. If you fill anything in, the installer will show each item and require confirmation.
| Prefillable item | Notes |
|---|---|
| Access domain | Address used by browsers and callers |
| Admin access address | Derived from the access domain when left blank |
| Platform database (PostgreSQL) | Decide on site / Deployed by us / Use an existing service |
| Analytics database (ClickHouse) | Same as above |
| Object storage | Decide on site / Bundled object storage / Local directory / Existing S3-compatible storage |
| Trace export address | Optional |
| Operations notification channel | DingTalk / Feishu / WeCom / Webhook / Decide on site |
| Host list | Needed only for multi-host; leave empty for single-host |
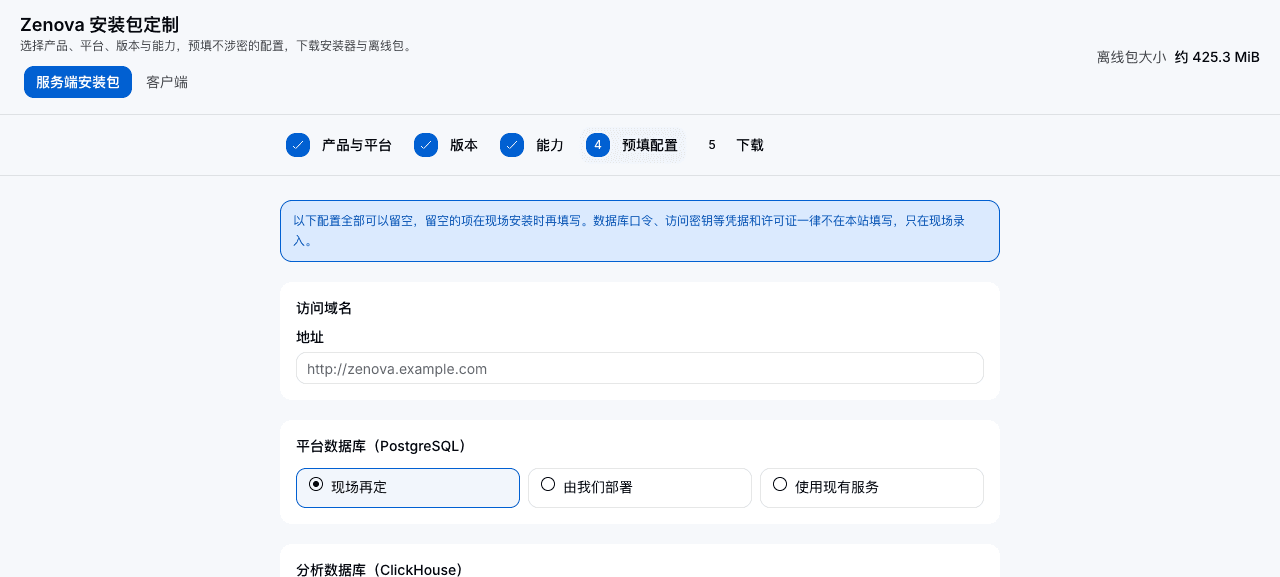
What you will see: choosing Use an existing service expands address, port, database name, and login account. Choosing Existing S3-compatible storage expands address, region, and bucket. Database passwords and access keys never appear as input fields, regardless of the choice.
Note: the page states that database passwords, access keys, and licenses are never entered on this site — only on site. Prefill address-type settings are marked in the offline package as coming from the customizer site and unsigned. During install you must type y for each item; refusing lets you rewrite it on the spot.
POC recommendation: leave this entire page blank. POC hosts and databases are often decided on site, and prefilling only adds a confirmation layer. When blank, the installer asks screen by screen as in Chapter 4, and the answers stay closer to reality.
2.6 Step 5: download
Procedure
- Open step 5, Download.
- Click Download installer (Linux · x86) and save the installer archive.
- Click Download offline package and save the
.zpkg. If the download is interrupted, click again to resume from where it stopped. - Copy the information shown on the page into the handover record.
- Copy the On-site install command for later. You can also copy the Configuration link to save every choice from this session; opening it on another machine reproduces the same package.
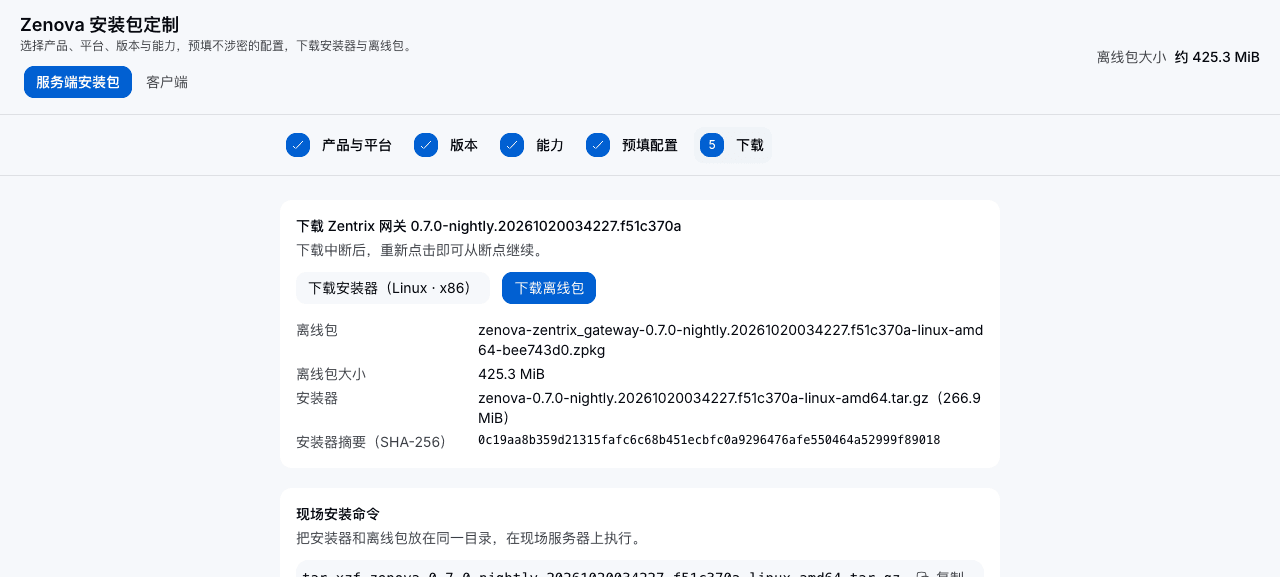
What each item on the page is for:
| Page item | Use |
|---|---|
| Offline package | Full .zpkg file name, including product, version, platform, and 8-character digest |
| Offline package size | Compare with the size after download to see whether the file is complete |
| Installer | Installer archive file name and size |
| Installer digest (SHA-256) | Local verification after download |
| On-site install command | One command that unpacks the installer and runs install; run it after the installer and offline package sit in the same directory |
| Configuration link | Saves every choice from this session; the link contains no credentials |
Meaning of each field in the file name:
| Field | Example | Meaning |
|---|---|---|
| Product | zentrix_gateway / zenova | Appears only in the offline-package file name |
| Version | 0.7.0-nightly.20261020034227.f51c370a | Matches the version chosen in step 2 |
| OS-architecture | linux-amd64 / linux-arm64 | Matches the platform chosen in step 1 |
| 8-character digest | bee743d0 | Computed from the version, platform, capability set, and prefilled answers |
Note: the installer file name has no product field. For the same version, the installer files downloaded for the two products have identical names. When preparing both products, store them in separate directories after download.
Note: the 8-character digest is a digest of the selection, not a checksum. Changing a prefilled setting with the same capability set changes the digest and therefore the file name. Do not treat the digest alone as proof that two downloads are the same version.
2.7 Clients tab
The Clients tab at the top lists ZenSwitch and Waner client packages that ship with this version, showing product, version, file, and digest. Clients are released with the platform and used together.
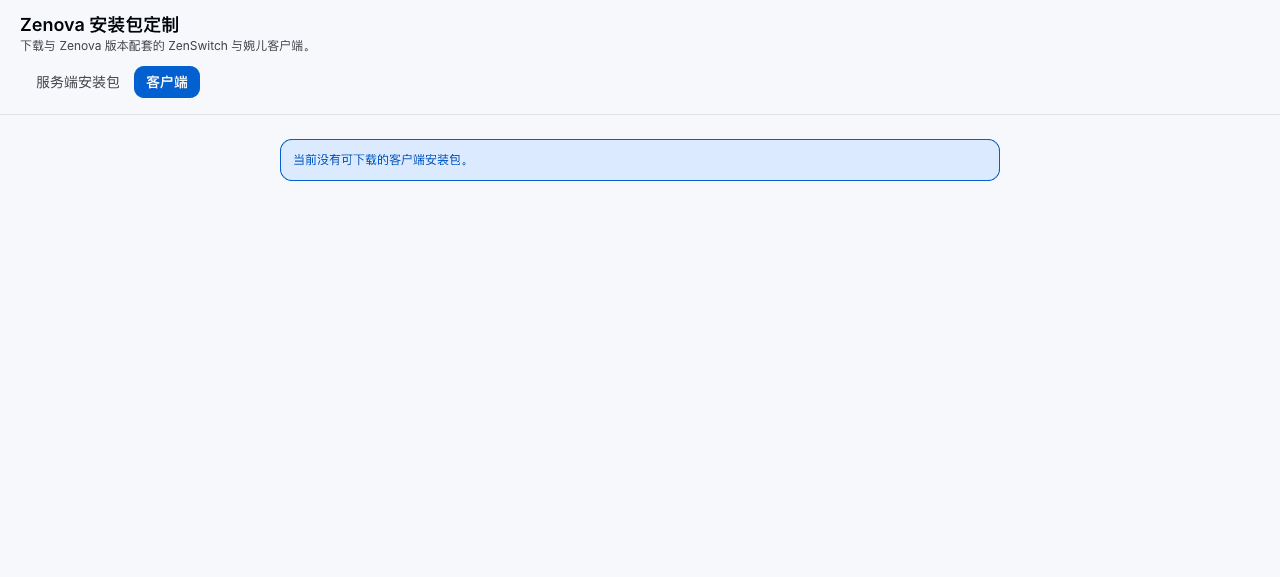
What you will see: when no client package can be downloaded, the page shows No client packages are available yet. That means this version did not publish client packages; it is not a page failure.
Note: if the POC only needs to verify gateway model calls and governance, you do not need the clients — curl is enough for every acceptance step in Chapter 7. Clients verify the member-side entry point and do not affect server function.
2.8 Verify after download
Before uploading the two files to the install host, verify them on a machine with internet access. This step is read-only and changes nothing.
Verify the installer digest
# Networked machine · ordinary user · read-only
sha256sum zenova-<version>-linux-amd64.tar.gz
What you will see: the printed digest matches the Installer digest (SHA-256) column on the download site exactly. On macOS use shasum -a 256.
Inspect the offline package
The offline package is a standard tar archive. You can list it without extracting:
# Networked machine · ordinary user · read-only
tar -tf <offline-package>.zpkg | head -20
tar -xOf <offline-package>.zpkg release.json | grep -oE '"(edition|version|channel)": ?"[^"]*"'
What you will see: the first command lists release.json and the component entries; the second prints three lines: product (zenova or zentrix_gateway), version, and channel (stable or test).
Check consistency: the following three must match. If any one differs, download again.
- The version number in the installer and offline-package file names;
versioninrelease.json;- The version selected in step 2 on the download site.
The offline package has no separate checksum file. Its integrity is guaranteed by the installer, which at startup checks each component against the digests recorded in release.json. Comparing the file size with the size shown on the download site is enough.
Capability notes
| Not provided | Alternative |
|---|---|
| Entering credentials or importing a license on the download site | Credentials and the license are entered only on site. After install, export a license request from the console, exchange it for a signed file, and import (section 6.4) |
| Downloading a standalone answers file | Prefill answers are written into answers.toml inside the offline package and are not produced separately. To write an answers file, follow section 5.2 |
| Signature verification of the offline package | Digest checks only detect download corruption; they are not a trust mechanism. Trust in the artifact source is provided by the delivery channel |
| Seeing the installed environment's version on the customizer site and fetching an upgrade package in one click | On the console, under System maintenance › System Updates, check Current version for this host's version, platform, and enabled capabilities, download the target version from the download site, and upload it on site (section 10.4) |
Previous: 1. Four decisions that must be made before deploy · Next: 3. Prepare the environment
1. Four decisions that must be made before deploy
POC deployment manual chapter. Verified against the 2026.10 mainline; command output follows the installer delivered for that engagement.
3. Prepare the environment
POC deployment manual chapter. Verified against the 2026.10 mainline; command output follows the installer delivered for that engagement.