Zentrix Gateway Traffic Rules Configuration Tutorial
Step-by-step configuration and verification for common routing, rate limiting, content check, access control, and semantic-cache scenarios.
2026.10 · Scope follows the current license, account permissions, and actual deployment.
This tutorial gives complete steps from creating a rule to verifying with a real call, by scenario. It is for administrators configuring traffic rules for the first time. Each scenario can be read on its own. For full value ranges, defaults, and limits of each field, see the Zentrix Gateway Traffic Rules User Manual. Rule names, model names, keys, and thresholds in the examples are for illustration. Replace them with real business values.
1. Before you start
1.1 Preparation
| Item | Requirement | Where to do it |
|---|---|---|
| Account | Tenant admin or Security Admin. Global limits can be maintained only by a tenant admin | A tenant admin assigns the role in Organization & Access |
| License | Includes Dynamic routing or Model guardrails. Otherwise the sidebar does not show Traffic rules | System Settings → Global settings → License |
| Models | The model you will forward to already has an enabled upstream and succeeds on Try run in model details. The model the caller uses has been added to a model group it can use | Admin Console › Models › Models and Admin Console › Organization & Access › Model Groups. See chapter 6 of the Zentrix Gateway User Manual |
| Test key | One API key used only for verification, whose available scope contains only testers | API key management under Admin Console › Organization & Access › Model Groups |
| Call entry | The entry URL the business actually uses. Examples in this tutorial use the OpenAI-compatible entry | See chapter 10 of the Zentrix Gateway User Manual |
Real-call examples in this tutorial all use the format below. Replace only model and the message content:
curl https://<gateway-url>/api/v1/agent-gateway/openai/v1/chat/completions \
  -H "Authorization: Bearer <test API key>" \
  -H "Content-Type: application/json" \
  -d '{"model":"customer-support","messages":[{"role":"user","content":"你好"}]}'
1.2 Understand three rules first
- Top to bottom. The gateway checks enabled rules from smallest Priority number to largest. A rule matches only when every condition is satisfied. If not, it is skipped and the next rule is checked.
- Two kinds of rule. A rule that sets a forward target, or whose action is Allow or Deny this call, stops matching after a hit. Later rules are not evaluated. A rule that only checks, limits, or rewrites continues matching after a hit. The On match column of the rule list shows Stop matching or Continue matching. Hover for the reason. Therefore rules such as limits and content checks must sit before forward rules.
- When no rule matches, a model call follows Default on the last row of the list: it is distributed across every upstream of the requested model.
1.3 Common steps for every rule
Every later scenario follows these seven steps. The scenario writes only the specifics of each step:
- Open Admin Console › Traffic › Traffic rules. At the top right of Rule list, choose New rule to open the rule canvas.
- In the Request enters node at the top of the canvas, fill a rule name (1–120 characters) that states the purpose, for example “Customer-support model primary route”.
- In the Match conditions node, choose Add condition, search in Choose a condition, add the condition, choose a comparison, and fill values. Conditions are AND. Multiple values in the same condition are OR.
- Choose Add an action. The list is grouped as Before forwarding the request, After the upstream response, and Other. After you pick an action, fill fields in the node.
- On the Validate rule tab of Debug and preview on the right, fill one request and confirm this rule shows Matched or Enrichment matched; continue evaluation. The Configuration checks tab has no unfinished items.
- Choose Save rule at the bottom. In Review changes, check Field diffs, Related objects, and Match order. When they are correct, choose Confirm and apply. The page says
Rule "<name>" saved. - Make one real call with the test key. Open that request in the Requests view of Operations overview, and on Routing & changes check the actual destination and the matched rules.
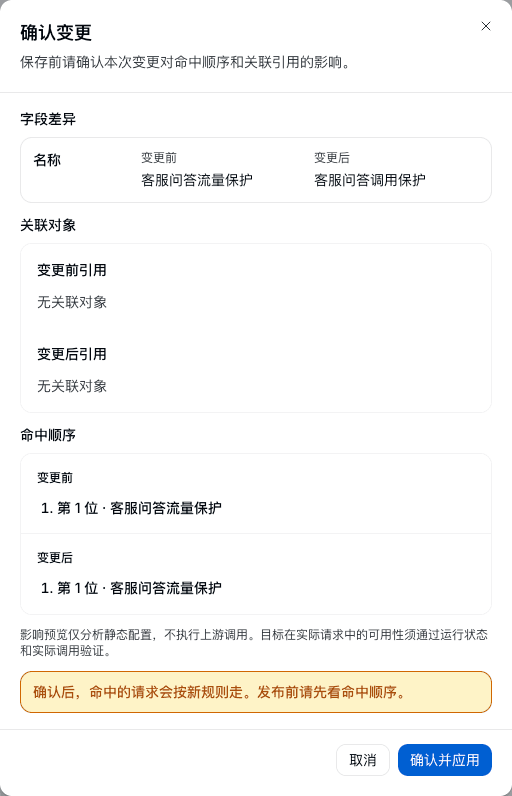
Figure 1: Review changes. Before confirming, check the actual change, related objects, and match order.
After save, gateway nodes may take a few seconds to load the new configuration. When the top of the list shows The latest configuration publish failed, the rule is not yet in effect. Follow the hint, then save again.
Narrow first, then widen. The first time you go live with a class of rule, narrow the scope with conditions to one model group or one test key. Widen to the whole group or tenant only after the behavior matches expectation.
2. Scenario 1: Map a requested model name to a specified model
When to use it: Business systems always request the model name customer-support, and the gateway decides which model actually runs. Later model changes are a rule change, not a business-code change.
Example goal: Requests whose model is customer-support are forwarded to one specified upstream.
Steps
- In Admin Console › Models › Models, create a model whose call name is
customer-support, add no upstream (traffic rules supply it), then add it to a model group the caller can use. - Create a rule named “Customer-support model primary route”.
- Add condition Client-declared model name, comparison Equals, value
customer-support. This is the model name in the caller's request, not a model ID. - Choose Add an action, and in Other choose Forward to a specified target. The editor automatically adds condition Call type = Model call.
- In the Forward to node, Target mode is Specified upstreams. In Primary targets, choose the upstream that will take the request (upstreams are grouped by their model).
- On Validate rule on the right, Call type is Model call, Requested model is
customer-support. Choose Caller or fill Credential identity. Confirm this rule shows Matched, and Validated routing target in the result is the upstream you just chose. - Save the rule and confirm apply.
Verify
- With the test key, send a request whose
modeliscustomer-support. Routing & changes on the request details shows the actual target is the chosen upstream. - Send a request with another model name and confirm this rule does not affect it.
- The Live traffic view on the rule details shows this rule's call count and success rate.
Common problems
- Validation shows this rule Not evaluated: a stop-matching rule in front already matched. Move this rule before it on the rule list, or narrow the earlier rule's conditions.
- You do not need a new rule only to distribute among every upstream a model already has: model calls are distributed across every upstream of the requested model by default. To limit providers or change the allocation method, set Target mode to All upstreams of the requested model. See section 7.1 of the Zentrix Gateway Traffic Rules User Manual.
3. Scenario 2: Fail over to a backup model when the primary fails
When to use it: When the primary model is rate-limited, times out, or is unavailable, the request is automatically sent to a model from another provider. The caller does not notice.
Example goal: Add a backup model on the rule from scenario 1.
Steps
- Open the details of “Customer-support model primary route” and choose Edit.
- In the Forward to node, keep the primary target, choose Add a backup tier, and in Backup tier 1 choose the backup model.
- Turn on Enable failover. Trigger conditions default to Upstream connect failed or interrupted, Upstream timeout, and Upstream returned a specified status code 429, 500, 502, 503, 504. Keep the defaults for ordinary cases.
- Keep Total attempts at 3 (including the first call) and Failover budget before first content (seconds) at 120. After either cap is reached, backup models are no longer tried.
- On Validate rule on the right, tick Simulate primary failure. The result shows the transfer chain and backup target after primary failure.
- Save the rule and confirm apply.
Verify
- While the primary model is healthy, requests go only to the primary.
- When the primary is rate-limited or unavailable, Live traffic on the rule details shows Transferred out on the primary and Transferred in on the backup increasing. Click a number with
›to see the transfer-out reason, for example Transferred out after failure · response rejected (429). - Attempts on Routing & changes of the request details lists each attempt's target and result.
Common problems
- The backup model received no request: confirm Enable failover is on, the actual error is in the trigger conditions, attempts and total budget are not exhausted, and the failure happened before the first content was sent to the caller. Once a streaming answer starts outputting, it does not switch to another model.
- Errors such as 400 that mean the request itself is wrong are not in the default trigger conditions. They would also fail on another model. Do not add them casually.
- The caller's timeout should be longer than the failover total budget, or the caller gives up first.
- Several targets in the same tier are only for splitting. They are not backups of each other. For disaster recovery you must configure a backup tier.
4. Scenario 3: Roll out a new model by percentage
When to use it: Before a new model goes live, send a small share of traffic to it, watch quality and success rate, then raise the share.
Example goal: 90% of customer-support requests go to the old model, 10% to the new model.
4.1 Split by percentage
- Edit “Customer-support model primary route”. In the Forward to node, set Target selection strategy to Weighted round-robin.
- Keep the old model in primary targets. Choose Add a split target and add the new model.
- Change the old model's weight to 90 and the new model's to 10. Weights in the same tier sum to 100%. When you adjust one target, the rest share remaining weight in proportion.
- On Validate rule on the right, check each target's expected share, then save the rule and confirm apply.
4.2 Observe and raise the share
- Live traffic on the rule details lists per target Configured weight / actual share, Send count, Send success rate, and Latency (median / slow). Click a number with
›in Configured weight / actual share to see that target's first-choice outcomes. - After the new model is stable, raise the weight 10% → 30% → 50% → 100%. After a full switch, delete the old-model target.
- With few samples, actual share drifts from the configured value. Judge from enough calls. Each gateway replica round-robins independently. On a multi-replica deployment, the overall share also needs enough samples.
4.3 Let testers use the new model first
When a few people should try it first, rather than a random percentage, create a rule in front of “Customer-support model primary route”:
- Create a rule named “Customer-support model canary”.
- Add condition Client-declared model name equals
customer-support, then Canary cookie: namezenova_canary, valuebeta01. For a custom name, use a Request header condition instead, for examplex-canaryequalsbeta01. - Add Forward to a specified target, primary target the new model.
- After save, confirm on the rule list that “Customer-support model canary” sits before “Customer-support model primary route”.
Requests with that cookie or header go to the new model. The rest still take the primary route. To roll back, disable or delete this canary rule.
Common problems
- Weighted split is not disaster recovery: a request sent to the new model that fails is not retried on the old model in the same tier. For disaster recovery, also configure a backup tier. See scenario 2.
- Canary-cookie values are write-only and are not echoed. When editing a rule, leaving the value empty while the cookie name is unchanged keeps the saved value.
5. Scenario 4: Rate-limit each API key
When to use it: Prevent one caller from filling a model's quota, for example at most 60 calls per key per minute.
Example goal: For model group “Customer support Q&A”, 60 calls per API key per minute, with an extra burst of 10.
Steps
- Create a rule named “Customer-support Q&A per-key rate limit”.
- Add condition Model group, choose “Customer support Q&A”; then Call type, Model call. A rule with a limit must pin call type to one kind.
- Choose Add an action, and in Before forwarding the request choose Limit. The canvas shows an Apply limit node.
- Keep Request rate on:
- Count by is By API key (the default for model calls), so each key is counted separately.
- When quota is used up is Reject immediately.
- Time window is minute, Requests in the period is 60, Immediate burst is 10.
- Do not add a forward target. This rule shows Continue matching on the list. After a hit, the request is still forwarded by later rules.
- On save, in Match order of Review changes, confirm it sits before “Customer-support model primary route”. If it sits after, use Move to top on the rule list.
Verify
-
Temporarily lower the threshold (for example 3 per minute, burst 1) and send 6 requests in a row with the test key:
for i in $(seq 1 6); do curl -s -o /dev/null -w "%{http_code}\n" \ https://<gateway-url>/api/v1/agent-gateway/openai/v1/chat/completions \ -H "Authorization: Bearer <test API key>" \ -H "Content-Type: application/json" \ -d '{"model":"customer-support","messages":[{"role":"user","content":"你好"}]}' done -
Requests over quota return 429, with reason
TRAFFIC_RATE_LIMITEDandRetry-After. -
Call with another test key and confirm it has its own independent quota.
-
After that checks out, change the threshold back to the production value.
Common problems
- This is a rolling rate limit that refills over time, not a quota that resets on the hour. Each gateway replica counts on its own, so actual admits may be higher than the configured value.
- An in-rule limit can only deny when exceeded. To queue or return a fixed reply, create a limit in Traffic rules → Global limits. See section 15.11 of the Zentrix Gateway User Manual.
- Monthly or daily totals use model-group quota or key quota, not a rate limit.
6. Scenario 5: Protect upstreams with a concurrency cap and a circuit breaker
When to use it: The upstream model has limited capacity, so simultaneous in-flight requests must be capped. When the upstream keeps failing, pause calls so the problem does not grow.
Example goal: For model group “Customer support Q&A”, at most 20 in-flight requests; pause calls for 30 seconds when the failure rate in the last 30 seconds reaches 50%.
Steps
- Create a rule named “Customer-support Q&A upstream protection”, with the same conditions as scenario 4: Model group “Customer support Q&A”, Call type Model call.
- Add Limit. In the Apply limit node, turn off Request rate (you only need concurrency and circuit breaker).
- Expand Concurrency, circuit breaker, and timeout (optional):
- Turn on Concurrency, Count by By model group, Concurrency limit 20.
- Turn on Circuit breaker, keep defaults: statistic window 30 seconds, minimum samples 10, failure-rate threshold 50%, slow-call threshold 2000 ms, slow-call-rate threshold 50%, open duration 30 seconds, half-open probes 5.
- To limit wait time, turn on Upstream call timeout, for example connect 3000 ms, request 60000 ms.
- Save and confirm apply. Confirm the rule sits before forward rules.
Verify
- When more than 20 requests are in flight, a new request returns 429 immediately, reason
TRAFFIC_CONCURRENCY_LIMITED. After in-flight requests finish, it recovers. - While the circuit is open, requests return 503, reason
TRAFFIC_CIRCUIT_OPEN, and the upstream no longer receives those requests. After 30 seconds it enters half-open. Successful probes restore it. - Full steps to verify a circuit breaker with controlled failures are in section 6 of the Zentrix Gateway Traffic Rules User Manual.
Common problems
- A circuit breaker itself does not switch models. To use a backup model while the circuit is open, configure failover on the forward rule (scenario 2). The gateway skips a target whose circuit is open.
- Slow-call threshold is only for circuit-breaker statistics. It does not interrupt a slow request. To interrupt, use Upstream call timeout.
- Editing a rule republishes configuration and resets circuit-breaker state.
7. Scenario 6: Automatically redact phone numbers and ID numbers in a conversation
When to use it: When a user question or model answer contains a phone number, national ID, or bank-card number, replace it with a placeholder before continuing, so sensitive data is not sent to an external model or returned to the caller.
Example goal: Redact sensitive data in both questions and answers for model group “Customer support Q&A”.
Steps
- Create a rule named “Customer-support Q&A sensitive-data redaction”. Add condition Model group “Customer support Q&A”.
- Choose Add an action, and in Before forwarding the request choose Content check · Conversation.
- Check stage is User question and model reply.
- Under Check methods, tick Sensitive data. In Detection scope, choose an industry template, or tick types such as Phone number, National ID, Bank card.
- On match is Redact and continue. Early in go-live, when false positives are unknown, you can first choose Record only, allow and watch for a while.
- On Validate rule on the right, Detection direction is Input. In Messages, fill “My phone number is 13812345678”. In Content check result, confirm a Phone number hit.
- Save and confirm apply.
Verify
- With the test key, send a question that contains a phone number. On the request details, the content sent upstream has the number replaced with a placeholder. The caller still receives a normal answer.
- Rule hits shows this hit and its action.
Common problems
- Person names, addresses, and organization names need a Sensitive-data recognition model first. See section 13.6 of the Zentrix Gateway User Manual. Ticking them when it is not set opens the settings drawer.
- Types with a check digit, such as national ID and bank card, are not recognized when the writing is non-standard or the check digit is wrong. Use correctly formatted samples when testing.
- Sensitive data recognized from an image cannot be masked and is treated as a block.
- A rule has only one check stage. When several rules match at once, the same type takes the stricter action (block above redact, redact above record only).
8. Scenario 7: Block banned words in a question and return a fixed reply
When to use it: When a user question contains a controlled word, do not call a model. Return a fixed explanation.
Example goal: Block when a question contains a word from lexicon “Customer-support banned words”, and reply “This question is not supported. Please contact human support.”
Prepare the lexicon
- Open Admin Console › Guardrails › Guardrail rules, switch to the Lexicon tab, and choose New lexicon.
- Name is “Customer-support banned words”, Type is Custom denylist, Category is the closest category.
- Open the lexicon and choose Add entry one by one. For many entries, Import a UTF-8
.txtfile, one entry per line.
Steps
- At the top right of Rule list, choose Import rule template, switch to the Content check group, choose Block keywords and return a canned reply, fill the highlighted required fields, then Import this one. You can also New rule from a blank canvas.
- Add condition Model group “Customer support Q&A”.
- In the Content check · Conversation node, Check stage is User question, Check methods ticks Keywords, and Referenced lexicon is “Customer-support banned words”.
- In Reply copy, Block reply is Custom copy. In Default reply copy, fill “This question is not supported. Please contact human support.”
- In Messages on Validate rule on the right, fill a sentence that contains a banned word, and confirm Content check result shows a block.
- Save and confirm apply.
Verify
- With the test key, send a question that contains a banned word. It returns 403,
error.codeiscontent_policy_violation,error.messageis the configured copy. The upstream did not receive this request. - Send a normal question and confirm a normal answer.
Common problems
- Full-width, traditional, lookalike, and zero-width rewrites are normalized before match. You do not add separate entries for them. Pinyin writing is recorded and not blocked. To block it, add the pinyin as an alias of the entry.
- The copy should state why it cannot continue and how to get help. Do not reveal the rule, thresholds, or a bypass.
- To judge by topic or risk category rather than fixed words, use template Block a custom topic or Block risky content. A content-judgment model must be set first. See section 14.3 of the Zentrix Gateway User Manual.
9. Scenario 8: Send requests that contain sensitive data only to a privately deployed model
When to use it: When a request contains sensitive data such as a national ID or bank-card number, only a locally deployed model handles it. Other requests still follow the original route to an external model.
Example goal: When a customer-support request contains a national ID or bank-card number, forward it to a privately deployed model.
Steps
- Create a rule named “Sensitive requests to private model”.
- Add condition Client-declared model name equals
customer-support. - Add condition Request contains sensitive data, choose National ID and Bank card.
- Add Forward to a specified target, primary target the privately deployed model.
- On save, confirm this rule sits before “Customer-support model primary route”.
Verify
- In More request facts on Validate rule on the right, fill the chosen types in Sensitive-data types and confirm this rule matches. These are assumed values, used only to check rule logic.
- With the test key, send a question that contains a correctly formatted national ID through the OpenAI-compatible entry. Request details show the actual target is the privately deployed model.
Common problems
- This condition is recognized before rule evaluation only on the platform model-call entry (for example the OpenAI-compatible entry
/api/v1/agent-gateway/openai/v1/*). The native gateway entry/v1/*and MCP, A2A, and API-service calls do not produce this fact, so the rule does not match. - When the recognition service is unavailable the request returns 503. It is not treated as “not detected” and allowed through to an external model.
- Rerouting only changes the destination. Request content is sent to the private model as-is. To also redact, create a separate scenario-6 rule. The same rule cannot use both the Request contains sensitive data condition and Sensitive data detection.
- Person names, addresses, and organization names cannot be this condition. Use them only in Detection scope of a content check.
10. Scenario 9: Allow only specified callers to use a model
When to use it: A high-cost model is open only to a few API keys. Other callers that request this model name are denied immediately.
Example goal: premium-chat may be used only by “R&D group key” and “Data group key”.
This scenario needs two rules together. The first allows callers on the list. The second denies the rest.
Rule 1: Allow the list
- Create a rule named “Premium model allowlist”.
- Add condition Client-declared model name equals
premium-chat. - Add condition Caller: Caller type is API key, comparison Is one of, select “R&D group key” and “Data group key”.
- Choose Add an action, and in Other choose Allow.
- Save and confirm apply.
Rule 2: Catch-all deny
- Create a rule named “Premium model catch-all deny”.
- Add condition Client-declared model name equals
premium-chat. - In Other, choose Deny. Deny reason code is
premium_model_not_allowed(lowercase letters, digits, and underscores). - On save, in Review changes, confirm it sits after “Premium model allowlist”.
Verify
- On Validate rule, Credential identity “R&D group key” shows rule 1 Matched. Another key shows rule 1 No match and rule 2 Matched.
- A real call with a key not on the list returns 403, with
deniedBy: routePolicyand reason codepremium_model_not_allowed.
Common problems
- Allow only ends rule evaluation. The request then follows the gateway's existing routing.
premium-chatmust be findable by default routing. To pin a destination, change rule 1's action to Forward to a specified target. - A Caller type of API key does not constrain calls started inside the platform. Calls by a platform user or an agent need the matching caller type, or an Organization member condition limited by department and functional group.
- Long-lived model-use permission should be configured in the model group's available scope. This scenario is for a unified close at the gateway entry by model name.
11. Scenario 10: Use different models in working hours and at night
When to use it: Use a faster model during working hours, and a cheaper model at night.
Example goal: Model A from 09:00–18:00 Beijing time, model B the rest of the time.
Steps
- Create rule “Customer-support daytime route”: add condition Client-declared model name equals
customer-support; add Time window, timezoneAsia/Shanghai, window09:00-18:00; action Forward to a specified target model A. - Create rule “Customer-support night route”: add only Client-declared model name equals
customer-support, and forward to model B. - On the rule list, confirm “Customer-support daytime route” sits before “Customer-support night route”.
Verify
On Validate rule on the right, change Validation time to a moment inside working hours and one outside. Confirm different rules match. You do not wait for the real window.
Common problems
- Time windows are judged in the chosen timezone, independent of the administrator's computer timezone. The window is half-open:
09:00-18:00includes 09:00 and excludes 18:00. Crossing midnight is allowed, for example22:00-06:00. - Only daily hour:minute windows. Weekday or calendar-date windows are not supported.
- Rule 2 has no time-window condition. It is the catch-all and must sit after.
12. Scenario 11: Choose a model by question difficulty
When to use it: Hard questions go to a stronger model, ordinary questions to a cheaper model. The gateway judges automatically.
Example goal: When the caller requests auto, hard questions go to the strong model, the rest to the economy model.
Prerequisite
In default models on System Settings → Global settings → General, choose a model for Intent recognition.
Steps
- Open Traffic rules → Intent set → Built-in intents. Choose Test intent recognition at the top right, enter a few real business questions, choose Recognize, and confirm Difficulty matches expectation.
- In dimension Task difficulty, find Hard, and choose Build a rule with it on that row. The editor prefills the intent condition and the rule name “Task difficulty: Hard”.
- Add condition Client-declared model name equals
auto, add Forward to a specified target, primary target the strong model, then save. - Create catch-all rule “Auto-route catch-all”: condition Client-declared model name equals
auto, forward to the economy model, sitting after the hard-question rule.
Verify
In More request facts on Validate rule on the right, fill Intent prompt, enter one hard question and one simple question, and confirm different rules match. Validation calls the intent-recognition model. Use text that is allowed to be sent for checking.
Common problems
- When intent recognition is unavailable (model not set, service disabled, call failed), the intent condition is treated as not matching, and the catch-all rule takes over. Do not omit the catch-all.
- Each judgment calls the intent-recognition model once, adding latency and cost. Enable it only for the model names that need it.
- Business-specific categories can be created in Intent set → Custom intent sets. See section 9 of the Zentrix Gateway Traffic Rules User Manual.
13. Scenario 12: Block dangerous MCP tools
When to use it: An MCP service provides delete or wipe tools that agents or callers must not call directly.
Example goal: Block tools whose names start with delete_ in MCP service “Ticket system”.
Steps
- Create a rule named “Block ticket-delete tools”.
- Add condition Call type, MCP call.
- Add condition Concrete capability, choose MCP service “Ticket system”.
- Add condition Tool name, comparison Is one of, fill
delete_*. When an MCP service is already selected, you can also pick from registered tools. - Add condition MCP method, keep the default Call tool.
- In Other, choose Deny. Deny reason code is
mcp_tool_blocked. - Save and confirm apply.
Verify
With a test client, call delete_ticket once. The call is denied. Rule hits shows this rule's hit. Call an ordinary tool and confirm it is not affected.
Common problems
- When MCP method is List tools, Resources, or Prompts, no tool name is produced, so you cannot also configure a Tool name condition.
- To inspect tool-argument content (for example whether a command contains
rm -rf) rather than cut by tool name, use Content check · Tool calls. See section 5.2 of the Zentrix Gateway Traffic Rules User Manual.
14. Scenario 13: Cap tokens and body size of one request
When to use it: Prevent a very long context or a very large body from costing too much or slowing the upstream.
Example goal: For model group “Customer support Q&A”, one request's input is at most 32000 tokens, output at most 4096 tokens, body at most 2048 KB.
Steps
- Create rule “Customer-support Q&A request caps”. Add condition Model group “Customer support Q&A”.
- In Before forwarding the request, add Per-request token cap. Max input tokens is 32000, Max output tokens is 4096.
- Add Request-body size cap, 2048.
- Do not add a forward target. After save this rule shows Continue matching. Confirm it sits before forward rules.
Verify
- A request with over-long input is rejected before it is sent to the provider. The error states this is a platform limit.
- A body over the cap returns 413.
- The output cap rewrites
max_tokensin the request. You can see it in the request sent upstream on the request details.
Common problems
- When several rules set a cap at once, the strictest value is taken.
- The body cap is judged on the inbound raw body. Range 1–32768 KB.
15. Scenario 14: Attach a system prompt to a class of requests
When to use it: Attach identity, output format, or safety requirements to every call of a model group, and switch or roll back by version.
Prepare the prompt
Open Admin Console › Capabilities › Prompts and create a prompt. See section 6.9 of the Zentrix Gateway User Manual. The body may use only gateway system variables, for example {{tenant}}, {{principal.user}}, {{request_id}} (platform call ID), {{client_request_id}} (the caller's X-Request-Id). Workspace-level prompts cannot be referenced by a traffic rule.
Steps
- Create rule “Customer-support Q&A shared prompt”. Add condition Model group “Customer support Q&A”.
- In Before forwarding the request, add Prompt: Choose prompt is the one you just created, Version tag is production, Inject position is Prepend.
- Save and confirm apply. Confirm the rule sits before forward rules.
Verify
Call once with the test key. On the request details, look at the request sent upstream: the first message is the injected system message, with variables replaced by actual values. The caller's original request did not contain this message.
Common problems
- When the node says The current tag is another version, not published, first confirm the prompt's version-to-tag relationship.
- After you move the production tag to a new version, rules that reference it must be saved again before they use the new version.
16. Scenario 15: Return a cached answer for similar questions
When to use it: Services with many repeated questions, such as FAQs. When a question is similar enough, return the previous answer without calling a model, to cut cost and wait.
Example goal: Turn on semantic cache for single-turn Q&A of model group “FAQ”.
Confirm before you start
This scenario uses the OpenAI-compatible entry from section 1.1. Semantic cache is judged from every rule this request hits. If any of those rules has one of the following, this request neither reads nor writes cache:
- Several forward targets, failover enabled, or target mode All upstreams of the requested model;
- Per-request token cap;
- Attach plugin;
- Rewrite request headers;
- Response rewrite, including rewrite response headers, rewrite response fields, and status-code mapping;
- Content check of the model reply;
- After Apply limit, there is still a content check, prompt, rewrite request fields, or rewrite request body.
A cached answer does not go through those rewrites and checks again. When the destination is not yet known, another model's answer might be returned to the caller, so cache does not participate in those cases. The last item is judged by execution order of the whole rule chain: first by order on the list, then by execution order on each rule's canvas. A rule whose limit sits after content check, prompt, and rewrite, and a rule that forwards to a single specified upstream, do not affect cache. Compare “Customer support Q&A” with earlier scenarios:
- Scenario 1's forward rule does not affect cache.
- Scenario 4 and 5 limit rules do not affect cache when they sit after scenario 7 (banned words) and scenario 14 (prompt) on the list. When they sit before those, there is still a content check or prompt after the limit, so cache does not participate.
- Scenario 2 (failover), scenario 3 (percentage split), scenario 6 (check model reply), and scenario 13 (token cap) make requests that hit them skip cache.
This scenario therefore uses another model group, “FAQ”, as the example. The editor warns only when one rule conflicts with itself. Combinations across rules are not warned. Before go-live, measure once with Verify below.
Semantic cache uses embedding and rerank models the tenant chooses. Before you start, set Semantic cache embedding model and Semantic cache rerank model in Admin Console › System Settings › Global settings › General › Default models:
- The embedding model finds nearby cached questions. The rerank model judges whether they are similar enough. When a rerank model is saved, the system actually calls it with built-in synonymous and non-synonymous samples and sets the hit standard. A model that cannot tell the two kinds of sample cannot be saved. Use another rerank model.
- Both kinds of call are billed at the chosen model, labeled Semantic cache embedding and Semantic cache rerank in usage and call records. The current question and nearby cached questions in the same isolation scope are sent to the chosen models. Confirm the data boundary before using an external provider's model.
- Deployments that use OceanBase as the platform database do not support semantic cache.
Steps
- Create a rule named “FAQ semantic cache”. Add condition Model group “FAQ”.
- Choose Add an action, and in Other choose Semantic cache. If there is not yet a Call type condition, the editor adds Model call. The node has no fields to fill. It shows the status of the two semantic-cache models. The hit standard is decided by the chosen rerank model. Validity and isolation scope are set by the platform. When the two models are not set or not available, Semantic cache cannot be chosen, or the node prompts you to set the models, which you can open from the node.
- This rule needs no other action. When you add Semantic cache to an existing rule and the node warns Semantic cache will never participate on this rule, this rule itself has one of the configurations above. If Apply limit sits before a content check, prompt, or rewrite, expand Apply limit and Move down it after those actions. For other configurations, delete the matching action, or create a separate rule.
- Save and confirm apply. The rule shows Continue matching. The request is then distributed across every upstream of the requested model by the Default row. Save is rejected while the two semantic-cache models are not ready. Set the models, then save.
Verify
Add -i to the call command in section 1.1 to show response headers, and change model to the model name that corresponds to “FAQ”.
- With the test key, send a single-turn question, for example “How do I change my login password?”. Confirm response header
x-zenova-cache: miss: cache was checked but missed, and this answer will be written. - After the first answer has fully returned, send the same question again with the same key. Confirm the header is
hit, and request details show Hit semantic cache, upstream not called. A differently worded question with the same meaning may also hit, depending on whether the rerank score reaches the chosen rerank model's hit standard. - Send the same question with another API key. The result is
miss. Cache is isolated by key. Different keys of the same owner also do not share hits. - Semantic cache savings on Operations overview counts hits, tokens saved, and net saving (amount saved by hits minus the cost of Semantic cache embedding and Semantic cache rerank calls). A cache-hit call is not billed, and does not count toward the rate limit or the tenant monthly token cap.
Common problems
-
No
x-zenova-cacheheader in the response: this request did not check cache. Open Routing & changes on the request details and look at the Semantic cache row under Request destination:- When that row is present, it states the reason, for example Did not participate: the rule chain has a token cap, Did not participate: a guardrail or rewrite still sits after the limit, so it runs only at dispatch, Did not participate: multi-turn conversations do not use cache, Did not participate: the caller asked to skip cache. Adjust the rule or the request from the reason. Cache applies only to Chat Completions format, exactly one user message (an extra system message is allowed), and a body of at most 256 KiB. When a semantic-cache model is not set, unavailable, or the call fails, the request still calls the model and does not fail. Reasons include Did not participate: semantic cache embedding model not set and Did not participate: semantic cache rerank model unavailable.
- When that row is absent, the request did not hit a rule that turned on semantic cache. Check this rule's conditions and enablement.
-
The second call is still
miss: these answers are not written to cache, so the next call still hits the model:- The first call failed or disconnected mid-way;
- The answer contains a tool call;
- The answer is larger than 512 KiB.
Also, after you change a model, upstream, provider, or rule, old cache no longer hits. After you change the semantic-cache embedding model, existing entries no longer hit. New entries accumulate with requests.
-
After quota is exhausted, even a cache-hit request returns 429: the model-group Visibility & quotas pool is judged before cache is checked. After the pool is full, the request is denied immediately. Rate limits and the tenant monthly token cap are judged after cache is checked. When they are exhausted, a request that can hit cache still returns the cached answer.
-
Response header is
bypass: the caller sentno-cacheinx-zenova-cache-control. This request does not read cache, but still writes. -
To skip cache for one request, for example when debugging or when you need a live result, send
x-zenova-cache-control: bypass. For other directives and cache parameters, see section 10 of the Zentrix Gateway Traffic Rules User Manual.
17. Pre-go-live checks and troubleshooting cheat sheet
17.1 Pre-go-live checklist
- The rule name states the purpose. Conditions are narrowed to the expected scope. There is no accidentally created “matches every request” rule.
- Continue-matching rules such as limits, content checks, and prompts sit before forward rules. Catch-all rules sit last.
- On Validate rule on the right, both should-match and should-not-match requests behave as expected.
- At least one real call was made with the test key, and the actual destination was checked on the request details.
- Rate-limit and circuit-breaker thresholds were verified on a test key or a single model group before the scope was widened.
- Content checks first used Record only, allow to watch false positives, then were changed to block or redact.
- The top of the list has no The latest configuration publish failed hint.
17.2 Common symptoms
| Symptom | Check first |
|---|---|
| Saved successfully but no effect | On Validate rule, does this rule show Not evaluated (blocked by a stop-matching rule in front)? Is the rule enabled? Do call type and model name match the real request |
| Validation matches, real request does not | Check the real request's entry, credential identity, and model name. Request contains sensitive data is produced only on the platform model-call entry. URL parameters depend on the call entry. Client CIDR depends on a trusted source IP. When the region is unknown, neither positive nor negative region match hits |
| Returns 403 | deniedBy and the reason code in the error: routePolicy is a rule deny; content_policy_violation is a content-check block |
| Returns 429 | Reason codes starting with TRAFFIC_ are a rule or Global limits; those starting with POOL_ are model-group quota or key quota |
| Returns 503 | TRAFFIC_CIRCUIT_OPEN is an open circuit; upstream_unavailable is every candidate target unavailable. With a Request contains sensitive data condition it may also be the recognition service unavailable |
| The backup model received no request | Is Enable failover on, is the error in the trigger conditions, is the attempt budget exhausted, did the failure happen before the first content was output |
| Split share does not match configuration | Are there enough samples; were requests rejected before the split; is a target disabled or unavailable |
| Semantic cache is on but nothing hits | The reason on the Semantic cache row under Request destination on the request details; whether both semantic-cache models in Default models are in effect; whether the same key was used. See scenario 15 |
For the full meaning of error codes, see the error reference. For field ranges and more investigation methods, see section 8 of the Zentrix Gateway Traffic Rules User Manual.
Zentrix Gateway Traffic Rules User Manual
Configure and verify traffic rules, Global limits, Intent set, semantic cache, circuit breaker, and failover.
Manage the gateway through MCP
Connect platform MCP in an external agent and, as your real identity, manage tenants, organization, users, models, MCP, skills, external agents, distribution, callers, and quotas.