13. Configure sensitive-data (PII) detection
Full-length chapter. Content is checked against the 2026.10 mainline code and the live console; menus and features depend on the current license, account permissions, and delivered environment.
Back to overview · Full table of contents · Download full PDF
This chapter explains how to have the platform recognize and handle sensitive data such as ID numbers, phone numbers, bank-card numbers, and secrets, both before a request is sent to a model or tool and after the model or tool returns a result. After this chapter you can view built-in recognition rules, add the enterprise's own rules, check the effect with a trial run, turn detection on in a traffic rule, and check the message sent upstream and how original text is retained. Entities such as person names and addresses, MCP-tool inputs and returns, sensitive information in images, and sensitive information in attachments such as PDF and Word are also in this chapter.
Detection is configured in two places: one defines what can be recognized, the other defines which calls, which types, and what to do on a hit.
| Location | What it does |
|---|---|
| Admin Console › Guardrails › Guardrail rules › Sensitive data | Maintain built-in and custom recognition rules; provide import, export, and trial run |
| Admin Console › Traffic › Traffic rules › Content detection · Conversation content | Specify detection scope and what to do on a hit |
A recognition rule itself does not apply to any call. It takes part in judgment only after a traffic rule's Sensitive-info detection references it. The required licensed module is Model guardrails. Adding a detection action in a traffic rule also requires Dynamic routing.
13.1 View built-in recognition rules
When to use: first confirm what the platform recognizes out of the box, then decide whether you need to add the enterprise's own rules.
Procedure
- Open Admin Console › Guardrails › Guardrail rules and choose the Sensitive data tab.
- The list shows by rule name, regex, type, source. The tag after the rule name is the group it belongs to.
- To view by industry, filter by group: General, Finance, Healthcare, Secrets.
What you will see
- There are 25 built-in rules, mostly built-in. General covers ID numbers, phone numbers, bank-card numbers. Finance covers bank account numbers, taxpayer IDs, unified social credit codes. Healthcare covers medical-record numbers and similar. Secrets covers Access Token, API Key, and similar.
- The Regex column of the ID-number, phone-number, and bank-card-number rules shows as intelligent recognition, judged by check digit and number range, not simple character match. An 18-digit number whose check digit does not meet the requirement is not recognized as an ID number.
Note
- Built-in rules update with the version. After you open them you cannot change or delete them. To cover in-house codes, add as in 13.2.
- This page has no master detection switch and no per-built-in-rule enable switch. Whether a class of data takes part in detection depends only on whether the Detection scope of the traffic rule that references it includes that type.
- Unified social credit codes are judged by an 18-character structure. If ordinary 18-digit serial numbers appear a lot in the business, check hits with real-shape samples as in 13.3, and switch to a custom regex if needed.
13.2 Add a custom rule and an industry template
When to use: built-in rules do not cover in-house codes (employee IDs, customer numbers, contract numbers), or you need to turn on detection as a set by industry.
Procedure (custom rule)
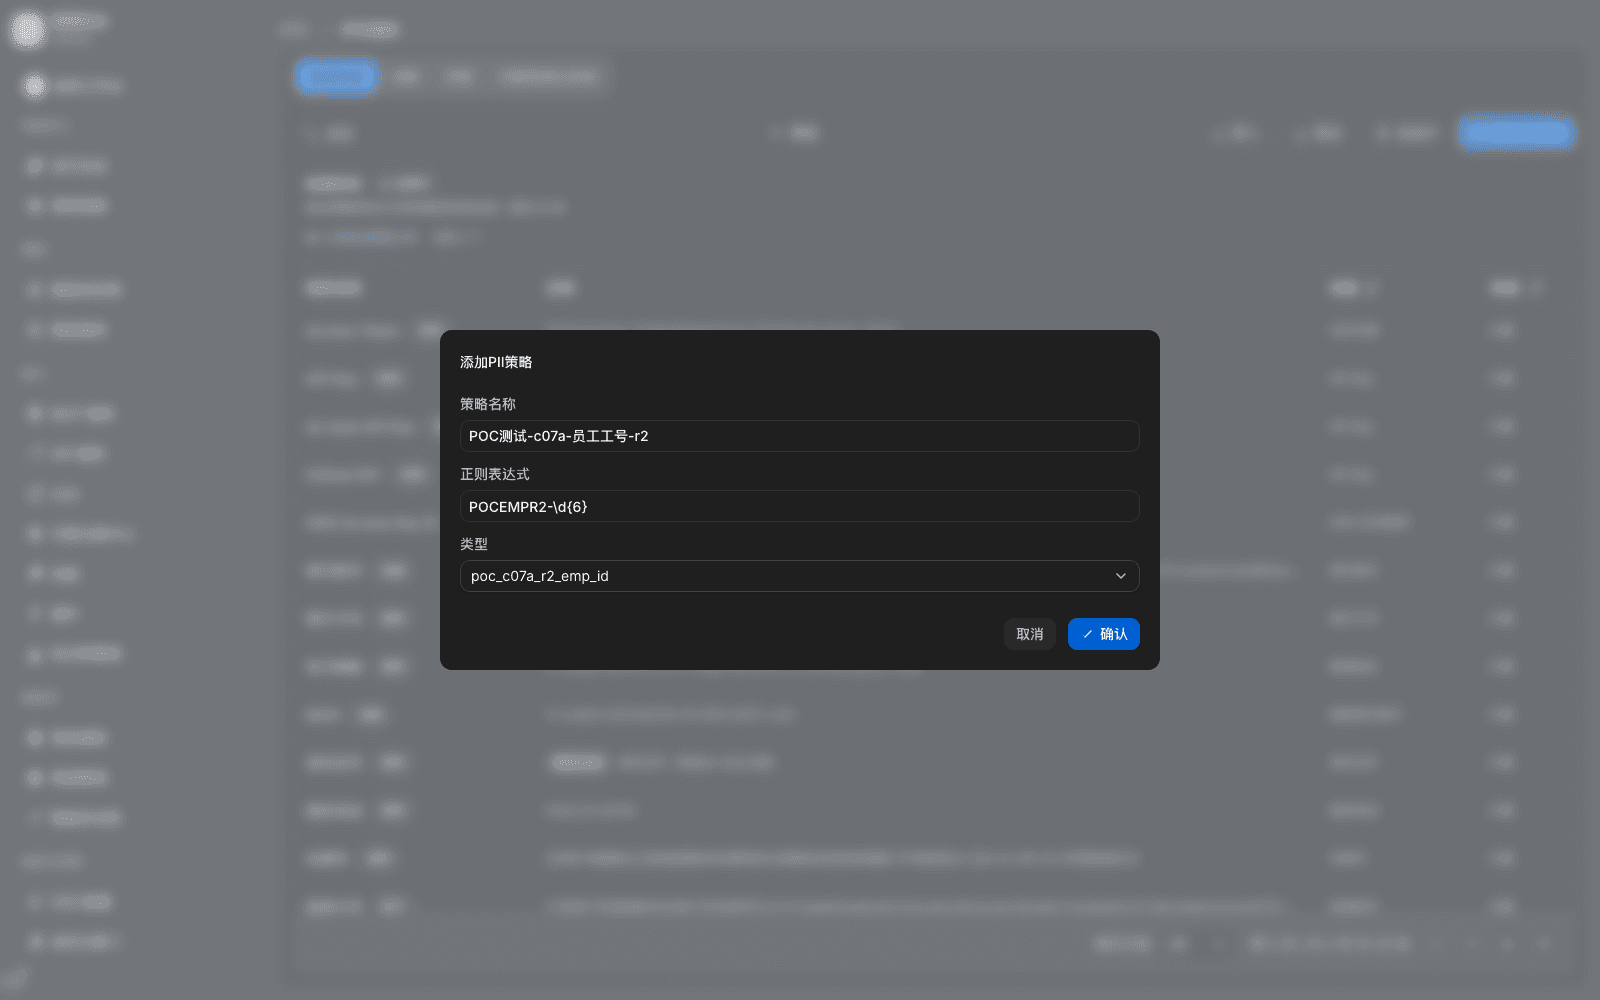
- On the Sensitive data tab click Add PII policy.
- Fill in Policy name, for example Employee ID. In Regular expression fill in the match rule, for example
\bEMP-\d{6}\b. - In Type pick an existing type from the dropdown, or type a new identifier (for example
employee_no) and choose Use the ID you typed in the list. - Click Confirm.
What you will see
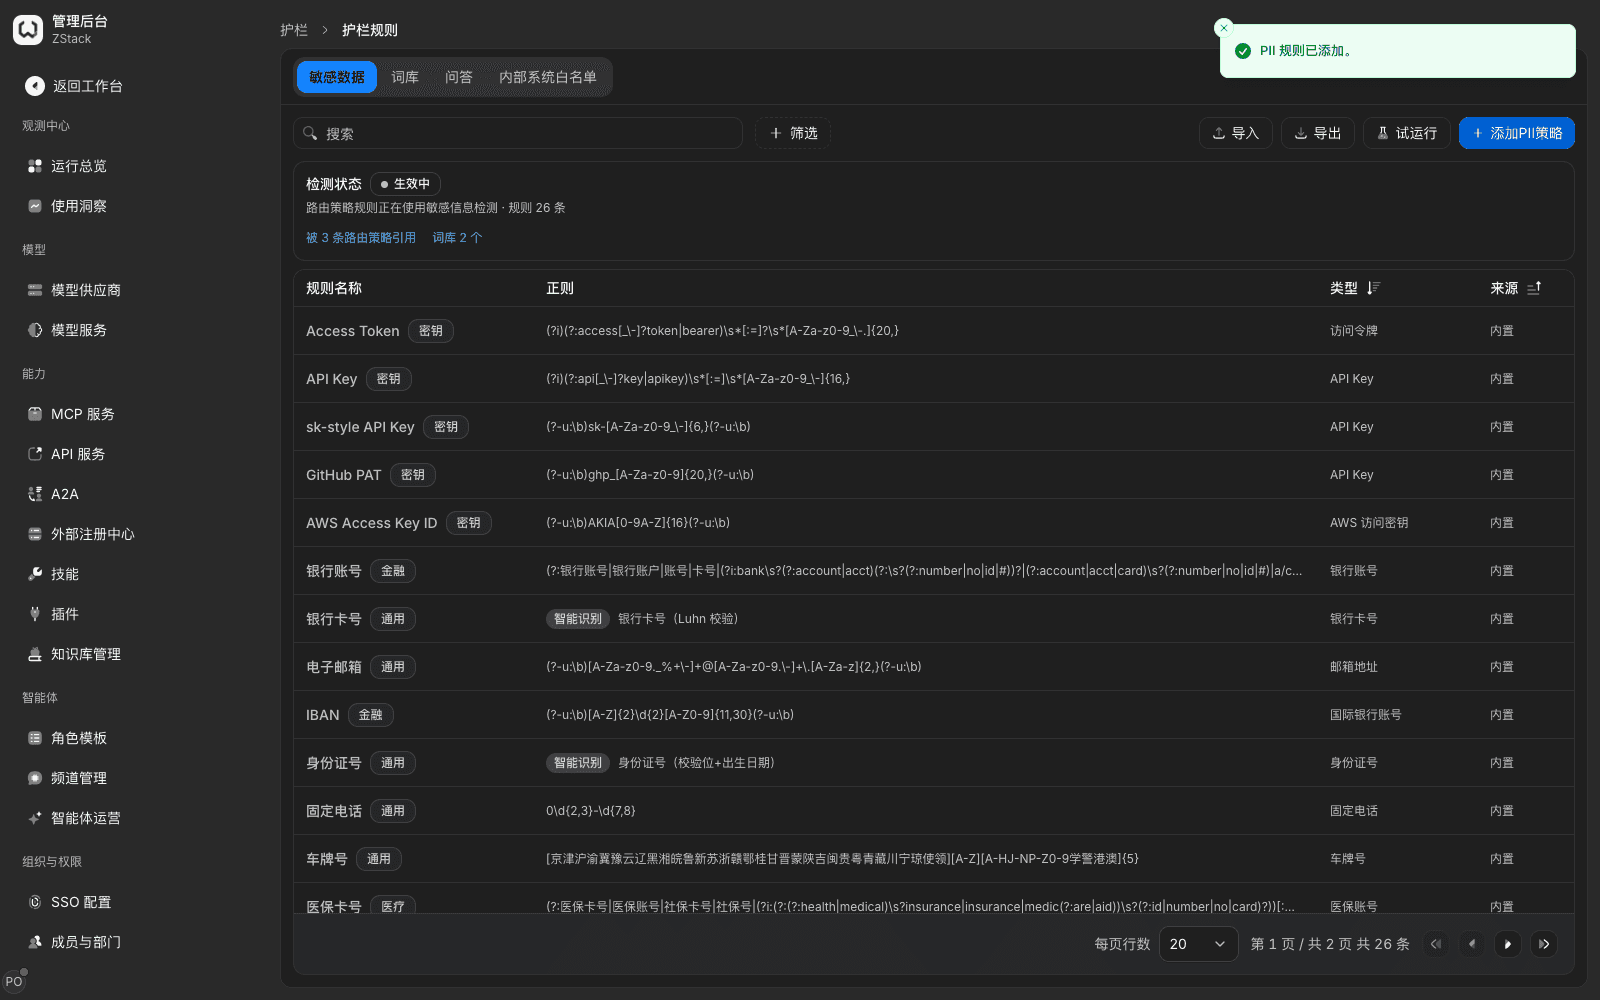
- The page says PII rule added. The rule appears in the list, Source is Custom, and the top rule count increases.
- The new type identifier immediately appears in the trial-run type list and in a traffic rule's Detection scope.
Industry templates: in a traffic rule's Detection scope › Templates, reference as a set by industry, for example pick Securities to bring in all related types of that industry. The template name is shown in Chinese in the canvas summary. Before save you can confirm in the top Configuration check whether it is a green-ticked Configuration OK. Templates are maintained with the platform version; after you reference one, types inside it take effect automatically as the platform updates.
Note
- Add boundaries to the regex yourself.
EMP-\d{6}treats the first 6 digits ofEMP-1234567as a hit, and after redaction a tail remains. Writing\bEMP-\d{6}\bavoids that. - Before a rule goes live, check one by one with should hit, boundary, should not hit samples as in 13.3. An expression that is too wide causes false positives and business interruption; too narrow misses.
- The same type can correspond to several rules. Traffic rules reference by type; a newly added rule is automatically merged into the detection scope that references that type.
Import and export recognition rules: use this when rules tuned in a test environment need to move to production, or custom rules need to stay consistent across several tenants.
- On the source environment's Sensitive data tab choose Export. The browser downloads
pii-rules.json. - On the target environment's Sensitive data tab choose Import, pick that file, and confirm.
- After import it shows Created: N; updated: N.
- When built-in rules in the file disagree with the target environment, the dialog lists These built-in rules disagree with the platform, skipped; platform rules were not changed and Disagreeing content. Remaining rules are imported as usual.
- Mid-import failure shows Import failed. You can retry in the same dialog; the already-imported part is not created again.
- You can only import a JSON file exported from this page. A format mismatch says Unsupported file format. Import only migrates recognition rules, not traffic rules. The target environment still needs to reference the matching types in a traffic rule as in 13.4 before detection takes effect.
13.3 Check recognition with a trial run
When to use: before a rule goes live, or after you adjust a regex, confirm hits and handling with a piece of text.
Procedure
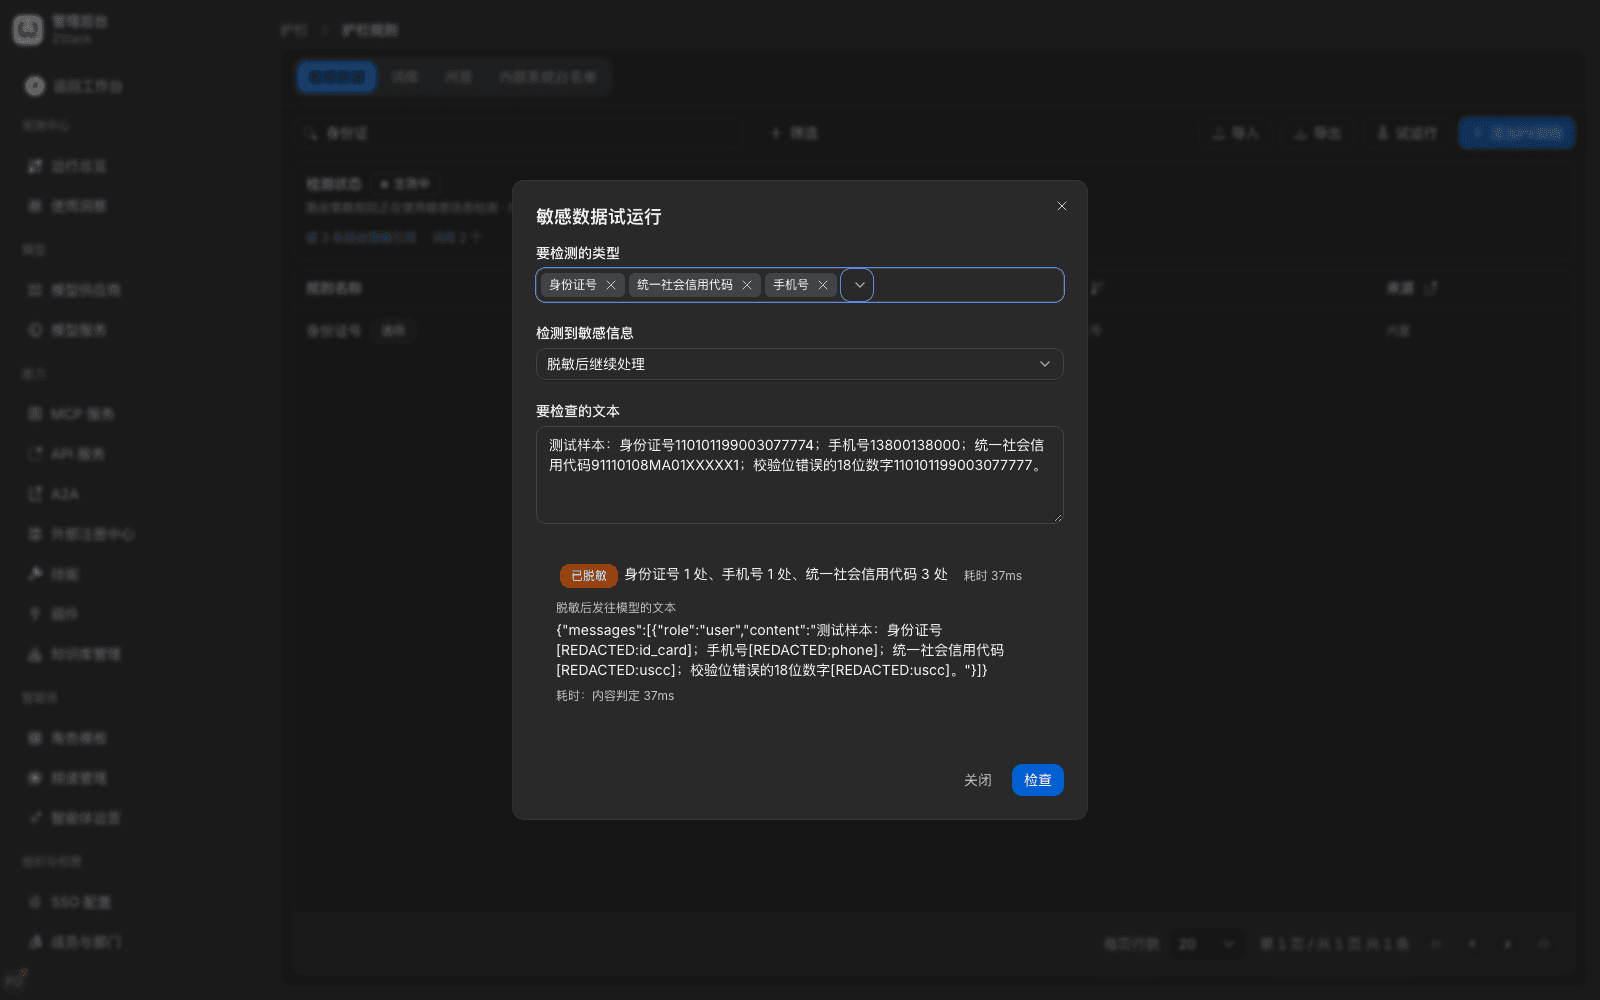
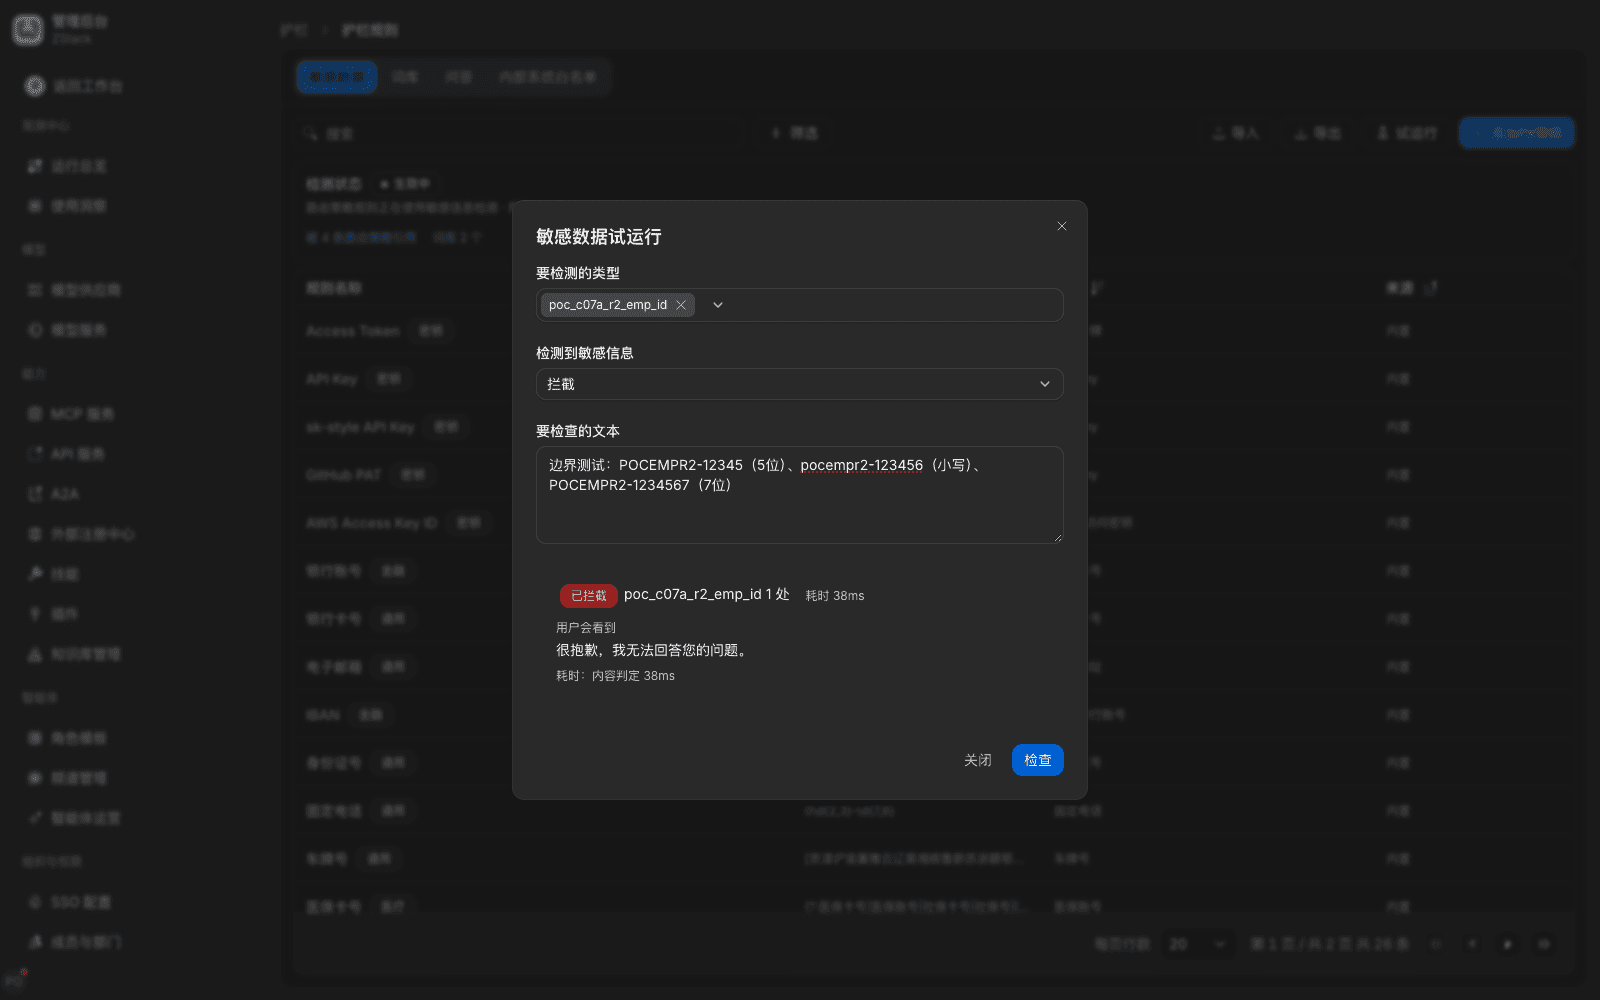
- On the Sensitive data tab click Trial run to open the Sensitive-data trial run dialog.
- In On detecting sensitive information choose a handling method: Redact then continue or Block.
- Choose types to detect, multi-select allowed. Paste a sample in the text box and click Check.
What you will see
| Conclusion | Meaning | Extra display |
|---|---|---|
| No risk found | None of the chosen types hit | Time this check took |
| Redacted | Hit, handled as Redact then continue | Hit counts per type, redacted text |
| Blocked | Hit, handled as Block | Hit counts per type, the reply the user will see |
- In the redacted text, hit fragments are replaced with placeholders such as
[REDACTED:phone],[REDACTED:id_card], which are easier to read. In a real call the gateway uses encrypted placeholders[PIIREF:v1:…]; see 13.5. - Ordinary business text (meeting arrangements, order numbers) usually shows No risk found, taking under 60 milliseconds.
Note
- A trial run does not call a model, does not go through the gateway, and does not produce a call record. You can check rules without affecting live traffic or billing. Person names, addresses, and organization names are the exception; they need to call the sensitive-info recognition model (see 13.6).
- A trial run is summarized as type + hit count. To confirm which fragment was recognized, pick Redact then continue and compare the replaced positions in the redacted text.
- After you add or change a rule, trial-run again; the result reflects the change immediately. Use fictional data in samples; do not paste real personal information.
13.4 Turn on sensitive-info detection in a traffic rule
When to use: make detection actually apply to a specified model, model group, API key, or MCP service.
Prerequisites: you have decided which objects to protect. For person-name scenarios, the recognition model is set as in 13.6.
Procedure
- Open Admin Console › Traffic › Traffic rules, click New rule, fill in a rule name.
- Click Add condition, choose a match range, for example Model and pick the model to protect, or Model group and pick the group to protect.
- Click Add disposition action, in the Before forwarding the request group pick Content detection · Conversation content, in Inspection stage choose User question, Model reply, or Both, and in Inspection methods tick Sensitive information.
- In Detection scope pick an industry template or pick types one by one; you can use both. Duplicate types are detected only once.
- In On hit choose Redact then continue or Block.
- Click Save rule, in Confirm changes check Match conditions and Actions, then click Confirm and apply.
What you will see
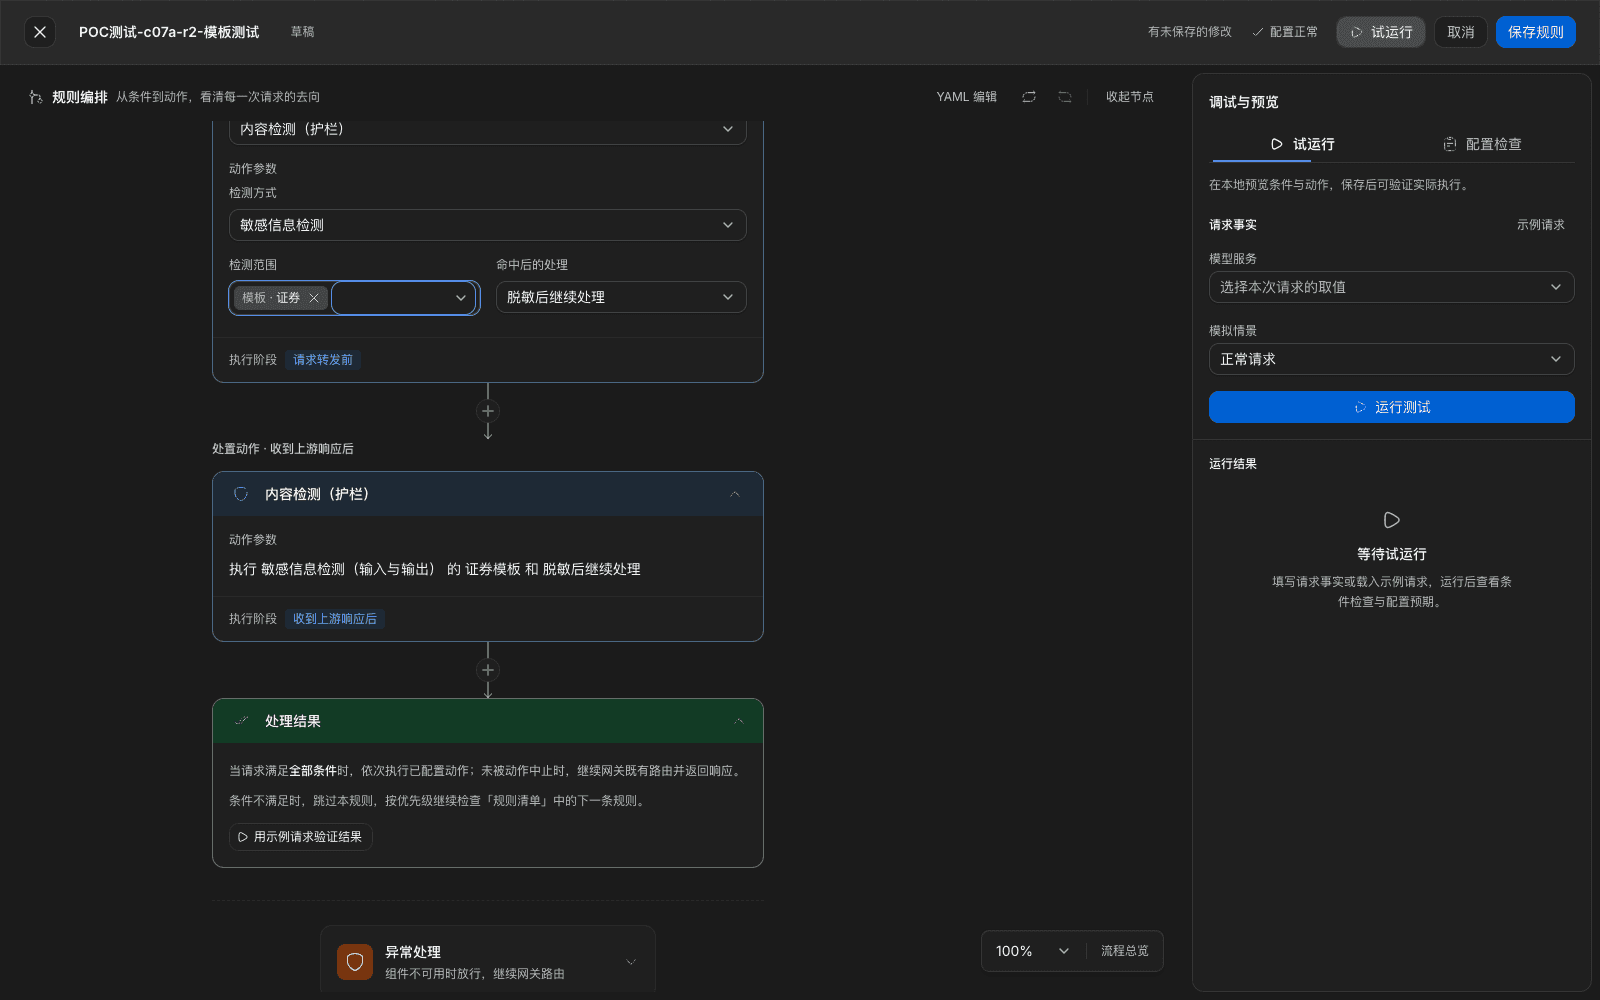
- The Content detection · Conversation content node appears in Before forwarding the request or After receiving the upstream response according to the chosen inspection stage. When you pick Both, both places share the same node. The summary shows the chosen template name and what to do on a hit.
- Match conditions in Confirm changes are the chosen model or group; Actions are the template name and handling method.
| Handling | Behavior | What the caller sees |
|---|---|---|
| Redact then continue | Hit fragments are replaced with encrypted placeholders then sent upstream; on the response direction, replaced then returned | A normal response; sensitive fragments are placeholders |
| Block | Stop this call; do not forward upstream (request direction) or do not return original text (response direction) | HTTP 403, body is the reply |
Note
- Which direction detection acts on is decided by the node's Inspection stage: User question only detects the request, Model reply only detects the response, Both detects both ways. One rule has only one inspection stage.
- When one request hits several detection rules, the same type takes the stricter handling: block over redaction.
- Traffic rules match in priority order. If an earlier rule is set to stop matching on a hit, this rule is not evaluated. Check hit order in Confirm changes before save.
- Traffic rules also have a condition Request contains sensitive information, used to split or deny by whether a request contains a class of sensitive data (see Section 15.7). In the same rule, the condition Request contains sensitive information and the action Sensitive-info detection cannot be used together. The editor says The condition already has Request contains sensitive information, so the same rule cannot also do sensitive-info detection. When you need both, split into two rules.
- Person names, addresses, and organization names can only be recognized by the sensitive-info recognition model, and cannot be used as a Request contains sensitive information condition. To redact or block this kind of information, pick it in the detection scope of the Sensitive-info detection action.
13.5 Check redaction and how original text is retained
When to use: confirm that the upstream really does not get sensitive original text, and check what the call record retained.
Procedure
-
Call that service with a request that contains fictional sensitive data:
curl https://<网关地址>/api/v1/agent-gateway/openai/v1/chat/completions \ -H "Authorization: Bearer <YOUR_API_KEY>" \ -H "Content-Type: application/json" \ -d '{"model":"<模型名>","messages":[{"role":"user","content":"测试数据:身份证号110101199003077774;手机13800138000;员工工号EMP-123456;会议室A-301。"}]}' -
Open Admin Console › Observability › Operations overview › Requests and open this request.
-
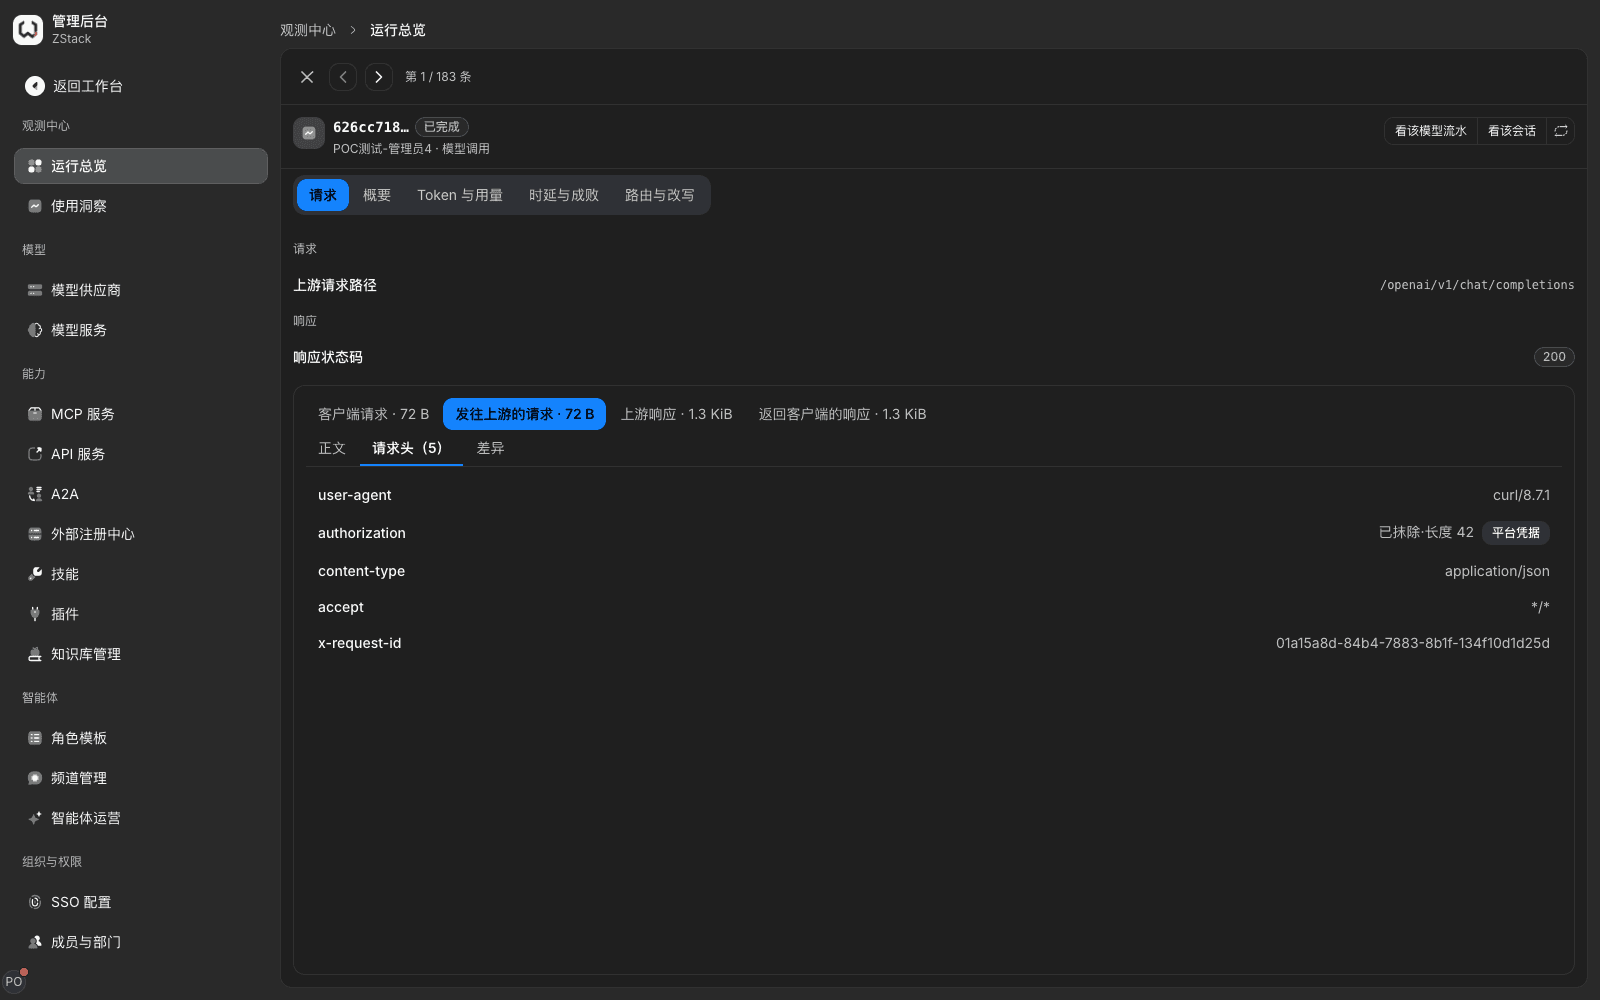
On the Request tab view Client request and Request sent upstream, then switch to Routing and rewrite to check the matched rule and handling.
What you will see
- In Request sent upstream, hit fragments such as ID number, phone number, and employee ID are replaced with sealed placeholders
[PIIREF:v1:…]. Non-sensitive content (for example "会议室A-301") stays unchanged. - A blocked request has status Intercepted, failure phase Policy intercept, and is not billed.
| Where it is retained | Content |
|---|---|
| Message sent upstream and the response | Only placeholders, no hit original values |
| Hit records and audit | Record data type, hit count, rule, and handling; no original text |
| Client request message | Retained according to body-retention settings in System Settings › Global settings › Data retention |
Note
- When a business system calls with an API key, the gateway does not restore placeholders in the model reply to original values. The client also gets the redacted result.
- If the business does not allow request bodies to be stored, adjust body-retention scope in Admin Console › System Settings › Global settings › Data retention before go-live. That setting applies to all calls of this tenant. Assess the impact on diagnosis before you change it.
- Operation audit only records configuration changes (who changed which rule and when), not request bodies. Redaction placeholders are bound to the tenant and cannot be swapped across tenants.
13.6 Recognize person names, addresses, and organization names
When to use: you need to recognize entities without a fixed format, such as in-house person names, addresses, and organization names.
Prerequisites: first pick a model for Sensitive-info recognition in System Settings › Global settings › Default models. That item is tenant-wide platform infrastructure, labeled Platform infrastructure, not by distribution in the list.
Procedure
- Open Admin Console › System Settings › Global settings, click Edit in the Default models area.
- On the Sensitive-info recognition row pick a model and click Save.
- Go back to Sensitive data › Trial run, pick Person name, Address, Organization name in types, paste a sample, then click Check.
What you will see
- After the configuration takes effect, person names, addresses, and organization names in the redacted text are replaced with placeholders of the matching type. The traffic-rule editor shows Sensitive-info recognition model: <model name>.
- When no model is configured, the traffic-rule detection scope says No sensitive-info recognition model is set yet; person name, address, and organization name cannot be picked. A trial run says No sensitive-info recognition model is set yet.
- When the chosen model is unavailable or disabled, the rule editor says The sensitive-info recognition model is no longer available; pick again or The sensitive-info recognition model is disabled.
Note
- Before go-live, first confirm the recognition model is available. When the recognition model is missing or unavailable, these three entity types cannot be recognized, and rules that depend on them cannot handle as intended.
- Calls of the recognition model show in model-group usage as Platform internal call: sensitive-info recognition.
- This configuration affects all rules that reference these three types. You cannot clear it while rules still use it; the page lists rules that need to be handled first. When the chosen model's upstream is an external provider, text under inspection is sent to that provider. Pick a model deployed inside the enterprise or one that meets data-compliance requirements.
13.7 MCP-tool inputs and return content
When to use: an MCP tool carries sensitive data such as customer files and order information in and out, and you need the same detection on call arguments and return results.
Prerequisites: there is a callable MCP service and an MCP token has been issued. The rule's Call type must be limited to MCP call.
Procedure
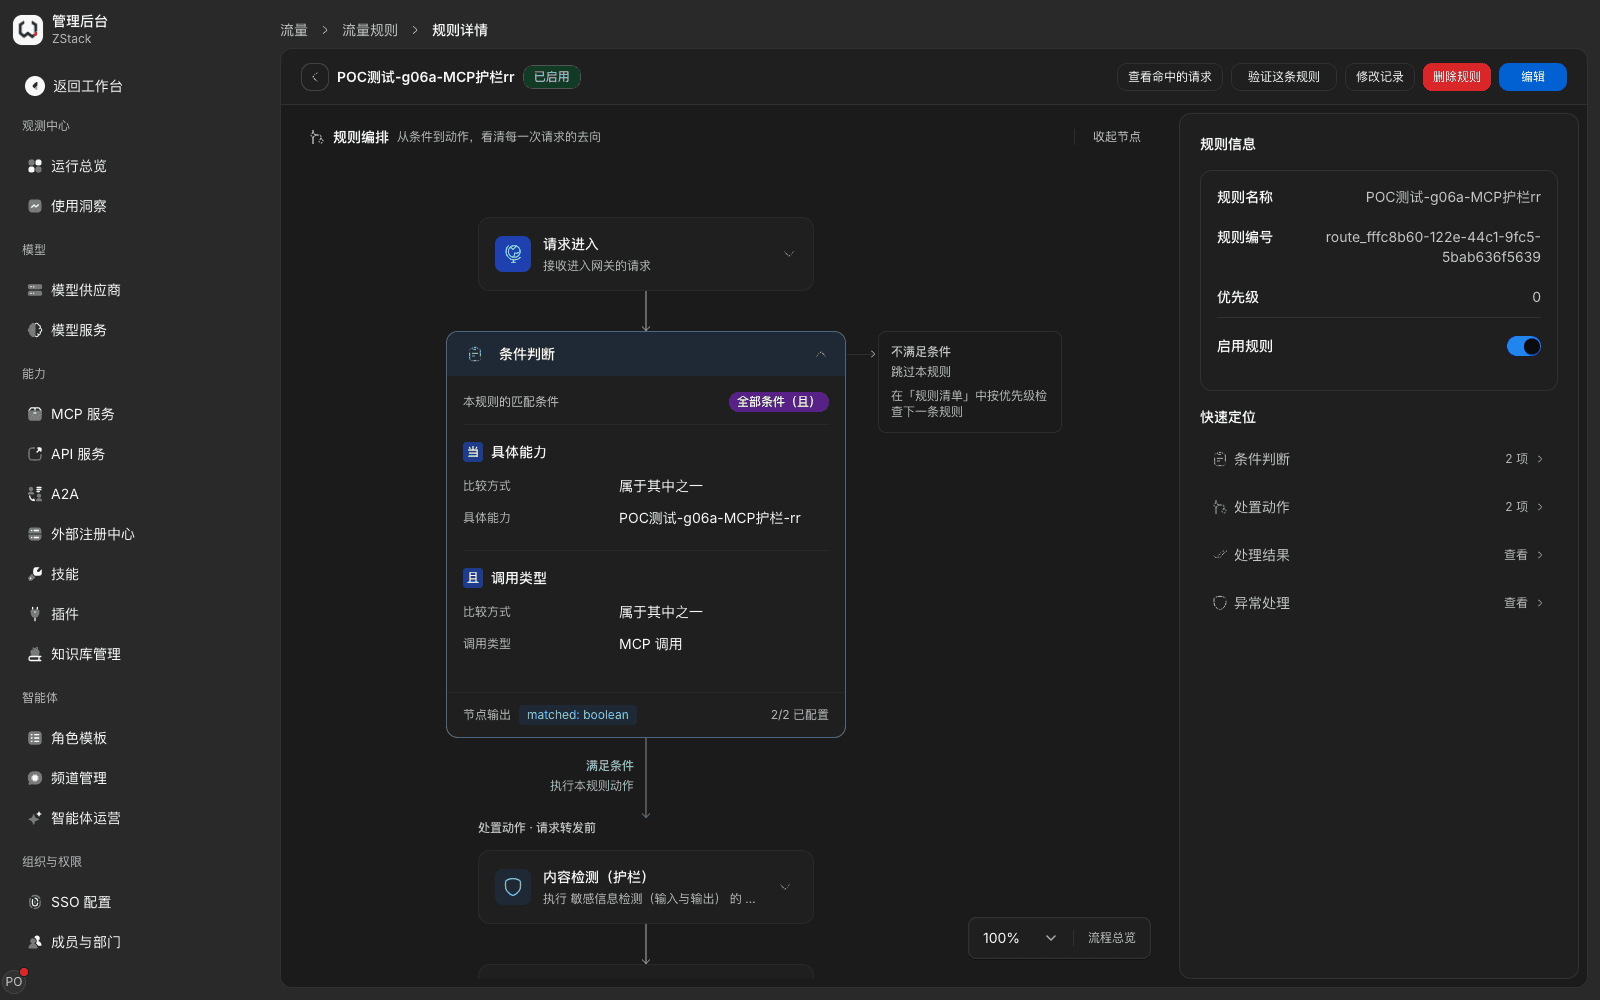
- Create a traffic rule, add condition Specific capability and pick the target MCP service, then add condition Call type = MCP call.
- Add Content detection · Conversation content, tick Sensitive information, set Detection scope to template General, and set On hit to Redact then continue or Block.
- To also intercept dangerous operations, add Content detection · Tool calls on the same rule; see Section 14.8.
- Save the rule and Confirm and apply.
What you will see
| Location | Redact then continue | Block |
|---|---|---|
| Call arguments (request direction) | Hit fragments replaced with [PIIREF:v1:…] then forwarded to the upstream tool | Deny this call, return execution denied: CONTENT_POLICY_BLOCKED |
| Tool return (response direction) | Hit fragments replaced with placeholders then given to the caller | Original text is not sent down; an intercept note is returned |
- Sensitive data that only appears in the tool return and is not in the call arguments (for example a customer file the tool returns by looking up a number) is also detected and handled.
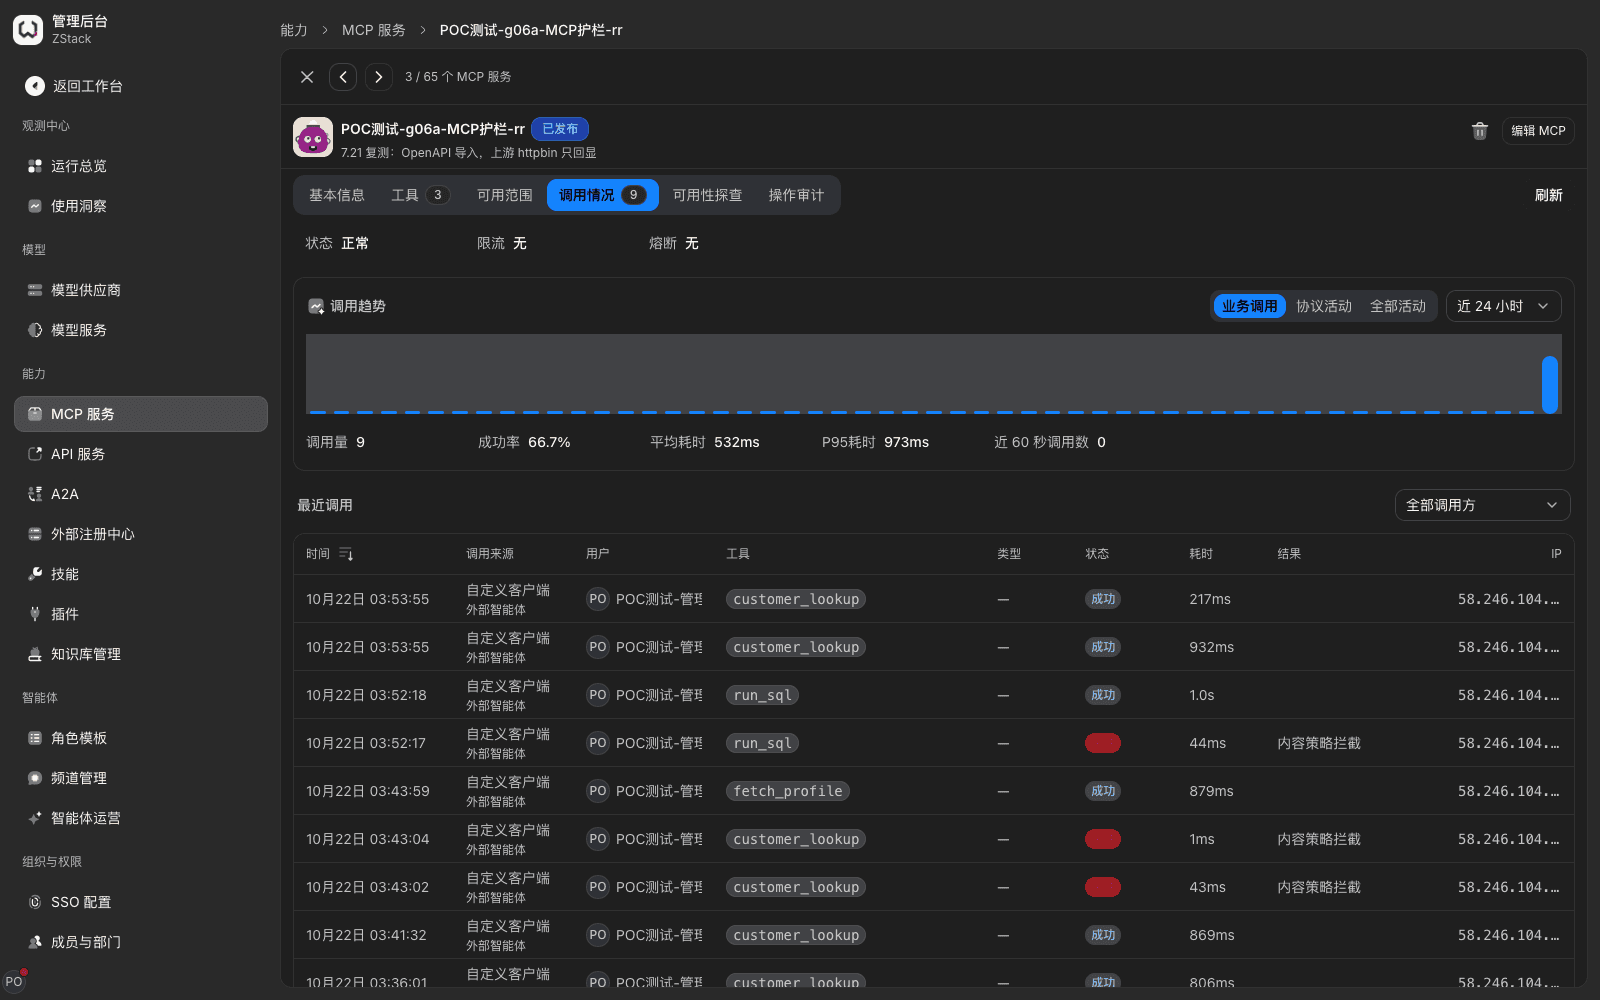
- A blocked call in the MCP service Call activity shows Failed · content-policy intercept. An admitted one shows Succeeded.
Note
- The MCP service detail page does not provide a separate guardrail tab. Detection of inputs and returns is configured uniformly in traffic rules. The Tools tab says: to disable some tools or only allow listed tools, configure in a traffic rule by the Tool name condition.
- A call whose return was redacted is still counted as a successful call, and Call activity does not separately mark which guardrail type hit. When diagnosing, use the request detail and hit records.
- Before calling, issue a token in member-side Get connection config. After the token expires, issue again.
13.8 Detect sensitive information in images
When to use: the caller attaches a screenshot or photo with the request (account-opening screenshots, ID photos), and you need to recognize ID numbers and phone numbers in the image.
Prerequisites: a vision model that supports image input. When the chosen model's upstream is an external provider, images are sent to that provider; assess compliance.
Procedure
-
Open a traffic rule that already has a Content detection · Conversation content action, confirm Sensitive information is ticked and on-hit handling is set.
-
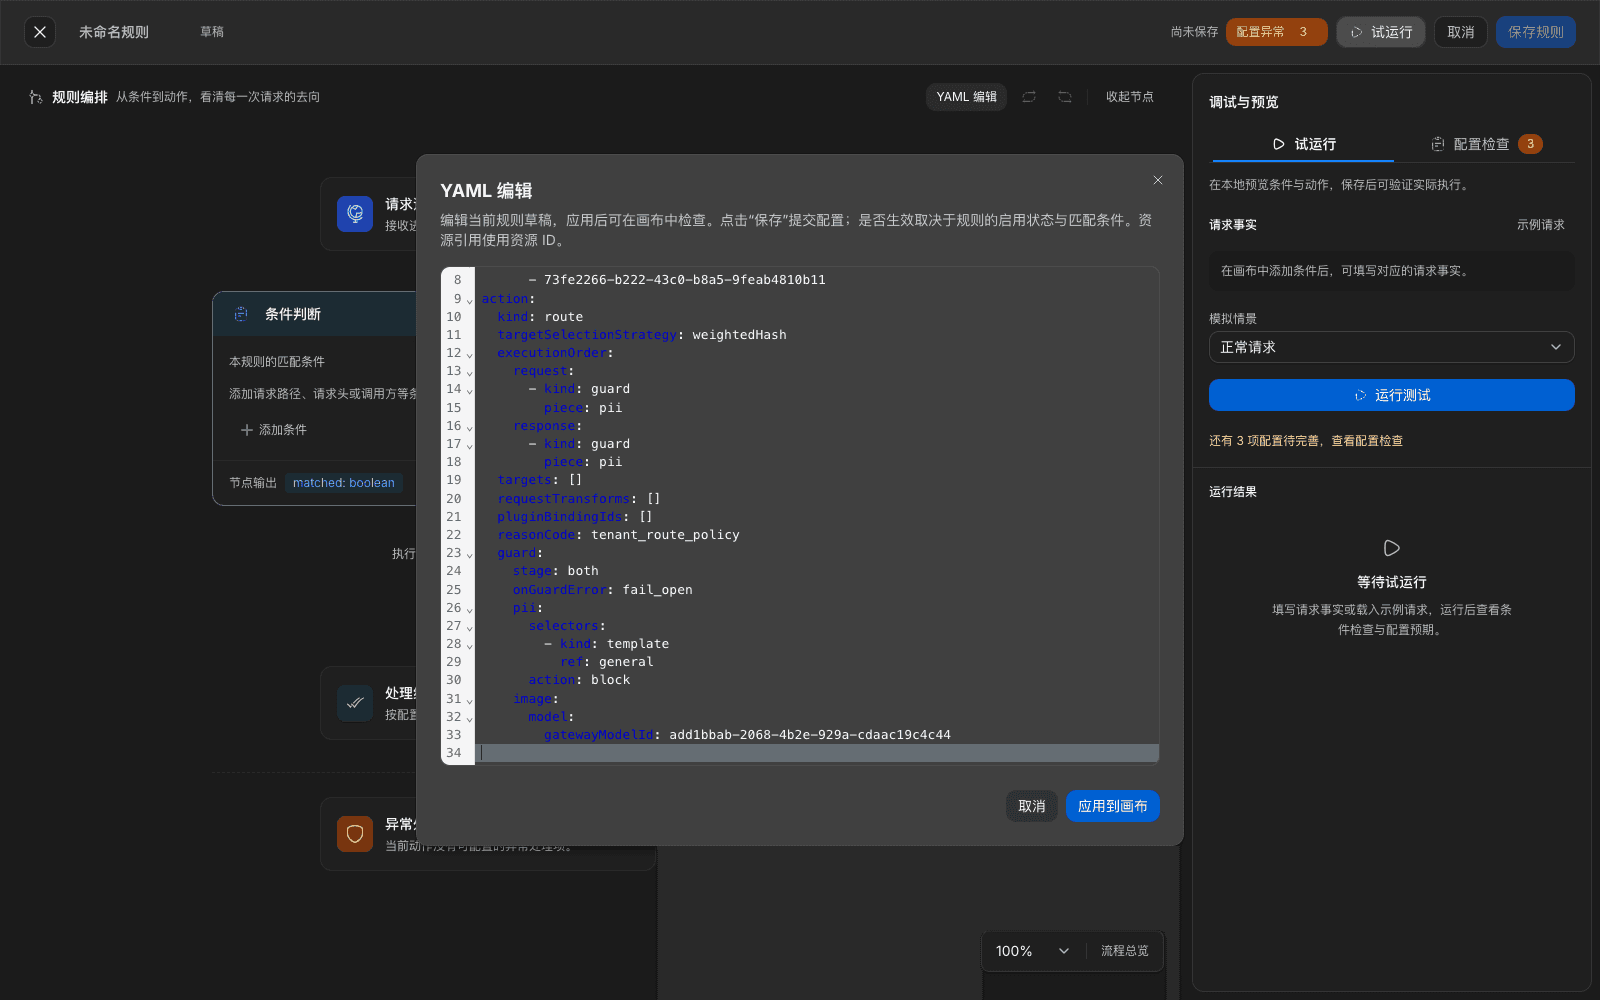
In the guardrail section turn on Inspect image content, and pick a vision model in Image understanding model. You can also click YAML edit, specify the vision model under
action.guard.content, then click Apply to canvas:action: guard: content: pii: action: block image: model: modelId: <视觉模型 ID> -
Click Save rule › Confirm and apply. On save the platform actually calls the chosen model with a built-in test image to check that it can read text in the image. If the check does not pass it gives a concrete reason and the rule is not saved.
-
Call once with a screenshot that contains test sensitive information and once with an ordinary notice image, and check the result.
What you will see
- The rule saves successfully and is pushed. When you read the rule definition back,
action.guard.content.image.model.modelIdis kept in full. The rule detail renders the node structure Request enters → condition judgment → before forwarding the request / after receiving the upstream response → handling result → exception handling.
Note
- Image detection depends on a vision model first converting the image into description + text in the image, then judging with the same rule's detection items. When an image is too small, blurry, or pure graphics, the model cannot read text, sensitive information in the image is not recognized, and the rule also cannot pass the check on save. Before go-live, verify once with a real business screenshot.
- When Inspect image content is off, images do not take part in detection, and sensitive information in the image is sent to upstream as-is. Text in attachments does not depend on this switch; see 13.9. Images in attachments (scanned pages, embedded images) are detected only after it is on.
- Image detection does not set a separate threshold. The judgment result shares the same rule's handling as text detection.
13.9 Detect sensitive information in attachments
When to use: employees send PDF, Word, or Excel files that contain ID numbers and names as attachments with a request to a model, through Claude Code, Codex, or a self-built application, and you need to recognize and handle sensitive information in the file before it is sent.
Prerequisites: the traffic rule already has Content detection · Conversation content and Sensitive information is ticked (13.4). Attachment detection has no separate switch. After the rule turns on sensitive-info detection, attachments take part. Recognizing person names, addresses, and organization names also requires the sensitive-info recognition model to be set first (13.6).
Attachment formats detected
| Format | Content read |
|---|---|
| Text page by page; pages without text (for example scanned pages) are treated as images | |
| Word (.docx) | Body, text boxes, inserted and deleted text in revisions, headers and footers, footnotes, endnotes, and comments |
| PowerPoint (.pptx) | Each slide and notes |
| Excel (.xlsx) | Cell content and comments of each worksheet |
| CSV, plain text, Markdown, RTF | Full text |
Attachments that appear in a user message, or in a tool return (for example an attachment Claude Code sends after reading a local PDF with the Read tool), are detected the same way.
Procedure
- Open the traffic rule and in On hit choose Redact then continue or Block.
- To detect scanned PDF pages and images in documents, configure image detection for that rule as in 13.8.
- Click Save rule › Confirm and apply.
- Call once with a PDF that contains a fictional ID number as an attachment, and check the result.
What you will see
- When you pick Redact then continue, a hitting attachment is sent to the model as redacted text, starting with [Attachment the 1st attachment, redacted by the gateway, original file not sent]. The original file is not sent. An attachment that did not hit is sent as-is. When later turns resubmit the same attachment, the rewritten text stays the same.
- Hits in images in the attachment (scanned pages, images embedded in the document) cannot be masked. Even if you pick Redact then continue, they are handled as Block.
- When you pick Block, this call is denied. An external client calling through the API gets HTTP 403.
- In Operations overview › Rule hits, the hit basis shows as Attachment text · 1st attachment · page 3. A hit in an attachment image shows as Attachment image text · 1st attachment · page 2. Attachment excerpt shows 60 characters of redacted text before and after the hit. Basis and excerpt only mark the attachment sequence number; they do not show a file name and do not store the full attachment.
- Open this conversation in Operations overview › Conversations. The matching message shows the redacted attachment text, labeled Redacted by the gateway, original file not sent. The original file is not stored and cannot be downloaded.
Recognition scope
- Types judged by recognition rules (including custom rules and lexicons), such as ID numbers, phone numbers, and bank-card numbers, cover the full attachment text.
- Types that need model recognition, such as person names, addresses, and organization names, and risk judgment of the content-judge model, cover only about the first 10,000 characters (32 KiB) of all attachment text in appearance order, per request. The rest is not model-recognized, is admitted as usual, and a separate Not inspected · attachment beyond model-recognition scope is recorded in rule hits. This situation is not handled as When the judge model is unavailable.
Caps and cases that are not detected
| Situation | Handling |
|---|---|
| A single attachment over 20 MiB, over 300 pages (slides and worksheets counted by count), or extracted text over 4 MiB | Handled as the rule's When the judge model is unavailable (Section 14.9). The rule hit shows a concrete reason, for example Detection unavailable · attachment is encrypted |
| The attachment is encrypted | Same |
| A single attachment takes over 3 seconds to parse, parse fails, or the gateway is parsing too many attachments at once | Same |
| Legacy Office formats (.doc, .xls, .ppt) | Admitted; the rule hit records Not inspected · legacy Office format |
| Other formats (for example archives, ebooks, or an unrecognized type) | Admitted; the rule hit records Not inspected · document format not supported |
| An attachment referenced by file ID (the file was uploaded to the model vendor first; the request only carries an ID) | Admitted; the rule hit records Not inspected · file submitted by ID reference |
| The attachment is only images, and the rule has no image detection configured | Admitted; the rule hit records Not inspected · attachment is only images |
Note
- After an attachment is turned into redacted text, the model does not get the original file's layout and images. For tasks that need layout, remove sensitive information from the file by hand first, then submit.
- Attachment content referenced by file ID does not go through the gateway and cannot be detected. When you need detection, have the caller carry file content with the request. Save legacy Office files as .docx, .xlsx, .pptx, or PDF first, then submit.
- The caps above are platform-fixed parameters and cannot be adjusted per rule.
Capability notes
| Not provided | Use instead |
|---|---|
| A master detection switch, per-built-in-rule enable | Use a traffic rule's Detection scope to control which types take part (13.4) |
| Handling configured by data grade | Rules are organized by group. Use different traffic rules to distinguish detection scope and handling (13.4) |
| Change industry-template content item by item on the guardrail page | Templates are maintained with the version. Append with Individual types or create a custom rule (13.2) |
| The gateway restores placeholders to original text then returns them to the caller | Not provided. The caller gets the redacted result (13.5) |
| Detect legacy Office (.doc, .xls, .ppt) and other-format attachments | Save as .docx, .xlsx, .pptx, or PDF then submit (13.9) |
| Detect attachments referenced by file ID | Carry file content with the request (13.9) |
| Recognize person names, addresses, and organization names in the full attachment text | Each request only recognizes about the first 10,000 characters of attachment text. When over, split the attachment and submit in several calls (13.9) |
| Adjust attachment size, page-count, and parse-duration caps | Platform-fixed parameters (13.9) |
| Entity types without a fixed format, such as date of birth | Add a custom regex rule (13.2), or use person-name and address recognition (13.6) |
| Adjust window parameters of multi-turn reassembly and streaming detection | Platform-fixed parameters; see Section 14.10 |
Previous: 12. External agents, skills, plugins, and external registries · Next: 14. Configure content detection and safety fences
12. External agents, skills, plugins, and external registries
Full-length chapter. Content is checked against the 2026.10 mainline code and the live console; menus and features depend on the current license, account permissions, and delivered environment.
14. Configure content detection and safety fences
Full-length chapter. Content is checked against the 2026.10 mainline code and the live console; menus and features depend on the current license, account permissions, and delivered environment.