12. External agents, skills, plugins, and external registries
Full-length chapter. Content is checked against the 2026.10 mainline code and the live console; menus and features depend on the current license, account permissions, and delivered environment.
Back to overview · Full table of contents · Download full PDF
This chapter is for tenant administrators and ordinary members. It explains how to bring in-house and external agents, skills, and tool combinations under gateway governance: connect an external agent that follows the A2A protocol, let the gateway authenticate and record on its behalf, and publish it as an MCP tool; import skills that have passed a security check and distribute them; pack skills and remote MCP into a plugin package for migration; bulk-sync agents and MCP services from Nacos; and distribute client access configuration to members.
Related entries are all under Admin Console › Capabilities:
| Entry | What it does | Member-side entry |
|---|---|---|
| A2A | Connect an external agent, issue caller tokens, view call activity and the task center | Workspace › A2A |
| External Registries | Sync external agents and MCP services from Nacos | — |
| Skills | Import, publish, and distribute skills | Workspace › Skills |
| Plugins | Import and export agent plugin packages | Workspace › Plugins |
The features above require tenant-administrator permission.
12.1 Connect an external agent
When to use: a system already provides an agent that follows the A2A protocol, and you want the gateway to provide a unified external entry.
Prerequisites: the external agent provides an A2A Agent Card, and its service URL is reachable from the network the gateway is on.
Procedure
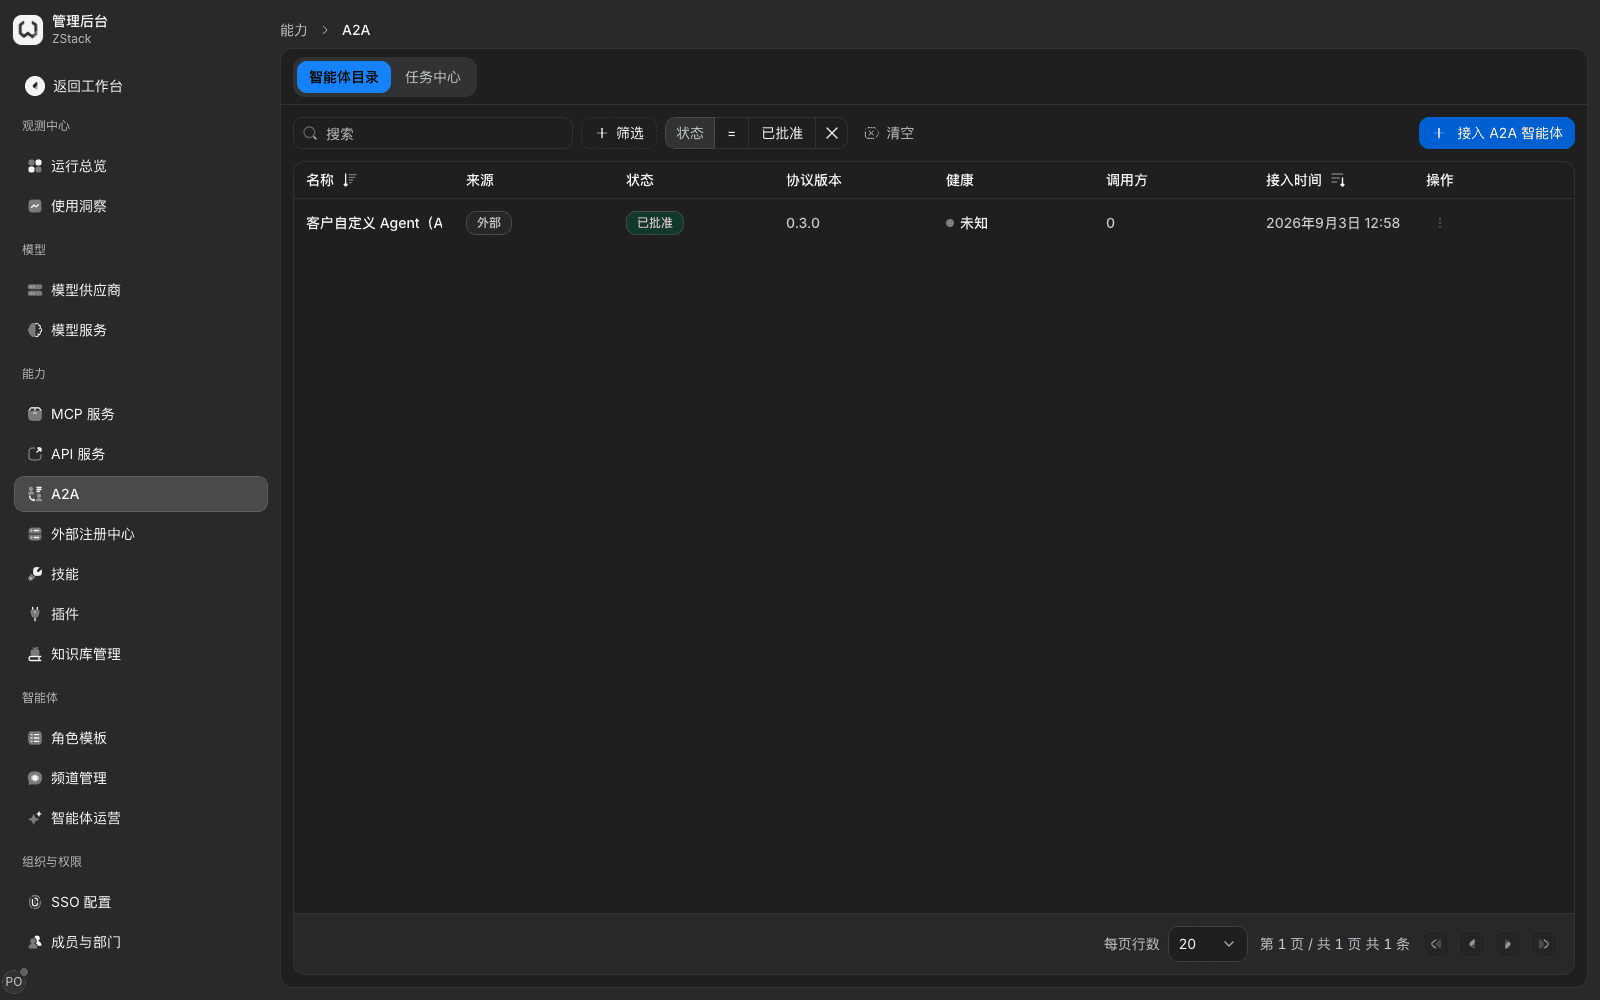
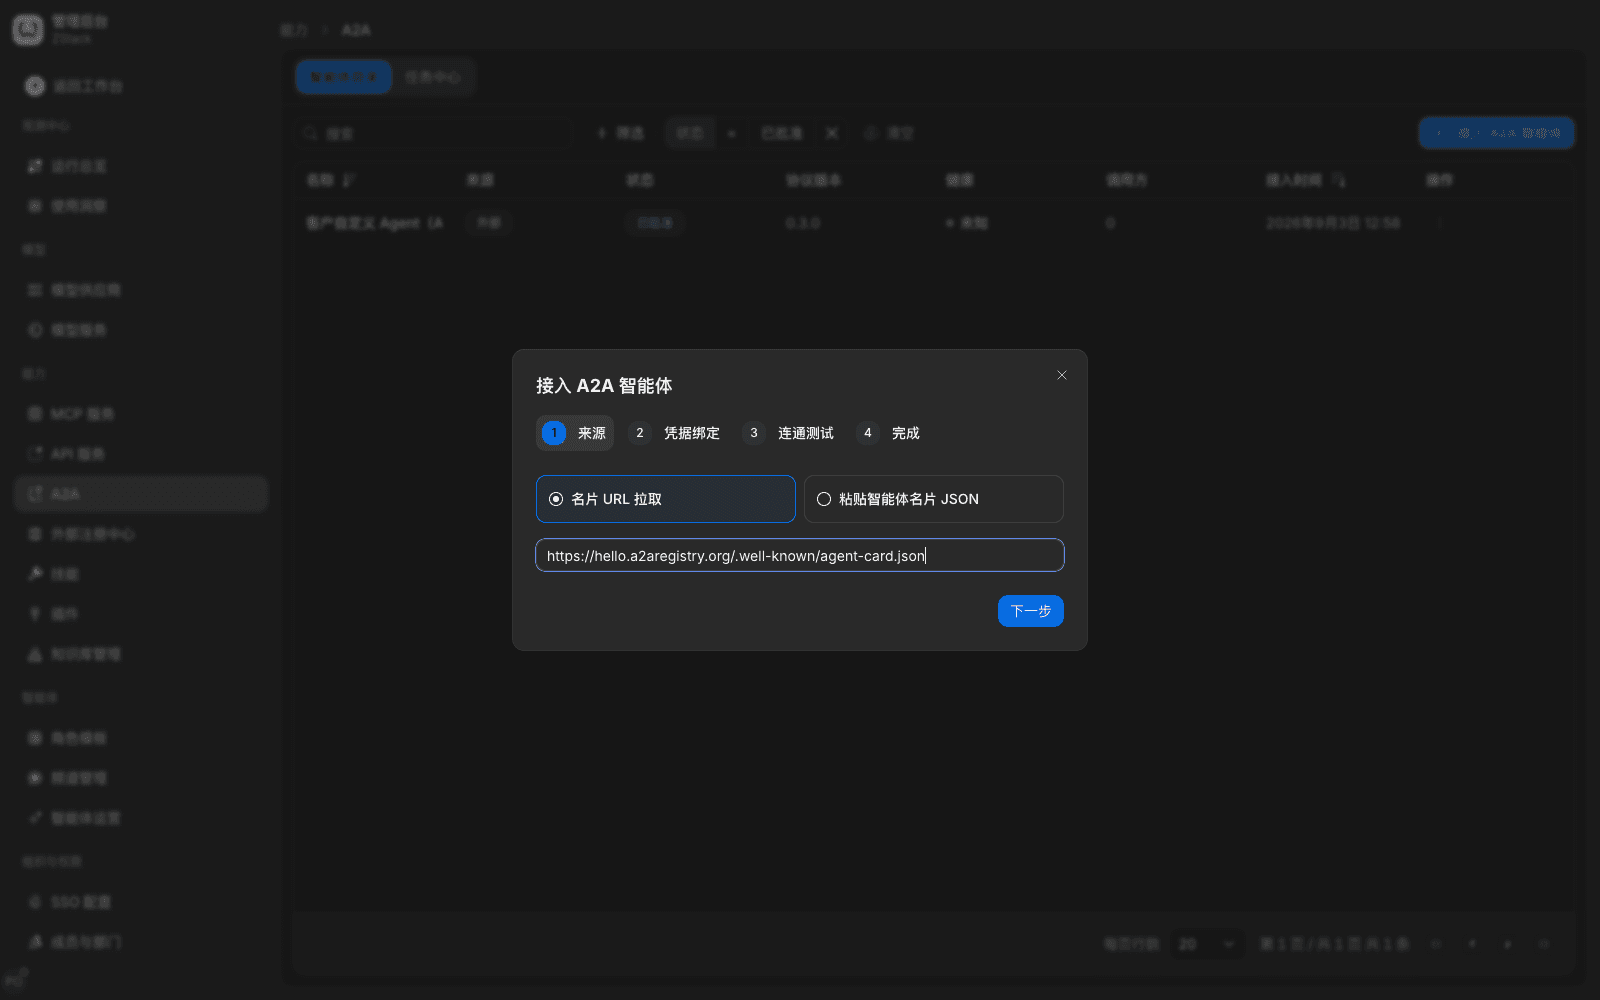
- Open Admin Console › Capabilities › A2A. On the Agent catalog tab choose Connect A2A agent in the upper right.
- Step 1 Source is one of two: Fetch from card URL fills the card URL (for example
https://agent.example.com/.well-known/agent-card.json), or Paste agent-card JSON pastes the card content. - Step 2 Credential binding picks an existing credential or Do not bind yet; upstream credentials are configured on the detail page (see Section 12.3). Step 3 Connectivity test choose Start test, and confirm it shows Connected, latency N ms.
- Step 4 Done checks card name, protocol version, and signature verification. The page says Registration submitted, currently pending approval.
- Back on the list, switch the status filter to Pending approval and choose Approve. Only an approved agent can be published, issue tokens, and be distributed.
What you will see
- The list shows name, source, status, protocol version, health, callers, and connected time. Protocol version is the
protocolVersionthe card declared; the version next to the title is the agent's own version. - While pending approval, the Publish switch is greyed out. After approve you can turn it on. Connecting the same card URL again is refused, with This card URL is already connected as agent "…"; you do not need to connect it again.
Note
- When the card does not declare authentication, credential source only offers No authentication and Platform unified configuration. When the connectivity test fails, first confirm that the gateway network can reach the service URL the card declared.
- After connect, neither the upstream URL nor the authentication method is exposed to callers (see Section 12.2).
12.2 Check the card the gateway rewrote
When to use: confirm what the gateway exposes externally, and the card URL callers get.
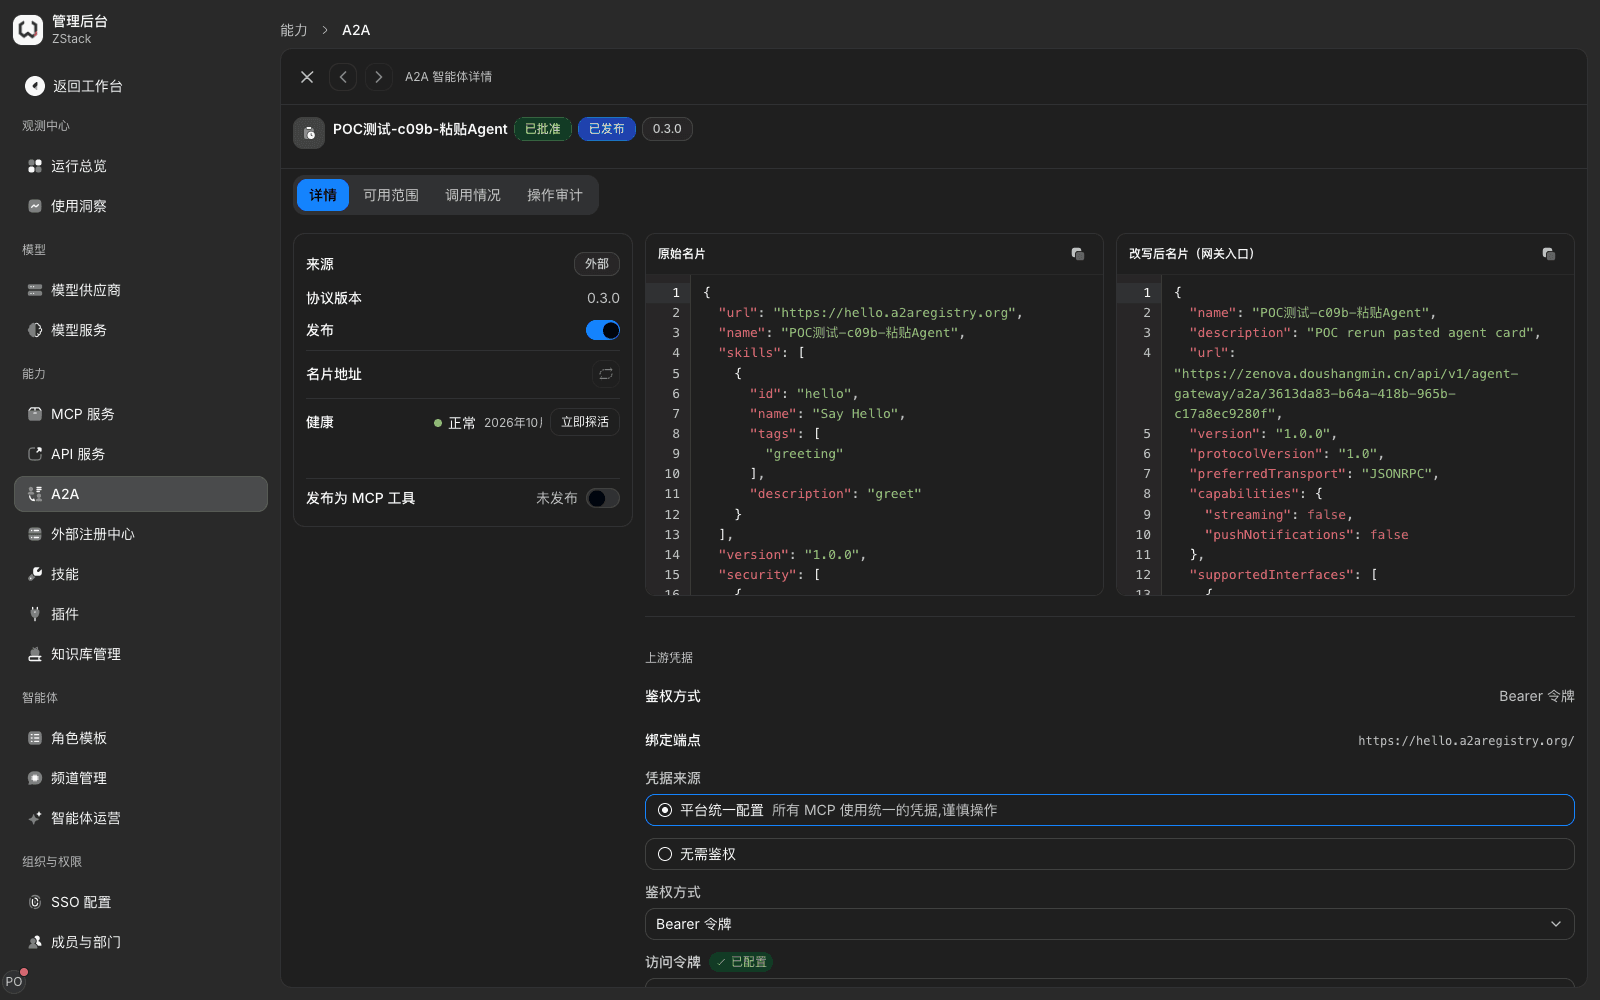
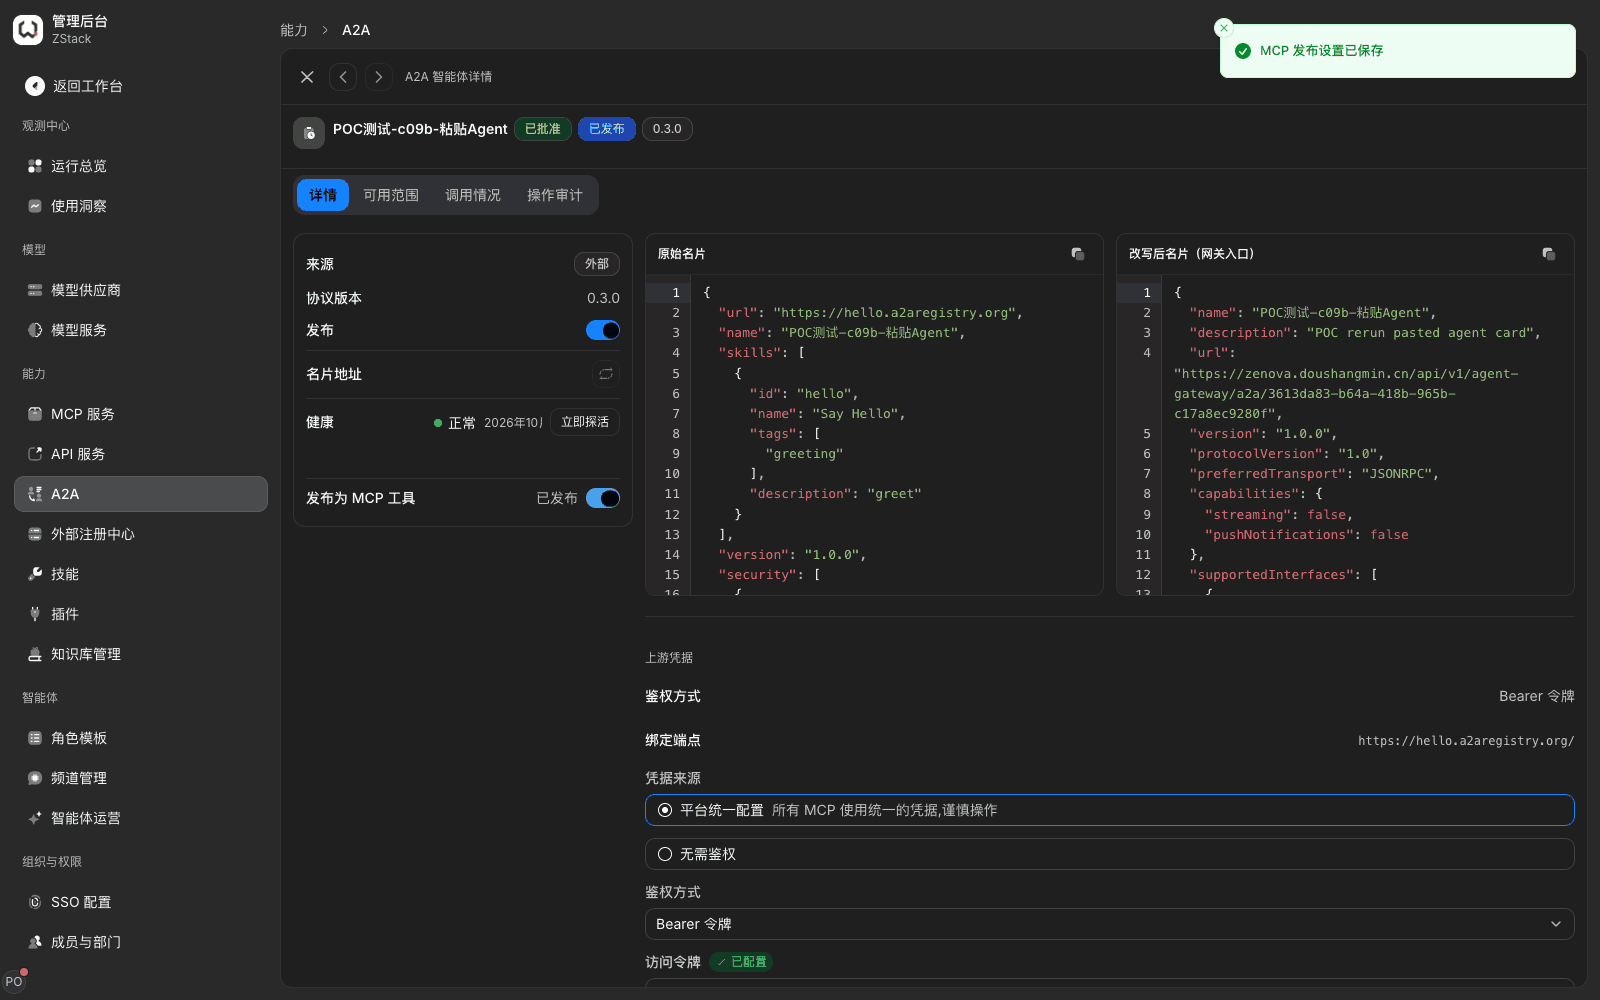
Open the agent detail Details tab to view Original card and Rewritten card (gateway entry) side by side:
| Item | Original card | Rewritten card |
|---|---|---|
Service URL (url, supportedInterfaces) | Upstream URL | The gateway's A2A entry |
Authentication declaration (securitySchemes) | Upstream scheme | The gateway's zg_a2a_ token and authorization-code + PKCE S256 OAuth |
| Upstream docs, icon links, extension declarations, signatures | Kept | Not exposed |
| Name, description, skills, capabilities | Kept | Kept |
The URL callers read the rewritten card from is https://<网关地址>/api/v1/agent-gateway/a2a/<智能体 ID>/.well-known/agent-card.json, readable without authentication. protocolVersion in the card is the protocol generation the gateway exposes; it is a different thing from the version the original card declared.
12.3 Configure upstream credentials and caller tokens
When to use: the upstream needs a credential to call; an external system needs a long-lived token to call the gateway entry.
Configure upstream credentials
- In the Upstream credentials area of the agent detail Details tab, view Authentication method. It is decided by the card declaration and supports Bearer token, API key, Basic Auth, Cookie, Custom request header.
- Set Credential source to Platform unified configuration, fill in the credential value, and choose Save credentials. The page says Credentials saved. Bound endpoint shows the upstream URL; the credential shows Configured and plaintext is not echoed.
Issue a caller token
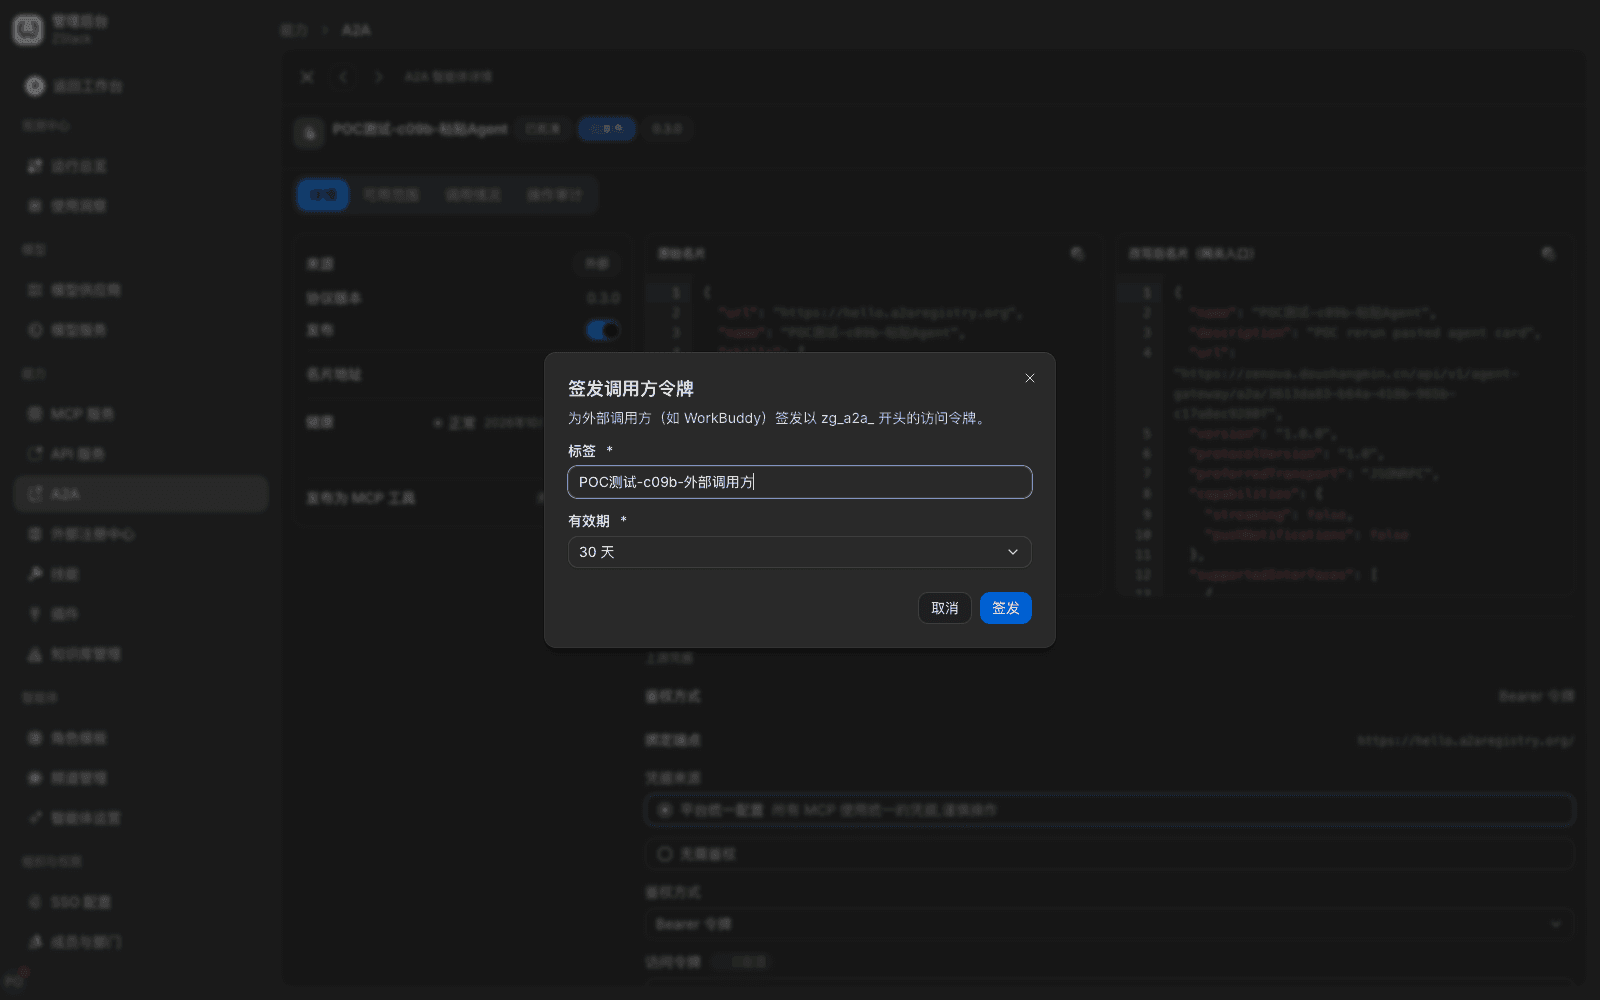
- In the Caller tokens area choose Issue, fill in Label (for example an external-system name) and validity, then choose Issue.
- Copy the plaintext in Token issued. Plaintext is shown only once; after you close it cannot be recovered.
- The list shows label, token fingerprint, expiry, last used, and status. To reclaim, choose Revoke.
What you will see
- The token list shows label, token fingerprint, expiry, last used, and status one by one. After issue, Last used is Never used.
- The revoke confirm box says After revoke it takes effect site-wide within 15 seconds (data-plane snapshot period) and cannot be undone. After confirm, status becomes Revoked. From about 15 seconds on, calls with that token return
401 a2a_token_invalid.
Note
- Callers only carry a
zg_a2a_token to call; the upstream credential is injected by the gateway. - The token fingerprint and the start of the plaintext are not necessarily the same. When you check which token it is, judge by label and issue time.
- When the card declares OAuth2 / OIDC authentication, configure it separately. mTLS and an API key in a query parameter are not supported.
12.4 Call an external agent through the gateway
When to use: a business system as caller submits a task to the gateway entry by the A2A protocol and retrieves the result.
- Call entry:
https://<网关地址>/api/v1/agent-gateway/a2a/<智能体 ID> - Rewritten card:
https://<网关地址>/api/v1/agent-gateway/a2a/<智能体 ID>/.well-known/agent-card.json
curl -X POST "https://<网关地址>/api/v1/agent-gateway/a2a/<智能体 ID>" \
  -H "Authorization: Bearer <A2A_TOKEN>" \
  -H "Content-Type: application/json" \
  -d '{
    "jsonrpc": "2.0",
    "id": 1,
    "method": "SendMessage",
    "params": {
      "message": {
        "messageId": "msg-001",
        "role": "ROLE_USER",
        "parts": [{ "text": "请汇总本周工单" }]
      }
    }
  }'
result.task of the return contains the task ID and status (for example TASK_STATE_COMPLETED). GetTask plus the task ID can query the full history.
What you will see
- A call without a token returns
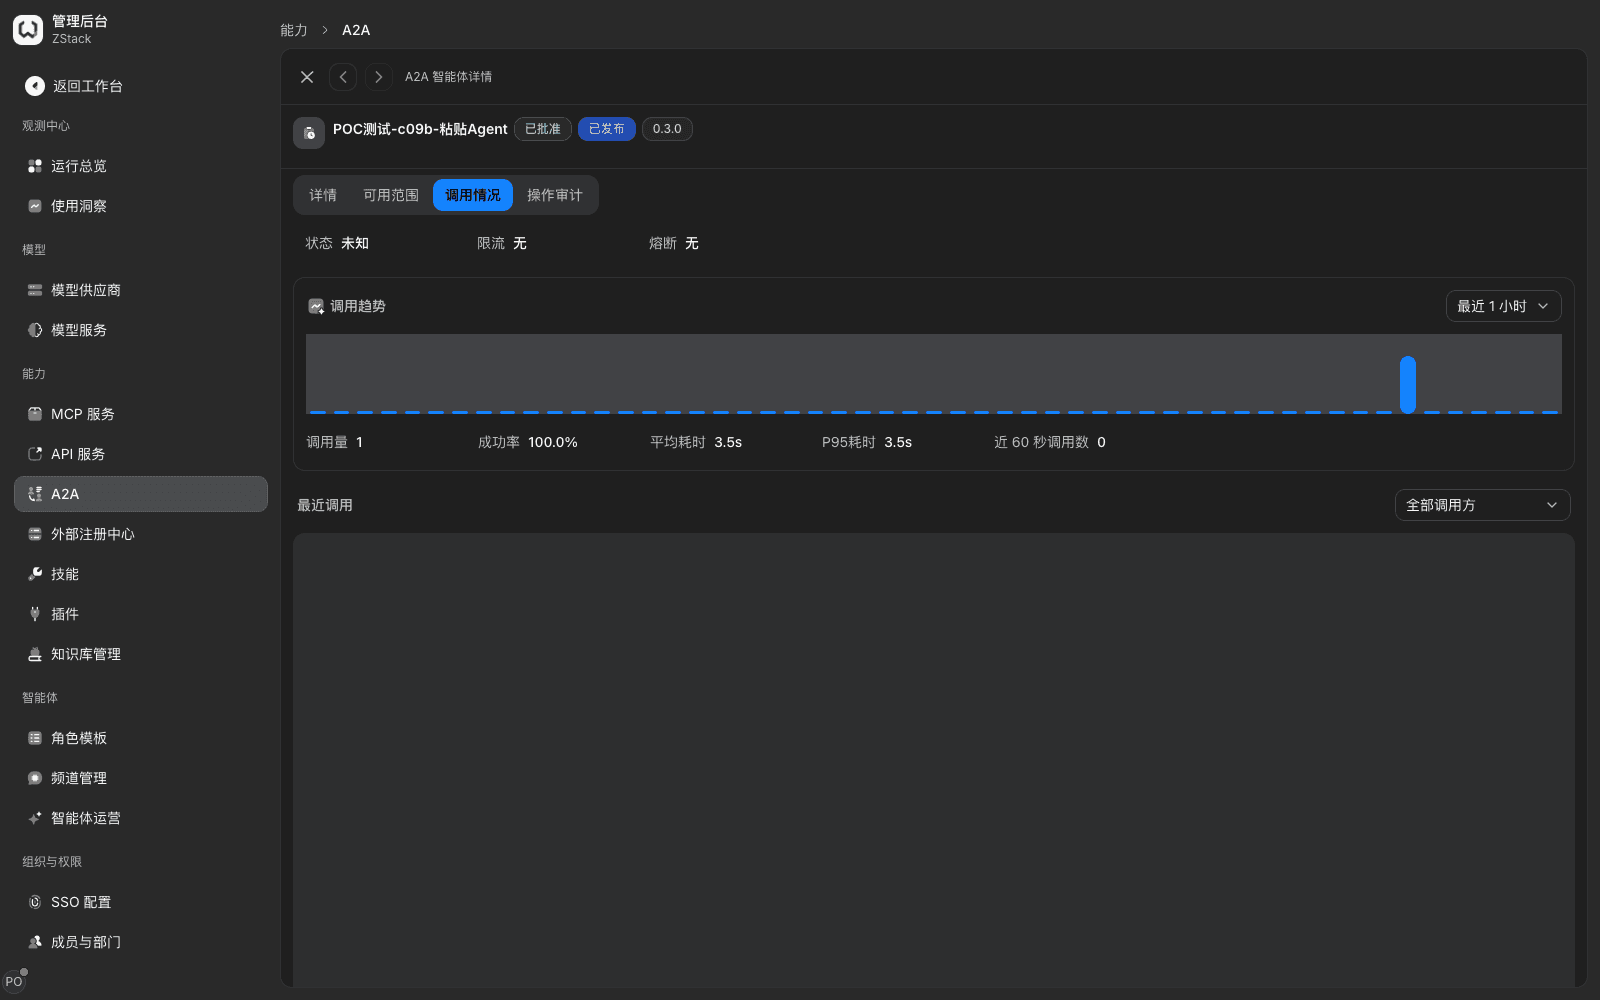
401,error_description: authorization required. - Call records appear on the agent detail Call activity tab and in the Task center (see Section 12.6), listing method, caller, status, and latency one by one.
Note
- The gateway entry works with A2A 1.0 semantics: method names are
SendMessage,GetTask,CancelTask, role isROLE_USER. Older spelling (for examplemessage/sendwithrole: "user") gets a JSON-RPC errorInvalid enum value. Clients that only support the old spelling need to upgrade. The upstream agent can be A2A 0.x (for example 0.3) or 1.0: the gateway forwards by the protocol version the card declared, sendingmessage/sendto a 0.x agent, while the caller always uses 1.0 spelling. The entry does not contain the upstream URL or credentials.
12.5 Distribute an external agent and publish it as an MCP tool
When to use: put the agent on the member-side A2A plaza and decide which members can use it; when needed, also publish it as an MCP tool for MCP clients to call.
Prerequisites: the agent is approved.
Procedure (administrator)
- On the agent detail Details tab turn on Publish, which lists the agent on workspace › A2A.
- Open the Available scope tab, choose Edit availability scope, tick members, then Next, choose validity, and Save. To let MCP clients call, turn on Publish as MCP tool on the same tab.
What you will see
- After available scope is saved it says Distribution saved; the tab shows distributed members. After you turn on Publish, a Published badge appears next to the title. After you turn on Publish as MCP tool, status shows Published.
- A2A configuration members get can call
SendMessagedirectly. Members outside scope see the card but it is labeled Needs administrator distribution; getting configuration says The requested resource does not exist, or cannot be accessed now.
Procedure (member)
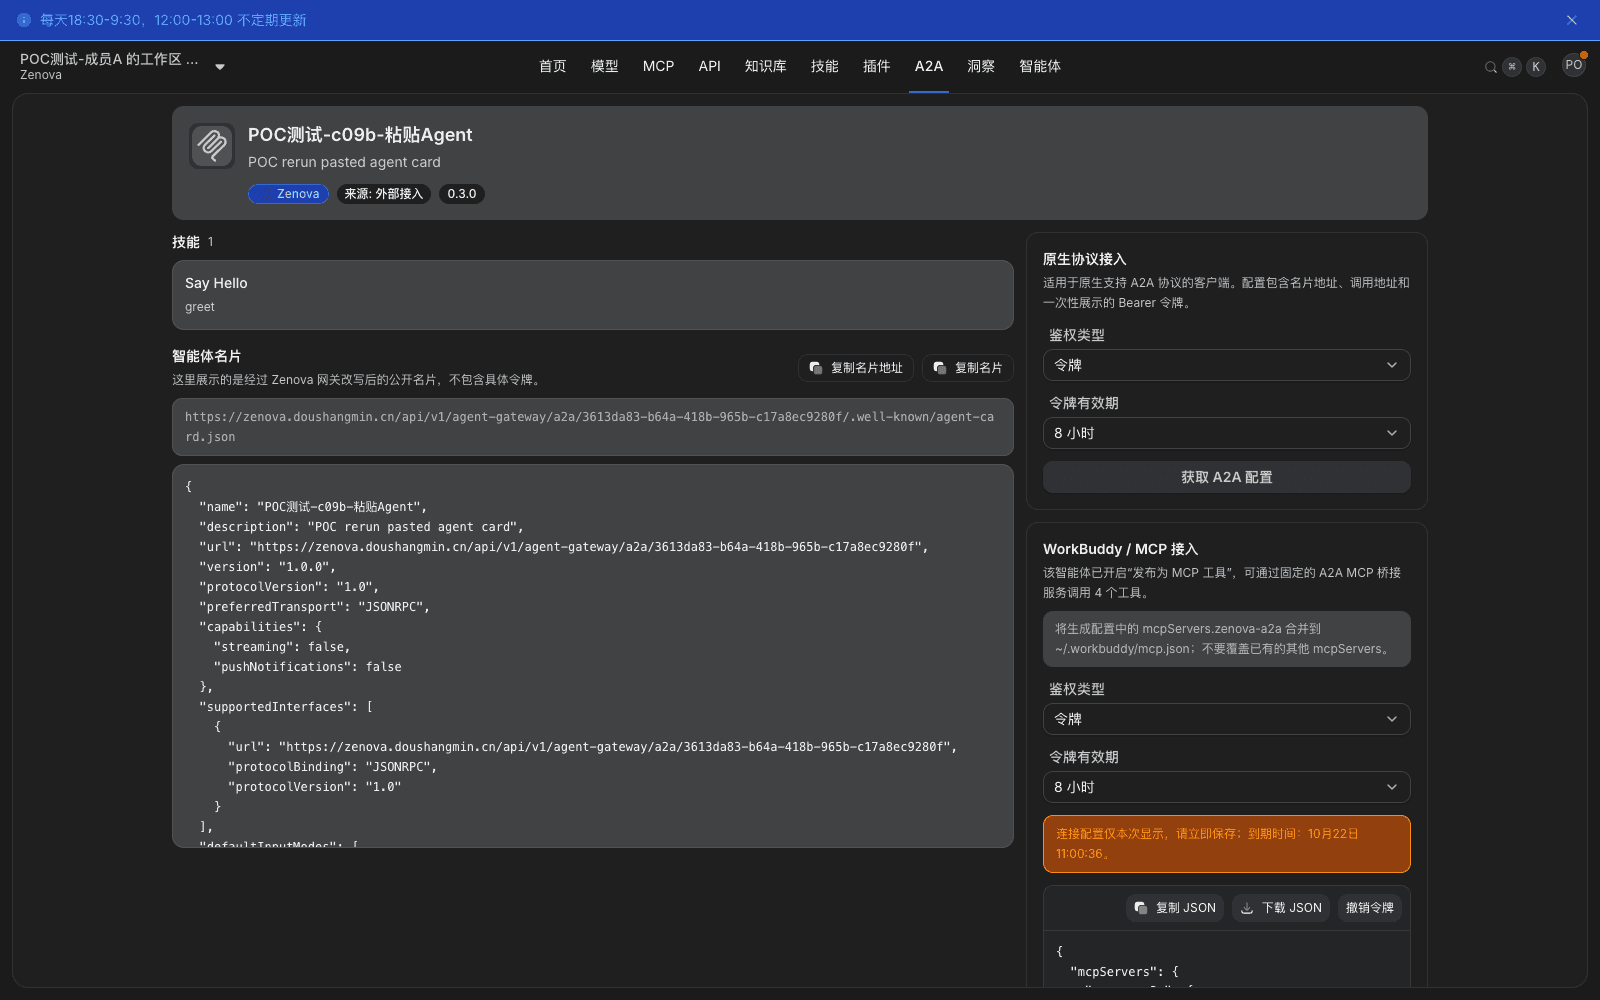
- Open the agent in workspace › A2A. The page shows skills and the rewritten card; you can Copy card URL and Copy card.
- In Native-protocol access, choose a token validity and Get A2A config, which gives the card URL, call URL, and a Bearer token shown once.
- When it is published as an MCP tool, the page's WorkBuddy / MCP access block can Get MCP config, and you merge the
mcpServersentry into the client configuration.
Note
- Publish as MCP tool is provided through a fixed A2A MCP bridge service, with 4 tools: list available agents, send a message, query a task, cancel a task. Members get the configuration once and it covers all agents that are published and distributed to them.
- After you turn off Publish as MCP tool, existing MCP configuration immediately cannot call. When the tenant turns off token access, members cannot generate A2A or MCP configuration.
- If connecting the bridge entry with MCP configuration returns
401, first have an administrator confirm publish status, then have the member get configuration again. Do not reuse a token issued earlier. - The prompt for members outside scope is different from a network failure: first confirm they are in available scope, then diagnose the network.
12.6 View call activity and the task center
When to use: check whether an external-agent call succeeded, what the result was, and which tasks there have been historically.
Call activity: the tab lists time, source, user, method (for example SendMessage, GetTask), status, latency, and result one by one. Intercepted calls are also recorded, with status Intercepted. Rate limit and circuit break are configured in traffic rules by call type A2A (requires the Dynamic routing module); see Chapter 15.
Task center
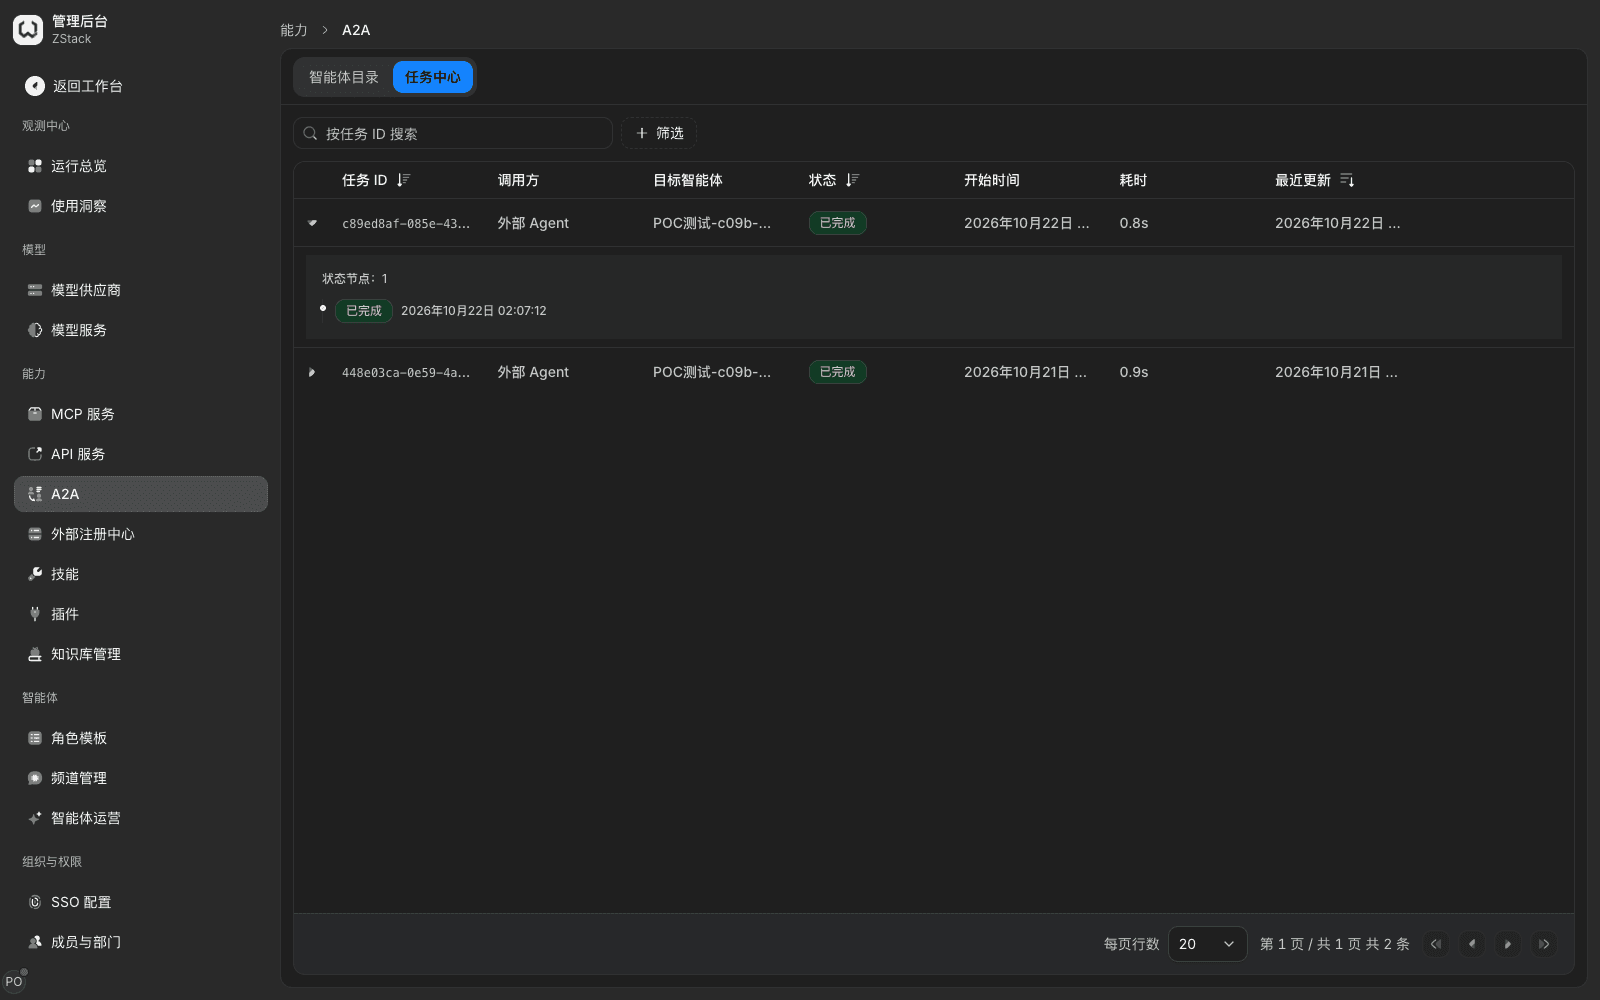
- Open A2A › Task center, type a task ID in Search by task ID, or add Target agent and Status conditions through Filter. The list shows task ID, target agent, caller, status, start time, latency, and last updated.
- Expand a task to view status nodes.
What you will see
- The caller column shows External Agent; the target agent shows a name. Filtering by target agent requires filling in the agent ID; you cannot pick by name.
- After expand it shows Status nodes. When the upstream returns completion synchronously there is only one node (for example Completed and its time). That is an accurate record: the upstream did not give intermediate stages.
Note
- The task center records calls initiated through the gateway. When a task cannot be found, first search by task ID. If still none, check the agent detail Call activity to see whether this call reached the gateway.
- The Operation Audit tab records this agent's registration, approval, credentials, tokens, and distribution changes.
12.7 Import and distribute skills
When to use: bring a behavior guide and attached files in as a skill, see the risk before install, then decide who to distribute to.
Procedure
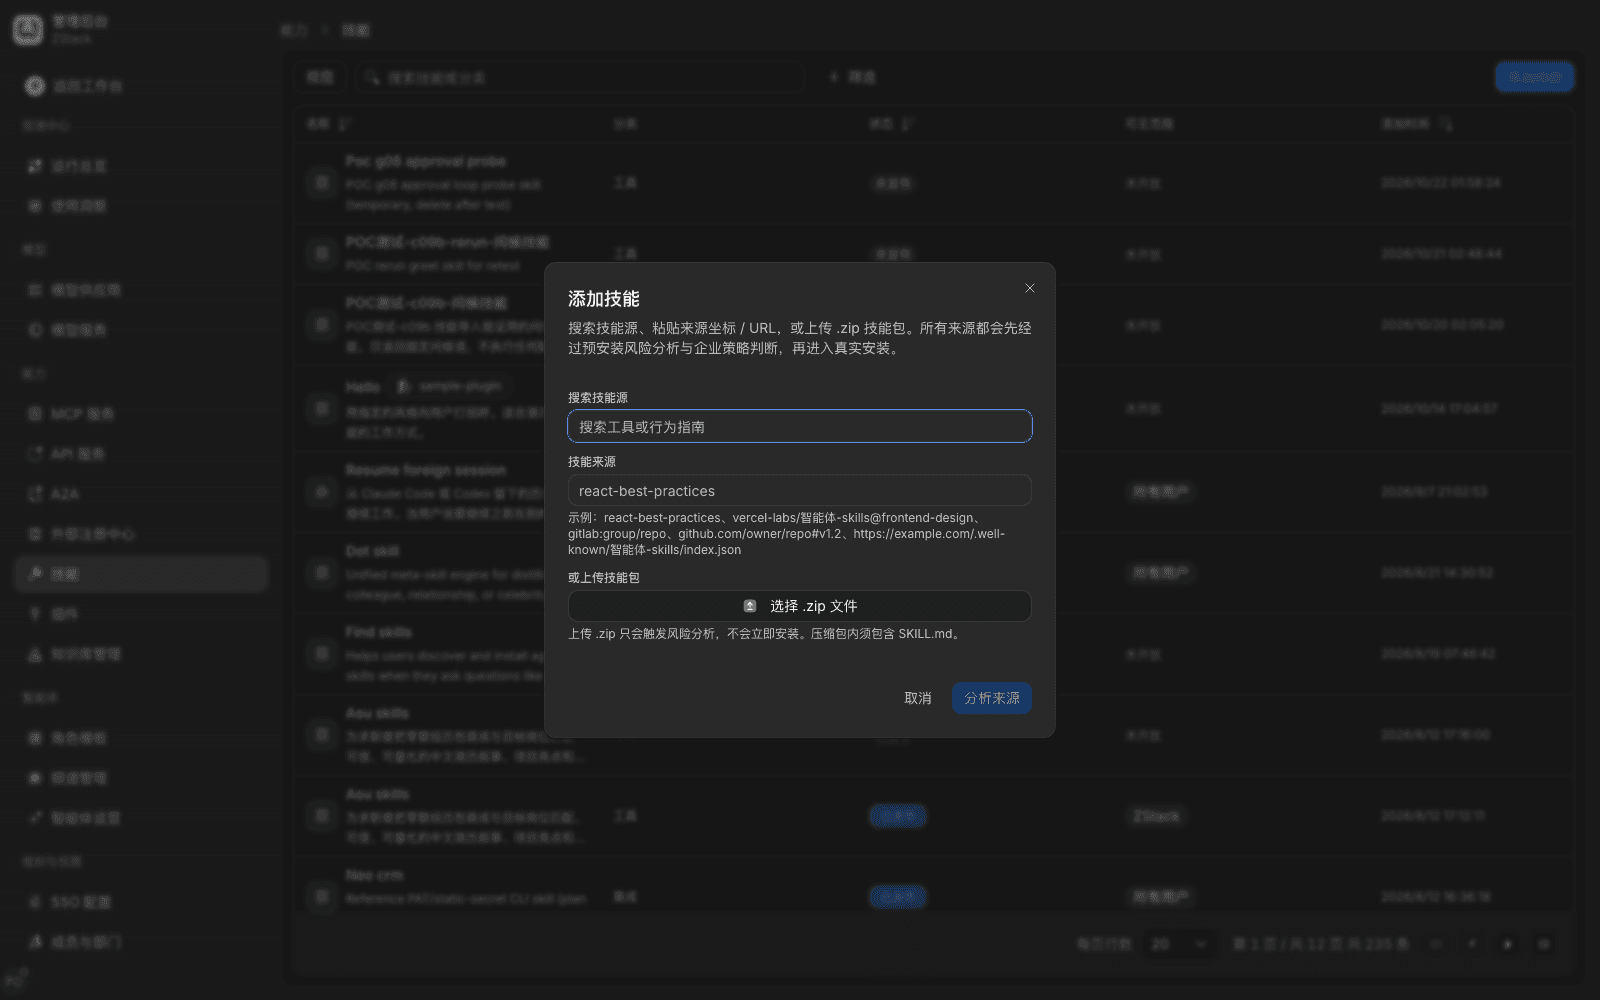
- Open Admin Console › Capabilities › Skills and choose Add skill. Pick a source on one of three tabs:
- Search skill sources: type at least 2 characters. Results list skill name, source repository, and install count. Choosing a result starts parse; you do not click another button.
- Source URL: fill in a repository, directory, or index URL (spellings under Supported source spellings below), then choose Parse source.
- Upload .zip: pick a skill package that must contain
SKILL.md, then choose Parse source.
- After parse, the left column top shows a source summary, for example GitHub · vercel-labs/agent-skills · commit 3f2a1c9. The candidate table below lists all skills in that source, 20 per page, searchable by name. Each row shows skill name, description, and directory path. Skills not yet analyzed show a file count in the Conclusion column. At this point only the skill index was read; no skill has been analyzed.
- Tick skills to import and choose Analyze selected (n not analyzed). Only ticked skills that have not been analyzed are analyzed; already analyzed ones are not analyzed again. At most 20 skills per analysis; over that the button is unavailable, so analyze in batches.
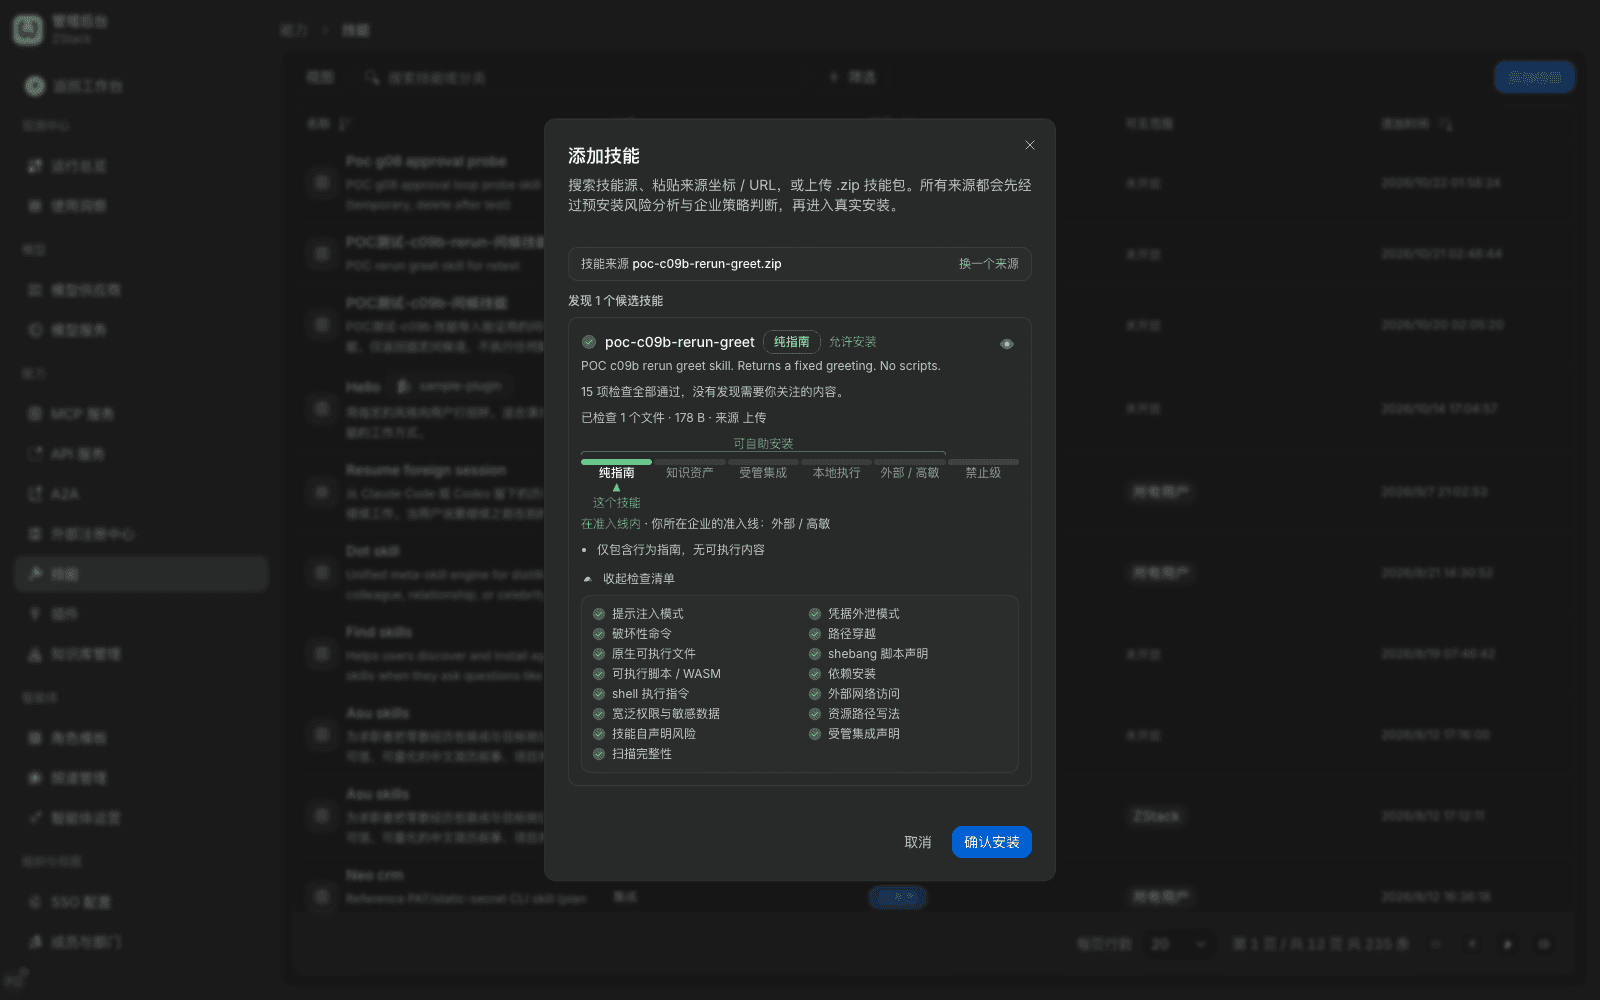
- Select a row in the candidate table. The right column shows that skill's analysis: risk level, admission conclusion, a 15-item checklist, the enterprise admission line on the risk scale, and all files in the skill package. A skill not yet analyzed says This skill has not been analyzed; tick it then click Analyze selected.
- Choose Import (n), n being the count of ticked skills that can be installed. The page says Skill installed. The new skill status is Unpublished, visibility Not open; at this point the Edit availability scope button cannot be clicked.
- On the Info tab turn on Publish, go back to the Available scope tab, tick members, choose validity, and save.
The following pre-tick one skill and automatically finish analysis while parsing, so you can check the result and import directly. For other skills in the same source, tick them then choose Analyze selected:
- You entered from a Search skill sources result;
- The source URL points to a concrete skill, for example
owner/repo@技能名, a skill-directory URL, or a skills.sh skill page; - The uploaded
.zipcontains only one skill.
What you will see: the risk-analysis result labels level, admission conclusion, and conclusions such as All 15 checks passed; nothing you need to attend to was found., and marks Your enterprise's admission line. After publish a Published badge appears in the header, effective scope shows Not distributed, and after you configure available scope it says Distribution saved.
Supported source spellings
| Spelling | Example | Meaning |
|---|---|---|
owner/repo | vercel-labs/agent-skills | A GitHub repository; lists all skills in the repository |
owner/repo@技能名, owner/repo/<目录或技能名> | vercel-labs/agent-skills@frontend-design | Same, and that skill is pre-ticked |
| GitHub repository or directory URL | https://github.com/owner/repo, https://github.com/owner/repo/tree/v1.2/skills/x | A directory URL takes content from the branch, tag, or commit in it, and pre-ticks skills under that directory |
| GitLab repository or directory URL | https://gitlab.com/group/repo, gitlab:group/repo, https://gitlab.com/group/repo/-/tree/main/skills/x | Same |
| skills.sh skill page | https://skills.sh/owner/repo/skill | Parses the repository that skill is in, and pre-ticks that skill |
| Other git repository | https://git.example.com/team/skills.git | Any git repository reachable over HTTPS; git@host:owner/repo spelling is accessed over HTTPS |
| well-known index | https://example.com/.well-known/agent-skills/index.json | Lists all skills registered in the index |
| ClawHub skill page | https://clawhub.ai/skill/<技能标识> | Parses that skill |
| Archive-file download URL | https://example.com/pkg/my-skill.zip | Supports .zip, .tar.gz, .tgz; lists all skills in it |
| Local skill package | Pick a file on the Upload .zip tab | Must contain SKILL.md; uploaded content belongs only to this enterprise |
- Writing only a skill name (for example
react-best-practices) does not count as a source: same-named skills may belong to several repositories, so it cannot tell which to take. The page says This source cannot be recognized. Enter a repository URL or owner/repo; to search by name use Search skill sources. - The URL cannot contain account passwords. Archive, index, and other git-repository URLs cannot carry query parameters (for example a signed temporary download link).
- When the specified skill does not exist in the repository, the candidate table still lists all skills, and under the source summary it says The repository has no skill named "x"; pick from the list below, until you change the source.
- One source contains at most 1000 skills. Over that it says This source contains too many skills (over 1000); enter a concrete skill-directory URL.
Tick and import rules
- The left of the bottom bar shows n selected. Tick state is kept after paging and search.
- Ticked skills that have not been analyzed are not imported. Next to the import button it says Another k unanalyzed skills will not be installed.
- Skills that cannot be installed after analysis (for example refused by enterprise policy, blocked by a security rule, malformed, or over the size cap) are automatically unticked and cannot be ticked again. The reason is in the Conclusion column.
- What is imported is the content obtained at analysis: confirm import does not visit the source again. Changes the source made after analysis do not enter this import.
- To change source, choose Change source. The page returns to the input area and keeps the original input.
Risk levels and admission conclusions
Risk levels from low to high: pure guide, knowledge asset, managed integration, local execution, external / high-sensitivity, forbidden. Admission conclusions:
| Admission conclusion | Meaning |
|---|---|
| Allow install | Risk level is inside the admission line |
| Refused by enterprise policy | Risk level is outside the admission line |
| Blocked by a security rule | Hit a forbidden item such as prompt injection, credential leak, destructive command, path traversal |
| Scan incomplete, treated as high risk | The check could not finish completely |
| Analysis failed | The source cannot be parsed or downloaded |
Re-import from source (update a skill)
When the skill source has a new version, update one by one on the skill detail:
- Open the skill detail and choose Re-import from source. The page opens Add skill, automatically parses the latest commit of that skill's source, and pre-ticks the original skill.
- In the candidate table only the original skill's row can be ticked. Other skills show Re-import can only update the original skill.
- When the content is the same as the installed version, that row shows Same as the installed version, the bottom says Same as the installed version; no update needed, and you can only choose Cancel.
- When the content changed it is analyzed automatically. After you check the result and confirm, the original skill is replaced with the new version.
- Only skills that recorded a source show Re-import from source. Early skills whose source URL cannot be recognized do not show that button; the source row shows Source URL cannot be recognized; delete then add again.
- Skills imported by uploading a
.ziphave no source that can be visited again. To update, upload a new skill package.
Common problems and what to do
| Stage | Situation | What to do |
|---|---|---|
| Parse | The source box says This source cannot be recognized | Change to a repository URL or owner/repo. If you only know the skill name, switch to Search skill sources and look up by name |
| Parse | It says That repository or branch cannot be found; check the URL | Check the repository URL and branch or tag name. A private repository cannot be accessed directly; pack as .zip and upload |
| Parse | It says This code host does not support on-demand fetch; upload a .zip instead | Download the skill directory locally, pack it, and switch to Upload .zip |
| Parse / analyze | It says Too frequent; try again later | Wait then choose Retry. Ticked skills stay as they are |
| Parse / analyze | It says Cannot connect to the code host for now | Choose Retry. If it keeps failing, confirm the platform network can reach that host |
| Parse | The source exceeds a size cap; the prompt names the over-limit items and the cap | Change to a URL that points to a concrete skill directory, or pack after you trim |
| Parse | It says No skill was found in this source (it must contain SKILL.md) | Confirm the directory the URL points to has SKILL.md |
| Parse | The URL points to an intranet or reserved address and is intercepted by the platform | The platform does not visit intranet URLs. Use a publicly reachable source, or pack as .zip and upload |
| Analyze | A single skill is malformed or over the cap | That row cannot be ticked; the reason is in the Conclusion column. Tick other skills and continue |
| Analyze | It says No candidate skill can be self-installed | All selected skills were refused by enterprise policy or blocked by a security rule. Adjust the install-admission policy, or choose Change source |
| Paging | The candidate table failed to load | Choose Retry in the table |
| Any | It says Source parse has expired; parse again | Parse results are kept for 24 hours. Choose Parse again; originally ticked skills are pre-ticked again |
| Import | Import is refused; the prompt states the reason | Adjust ticks as prompted then confirm; tick contents are kept |
Note
- Risk analysis is based on rule matching; it does not execute skill content. The tenant admission line defaults to external / high-sensitivity and cannot be set to forbidden.
- Editing a skill takes effect directly; there is no compare the diff then restart. To go back to the source version, choose Re-import from source, which also goes through risk analysis. Members can download the skill package on the skill detail; administrators view download records in Download records. One package is capped at 20 MiB.
- The platform only visits public sources that can be read without signing in. It does not store code-host accounts or tokens.
12.8 Import and export an agent plugin package
When to use: pack skills and remote MCP services into a standard zip so you can migrate between platforms, or give it to an agent tool that supports plugins to install as a whole.
Export as a plugin
- Open Admin Console › Capabilities › Plugins, choose Export as plugin, fill in Plugin name (lowercase letters, digits, and hyphens only), Version, Description, License.
- Tick components under Skills and MCP Services (only remote MCP services can be exported).
- Choose Preview, check components and skill IDs. The page says The artifact contains no credentials; the target side must configure them. Choose Export to download a zip, or Save to platform.
The export contains plugin.json, .claude-plugin/plugin.json, MCP configuration (only service type and URL), and skills/<技能标识>/SKILL.md. It does not contain credentials, available scope, or fixed values.
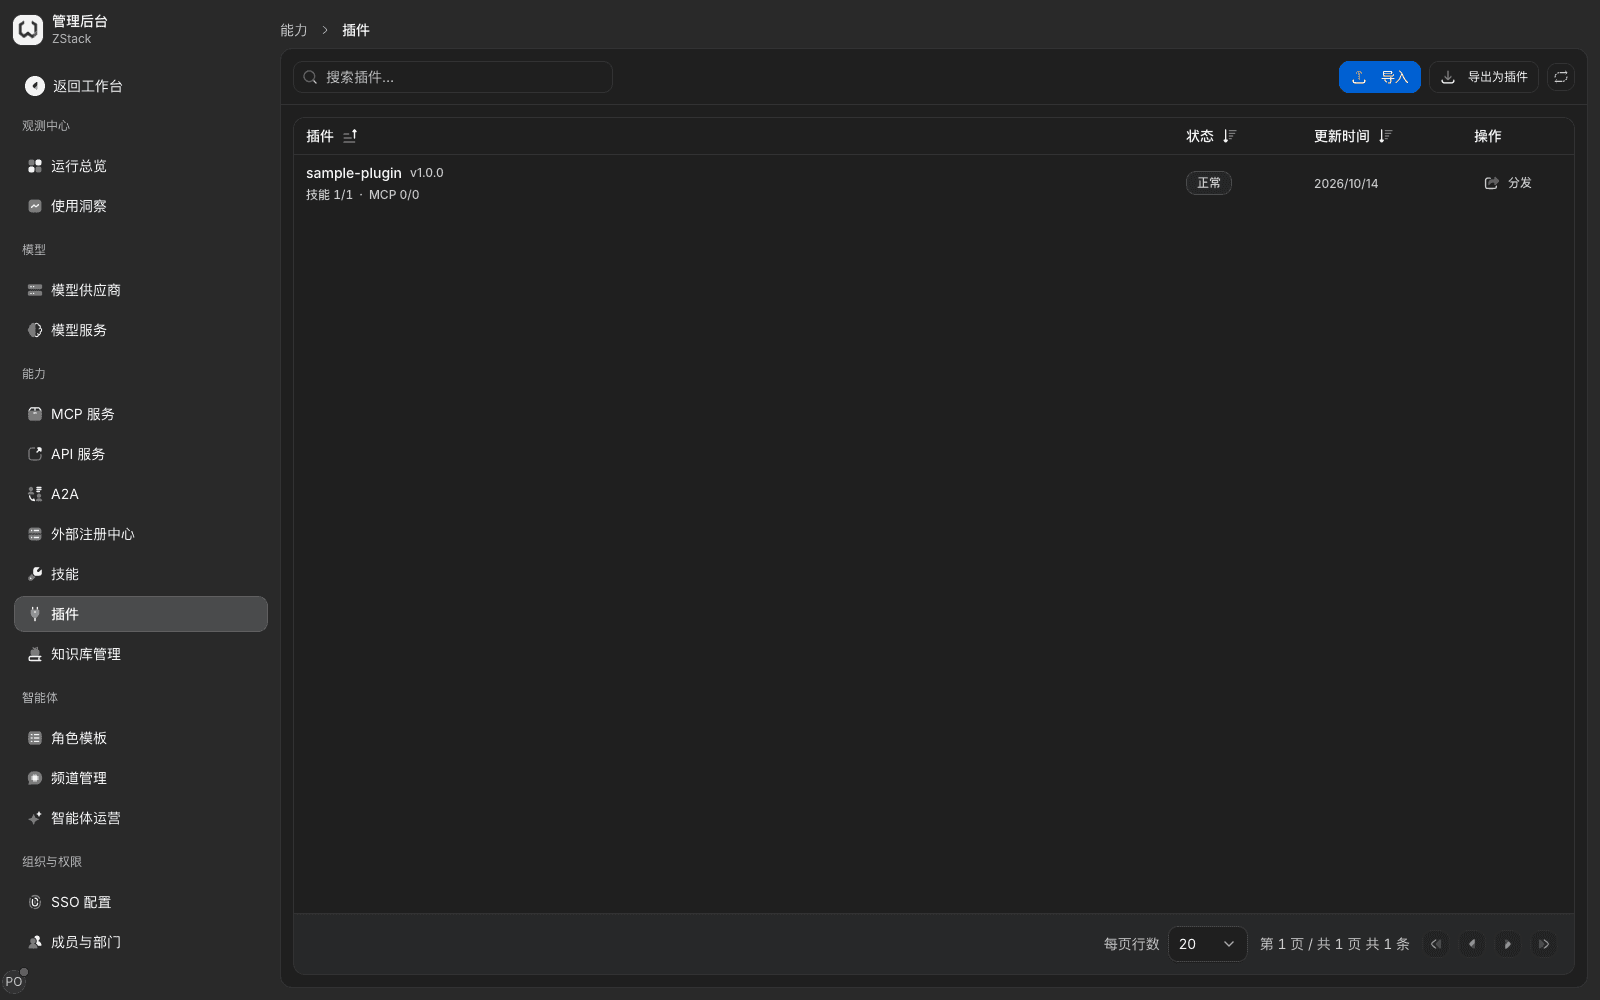
Import a plugin package: on the Plugins page choose Import, upload a .zip plugin package, tick components to import in the preview, then choose Import.
What you will see
- After a successful import the plugin immediately appears in the Plugins list with a component count, for example Skills 1/1 or Skills 1/1 · MCP 1/1. Skills in the package enter the Skills list as Unpublished / Not open; MCP services in the package enter the MCP Services list as Unpublished.
Note
- Skills in the package and skills imported directly use the same pre-install check. Outside the admission line or hitting a forbidden item refuses the import.
- The package manifest must carry
$schema. Missing it promptsmanifest_invalid (required field $schema is missing). Missing$schemainmcp.jsonreportsmcp_config_invalid. When the$schemaversion is unsupported, preview shows 0 available components and nothing is stored. - Imported components must each have credentials configured, be published, and be distributed before they can be used. Visibility on the plugin overview is This tenant. A duplicate plugin name refuses import; rename and retry, or delete the old plugin first.
12.9 Sync an external registry
When to use: the enterprise already uses Nacos to manage A2A agents and MCP services, and you want to bring them under gateway governance in bulk instead of connecting one by one.
Prerequisites: Nacos provides the AI registry-management APIs (/nacos/v3/admin/ai/a2a, /nacos/v3/admin/ai/mcp), and the platform can reach its URL. When authentication is on, provide an account that can read the target namespace.
Procedure
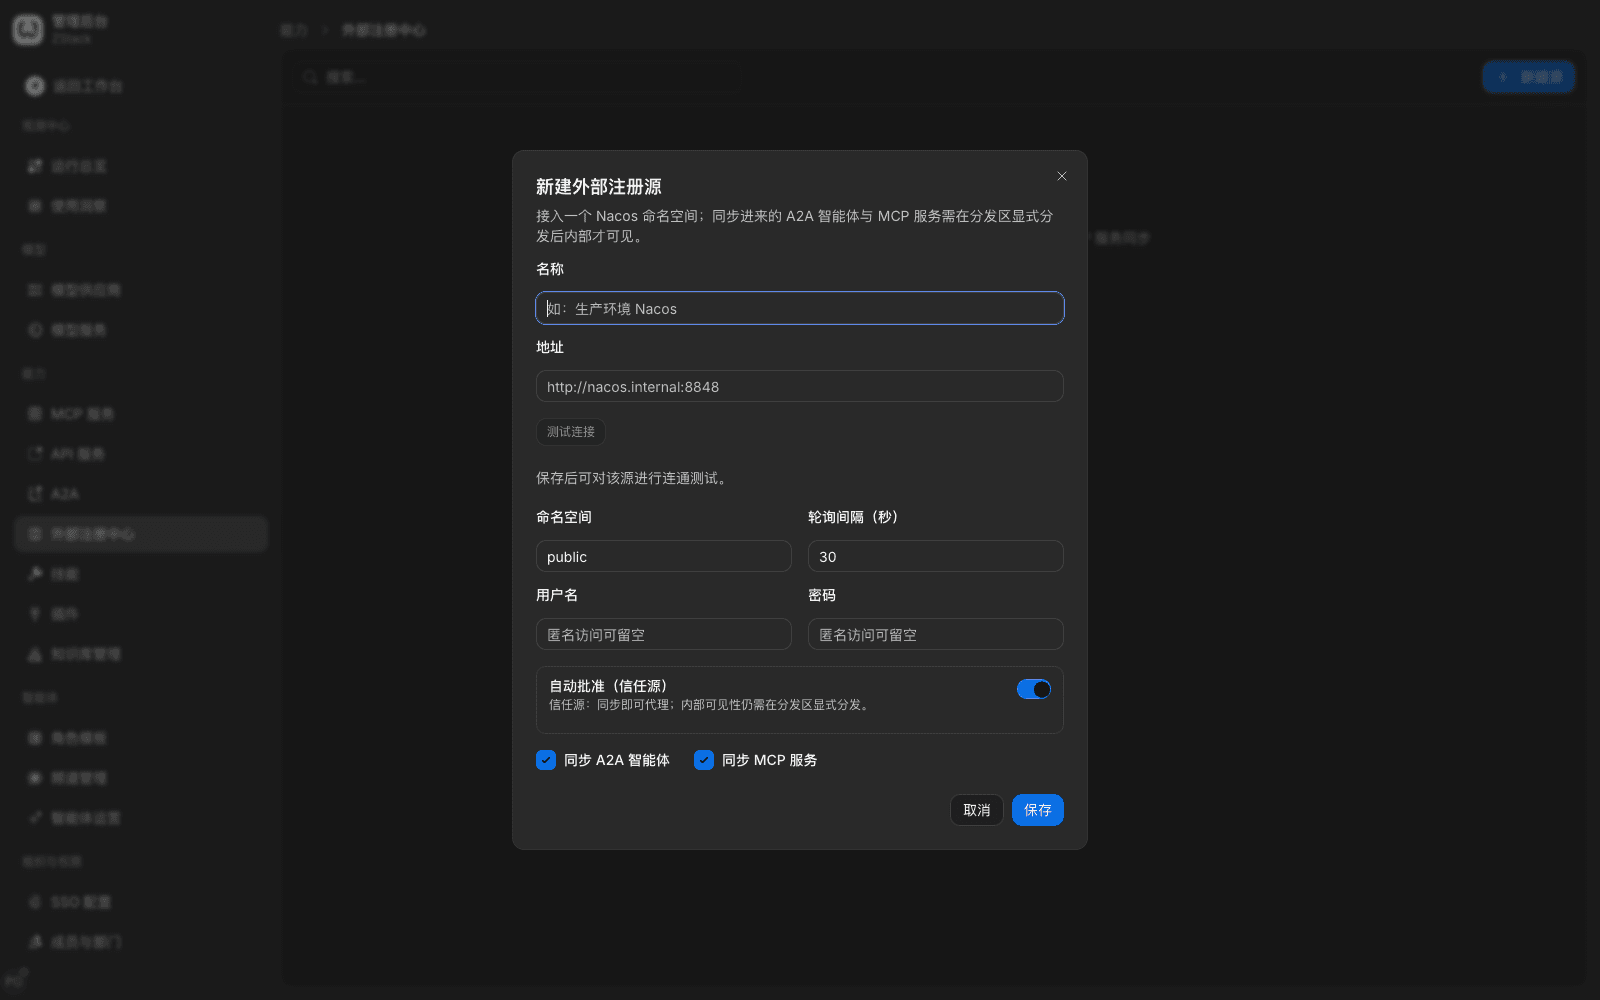
- Open Admin Console › Capabilities › External Registries, choose New source, fill in the fields below, then choose Save.
| Field | Meaning | Default |
|---|---|---|
| Name | Registry-source name | — |
| URL | Nacos server URL, for example http://nacos.example.com:8848 | — |
| Namespace | Namespace to sync | public |
| Poll interval (seconds) | Automatic sync period | 30 |
| Username / password | Can be empty for anonymous; must be filled as a pair | Empty |
| Auto-approve (trusted source) | Synced entries skip per-item approval | On |
| Sync objects | Sync A2A agents / sync MCP services | Both ticked |
- After save, in the row-end More actions › Edit choose Test connection, check how many A2A agents, MCP services, and skipped templates can be synced, then choose Sync now or wait for automatic sync at the poll interval.
What you will see
- The list shows health, last sync time, and created time. After create, health is Unknown. Test connection returns how many can be synced; on failure it gives a reason and a suggestion. When Sync now fails, the health column becomes Degraded.
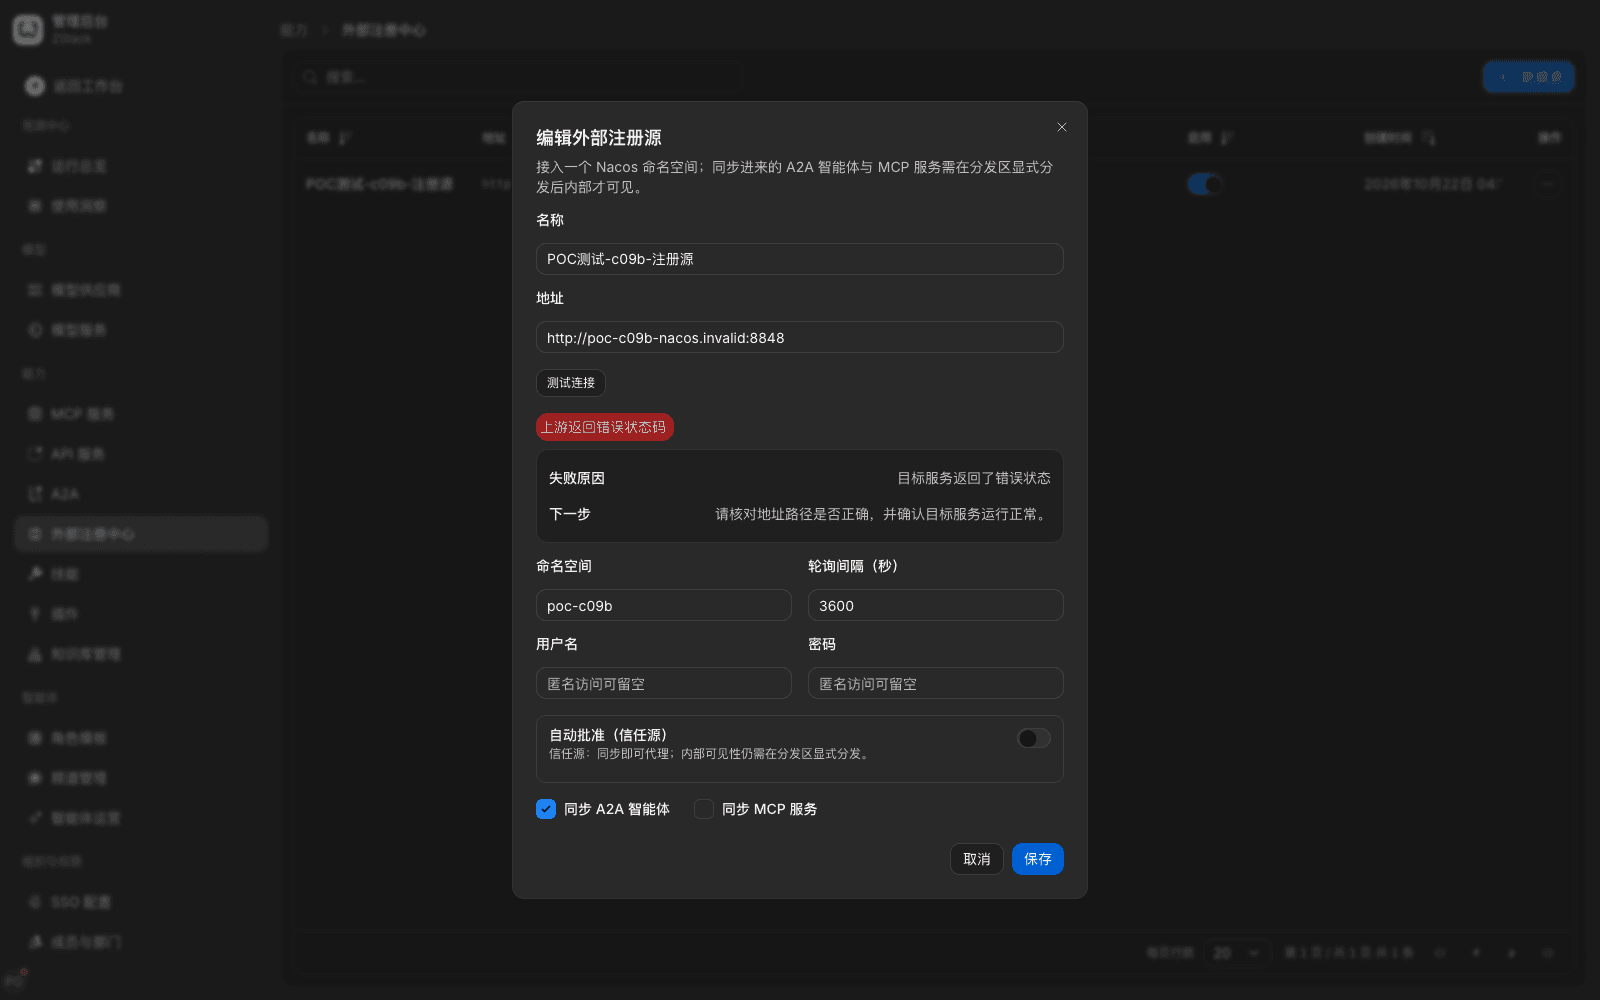
Sync rules
- Synced agents and MCP services still need to be explicitly distributed in their own Available scope before members can see them. When Auto-approve is off, agents enter the catalog as Pending approval.
- Syncing the same entry again updates the original record. An upstream is treated as deleted only after it is missing from two consecutive polls. When a single sync is empty or deletes more than half the entries, deletes are paused and it is marked Degraded.
- Synced agents cannot be deleted one by one; they are managed uniformly through the registry source.
12.10 Plugin catalog, version binding, and execution statistics
When to use: manage gateway-side extension plugins: browse the catalog, download a development package, view versions and execution.
Procedure
- Open Admin Console › Traffic › Gateway extensions. The plugin list shows type and capabilities, current version, status, binding count, credential-binding count, and last updated.
- Choose Download SDK, pick a development language (Lua or Rust), fill in a plugin ID, then download.
- Open the plugin's Manage, and view Overview, Versions, Execution statistics, Bindings in turn.
What you will see
- Overview shows runtime, declared hooks, failure policy, visibility, and install status. Built-in and self-built plugins are in the same list.
- The SDK contains
manifest.json(declaringschemaVersion,hostApiVersion, runtime, hooks, supported service types, and failure policy), sample code, and the SDK runtime. - The Versions page shows current version, source version, channel, artifact ID, and digest, and provides Upload a new version. Version history keeps artifacts so you can switch back.
- Execution statistics give execution counts and conclusion distribution per hook, listing time, hook, conclusion (for example Rewrite · force), reason, latency, and binding one by one; you can click into request detail.
- On the Bindings tab, Create binding can set service type (model group / MCP / API / A2A), scope, caller, and configuration overrides.
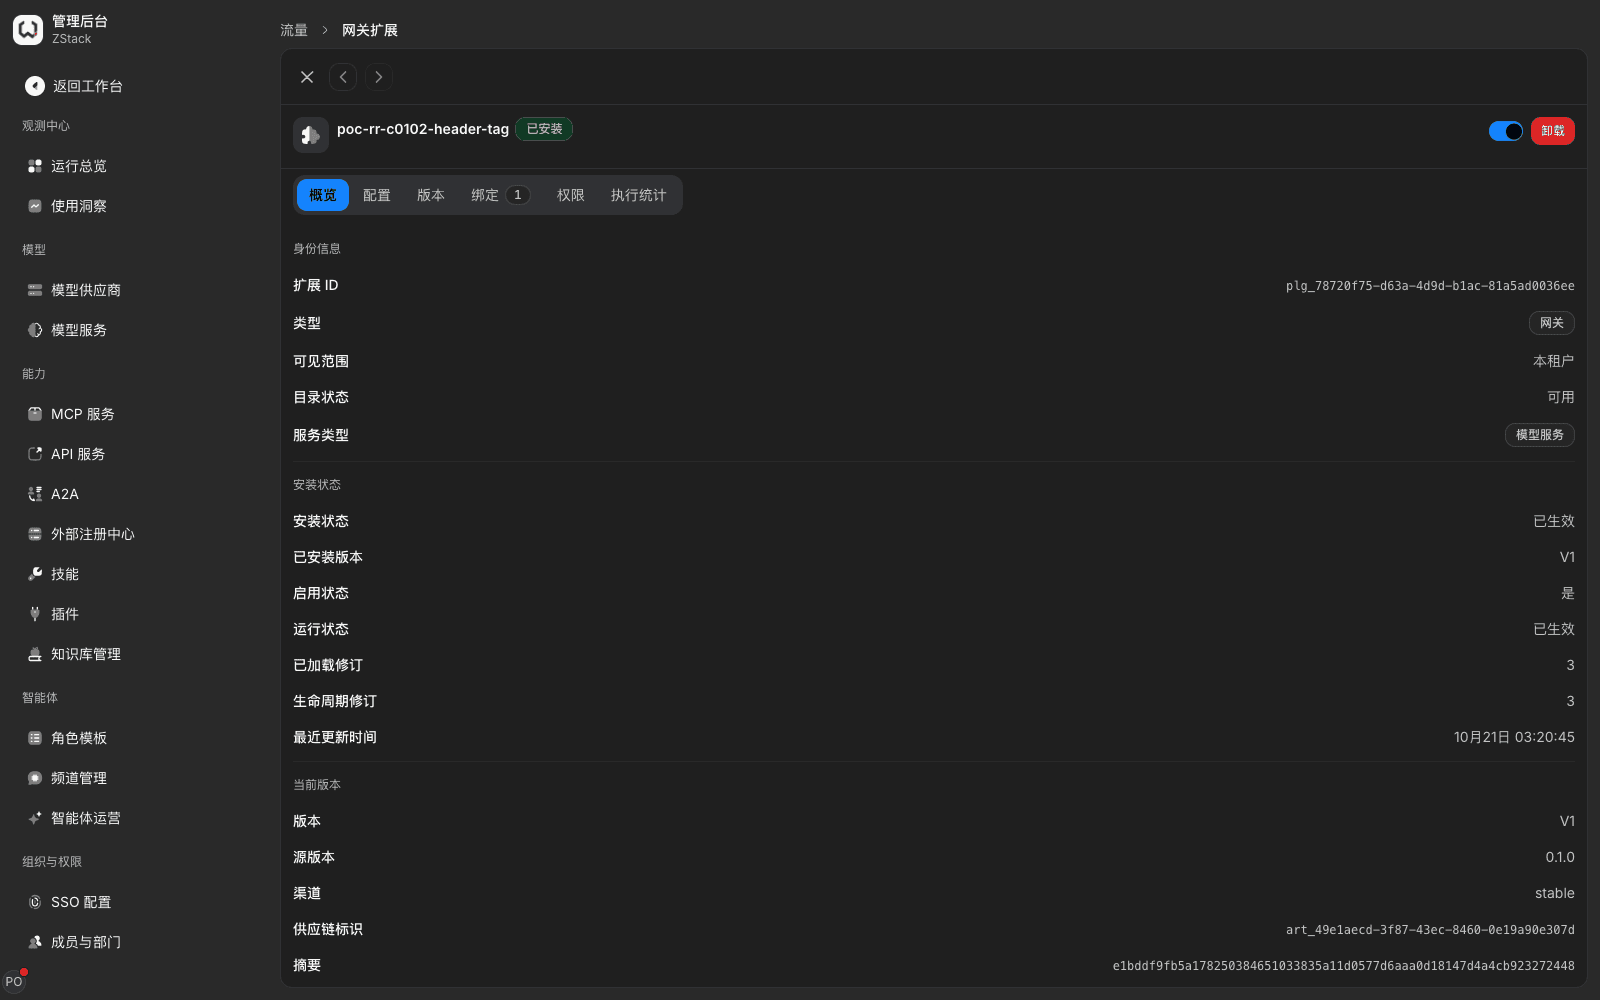
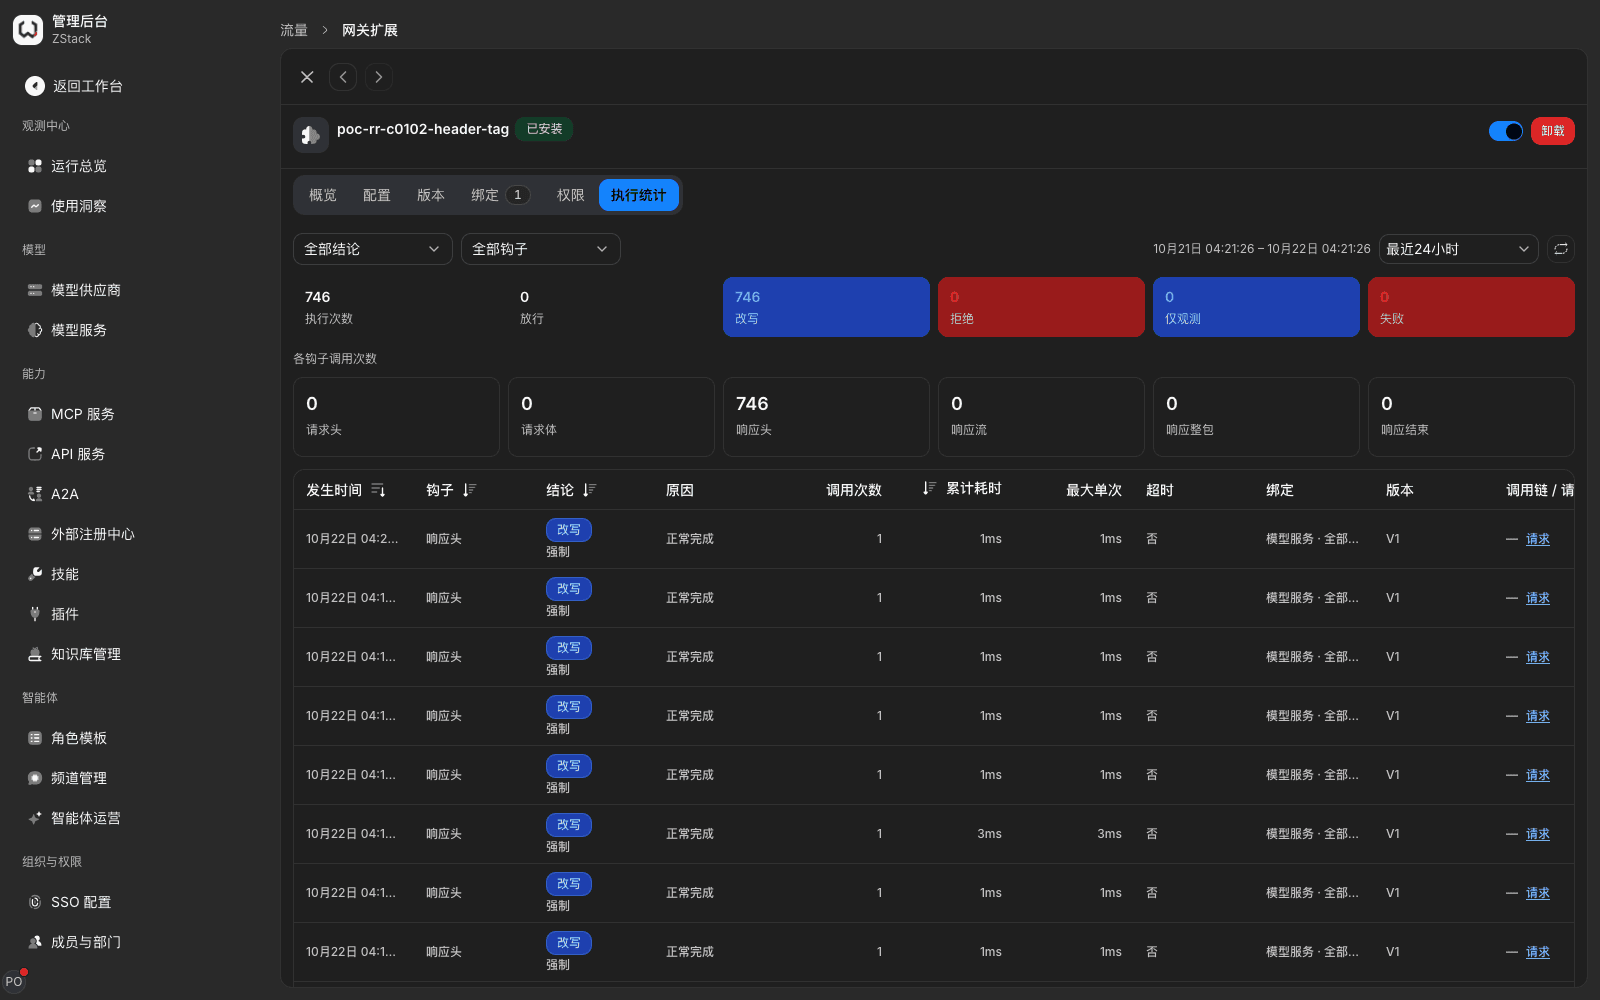
Note
- Failure policy is declared by the plugin manifest (fail open / fail closed). Security-critical plugins should declare fail closed; check it on overview after install. When binding scope is All services, services added later are also covered.
- An uploaded plugin package is checked at the entry for package format, manifest version, host API version, and
$schema. Illegal packages are refused.
12.11 Built-in policy plugins and disposition actions
When to use: without writing code, finish policies such as request intercept with built-in traffic-rule actions.
Procedure
- Open Admin Console › Traffic › Traffic rules and choose New rule.
- Add condition to narrow the rule, for example Model equals a model plus a Request header condition.
- Add disposition action choose Deny this call, fill in a reason code, choose Save rule, check field diffs and hit order in the confirm dialog, then Confirm and apply.
What you will see
- A call that hits the rule returns HTTP
403, body containingcode: permission_denied,deniedBy: routePolicy, and the custom reason code. Calls that do not hit return a result as usual.
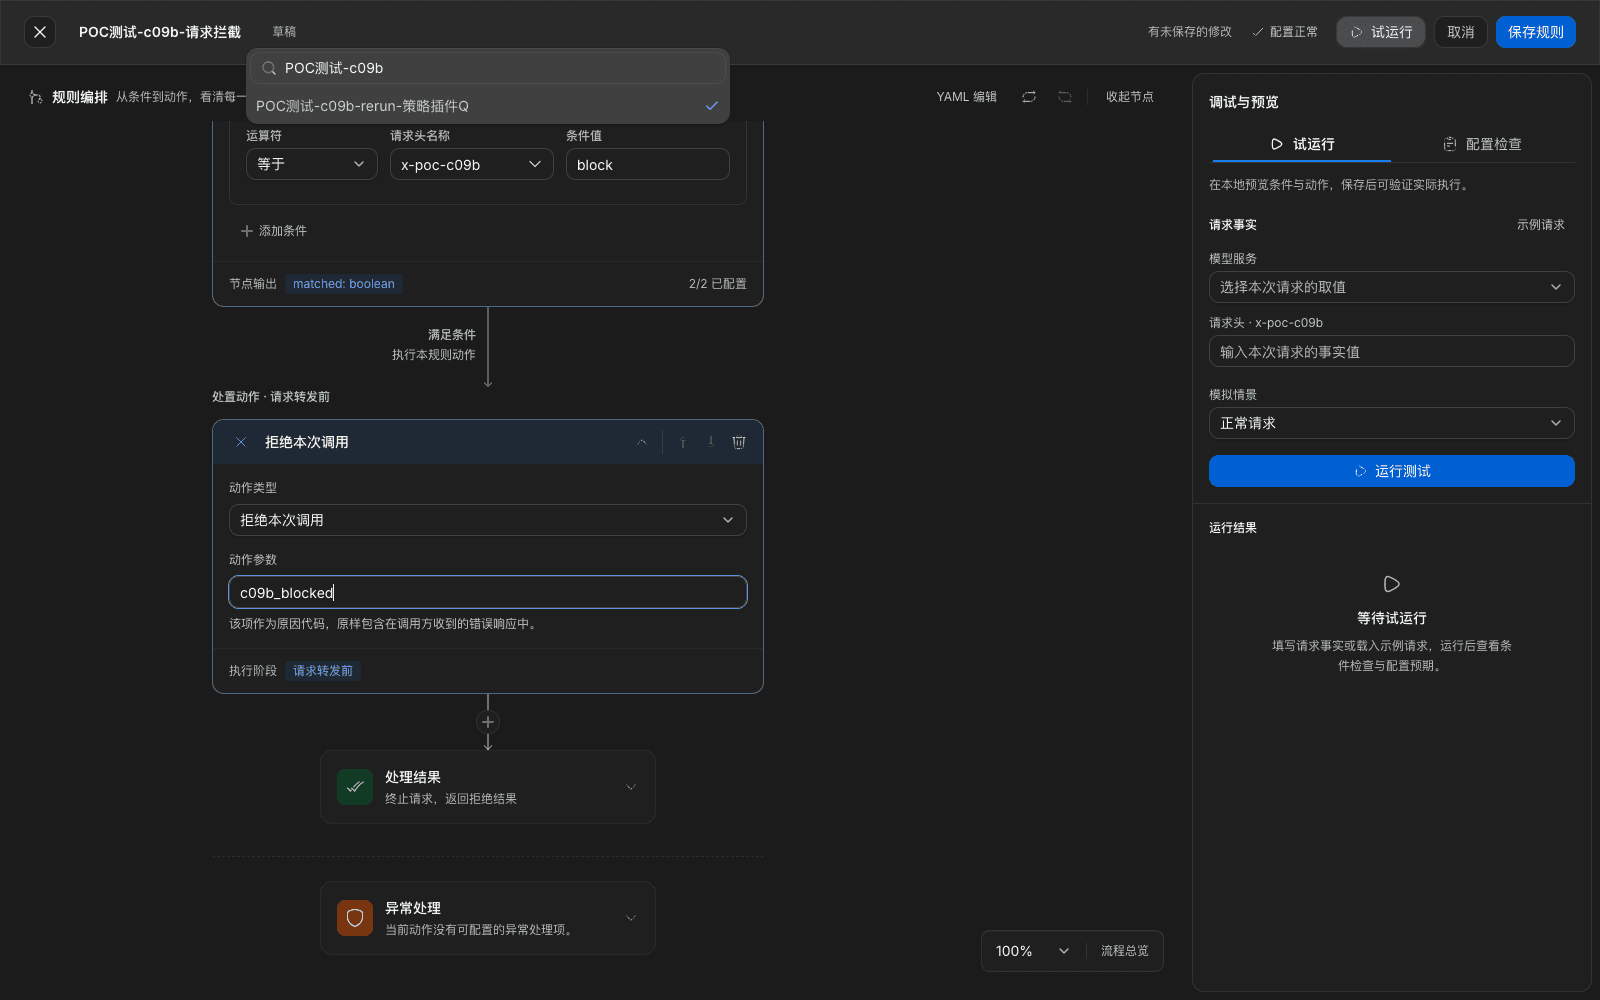
Disposition-action list
| Group | Available actions |
|---|---|
| Before forwarding the request | Per-request token cap, request-body size cap, content detection (guardrail), Apply limits, rewrite request headers / fields / body, Prompt |
| After receiving the upstream response | Rewrite response headers, status-code mapping, rewrite response fields, mirror copy |
| Other | Deny this call, Forward to, Mount plugin, Semantic cache, Reasoning instruction, Conversation-switch protection, Shadow dispatch, Allow |
Note
- Denied calls do not appear in Operations overview › Requests; that list only shows completed calls. To check intercept effect, view the rule's hit records.
- For replay protection, use Mount plugin to mount a self-built plugin, or validate request uniqueness on the upstream side. When you use a Caller condition, you must also narrow Call type to one kind.
12.12 Manage a client's access configuration
When to use: give observability and access configuration to members so they can connect the platform in a local client.
Procedure
A member opens workspace › My clients, chooses New client, and fills in Basic information and Keys and configuration in two steps. Client types are chosen by group:
| Group | Clients |
|---|---|
| Reporting (generic observability protocol) | Waner, Claude Code, Codex, Grok, OpenCode, generic observability protocol |
| Via ZenSwitch | Trae, Qoder, WorkBuddy (including CodeBuddy) |
Open the Configuration tab of an existing client detail and copy the access snippet.
What you will see
- The Configuration tab gives configuration you can paste: for Claude Code it is a set of
exportenvironment variables, including a telemetry switch, export protocol, platform collection URL, and request headers with a workspace ID and a key placeholder, with a Copy button next to them. - The Via ZenSwitch group note is Connected automatically by ZenSwitch; turn on session observability for that client in ZenSwitch. The key in the snippet is a placeholder; generate one separately and replace it by hand.
Note
- The web only provides Copy snippet → paste into the client. It does not rewrite local files and has no rollback button. Back up the original configuration before you change it.
- Clients in the Via ZenSwitch group must have the session-observability switch turned on inside ZenSwitch before they can report. Installers are obtained from the download site. If the list is empty, contact an administrator.
12.13 View agent runtime status and debug prompts
When to use: confirm the status of a running agent, or debug a prompt without affecting the live agent.
Procedure
- Open Admin Console › Agent operations. The list shows agent, status, service status, workspace, runtime version, upgrade status, node, and created time.
- Open the agent detail. The Overview and Events tabs give operations information. You can start, stop, restart, and re-push configuration.
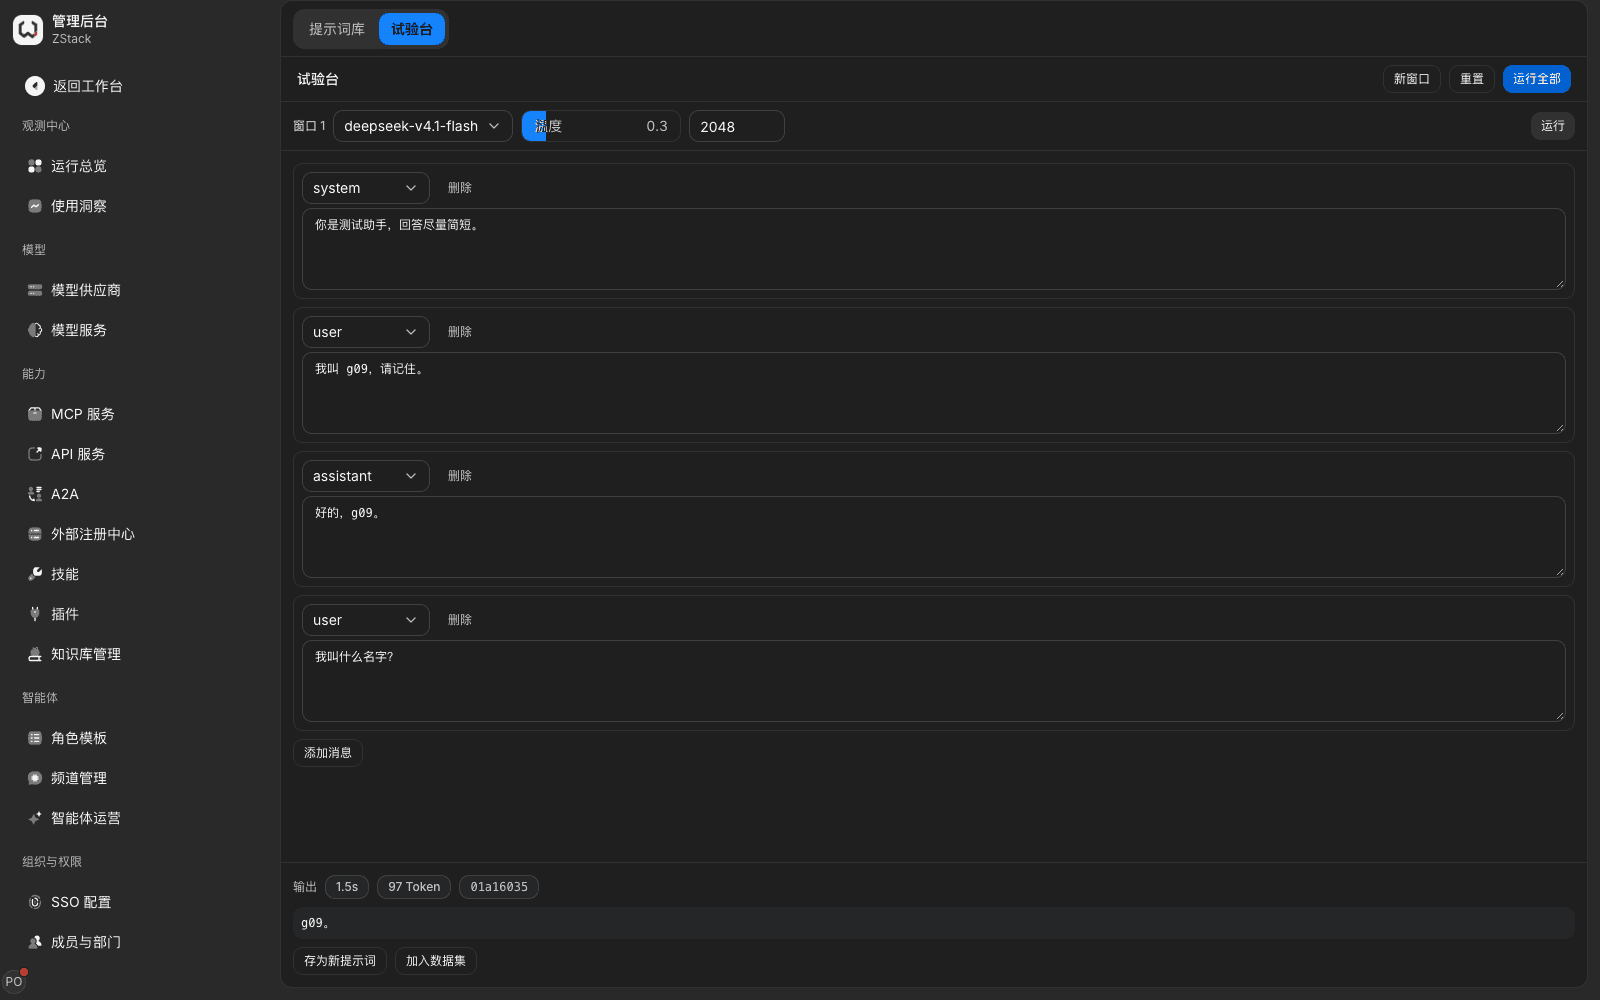
- To debug a prompt, open Prompt library › Playground, pick a model and max output length, construct multi-turn messages, then Run.
What you will see: Agent operations only provides an operations view. The playground can run a full multi-turn conversation; the result gives latency and token counts and keeps context, with New window, Run all, Save as a new prompt.
Note
- The playground calls the model directly and does not go through the agent, so there is no tool-call trace and you cannot single-step an agent flow. Real conversation traces are in workspace conversations and Observability.
- Stop and restart affect agents in live use. Confirm the blast radius before you operate.
Capability notes
| Not provided | Use instead |
|---|---|
| An in-Admin-Console agent-conversation debug panel (multi-turn conversation, tool-call traces, single-step) | Debug prompts in Prompt library › Playground (Section 12.13); real traces are in Observability |
| Set a call quota and max turns on a single agent | In a traffic rule, condition Caller type Agent, configure Apply limits to rate-limit. Max turns has no configuration item |
| A2A old method names and role spelling | Upgrade the client to A2A 1.0 SendMessage, GetTask, and ROLE_USER |
| Upstream mTLS, API-key authentication in a query parameter | Have the upstream switch to Bearer, API key, or basic authentication, then connect |
| Automatic sync from a registry other than Nacos; diff comparison when editing a skill | The former, connect one by one from a card (Section 12.1); the latter takes effect directly after edit, and to roll back choose Re-import from source |
| Bulk-check whether imported skills have a new version | On the skill detail choose Re-import from source one by one; when content is unchanged it says no update is needed (Section 12.7) |
| Import a skill from a private repository or a source that requires sign-in | Pack locally as .zip then upload (Section 12.7) |
| One-click write of local client configuration from the browser, with rollback | Copy the snippet and paste by hand; back up the original file before you change it (Section 12.12) |
| A built-in replay-protection action in traffic rules | Implement it with Mount plugin mounting a self-built plugin, or validate request uniqueness upstream |
| Sandbox resource isolation between plugins, and adjustable timeout parameters | Plugins run in a limited sandbox; caps and timeouts are fixed by the platform |
Previous: 11. Configure and distribute MCP services and API services · Next: 13. Configure sensitive-data (PII) detection
11. Configure and distribute MCP services and API services
Full-length chapter. Content is checked against the 2026.10 mainline code and the live console; menus and features depend on the current license, account permissions, and delivered environment.
13. Configure sensitive-data (PII) detection
Full-length chapter. Content is checked against the 2026.10 mainline code and the live console; menus and features depend on the current license, account permissions, and delivered environment.