4. Configure model providers
Full-length chapter. Content is checked against the 2026.10 mainline code and the live console; menus and features depend on the current license, account permissions, and delivered environment.
Back to overview · Full table of contents · Download full PDF
This chapter is for platform administrators and operators. It explains how to connect a public-cloud model platform, a third-party aggregator, or an enterprise-built inference service, and how to keep it stable and auditable. After this chapter you can create and verify a provider, choose the upstream interface format, maintain multiple accounts, adjust timeouts and retries, view probes and balance, attest upstream authenticity, run a performance test, and understand how configuration changes take effect.
A model provider records how the platform connects to an upstream model endpoint: provider type, request URL, model request format, call credentials (accounts), and enabled models. Models enabled under a provider are called upstreams. Each enabled upstream belongs to a model. Callers use the model's call name; the gateway then dispatches to its upstreams. Connecting a provider is therefore the first step of model access.
Entry: Admin Console › Models › Model Providers. Prices are maintained on the provider detail Model pricing tab. Categories are maintained on the Categories tab of Admin Console › Models › Models. Both are in Chapter 5.
Prerequisites: sign in as tenant administrator or a role that can manage providers, and you already have the upstream request URL and a valid credential. Enter credentials only in the credential fields on the page; do not put them in tickets or screenshots.
4.1 View the provider list
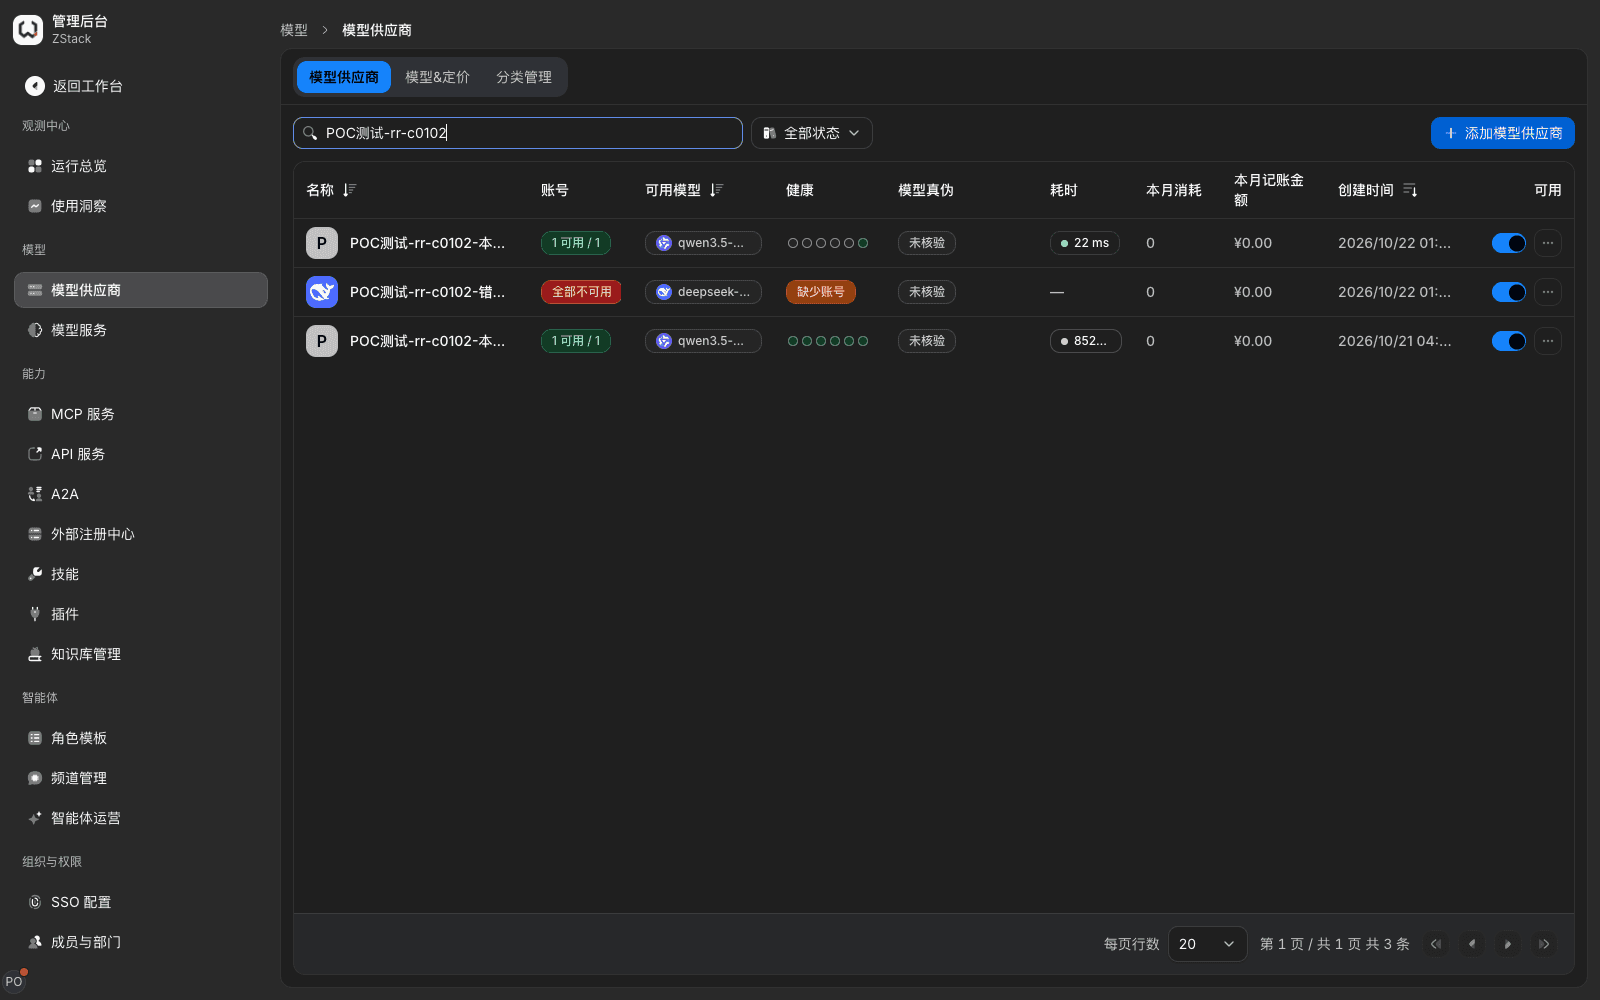
When to use: daily inspection, confirming whether each upstream is available, which models are enabled, and how much was consumed this month.
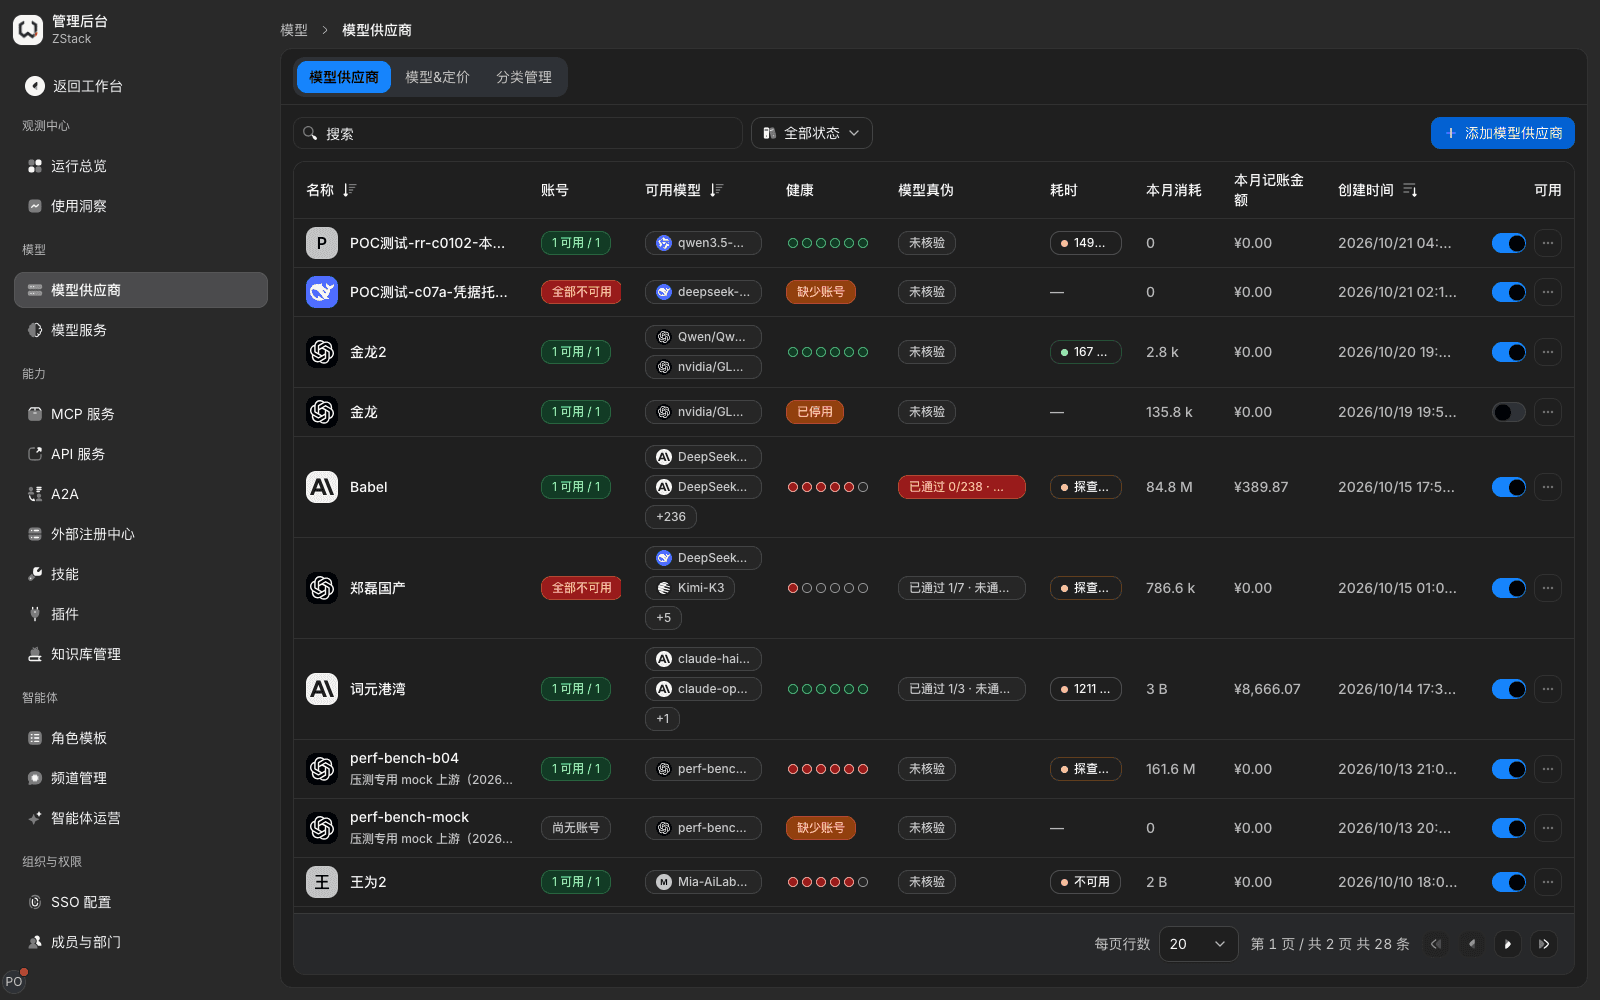
| Column | Meaning |
|---|---|
| Accounts | Available accounts / total accounts, for example 1 available / 1; when none are available it shows All unavailable · missing accounts |
| Available models | Enabled models, for example 1 · qwen3.5-plus |
| Health | Probe timeline for a recent window, one sample per cell |
| Model authenticity | Upstream authenticity attestation result; Not attested until attested (Section 4.7) |
| Latency | Connection delay of the latest probe, for example 22 ms |
| This month's consumption / This month's billed amount | Usage through this provider this month, and the amount recorded at selling prices |
| Available | Enable or disable this provider |
The search box at the top filters by name.
4.2 Create and verify a provider
When to use: first connection of a public-cloud model vendor, an aggregator, or an in-house inference service.
Prerequisites: you have the upstream request URL and a valid credential. Public-cloud vendor URLs are filled from the provider type; self-hosted services you fill in yourself.
Procedure
- On the Model Providers tab choose Add model provider and fill in Model provider name. In Description (optional) write purpose and owner.
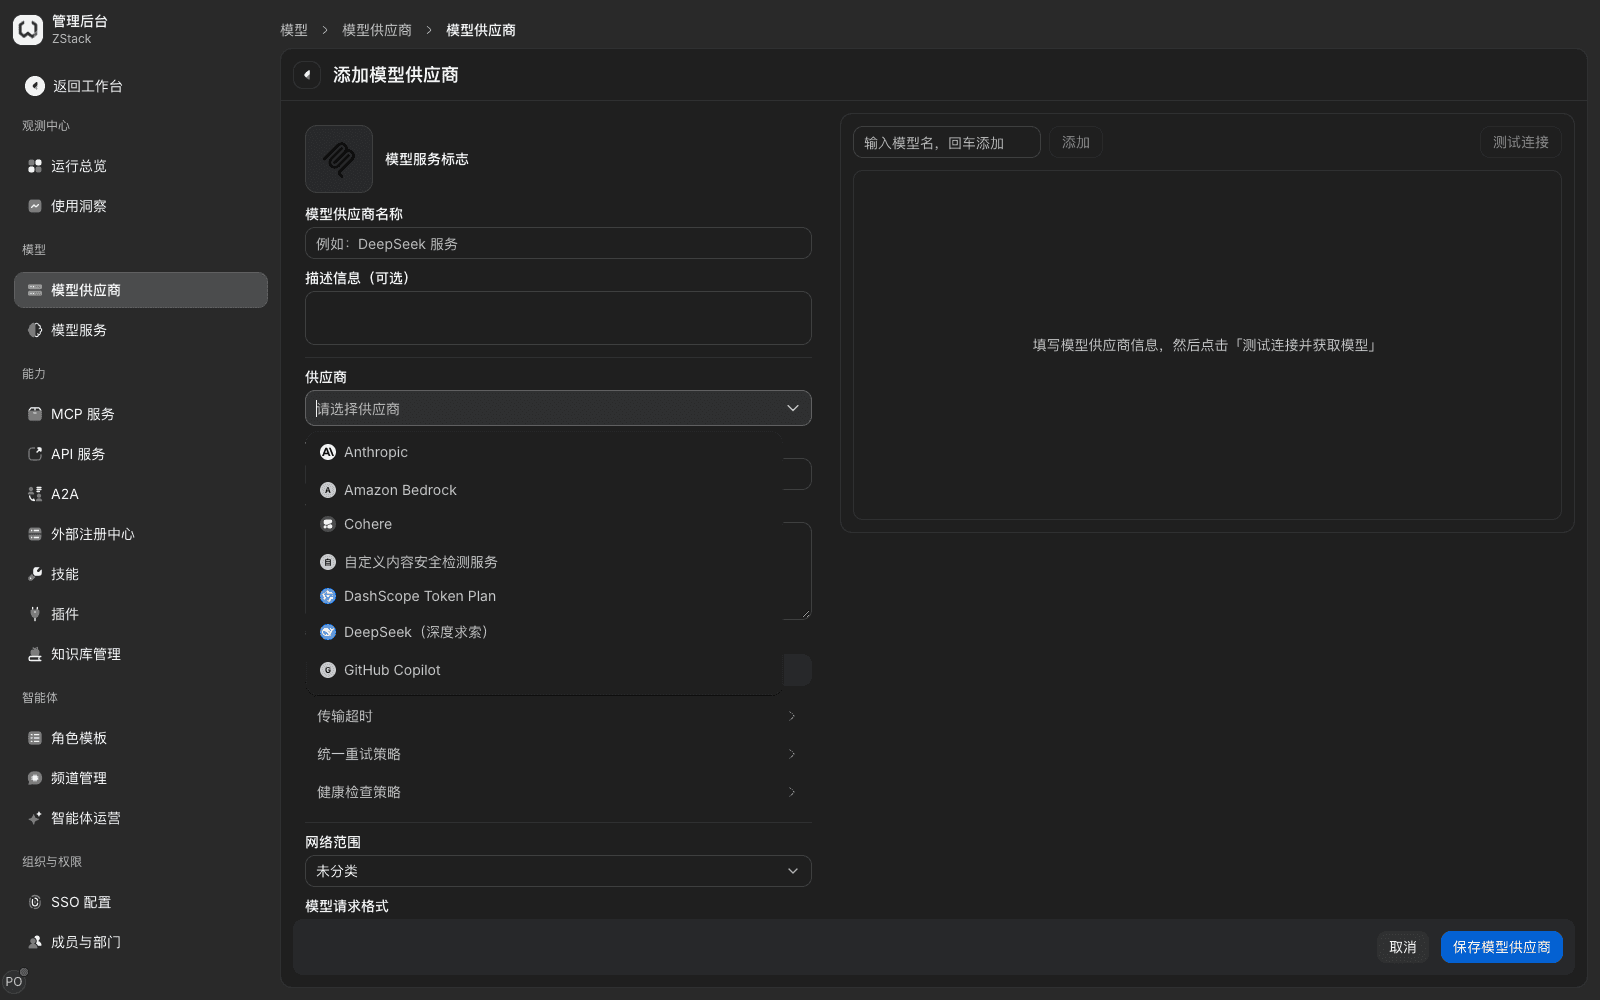
- In the Provider dropdown choose a provider type. The built-in catalog has 30 types covering domestic and overseas cloud vendors, aggregators, and local inference, for example OpenAI, Anthropic, DeepSeek, Tongyi Qianwen, and Local deployment.
- After you pick a type, Request URL is filled with the default; change it to the real endpoint.
- Fill in the credential under First account API key. After save it becomes an account (more accounts in Section 4.4).
- Choose Test connection and fetch models. This step only probes the connection; it does not save configuration.
- After a successful connection, enable the models you need. If the endpoint does not return a model list, type a name in Enter a model name and press Enter to add and press Enter.
- In the Will become model column, check each upstream's destination: same-name items default to attaching to that existing model; the rest default to creating a new same-name model, which you can rename. You can also tick model groups to join. Items attached to an existing model show impact (Section 6.1).
- Choose Save model provider.
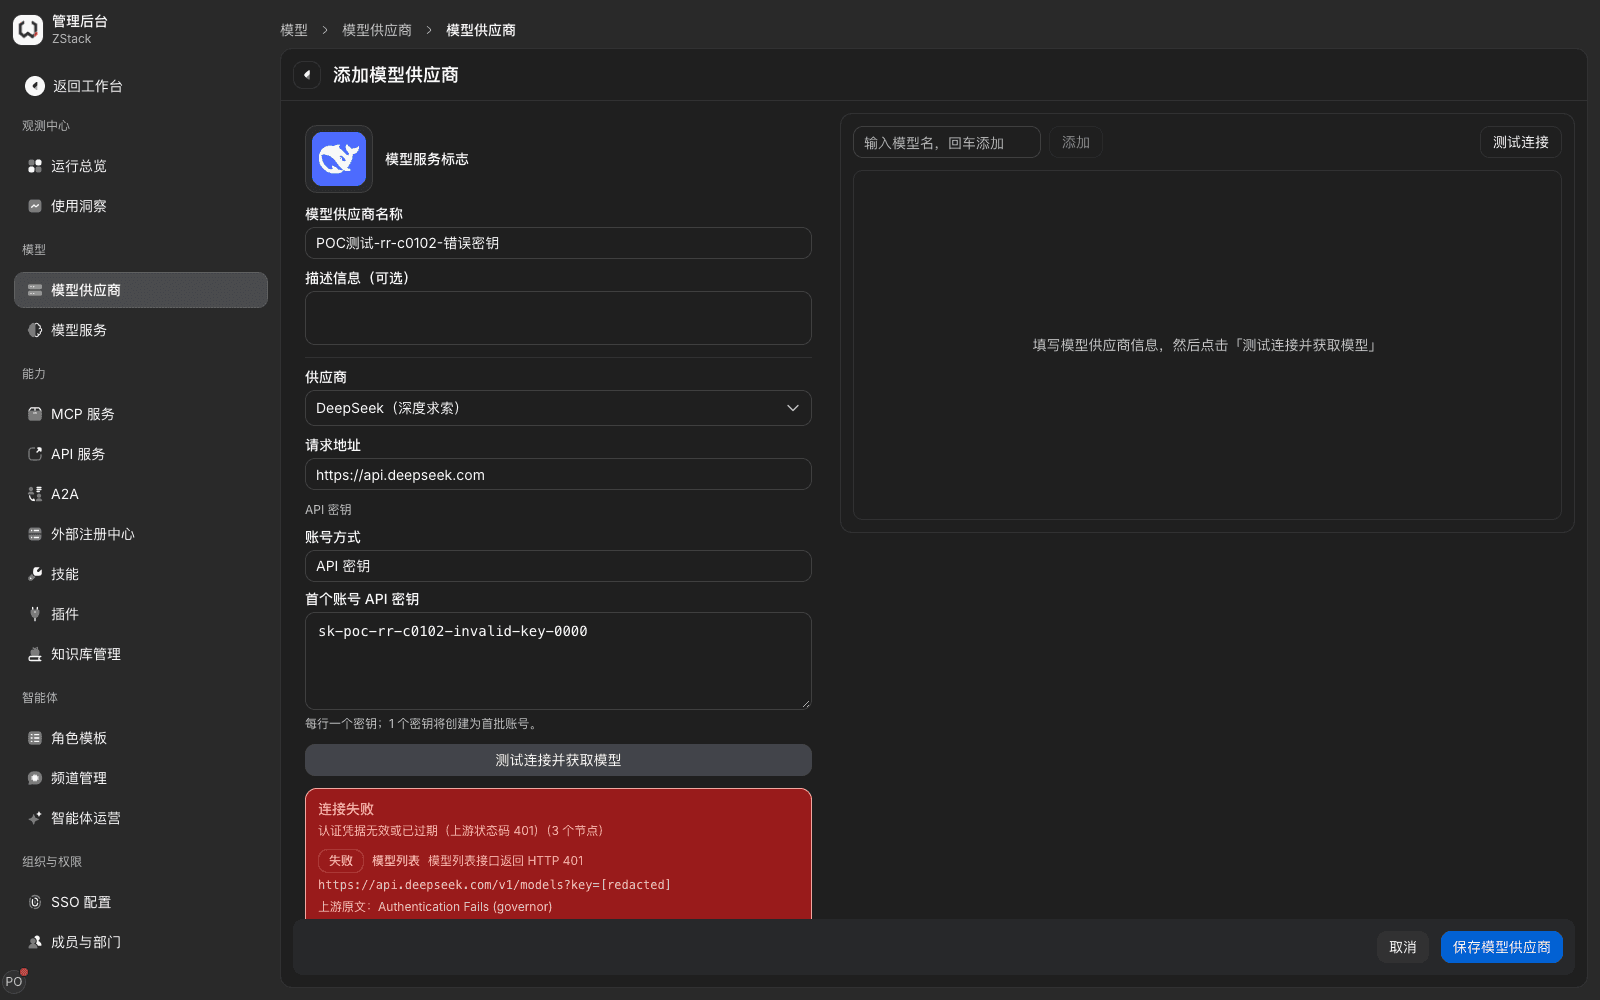
Prompts when connection fails: the page gives per-item detail, not only "failed". An invalid key prompts Connection failed: authentication credential is invalid or expired (upstream status 401), lists Model list and Chat results and the upstream original text by interface, and lists that all five tried key-passing methods (Authorization: Bearer, x-api-key, x-goog-api-key, api-key, ?key=) were refused, so you can confirm the problem is the key itself.
Admission check on save: save runs another upstream connection test. If it does not pass, the prompt is Upstream connection test did not pass; configuration has not taken effect, with Save anyway (N keys marked abnormal) on the right. If you choose that, configuration is saved; keys that did not pass are marked abnormal and do not take part in calls.
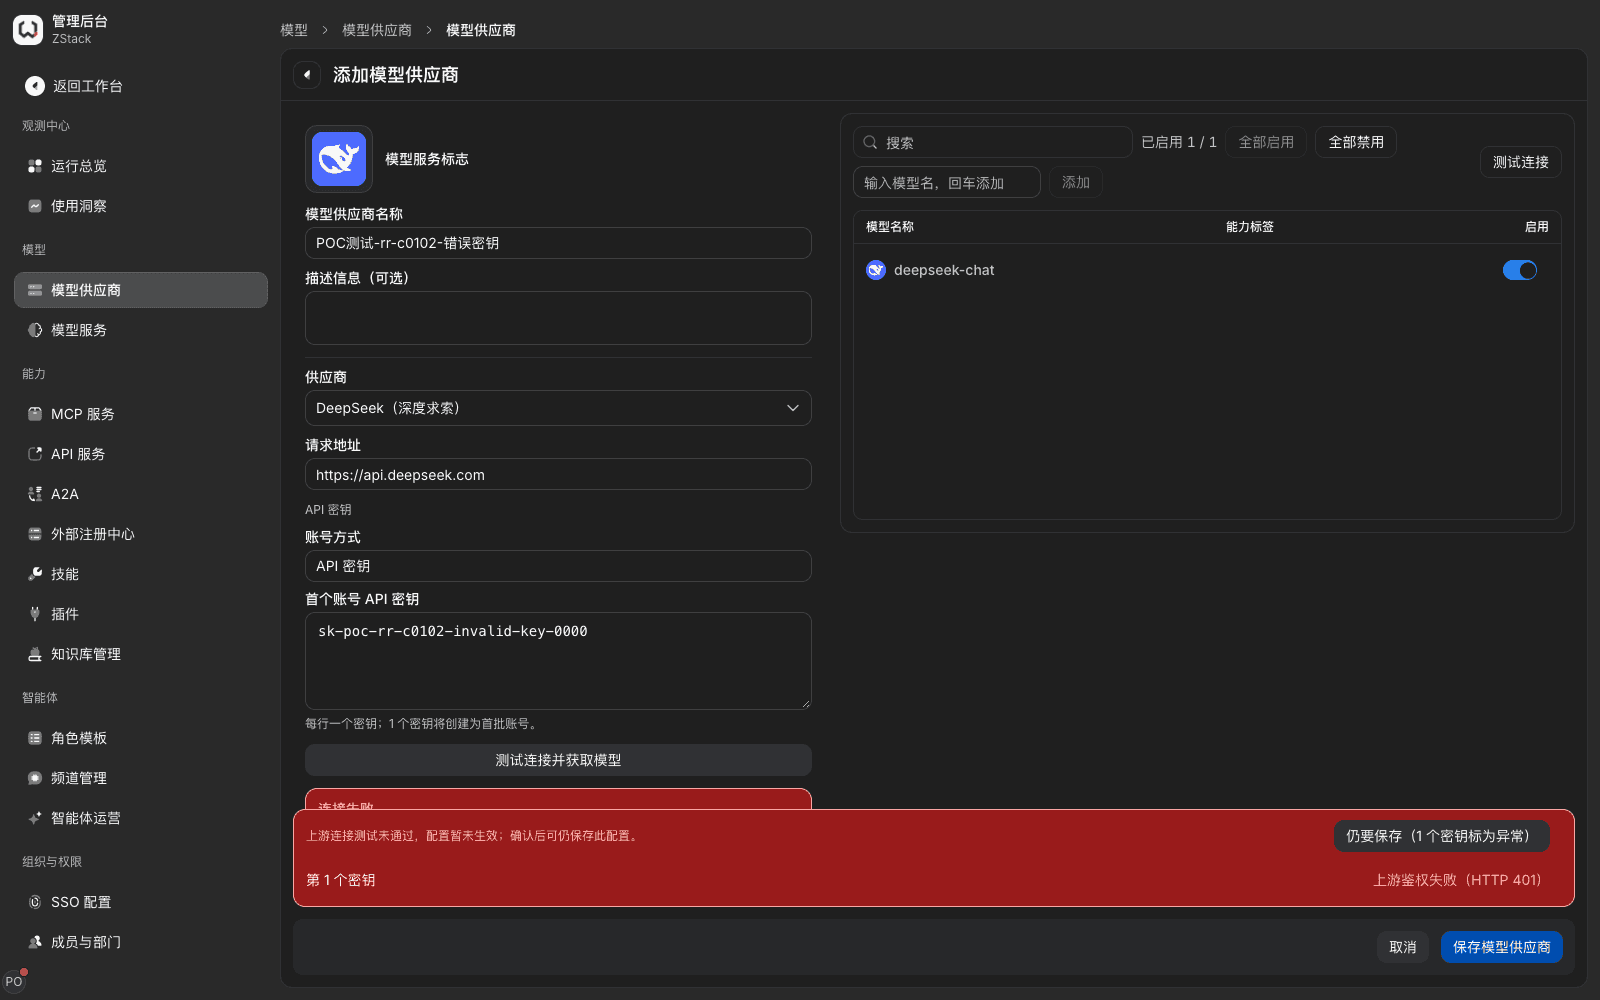
What you will see: after a successful connection, models returned by the endpoint are listed on the right; enable them one by one. After save you return to the list: this provider Available is on, and Accounts and Available models show available-account count and enabled models.
Connect an in-house inference service
Self-hosted vLLM, Xinference, Ollama, or other OpenAI-compatible inference is connected by choosing Local deployment in Provider.
- Service URL is protocol and host; do not put a specific interface path in the URL. Authentication is API key or No authentication.
- In the Interface capabilities table, declare the interfaces this service provides, eight items: chat, model list, text completions, embeddings, rerank, image generation, speech synthesis, speech transcription. Each can be switched, given a path, and given a format (OpenAI compatible or Jina / Cohere compatible). On create, Embeddings, Rerank, and Speech transcription are on by default; turn off capabilities the service does not provide.
- Paths start after the service URL, for example set Chat to
/api/v1/agent-gateway/openai/v1/chat/completions. - Choose Test connection and fetch models, enable only the models you need, and save. If you tick an unimplemented interface, calling that interface will fail.
4.3 Choose interface format and protocol conversion
When to use: the upstream only provides one protocol (for example only OpenAI Chat Completions), while callers use Anthropic or OpenAI Responses.
Procedure
- When creating a provider, choose in Model request format. For an existing provider, change it in Edit AI provider.
- Choose the key-passing method the upstream requires. If you leave it empty, the connection test auto-detects and saves the first method that is accepted.
- Save.
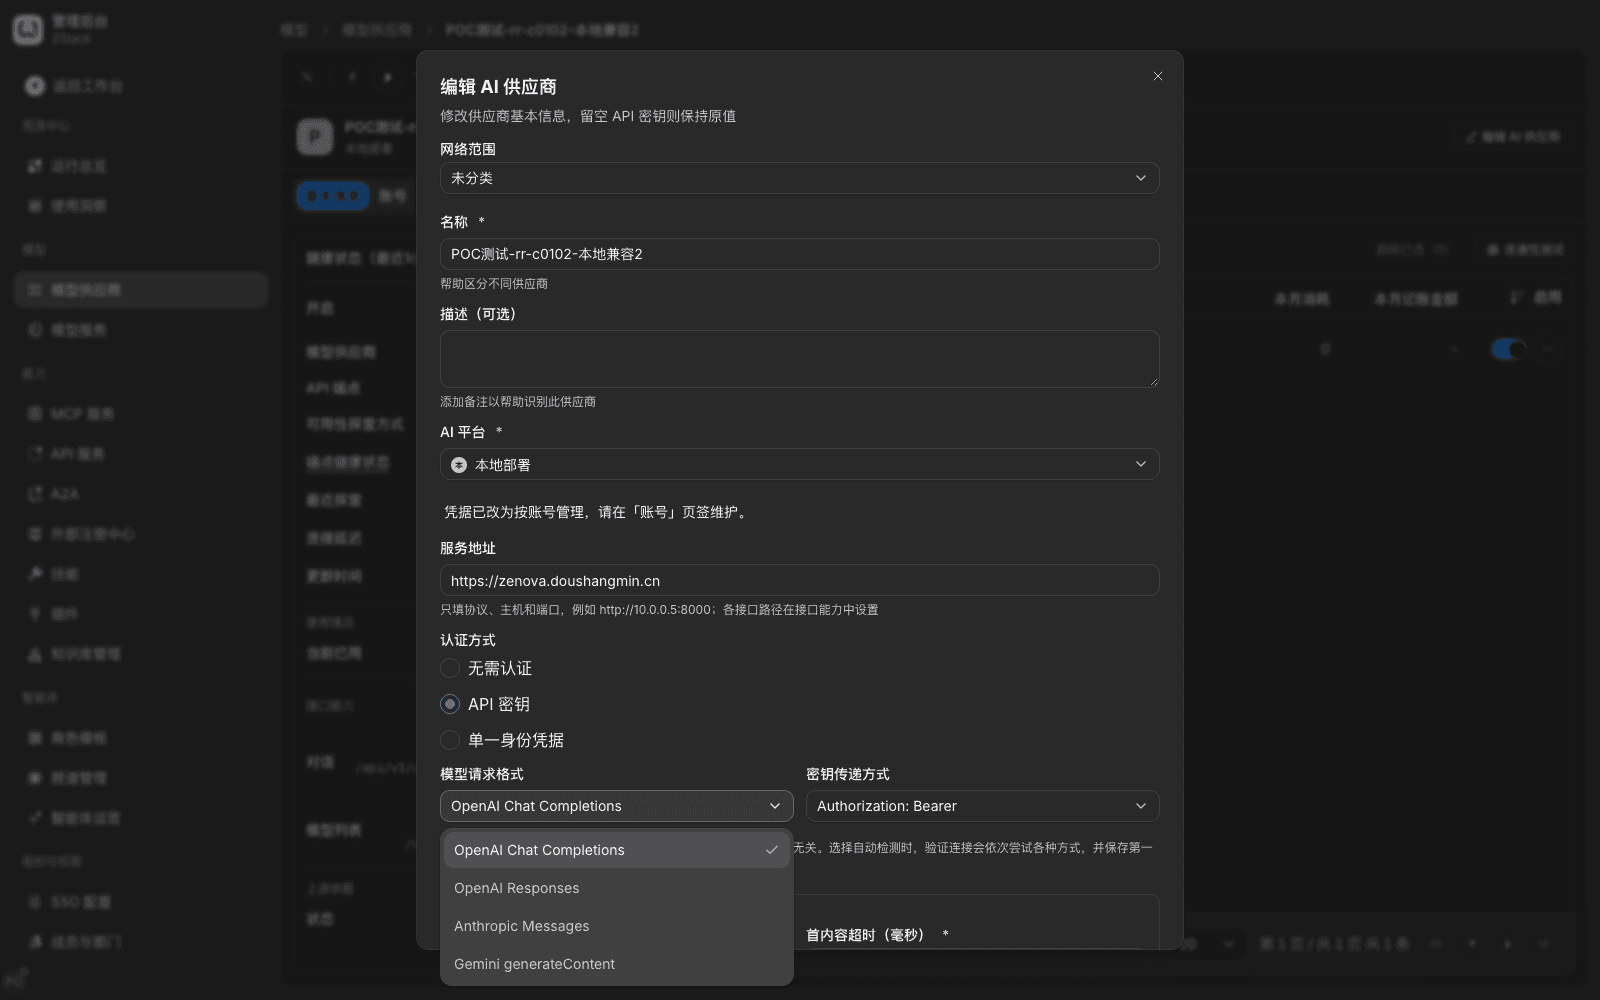
That dropdown only decides the protocol the gateway uses to request the upstream. It is independent of the protocol the caller uses.
Protocol conversion: callers can use any inbound protocol. The gateway converts request and response between the inbound protocol and the upstream format. When you call an OpenAI-format upstream with the Anthropic protocol, the caller gets a standard Anthropic structure: type: message, with both thinking and text blocks in content.
Where dropped fields appear: fields the upstream does not support do not disappear silently. They appear in three places: response header x-zenova-conversion-dropped (for example anthropic.top_k, also listed in access-control-expose-headers so browser scripts can read it); the Diff tab of the call-detail Request tab, which states the cross-family forward direction and lists Not forwarded upstream: other field top_k; and Routing and rewrite › Adjust for target capability, which states Dropped: anthropic.top_k (attempt 1).
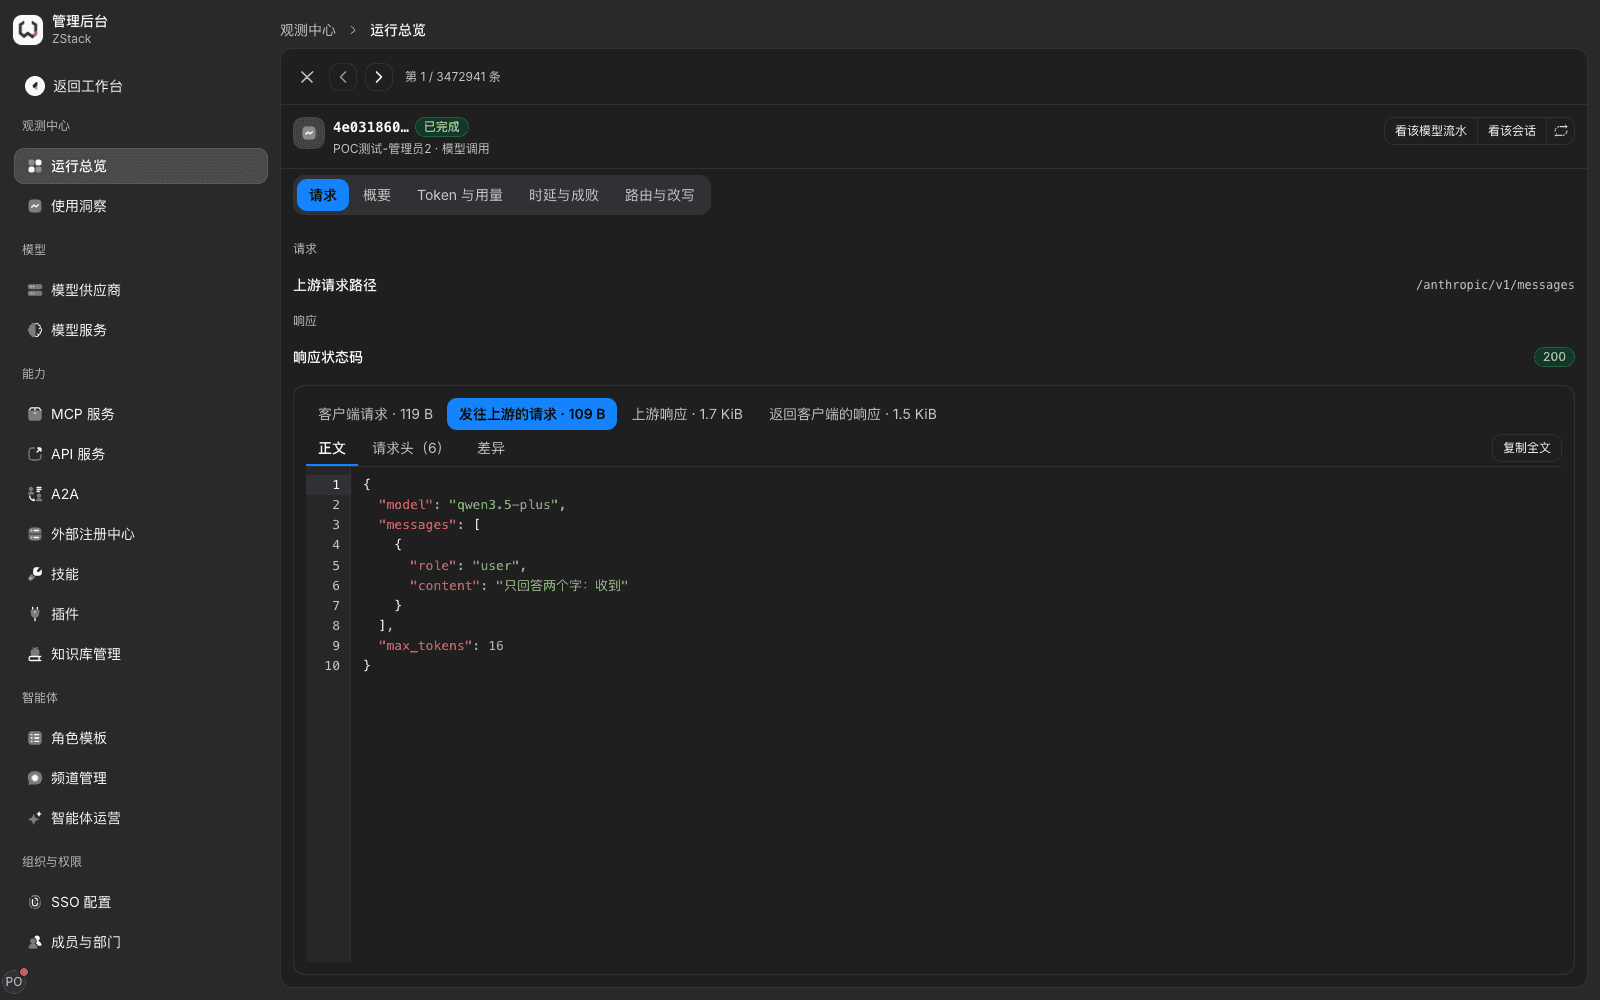
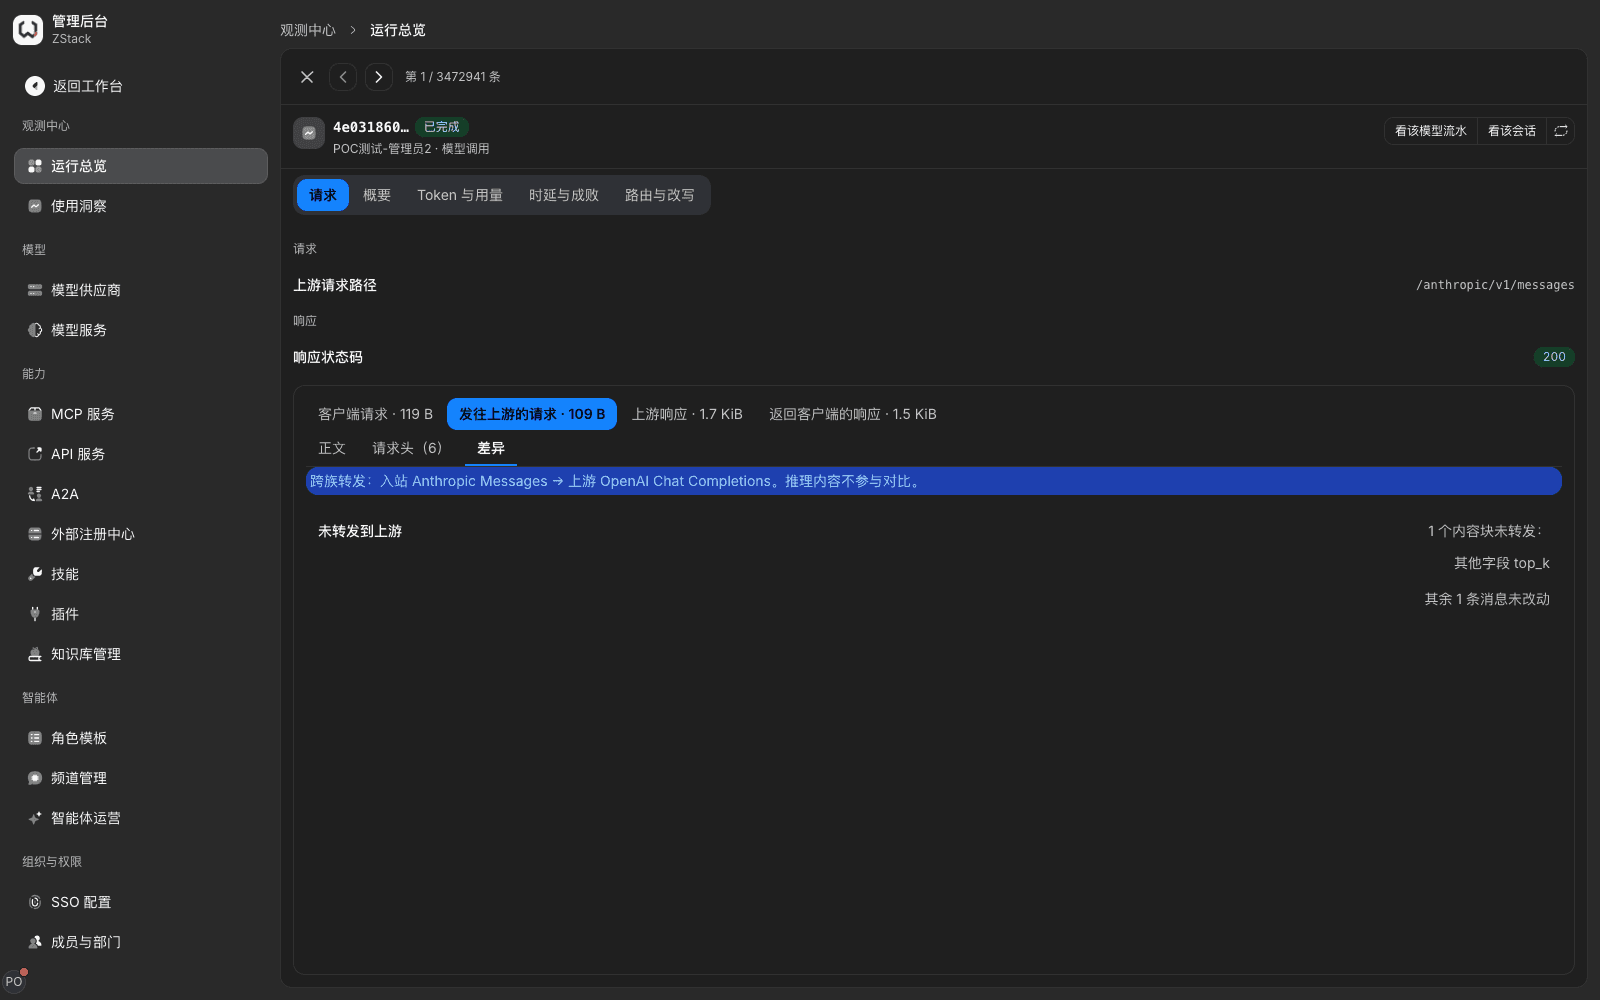
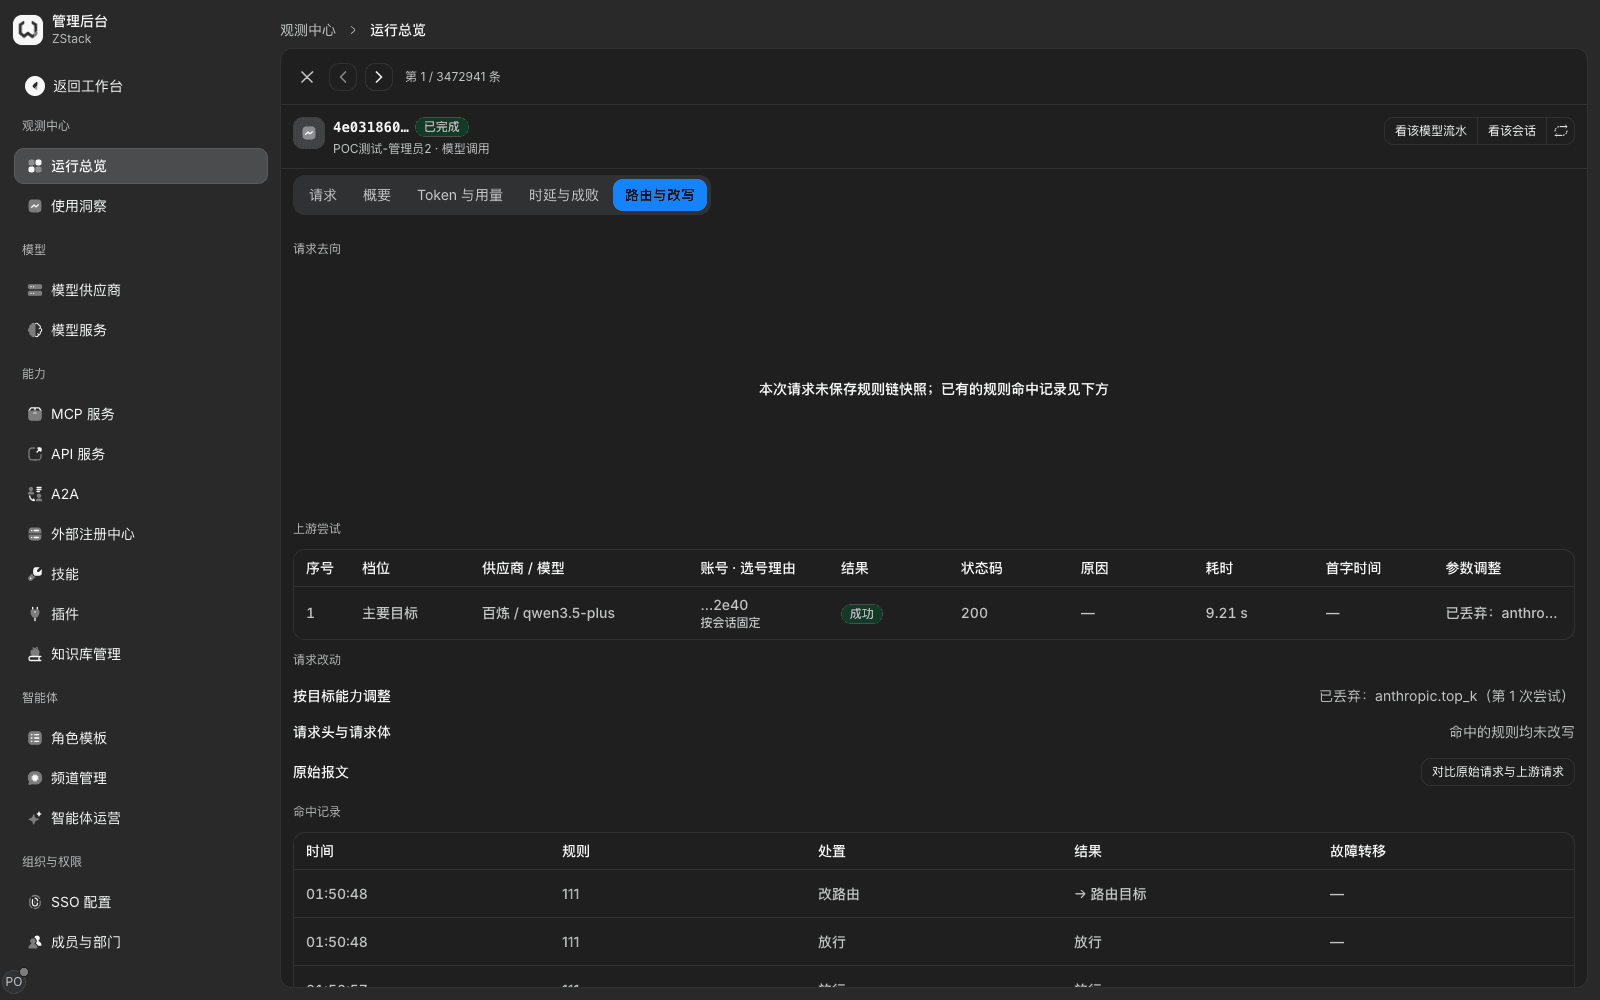
Note: model request format must match the upstream's actual protocol. A mismatch fails the call immediately. After a change, run a connectivity test first. For business that depends on protocol-specific parameters, keep the two aligned.
4.4 Configure multiple accounts on the same provider
When to use: the same vendor has several keys or subscription accounts that should share requests and raise concurrency, or the same inference service is deployed at several addresses and you want unified scheduling.
Procedure
- Open the Accounts tab of the provider detail.
- Choose Add account and fill in that account's URL and concurrency cap (empty means unlimited; fill in only when the upstream limits concurrency per account). The URL can point to an instance different from the provider URL.
- After save, the account takes part in scheduling.
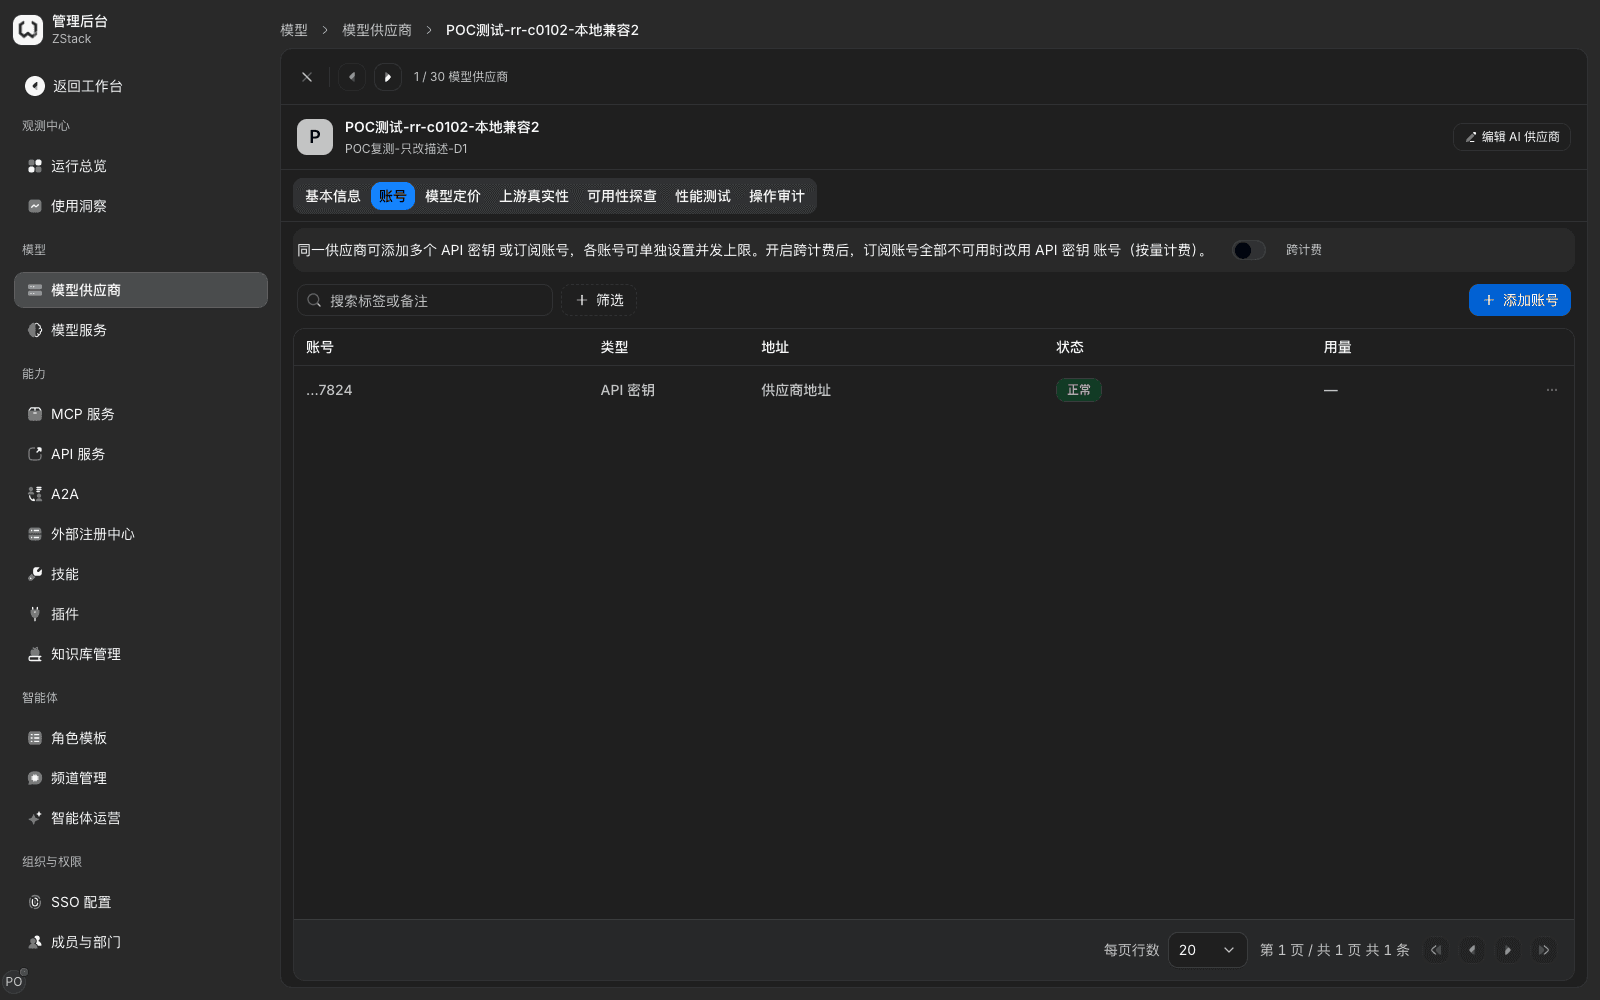
What you will see: columns are Account, Type, URL, Status, Usage, and can be filtered. Provider URL in the URL column means it inherits the provider request URL; an account with its own URL points to another instance. Requests are shared among available accounts. Abnormal accounts are skipped, with the reason in Chinese under the status, for example Key invalid or revoked.
Note: registering multiple accounts with different URLs is the only way inside the platform to maintain multiple instances of the same service.
4.5 Configure transport timeouts, retries, and health checks
When to use: upstream is slow or fails occasionally, or you need a failed upstream to be recognized faster.
Procedure
- When creating a provider, expand the three collapsible sections at the bottom: Transport timeouts, Unified retry policy, Health-check policy. For an existing provider, change them in Edit AI provider.
- Adjust values using the tables below. Each item has a meaning note under it.
- Save. Opening the edit dialog again echoes every value and checkbox in full.
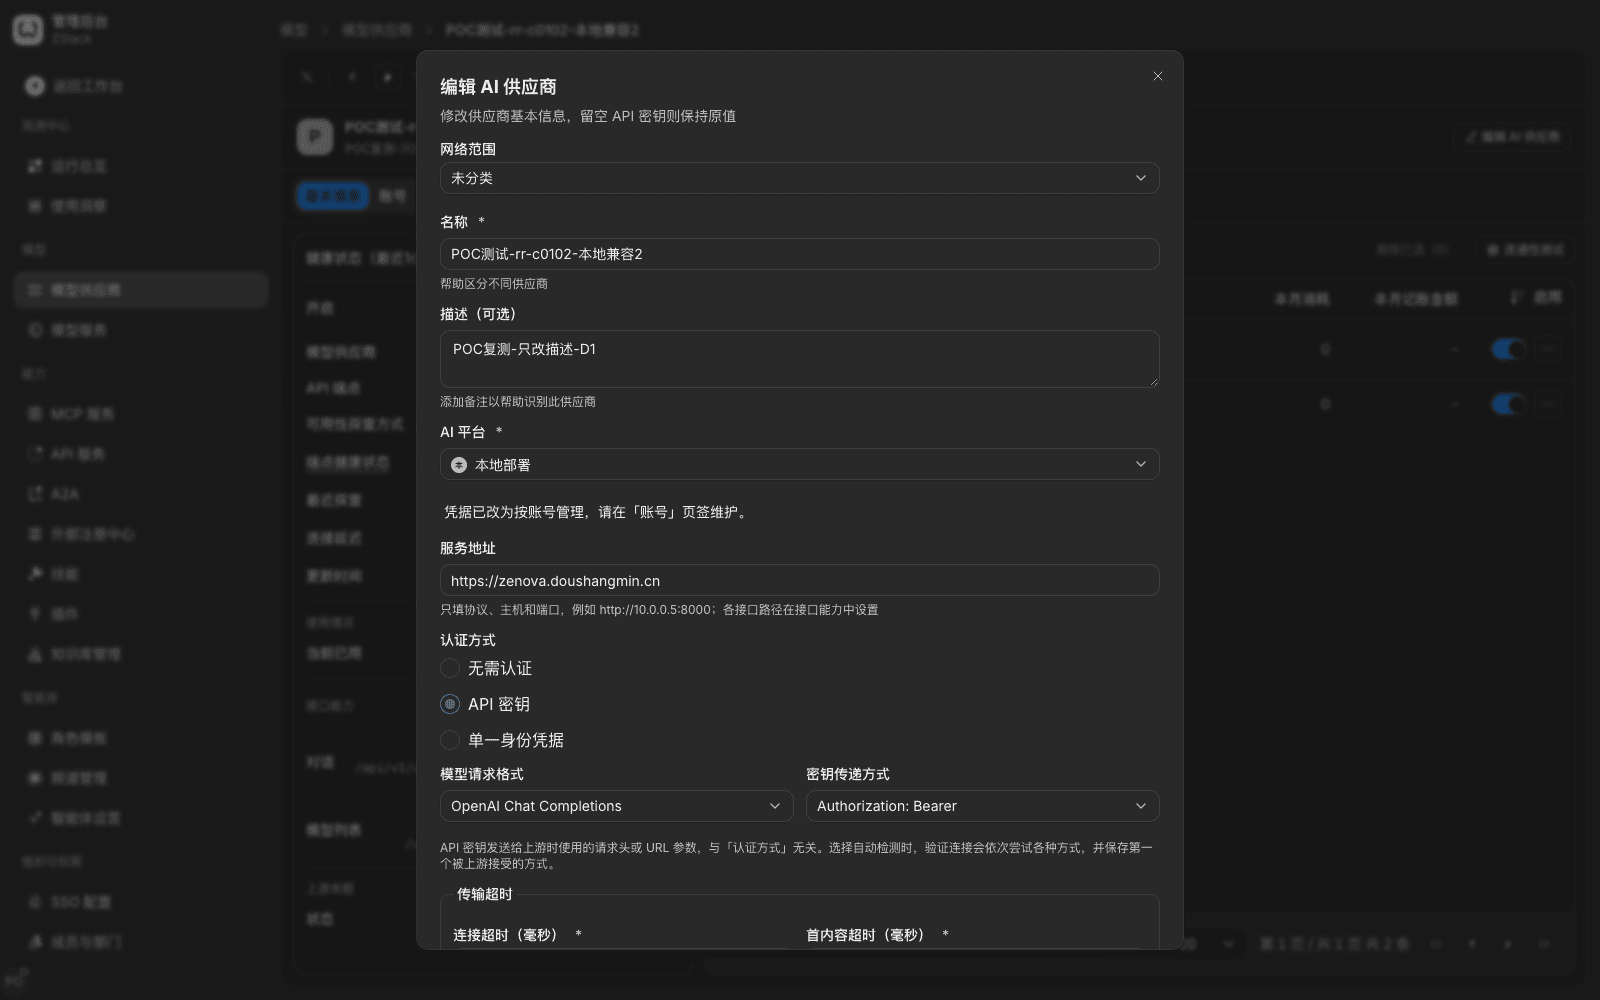
| Transport timeout | Meaning | Default (ms) |
|---|---|---|
| Connect timeout | Cap for establishing a connection; must be no greater than every other item | 8000 |
| First-content timeout | Cap from dispatch to the first content event for streaming requests | 120000 |
| Query response-header timeout | Only for non-streaming query-style interfaces | 30000 |
| Non-streaming generation timeout | Wait until the whole generation finishes before returning response headers; after timeout, do not retry the same target | 600000 |
| Stream idle timeout | Maximum interval between two upstream bytes; heartbeats do not trigger this | 60000 |
| Whole-stream cap | Longest duration of one stream; only to stop a runaway stream | 1800000 |
| Retry and probe | Meaning | Default |
|---|---|---|
| Max retries | How many times to retry after failure, at most 5 | 2 |
| Initial / max backoff | Wait before the first retry and backoff cap (ms) | 250 / 2000 |
| Retryable error types | Transport error, timeout, rate limit, server error | All four selected |
| Probe interval | Integer between 60 and 3600 seconds | 300 seconds |
| Consecutive failures to unhealthy / consecutive successes to recover | 3 / 2 |
Field validation: save is blocked when values are out of range or conflict. The prompt names the conflicting fields, for example Connect timeout cannot be greater than first-content timeout. When retries exceed the cap, the input shows Value must be less than or equal to 5. When the probe interval is too small, the prompt is Probe interval must be an integer between 60 and 3600 seconds.
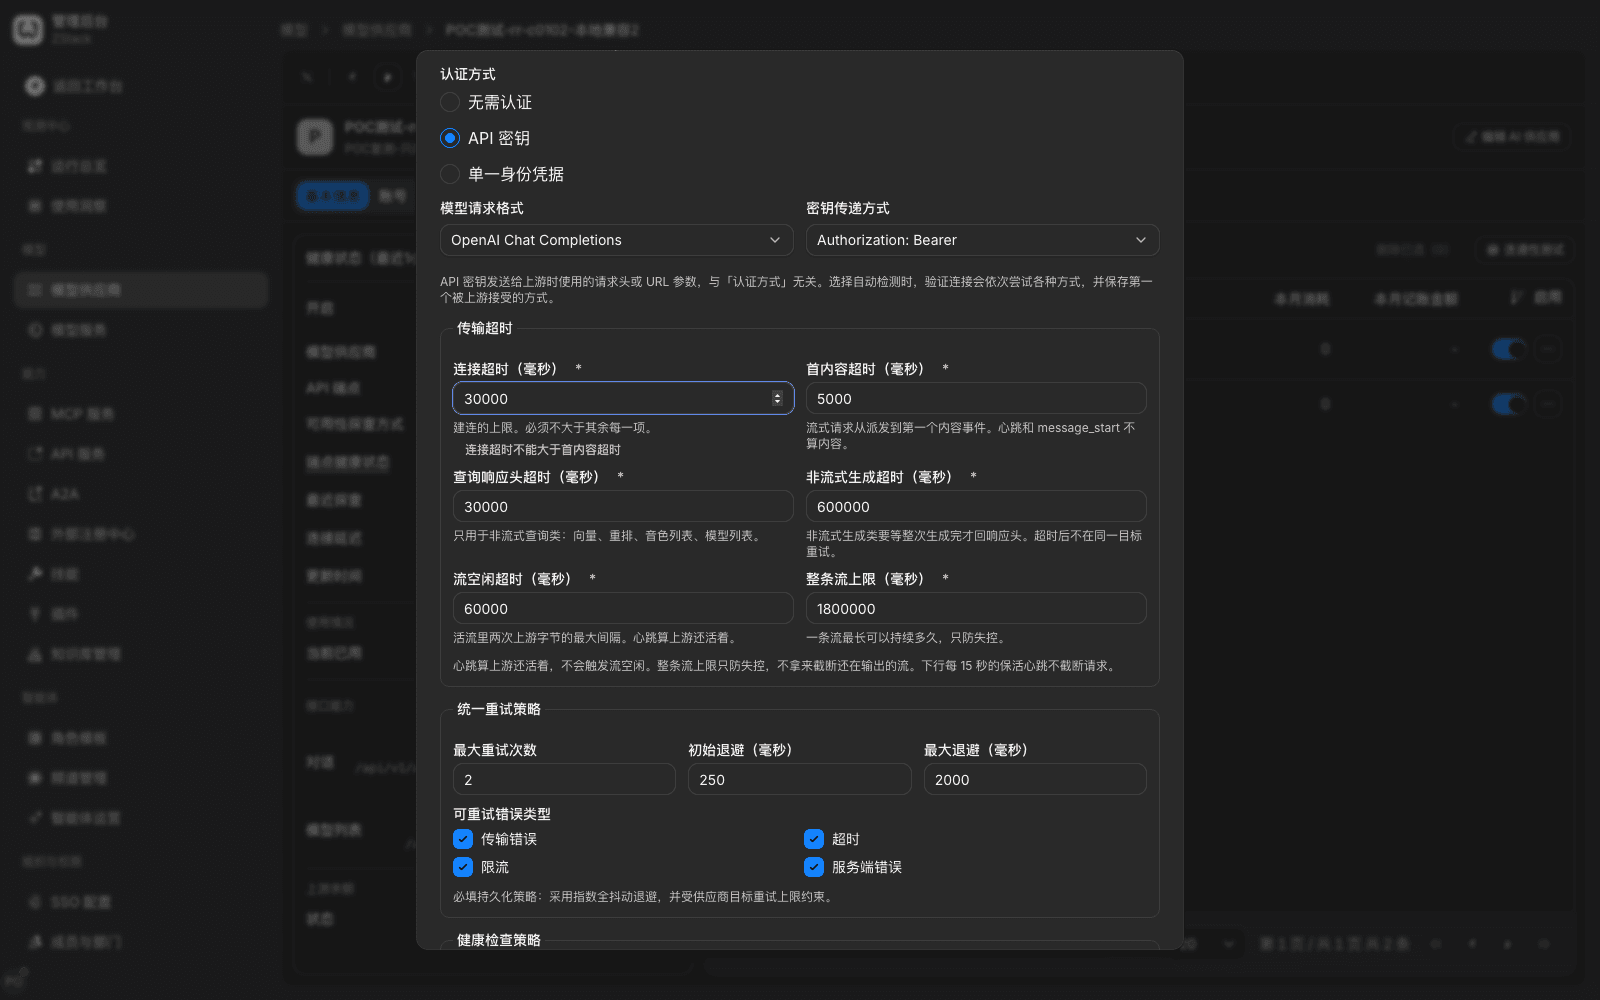
Note: health only affects routing priority. Requests are still sent; one failed probe does not take the provider out. To fail over to a backup model, configure failover in traffic rules (Chapter 15). These policies are visible only in Edit AI provider.
4.6 View availability probes and upstream balance
When to use: daily confirmation that a provider is available, diagnosing failed calls, watching whether the upstream quota is enough.
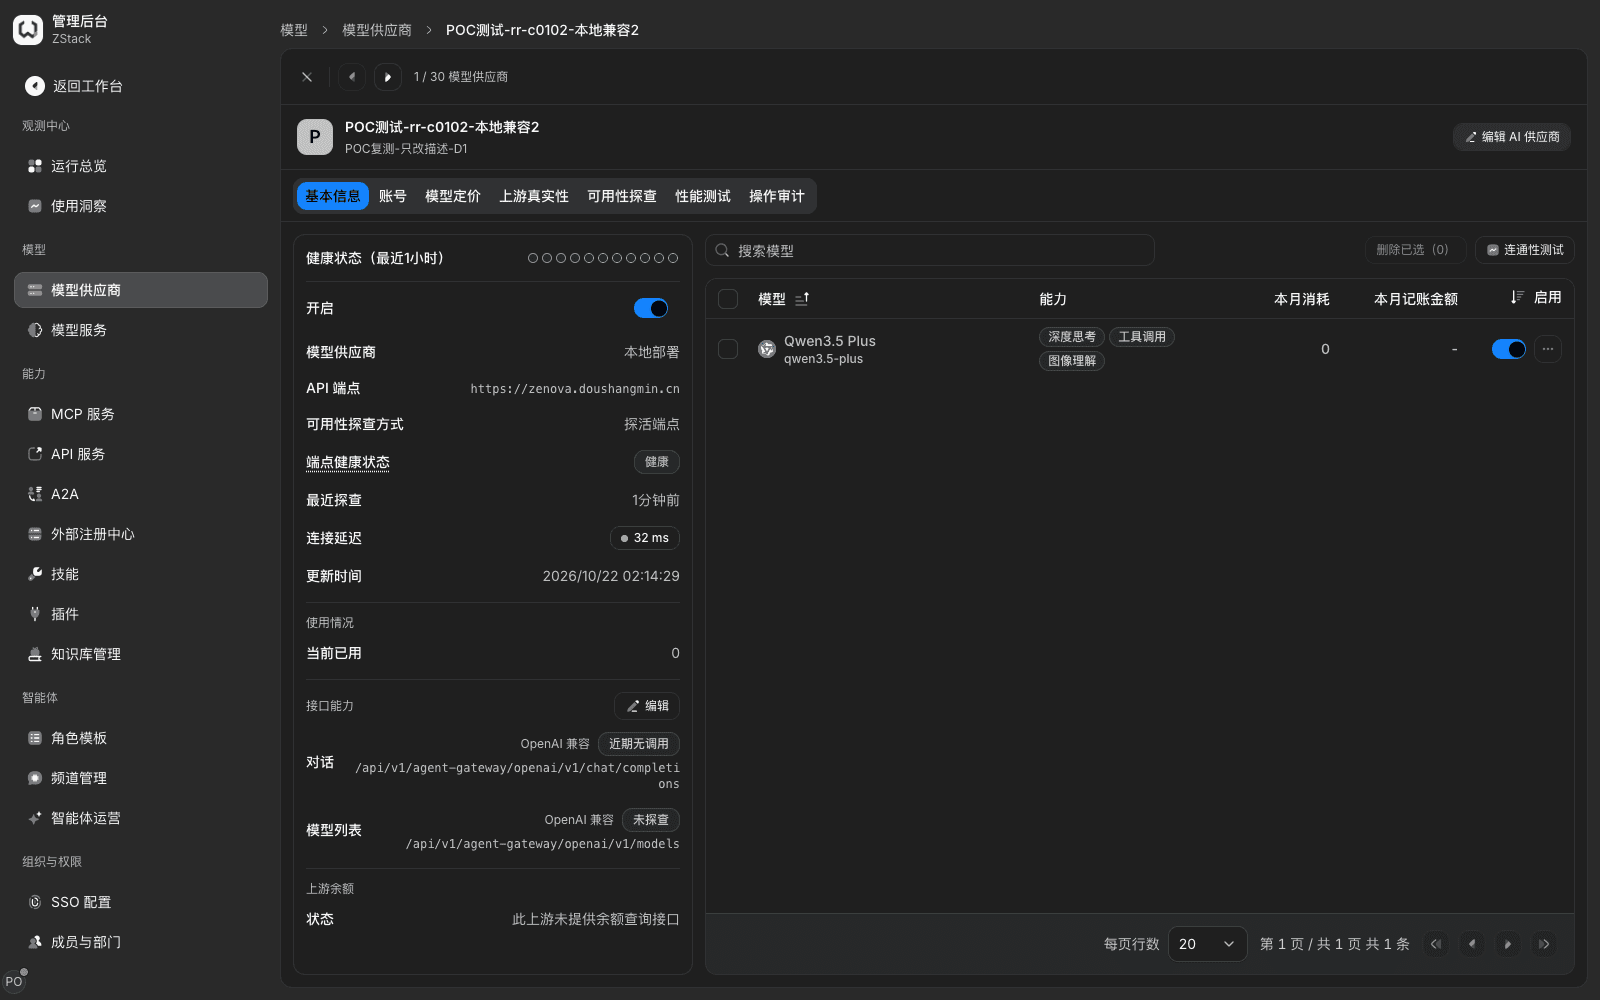
The platform probes the provider at the Health-check policy interval, default every 300 seconds. You can also choose Connectivity test on the Availability probes tab to start one immediately.
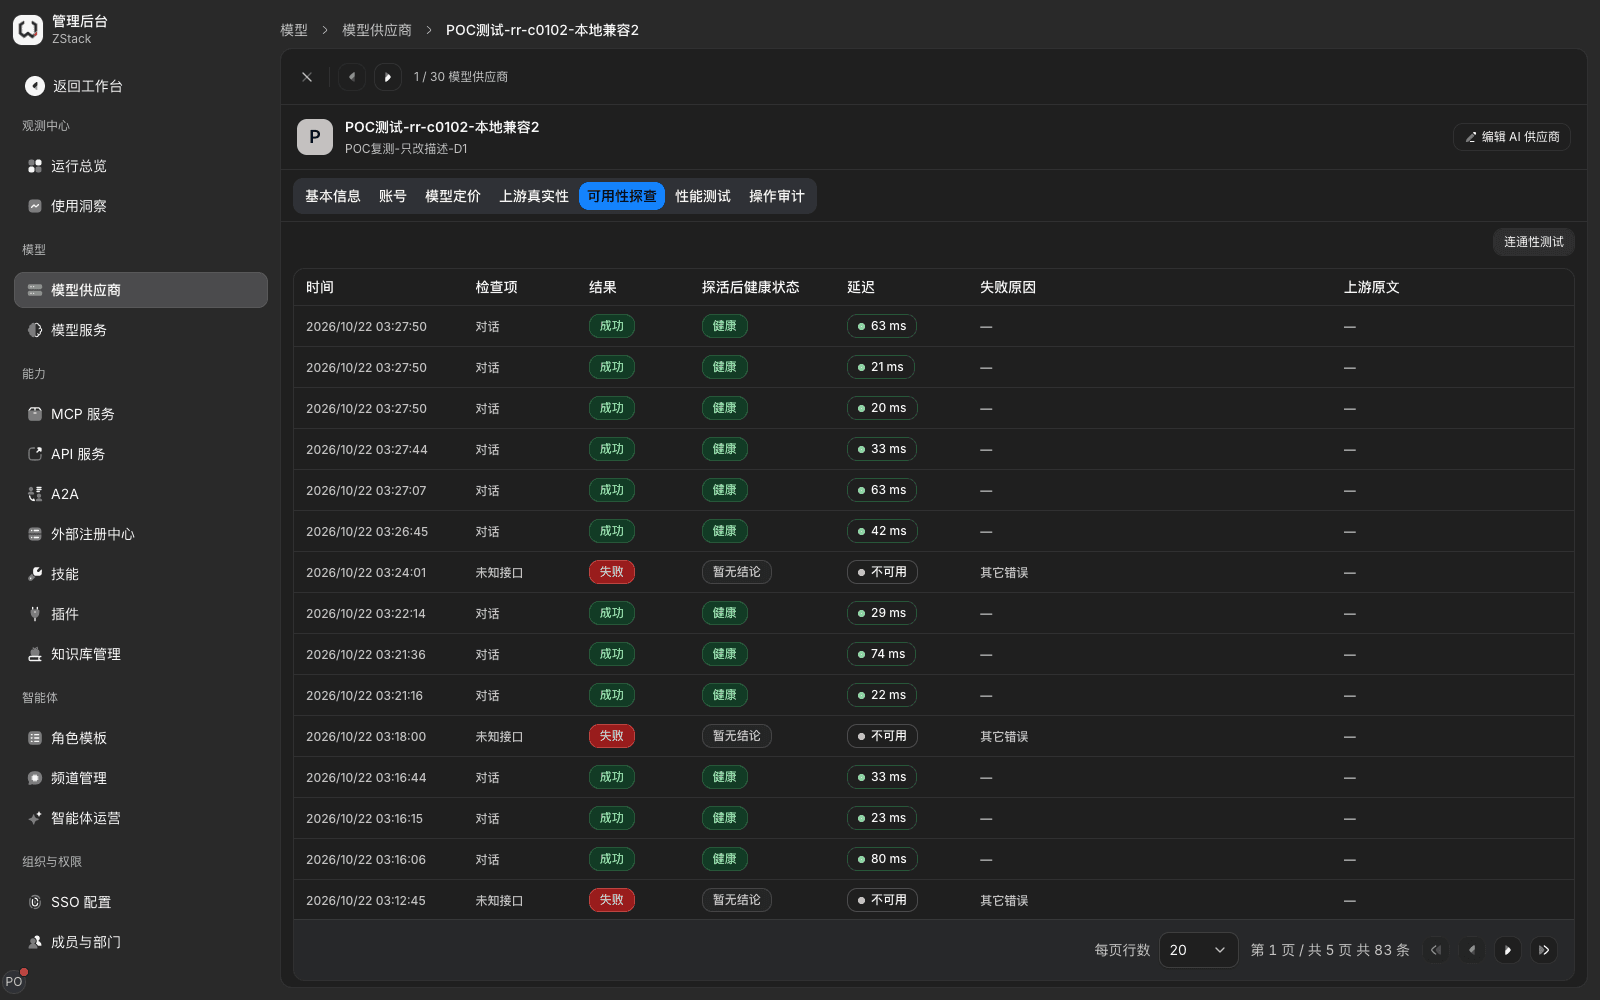
What you will see: the test usually returns a conclusion in a few seconds and adds a record with columns Time, Check item, Result, Health, Latency, for example Chat / Success / Healthy / 20 ms. Periodic-probe history is kept as well, so you can tell whether a fault is continuous or occasional.
Probe history sometimes has records such as Unknown interface / Failed, from interfaces the upstream does not implement, unrelated to chat capability. Judge availability by the Chat check item. Health, failure reason, and connection delay on Basic information come from different times; when they disagree, trust the latest Availability probes row.
Upstream balance: the Basic information tab shows remaining quota and update time, for example Remaining quota -0.118627 USD, updated 3 minutes ago. Where the number comes from depends on the upstream: some return a real balance, some estimate from cumulative usage, and it can be negative. When the upstream has no balance-query interface, it shows This upstream does not provide a balance-query interface, which is an explicit message, not a load failure.
Note: a probe only represents connectivity at probe time. The full reason for a failed call is in the request detail (Chapter 20). If Connectivity test gives no feedback and no new record, first look at the Accounts tab. When all accounts are Abnormal, restore an available account and try again.
4.7 Attest upstream authenticity
When to use: when you connect models through a relay or a third-party aggregator, confirm that the upstream actually provides the declared model and has not substituted, downgraded, or protocol-translated it.
Procedure
- Open the Upstream authenticity tab of the provider detail. Attestation runs only when you click Attest; it is not scheduled. Models start as Not attested.
- On the target model row choose Attest and wait for the conclusion, usually within a minute.
- Choose View to open attestation detail and read the evidence layer by layer.
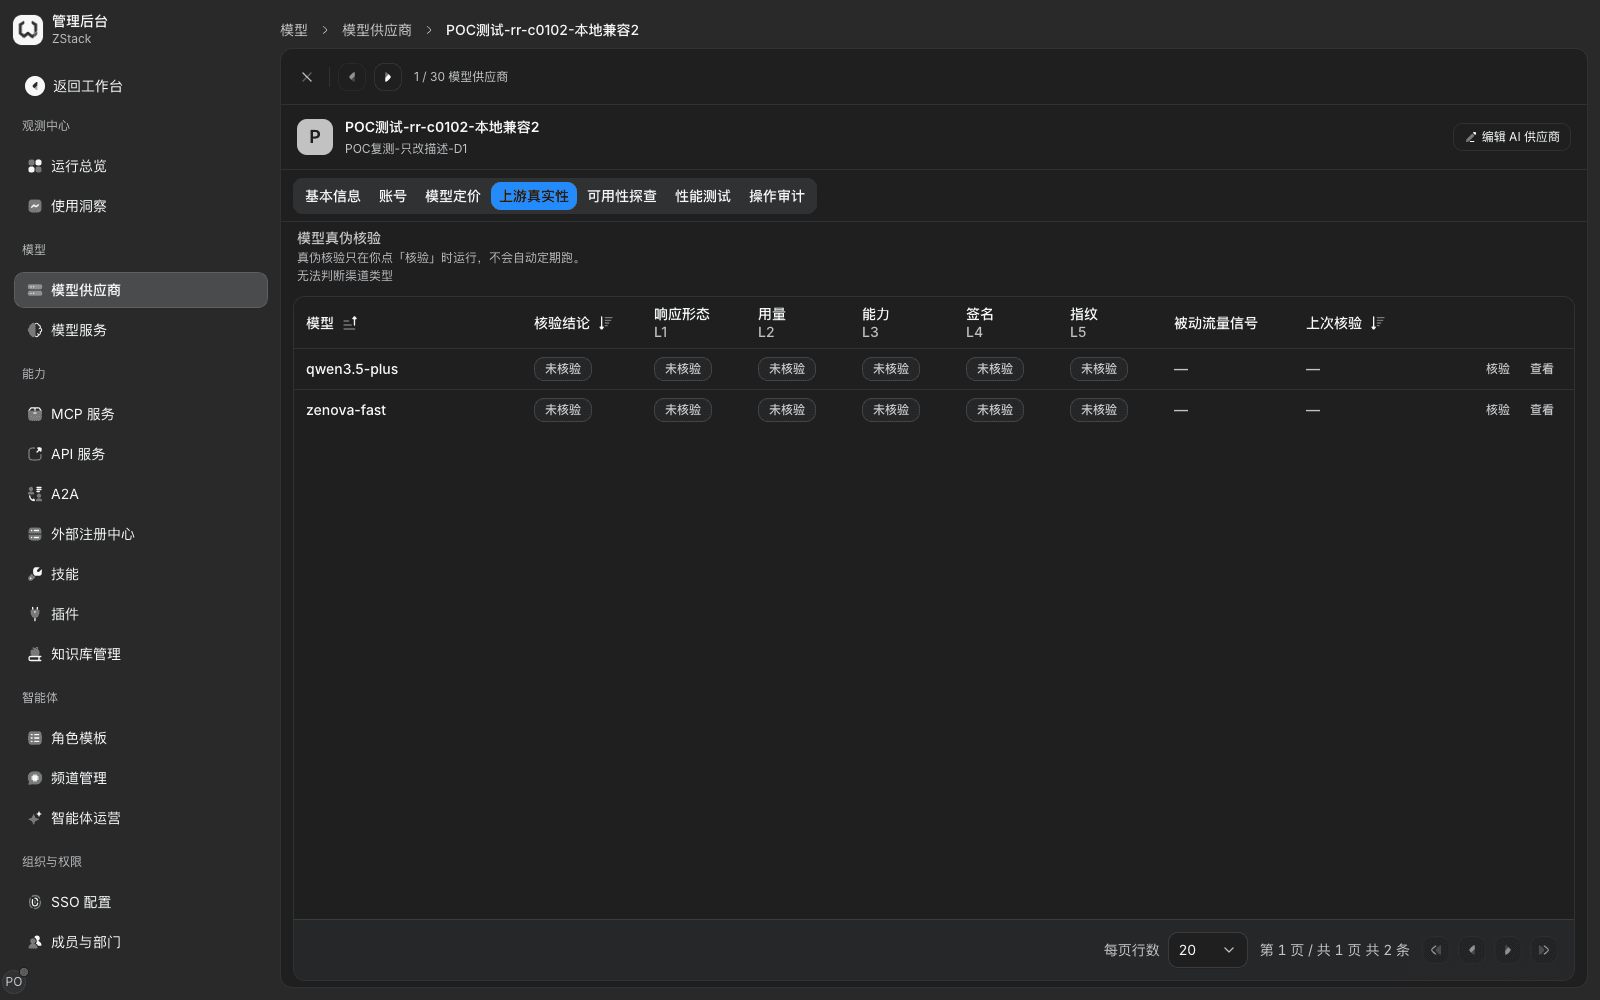
What you will see: each model has an overall conclusion (Pass / Fail) and five layer results, plus a Passive traffic signals column.
| Layer | What is attested | When not applicable |
|---|---|---|
| L1 response shape | Whether return structure, billing field set, and error format match the original vendor | — |
| L2 usage | Whether billed tokens match the baseline | No comparison baseline yet |
| L3 capability | Whether tool-call block shape and vision answers match the declaration | — |
| L4 signature | Whether the original-vendor signature is valid | Current interface protocol does not support this |
| L5 fingerprint | Whether answer style matches the baseline | No comparison baseline yet |
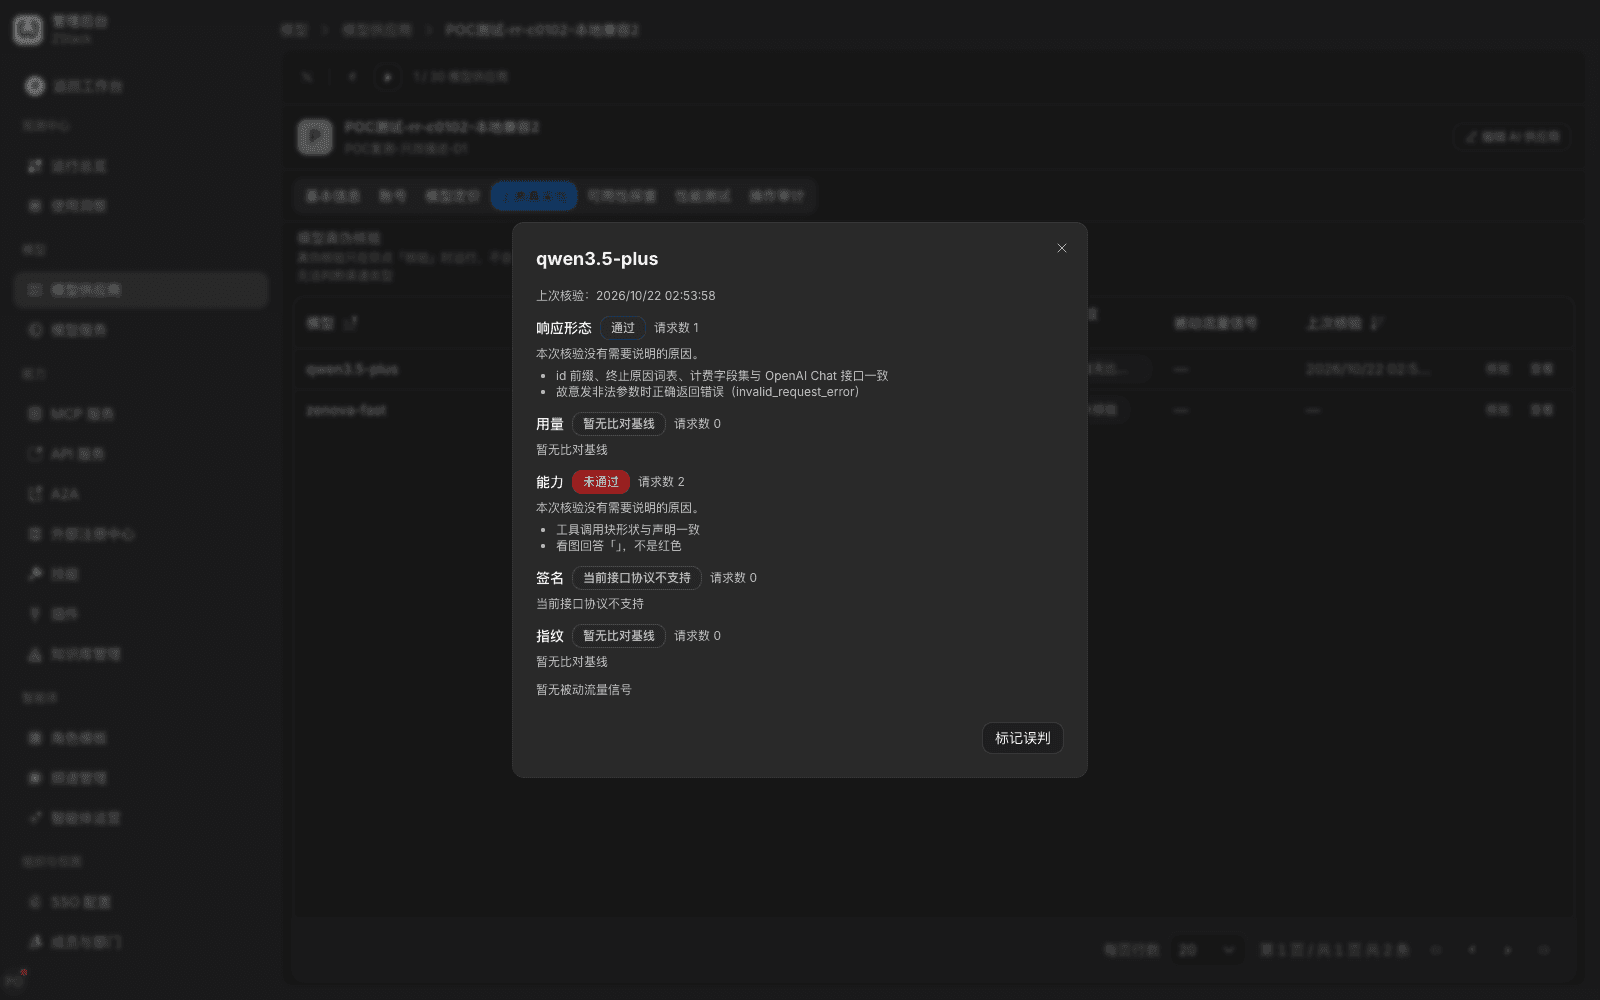
Note: attestation sends a small number of real requests upstream and consumes quota. The capability-layer vision check sends a test image upstream. If that upstream has a minimum image size, this layer may show Fail because the test request was refused. In that case, call once by hand with a normal-size image and then judge.
4.8 Run a performance test against the upstream
When to use: before go-live, measure the upstream latency baseline and compare providers or accounts.
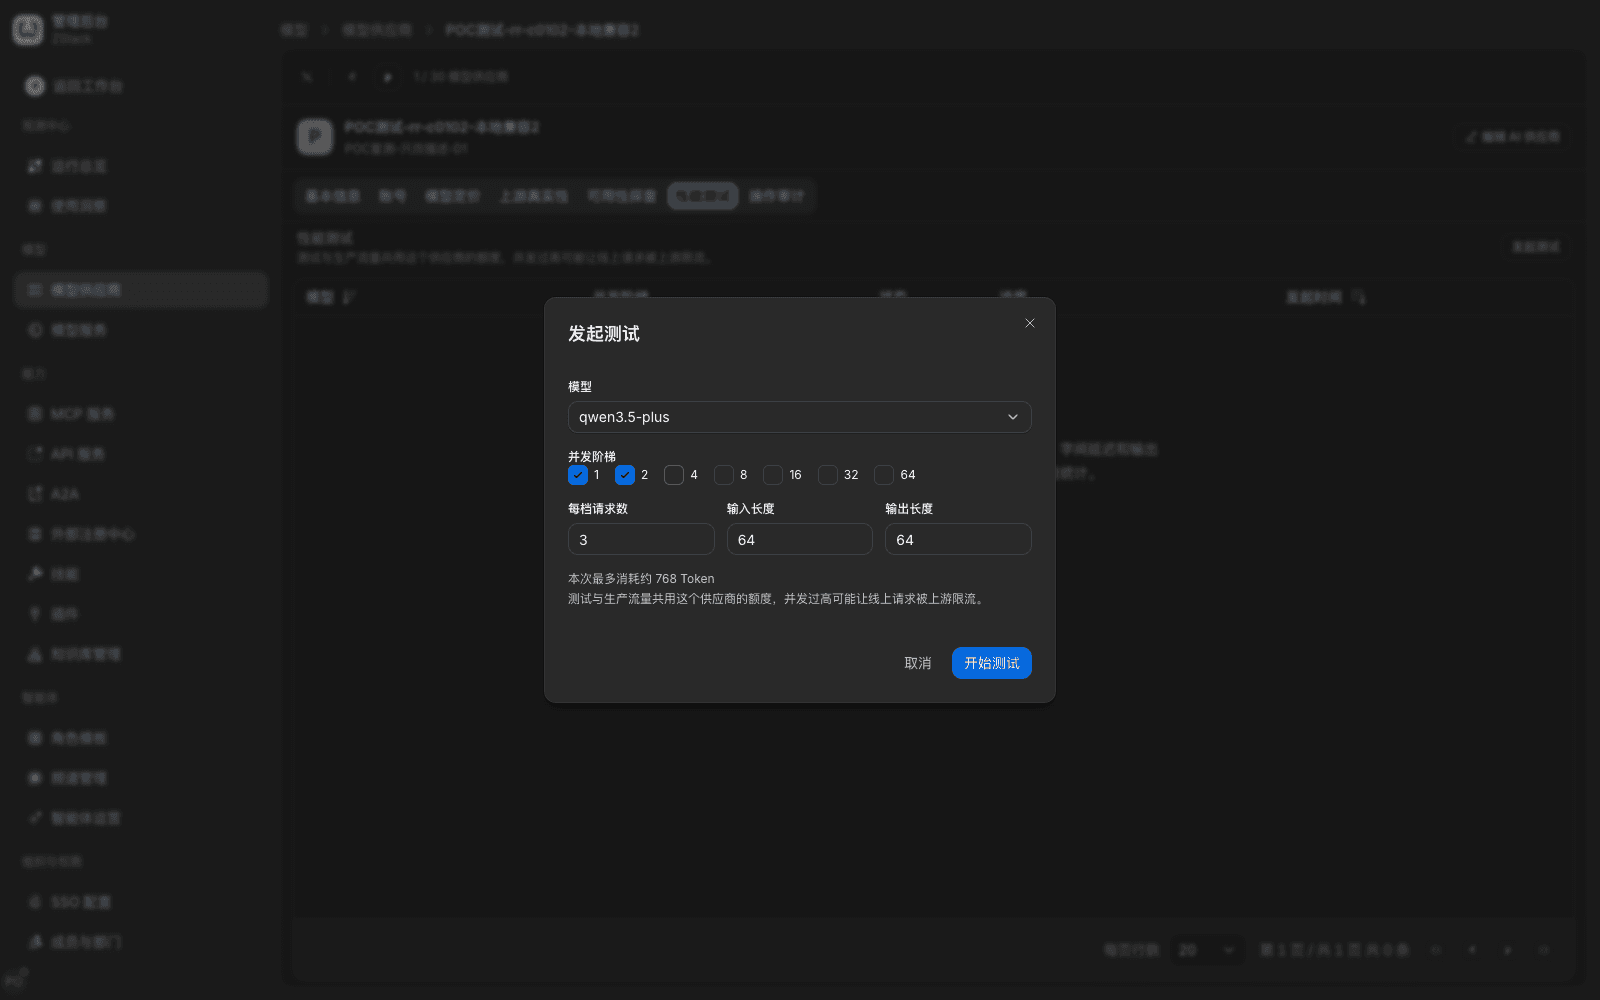
The performance test sends requests upstream across concurrency steps and measures time to first token, inter-token latency, end-to-end latency, and time per token. The page states two points: the test connects straight to the upstream, bypasses the gateway, and is not counted in usage; the test and production traffic share this provider's quota, so high concurrency may cause the upstream to rate-limit live requests.
Procedure
- Open the provider detail Performance test tab and choose Start test.
- Choose the model under test and concurrency steps; default 1, 4, 16. Keep only smaller steps if you want.
- Fill in requests per step and input / output length (tokens), check the estimated consumption (for example This run consumes at most about 768 tokens), then choose Start test.
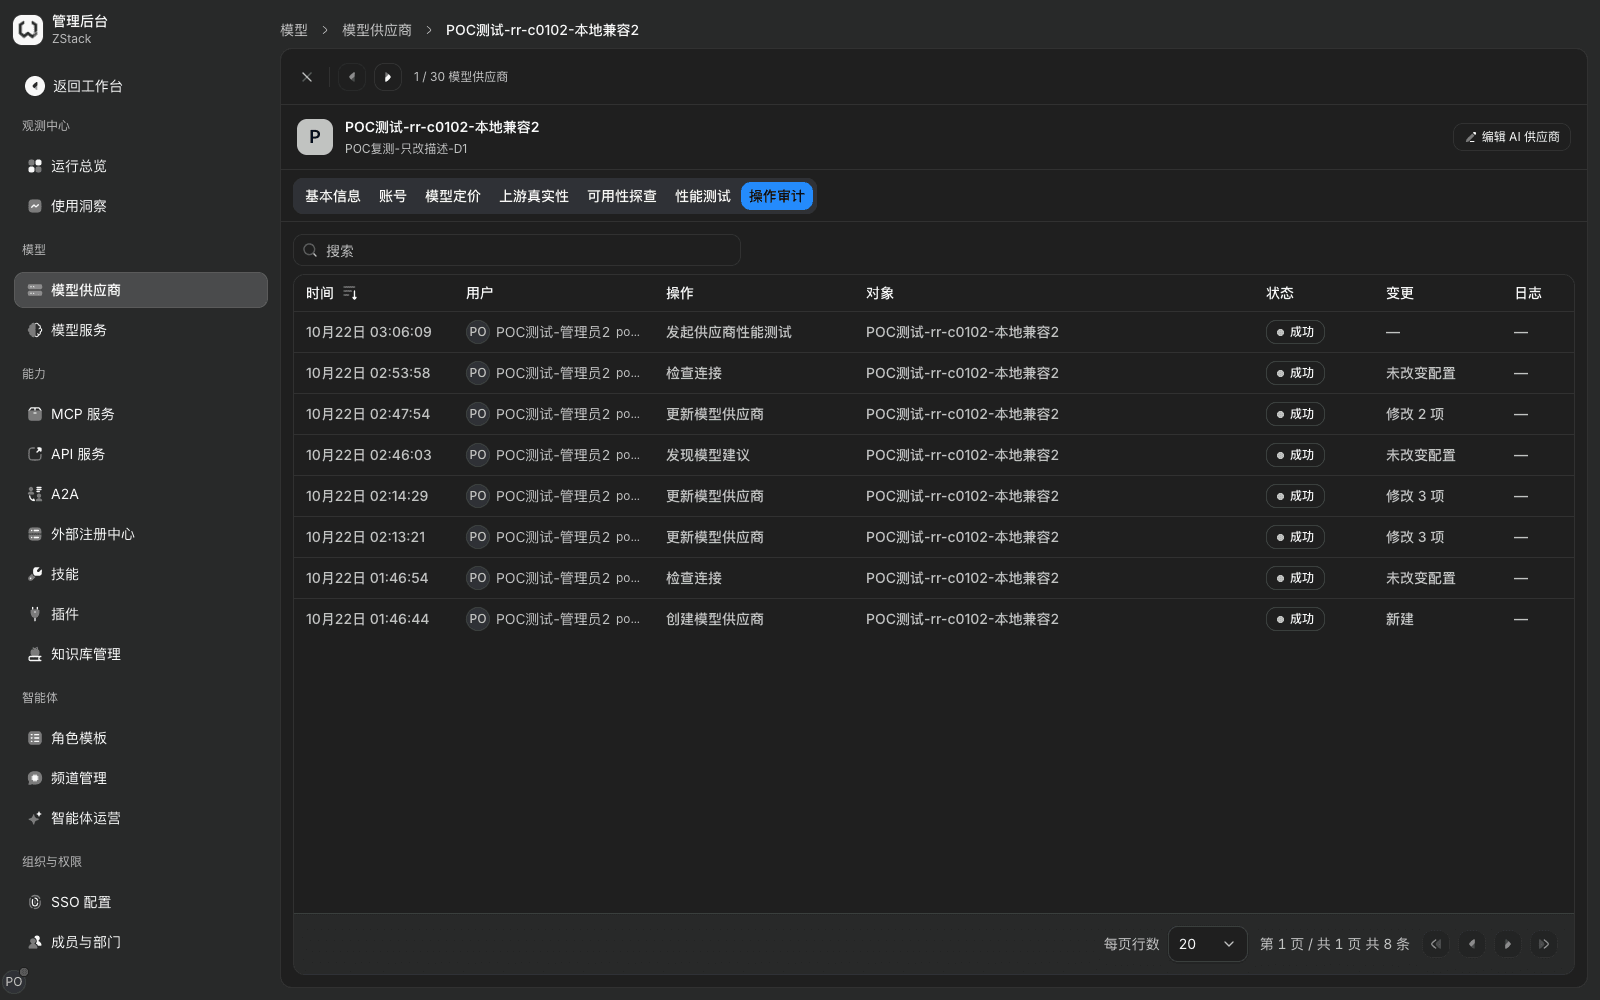
What you will see: the first sample appears about ten-odd seconds after start. The overview gives time to first token, inter-token latency, end-to-end latency, and time per token per step, with a trend chart. Per-step detail lists metrics by step. Cancel test has a second confirm; in-flight requests stop immediately and completed samples are kept. Start and cancel are both written to Operation Audit, with the action name Start provider performance test.
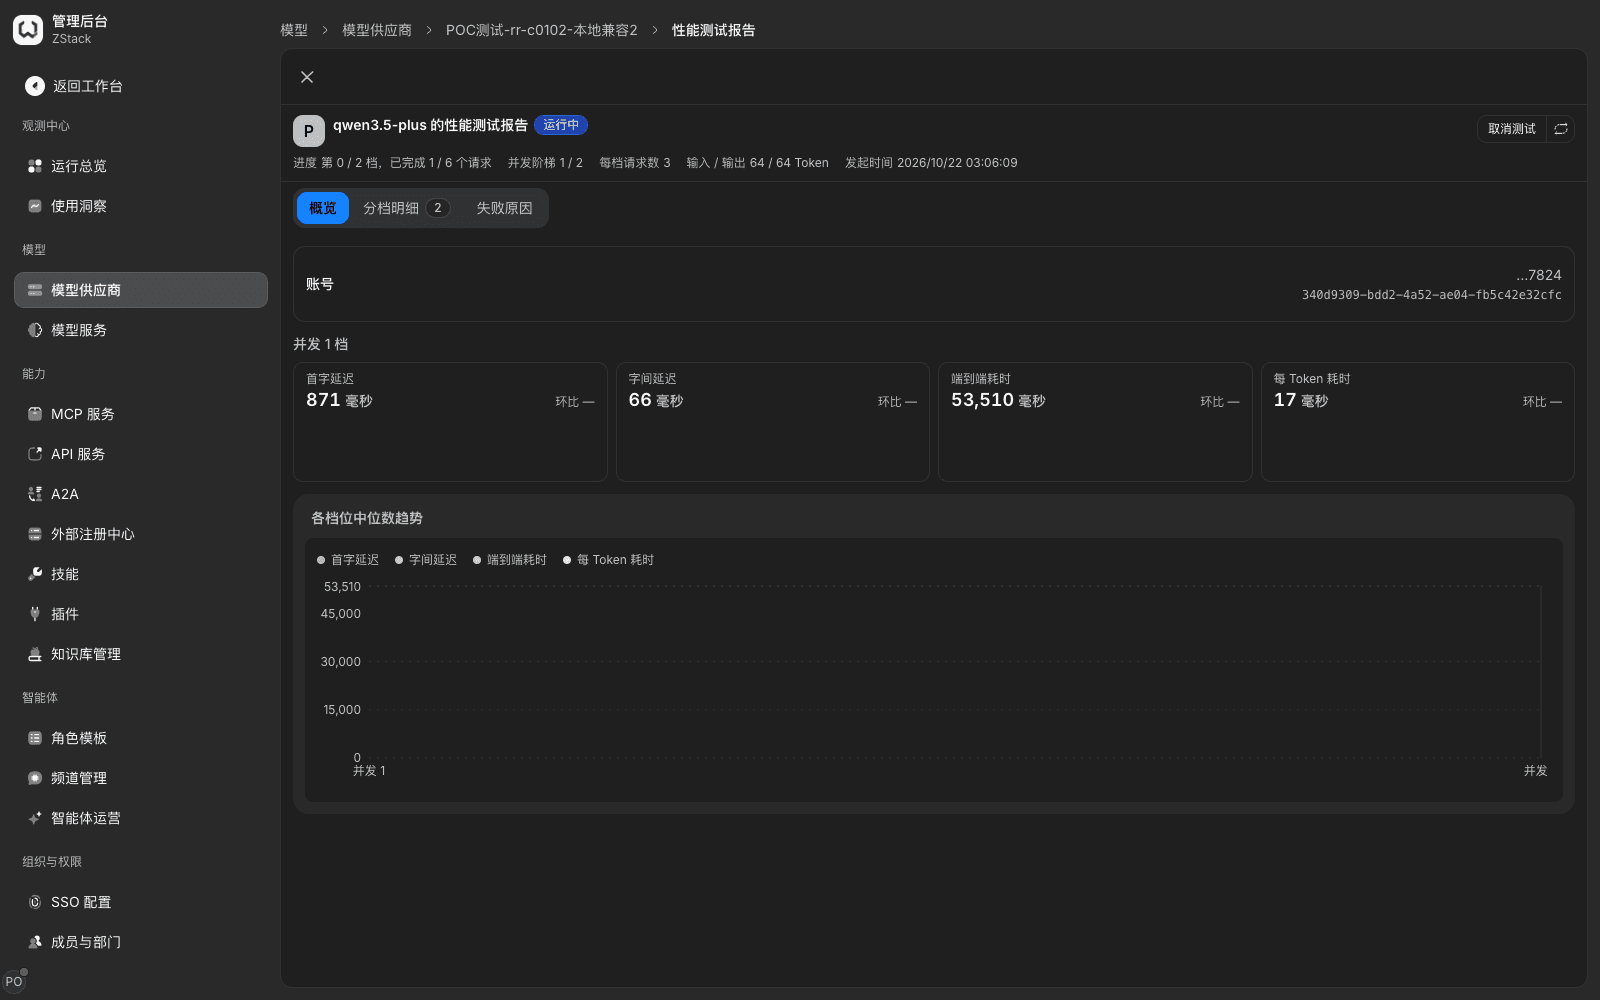
Note: if progress stays on the first request for a long time, first Cancel test, confirm the upstream is reachable and the model is available, then retry from the smallest step. Output length is a suggestion sent to the upstream with the request; some upstreams do not follow it strictly. Read end-to-end latency together with the tokens actually produced at that step.
4.9 Provider configuration versions and change history
When to use: you need to know when provider configuration was changed, and to make sure a bad configuration does not take effect directly.
Procedure
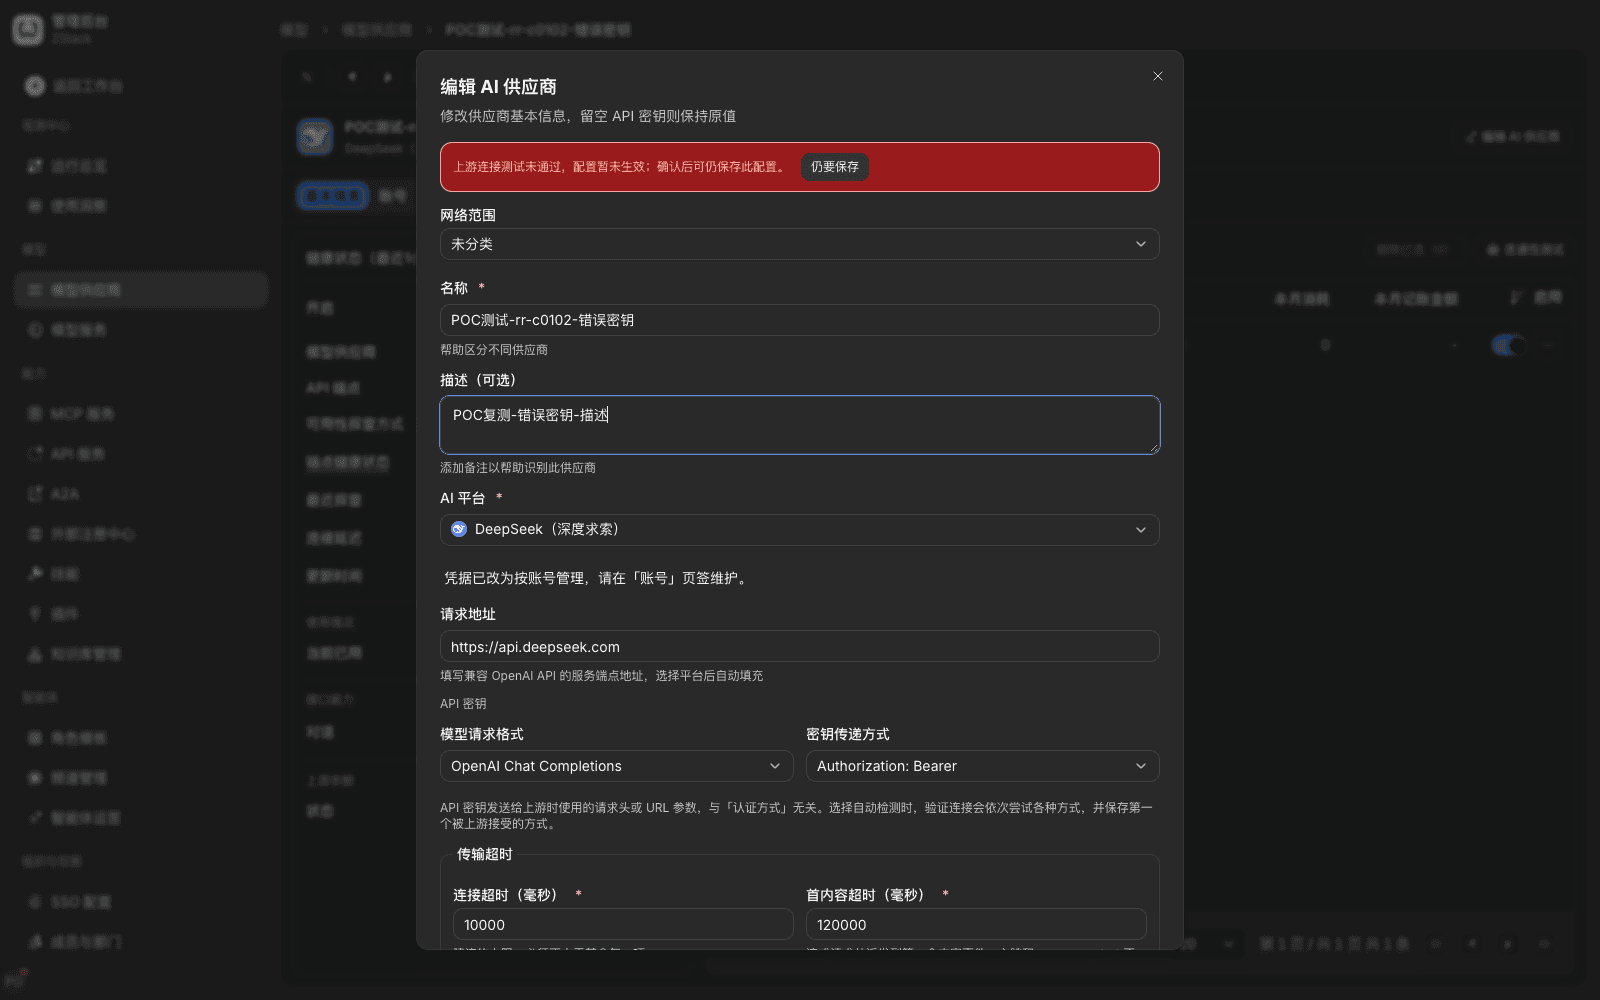
- In the upper right of the provider detail choose Edit AI provider.
- Change description, service URL, interface capabilities, model request format, timeout, retry and health-check policies, and enabled models as needed. Credentials are maintained on the Accounts tab.
- Choose Save.
Each save creates a new configuration version. It takes effect only after the pre-activation check. Old versions are kept and not overwritten.
Pre-activation check: on save the platform first runs an upstream connection test with the new configuration. If it does not pass, the prompt is Upstream connection test did not pass; configuration has not taken effect. After confirm you can still save this configuration. Only after you confirm and choose Save anyway is it activated.
Change history: the Operation Audit tab lists create, update, enable/disable, performance test, and similar operations by time. Update records state how many items this change touched, for example Update model provider · 3 items changed.
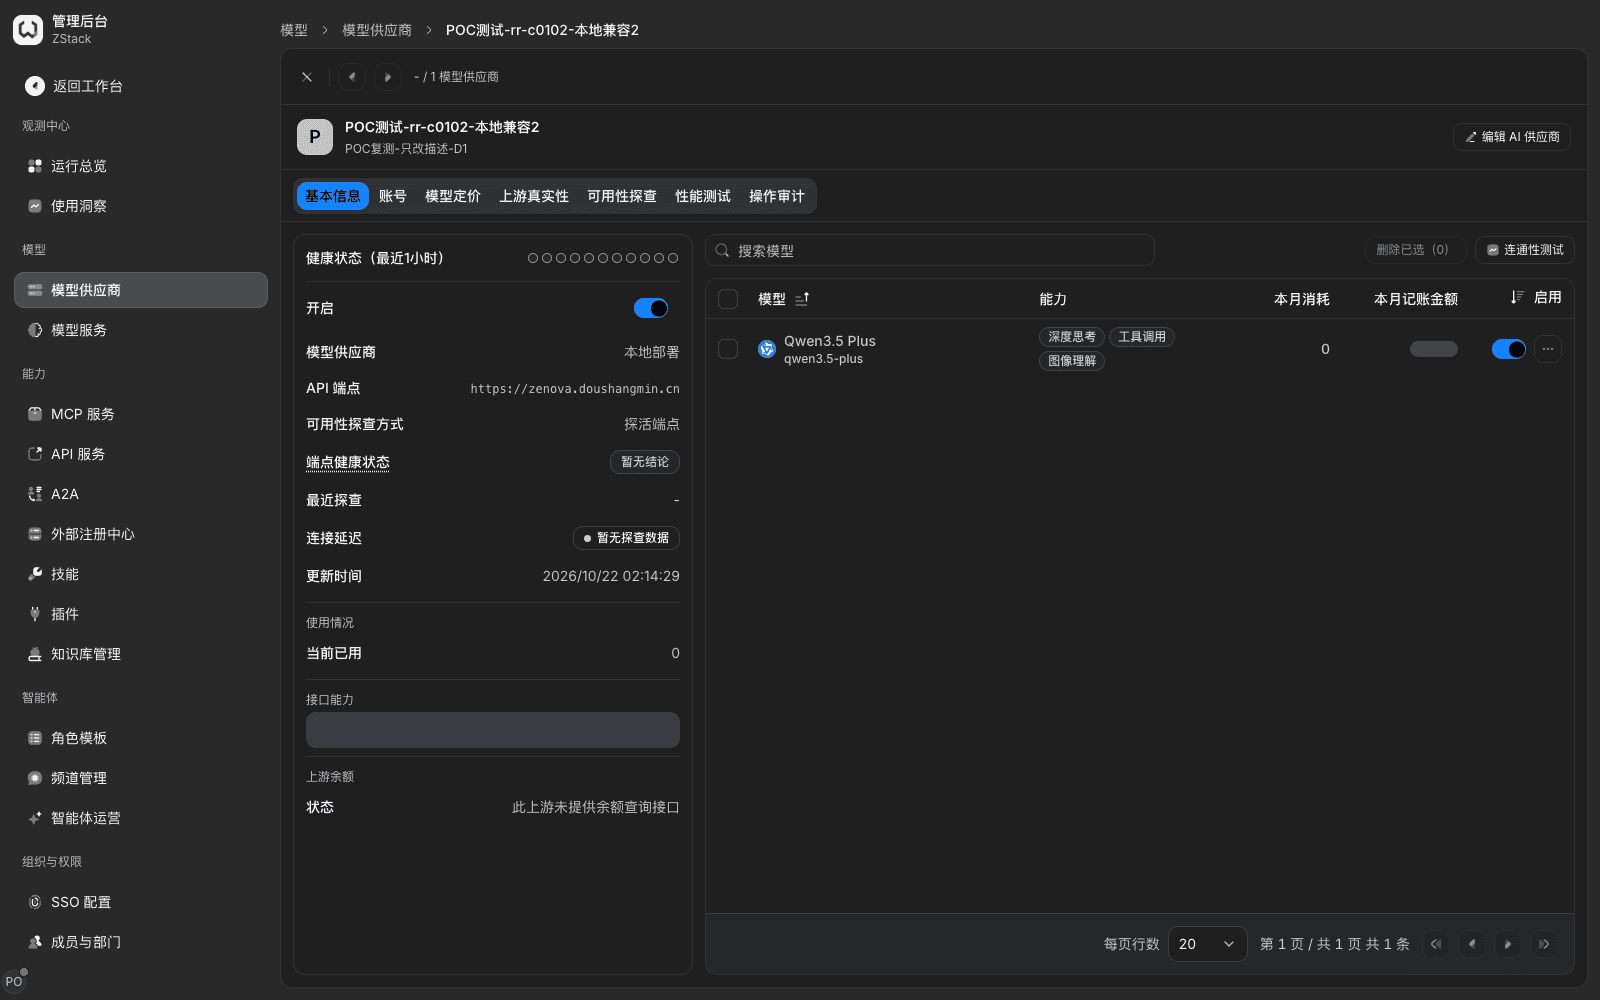
Note: the detail page only shows the currently effective configuration. There is no version list or rollback entry. To go back to an old configuration, fill in the original values and save, which also goes through the pre-activation check. Disabling a provider (turning off Available or Enable) only changes enablement; it does not create a new version.
Capability notes
| Not provided | Use instead |
|---|---|
| Auto-discover model-backend instances from a Kubernetes Service / Endpoint or a registry | Register multiple instances of the same inference service as multiple accounts of the same provider, each with a different URL (Section 4.4). Capabilities › External Registries only syncs A2A agents and MCP services from Nacos |
| Instance weight, port, or custom metadata in routing | An account only has URL, concurrency cap, and status. To split by instance, split into multiple providers and distinguish with traffic-rule conditions (Chapter 15) |
| Non-standard-protocol models passed through as URL + arbitrary path and counted in model usage | The model gateway only accepts declared standard endpoints. Undeclared endpoints return 404 (RESOURCE_NOT_FOUND). For byte-for-byte pass-through, use Capabilities › API services (Chapter 11): token auth, visibility, and call records, but it does not parse the model field, does not count tokens or cost, and does not use service quotas |
| View the provider version list in the UI and roll back in one click | Use Operation Audit to check how many items changed, put the original values back by hand and save, which also goes through the pre-activation check (Section 4.9) |
| Scheduled automatic upstream-authenticity attestation | Attest on demand by hand; combine with Passive traffic signals to watch whether the upstream-reported model matches the requested model (Section 4.7) |
Previous: 3. Organization and permissions · Next: 5. Model pricing and categories
3. Organization and permissions
Full-length chapter. Content is checked against the 2026.10 mainline code and the live console; menus and features depend on the current license, account permissions, and delivered environment.
5. Model pricing and categories
Full-length chapter. Content is checked against the 2026.10 mainline code and the live console; menus and features depend on the current license, account permissions, and delivered environment.