3. Organization and permissions
Full-length chapter. Content is checked against the 2026.10 mainline code and the live console; menus and features depend on the current license, account permissions, and delivered environment.
Back to overview · Full table of contents · Download full PDF
This chapter explains how to connect an enterprise identity source, sync the org tree, organize members by department and functional group, assign admin roles under three-person separation, and manage account enablement, passwords, sessions, and two-factor authentication. The last section explains when credentials become invalid after a transfer or departure, and how to confirm. Once the org is ready, capabilities can be granted by department or functional group as a whole instead of person by person.
Menus in this chapter and who can open them:
| Menu | Location | Accounts that can enter |
|---|---|---|
| SSO configuration | Admin Console › Organization & Access › SSO configuration | Tenant administrator, Security Admin |
| Members & Departments, Functional Groups | Admin Console › Organization & Access | Tenant administrator, Config Admin |
| Role Management | Admin Console › Organization & Access › Role Management | Tenant administrator only |
| Account & session security | Admin Console › System Settings › Global settings › Account & session security tab | Tenant administrator, Security Admin |
| Account security (personal) | Workspace › Settings › Account security | The member themselves |
3.1 Connect an enterprise identity source (SSO)
When to use: employees want to sign in with DingTalk, Feishu, or WeCom scan, or with the enterprise's unified authentication, without remembering a separate platform password; and you want the org tree synced from the identity source as authorization subjects. Prerequisite: you have already created an internal app on the identity source and have the app credentials.
Procedure
- Open Admin Console › Organization & Access › SSO configuration. The page lists Connected identity sources and their status. Connected sources show Enabled; click View to check all configuration except secrets.
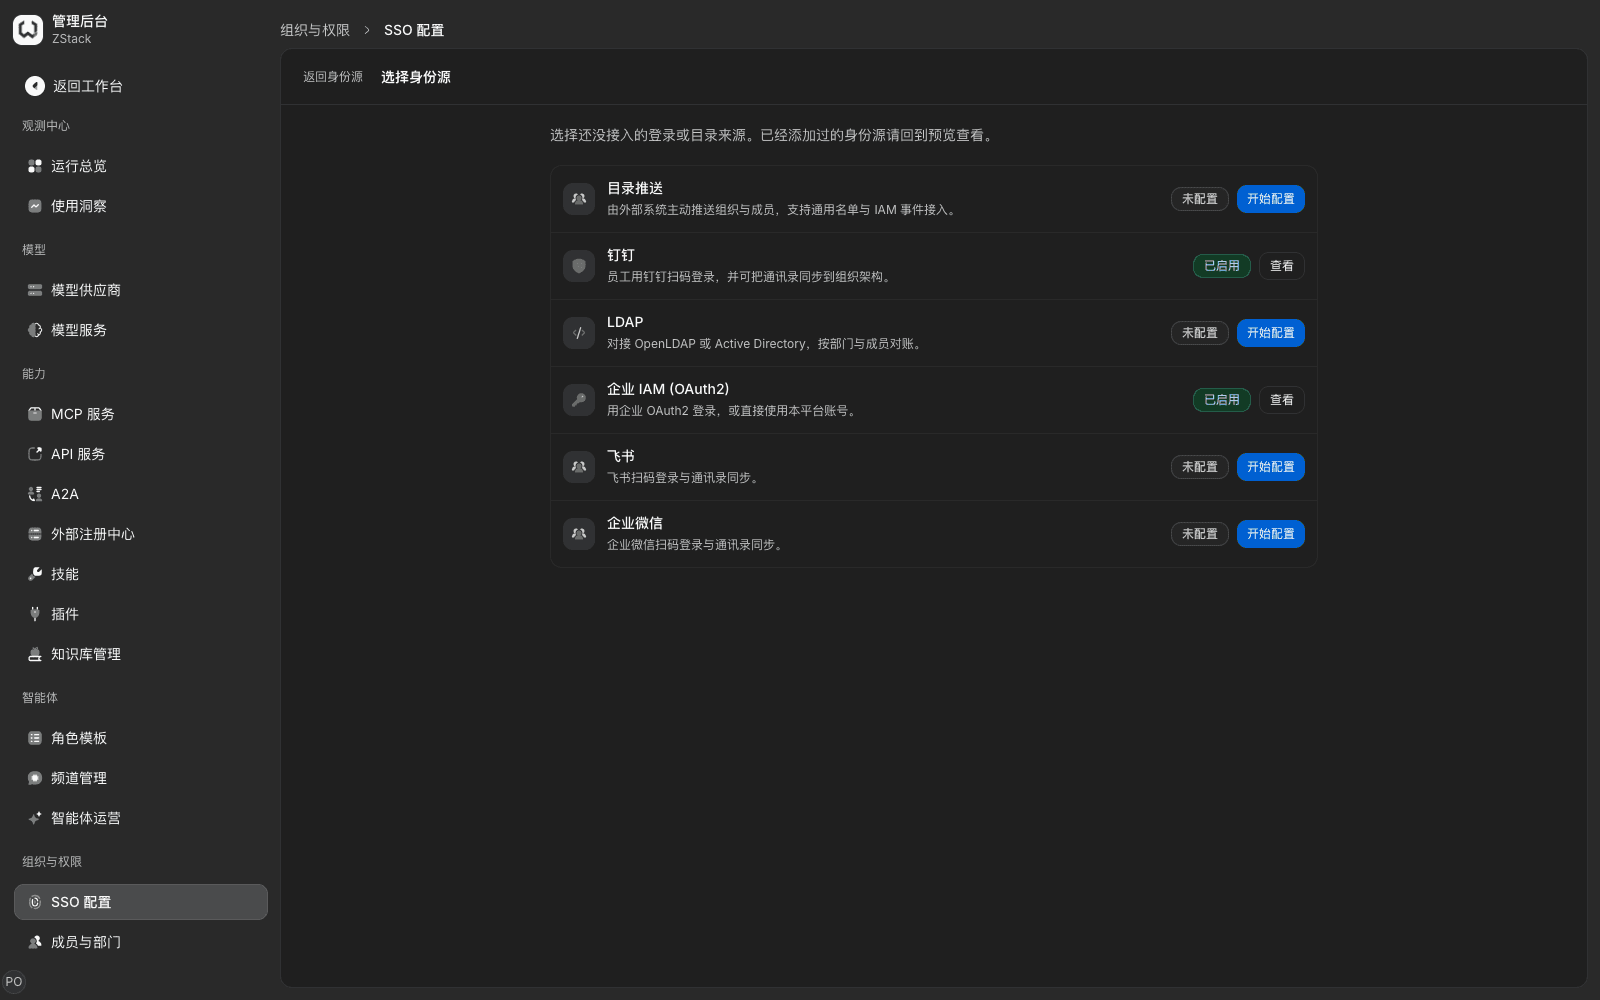
- Click Add identity source in the upper right, pick a type on Choose identity source, click Start configuration, and fill in the wizard step by step, then enable.
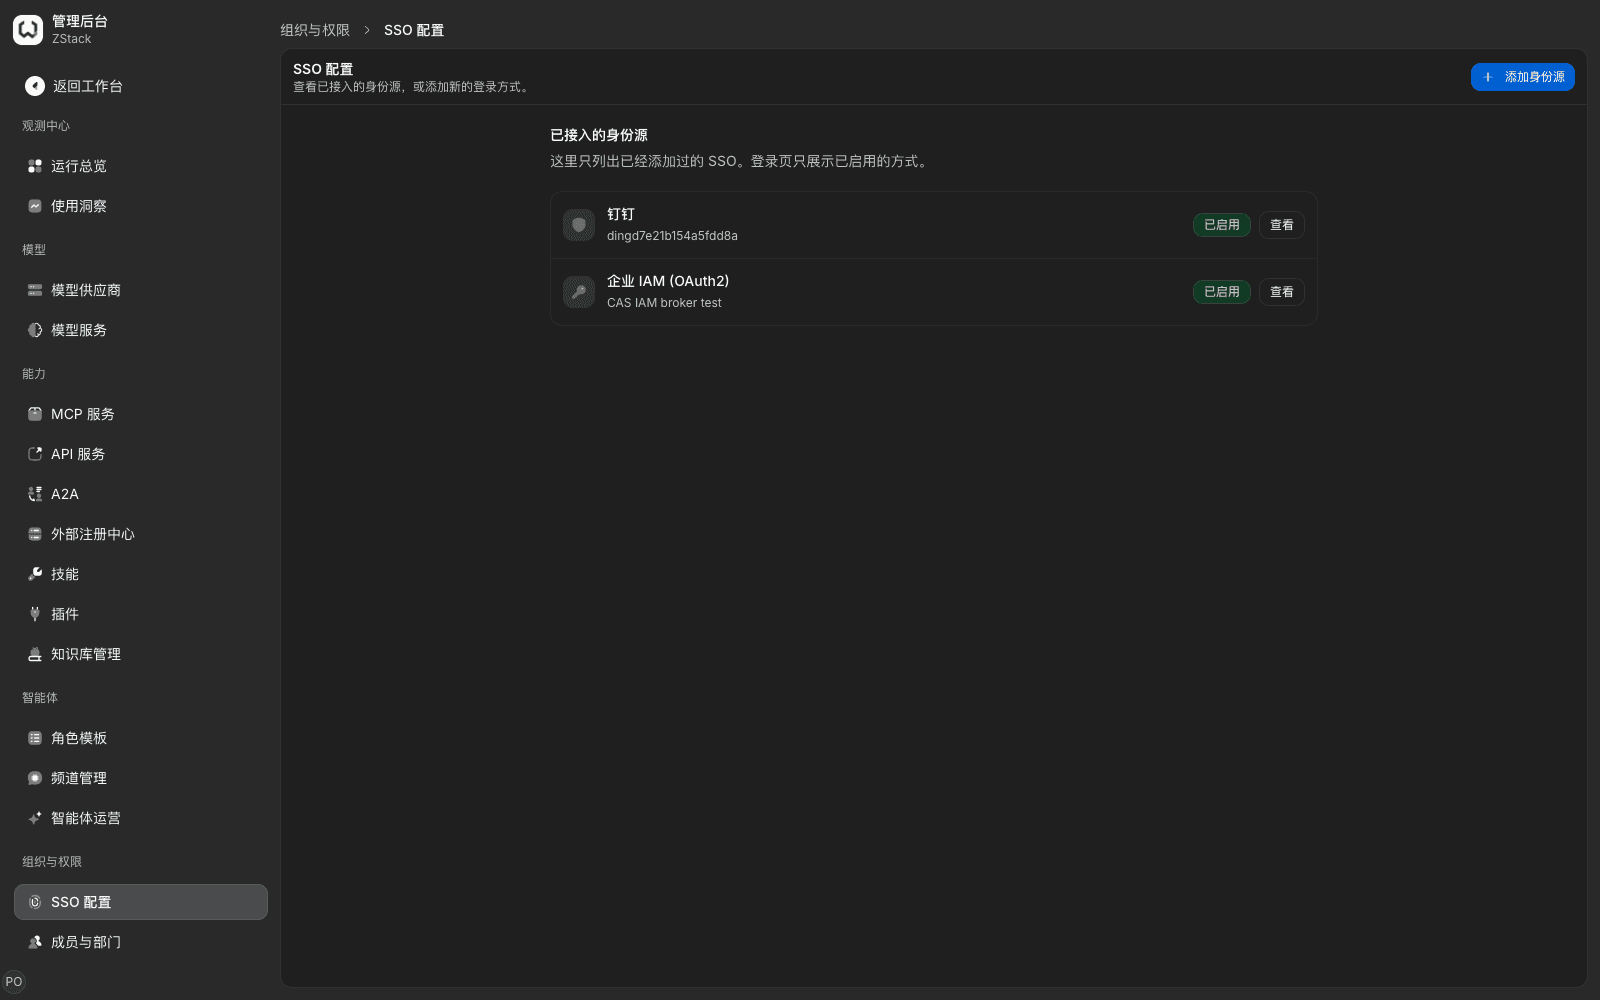
Six source types can be connected: DingTalk, Feishu, WeCom, enterprise IAM (OAuth2), LDAP, and directory push.
3.1.1 DingTalk scan sign-in
The wizard has four steps:
- Prepare callback: the page shows a system-generated callback URL, read-only and copyable. Register it in the DingTalk internal app's callback configuration.
- Fill in credentials: Corp ID, AppKey, AppSecret. AppSecret is stored encrypted and is not echoed; leave it empty on later edits to keep the current value.
- Sign-in policy: when Create account on first scan is on, a DingTalk user who is not yet on the platform is provisioned and signed in on scan; when off, only employees who already have a platform account can scan to sign in. After Enable DingTalk sign-in is on, the sign-in page shows a DingTalk entry.
- Org sync: turn on as needed; see 3.2.
The Feishu and WeCom wizards are similar: fill in enterprise ID, app ID, and app secret, decide whether unregistered members can auto-provision, put the callback URL into the vendor console, then enable.
3.1.2 Enterprise IAM single sign-on
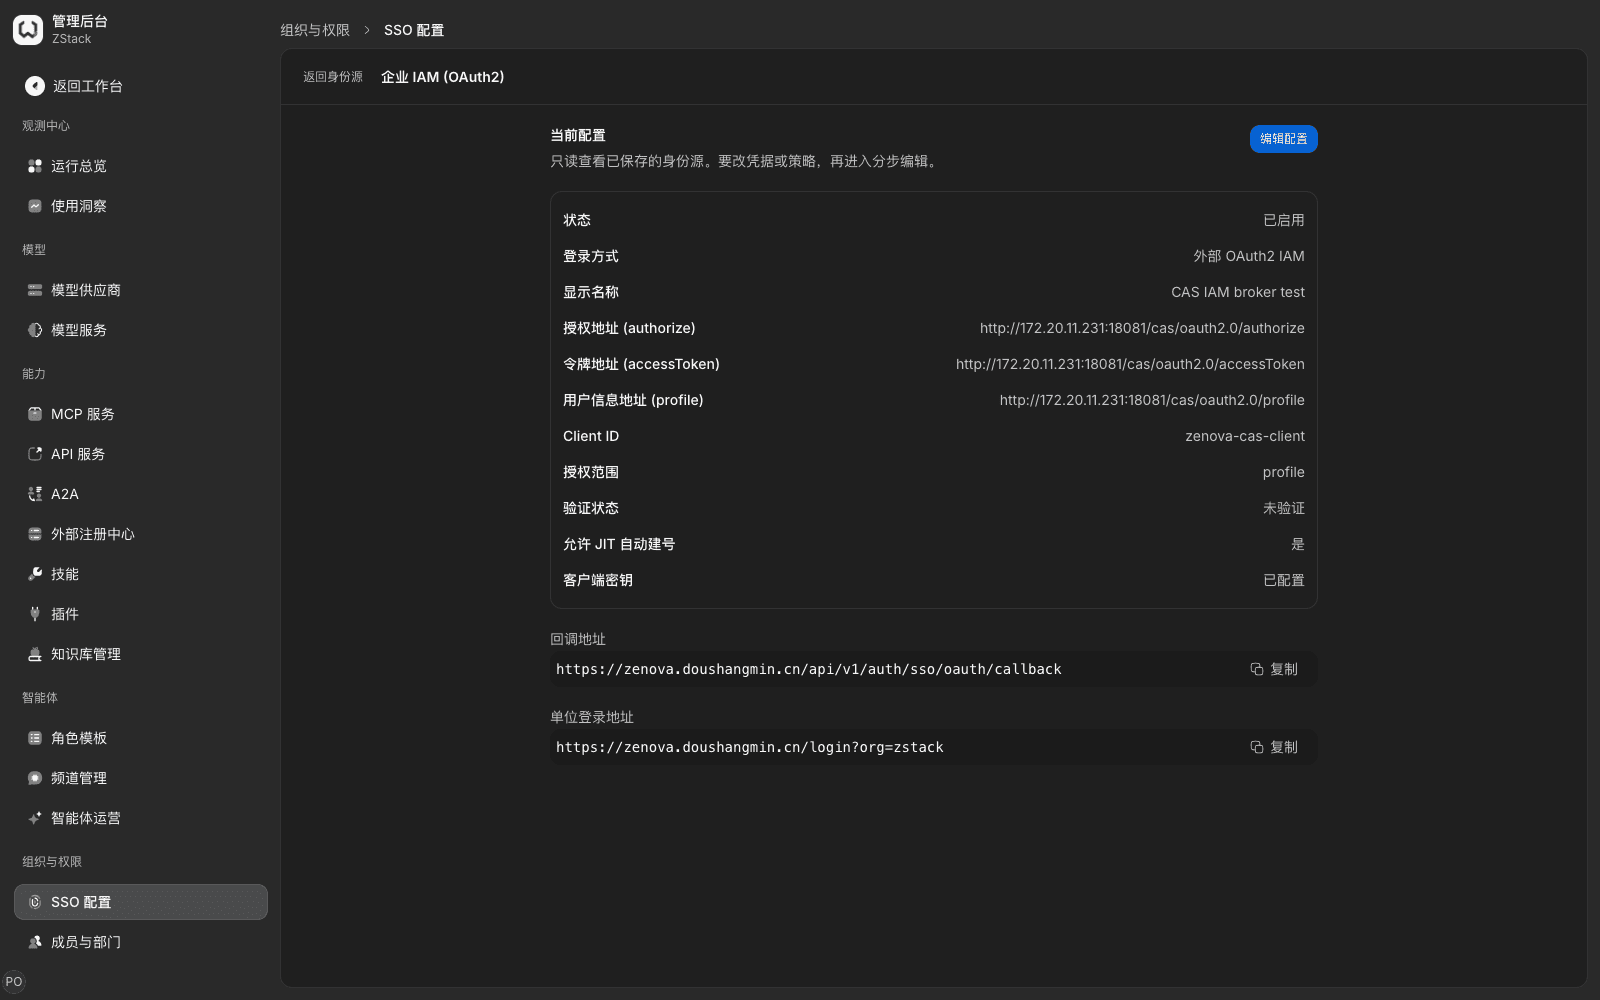
Four wizard steps: prepare callback, choose method, endpoints and credentials, identity mapping. Fill in authorization, token, and user-info URLs plus Client ID and Client Secret, and decide whether to Allow JIT account creation. After save, a unit sign-in URL is generated, of the form <平台地址>/login?org=<单位标识>, which you can give to employees.
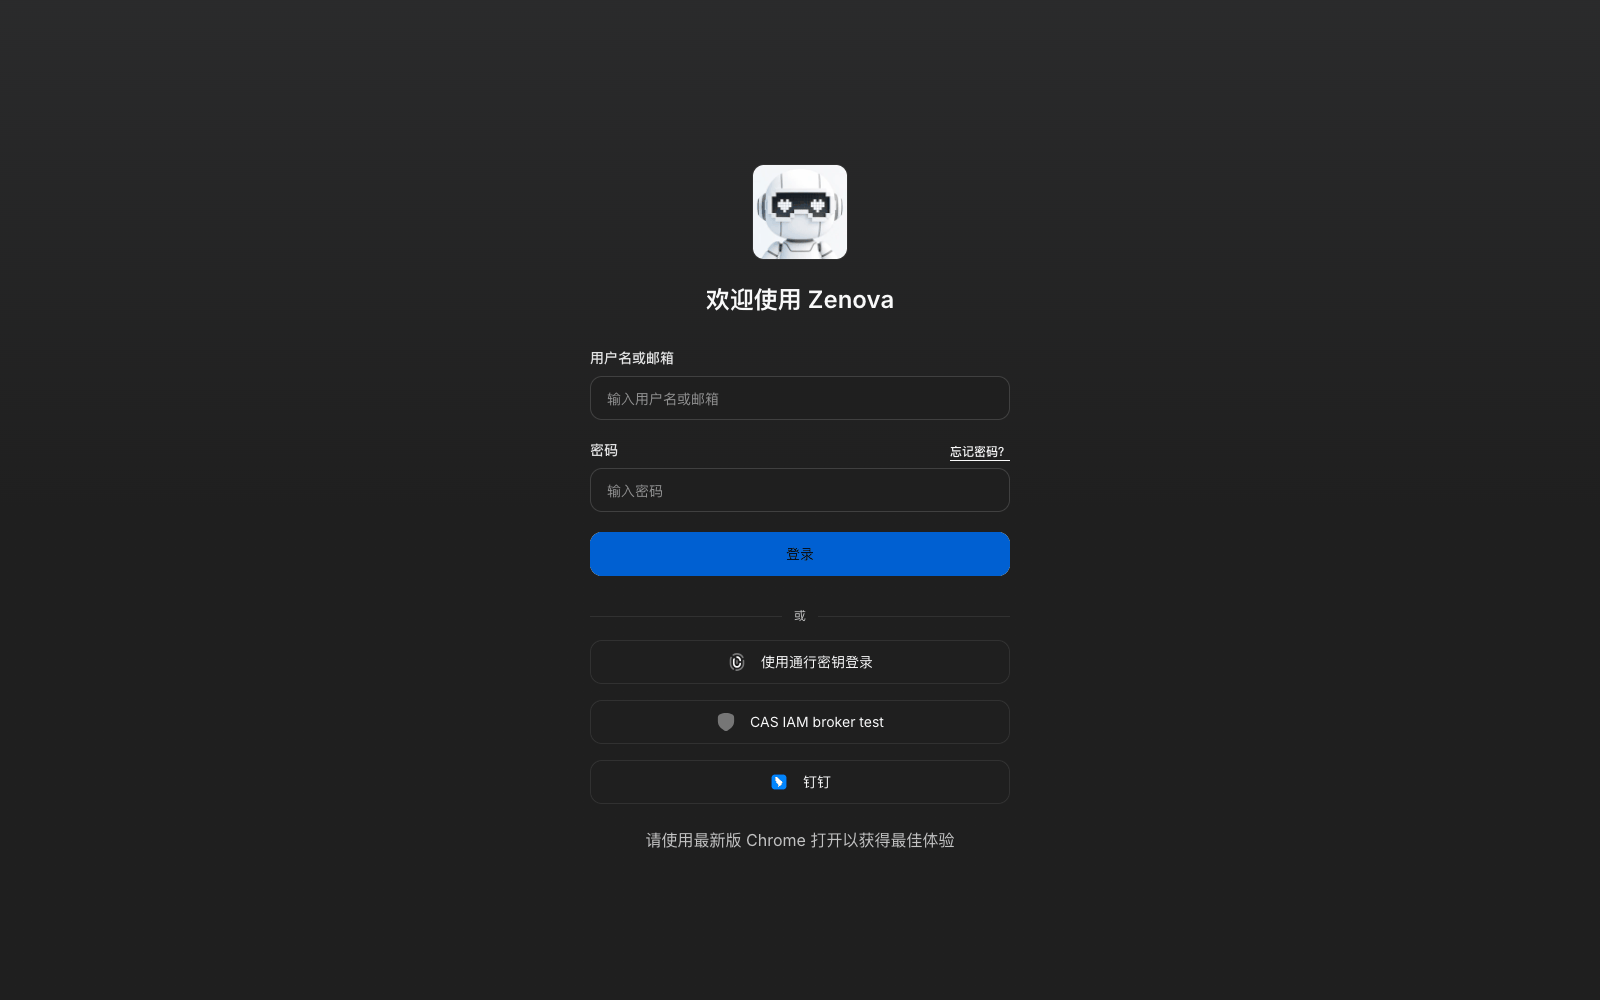
What you will see: under the username-and-password box, the sign-in page shows one entry per enabled identity source. After signing in with an identity-source account, that account's Source is External.
Note
- After save, Verification status is Unverified. Trust it only after a test sign-in. Changing endpoints or credentials requires re-verification.
- SSO configuration applies to all members of this tenant. Assess impact before you change Create account on first scan or disable an identity source; prefer a low-traffic window.
- Identity sources are for signing in to the Admin Console and the workspace. Business-system credentials that call models are data-plane authentication (see 3.9).
3.2 Sync the directory and receive directory push
The org tree can be pulled from an identity source on a schedule, or pushed by an external system. Departments and members brought in either way are read-only; structure and membership are maintained in the source system.
Directory sync fits enterprises that already maintain the org tree in DingTalk, Feishu, WeCom, or AD. Open View on that identity source and scroll to Directory sync: click Sync now when you need an immediate reconcile; turn on Automatic sync and pick a period for scheduled sync. The region shows department count, new-user count, membership-relation count, staged-change count, and next sync time for this run.
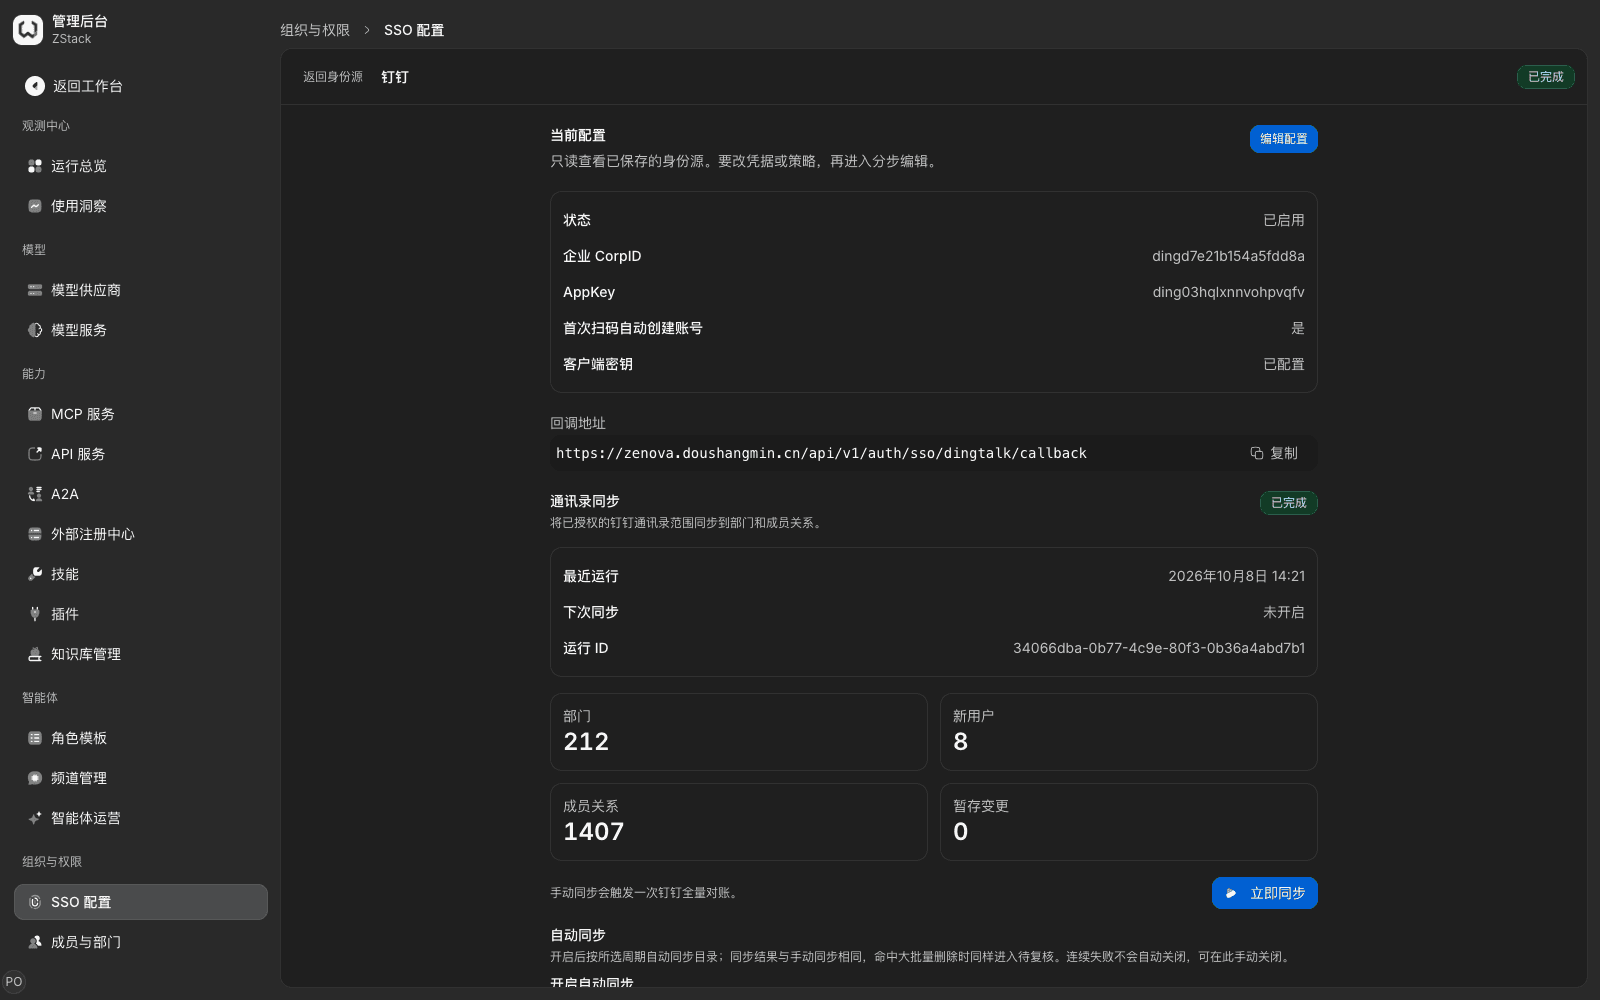
Quarantine review: when a single sync's change volume exceeds the threshold, changes are staged as Pending review instead of taking effect, to stop a source-system incident from disabling a large number of accounts by mistake. An administrator can approve or reject them in one action after review.
Directory push fits HR systems that notify the platform immediately on hire, transfer, or departure; it is also the recommended entry for "cut access on departure". Choose Directory push in Add identity source. After enable, fill in source name, app ID, and app secret (required on first save, not echoed). If enterprise IAM is already configured, you can link it; pushed members are associated with existing accounts by the SSO account-match field. After save, a push URL and a connection-test URL are generated; configure them plus credentials on the external system to start pushing.
What you will see: after a push, matching departments and members appear. People marked disabled go to the Departed members tab, and their sign-in sessions, API keys, and access tokens all become invalid.
3.3 Maintain departments and members
When to use: you need to build the org tree, create accounts by hand, change a person's department, or handle departure and restore. Sign in as tenant administrator or Config Admin. Departments and members managed by sync or push are read-only and must be maintained in the source system.
3.3.1 Create a department and add members
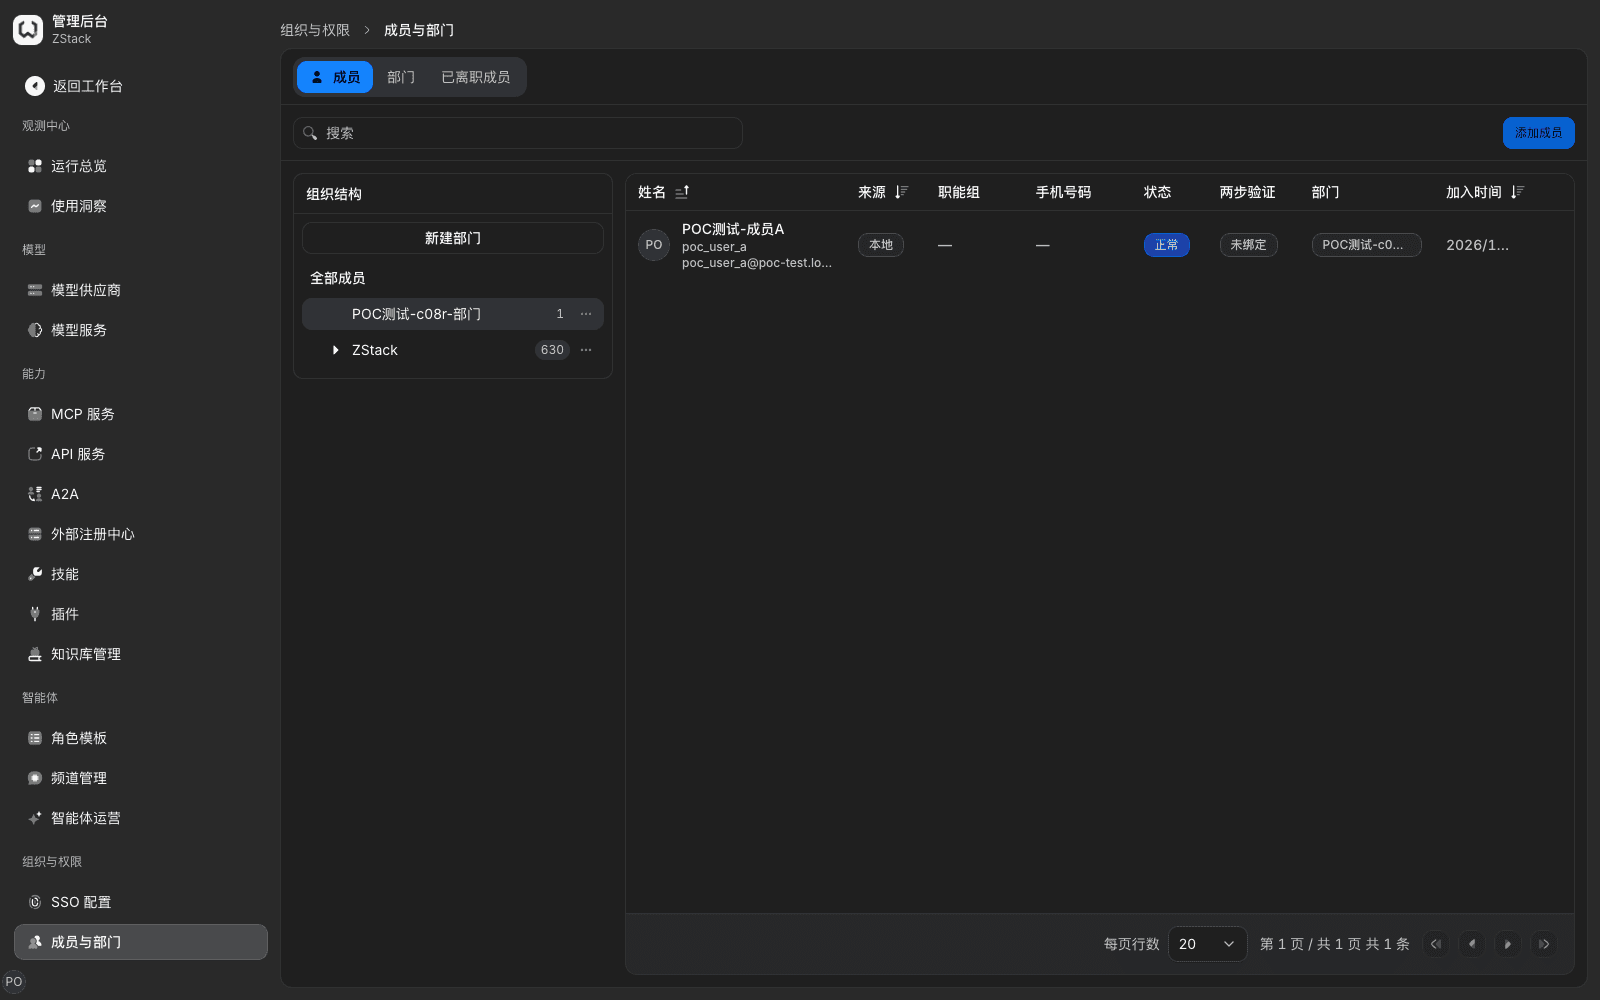
- Open Members & Departments. On the Departments tab, click New department in the org tree, fill in department name, description, owner, and parent department (which decides its place in the tree), then click Confirm. The department then shows a full path, for example "ZStack – R&D Center".
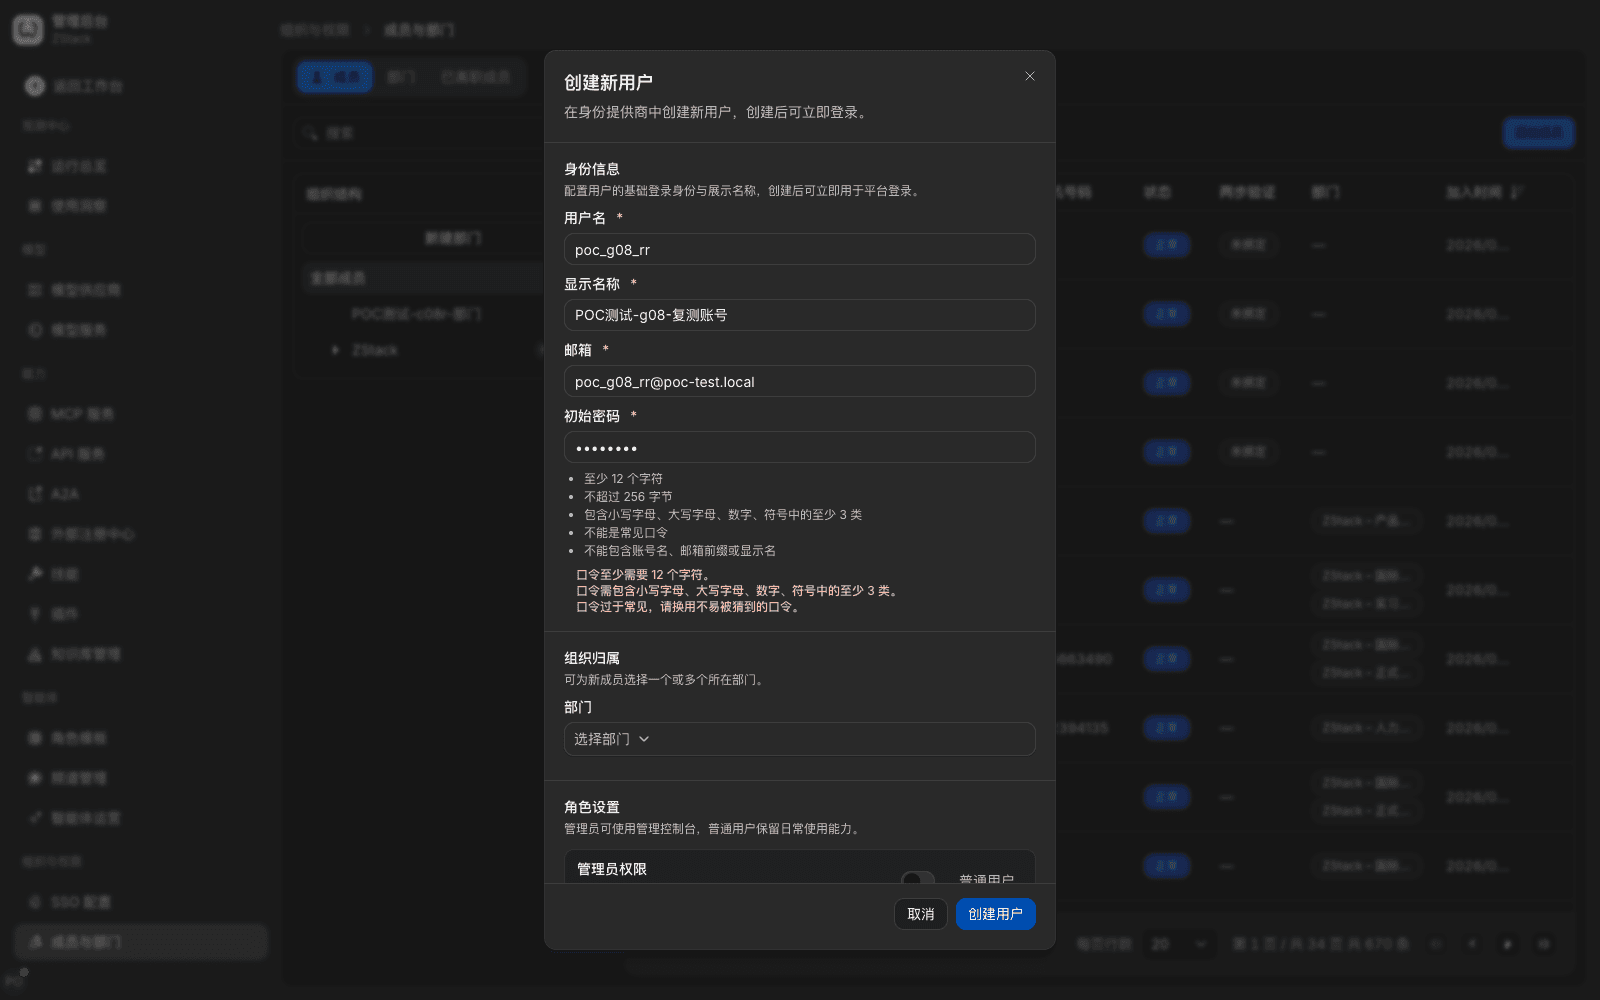
- Switch to the Members tab, click Add member, fill in username, display name, email, initial password, and choose a department. That member can then receive department-based grants.
- Click Create user. The account can sign in immediately. Give the sign-in URL and initial password to the person over a secure channel, and require them to change it after first sign-in.
Note: accounts come from only four sources — administrator create, auto-provision on first identity-source sign-in, sync, and directory push. The platform does not provide an account-request approval flow.
3.3.2 Change affiliation and row actions
On a member row, click ⋯ › Adjust organization affiliation. Add or remove departments under Departments (multi-select, peers), maintain functional groups the member belongs to directly under Functional Groups, then click Save. Affiliation updates immediately. After a member is removed from a department, capabilities granted only through that department and the matching keys lose authorization at once (see 3.9).
The member list shows name, source (local / external), functional groups, status, two-factor authentication, department, and join time. The row menu also offers reset password, reset two-factor authentication, delete (move to departed), and revoke all permissions. Members managed by sync or push must be handled in the source system. You cannot delete the last tenant administrator.
3.3.3 Assign department administrators
When to use: a subordinate unit is provisioned by headquarters and then needs to manage its own model use, for example a branch managing its own people's model services, usage, and limits.
Prerequisites: sign in as tenant administrator. A department administrator's scope is the assigned department and all of its child departments. The assigned department must be enabled.
Procedure
- Open Members & Departments, select the department on the Departments tab, and open department detail.
- In the Department administrators block, click Add, choose a member, then click Add. The assignment takes effect immediately. The same member can administer multiple departments.
- To revoke, click Revoke on that member in the list and confirm. The member loses department-admin permission on the next request. Delegations and limits they already granted stay with the department and continue to be managed by other administrators of that department or by the tenant administrator.
After a department administrator signs in they enter the Management Console. The page header shows Admin scope: department name (including children). The sidebar only shows the following entries, and they only act on the administered scope:
| Entry | What a department administrator can do |
|---|---|
| Model group delegation | Re-grant model services that headquarters already opened to this department (or a parent) to departments or members in scope; cannot re-grant to workspaces, functional groups, or everyone |
| Operations overview | View usage statistics and peak callers in scope; on Requests, view and export the request list by in-scope departments; no single-request detail |
| Usage insights | View the Members tab and member profiles; no issues, work items, rules, or settings |
| Member keys | View and disable personal keys of members in scope; cannot view plaintext, rotate, delete, or restore |
| Traffic Limits | Set concurrency and rate limits for members, keys, and departments in scope |
Scope and statistics
- All of a member's departments must be in the administered scope before a department administrator can re-grant services to that member, disable their keys, or set personal limits. A limit set on a department applies to all of that department's members, including members who also belong to other departments. If headquarters needs a member not to be bound by a department limit, change their department affiliation, or set a time-bounded Exemption.
- Operations overview usage and requests are counted by the affiliation department at call time. Usage insights, model keys, and limits are split by the member's current departments. After a transfer, the two pages' numbers may disagree. A newly transferred member's evaluation conclusions from before the transfer, in the selected time range, are still visible to the new department's administrators.
- Department administrators do not see conversation plaintext: there is no session or call detail, and plaintext excerpts in Usage insights are hidden.
- When a department administrator exports a member evaluation list or call records, the audit log records the exporter and the admin scope at that time.
When a re-grant takes effect and lapses
- A re-grant is in effect only while its basis holds: headquarters has an in-effect opening to the re-grant's department or a parent, and the re-grant subject is still in that department's scope.
- When a tenant administrator deletes or narrows the opening to that department, re-grants that lose their basis are deleted with it. Opening again later requires the department administrator to re-grant.
- When an opening expires, a department is disabled, or a member is moved out of scope, the re-grant pauses and is marked Basis lapsed in the availability-scope list. It resumes automatically after renewal or org restore. Tenant administrators can see all re-grants and their status in a model service's availability-scope list, and can delete re-grants they do not need before renewal.
Limits
Limits set by a department administrator stack with headquarters limits; they only add restriction, they do not relax or override headquarters limits. Priority is fixed by the system. Department administrators can only change, enable/disable, and delete limits that belong to their administered scope; they cannot change headquarters limits.
Note
- To stop one member from using one model service, a tenant administrator can disable that member's keys in Model Groups › API key management: all of that member's keys on this service become invalid at once, and they cannot claim new keys. A department administrator cannot undo this. To restore, the tenant administrator opens that key's detail and clicks Restore: restore only lifts the disable on that member; the disabled key itself does not become valid again, so the member must claim a new key. You cannot pre-disable a member who has no key yet; reclaim the opening to their department or adjust the department administrator.
- Department structure and people are still maintained by directory sync or the tenant administrator. Department administrators cannot change them.
3.4 Use functional groups for cross-department authorization
When to use: project teams, virtual teams, special-purpose groups, and other grants that do not map to the org tree. A role decides which admin pages you can enter; a functional group decides which capabilities you can use.
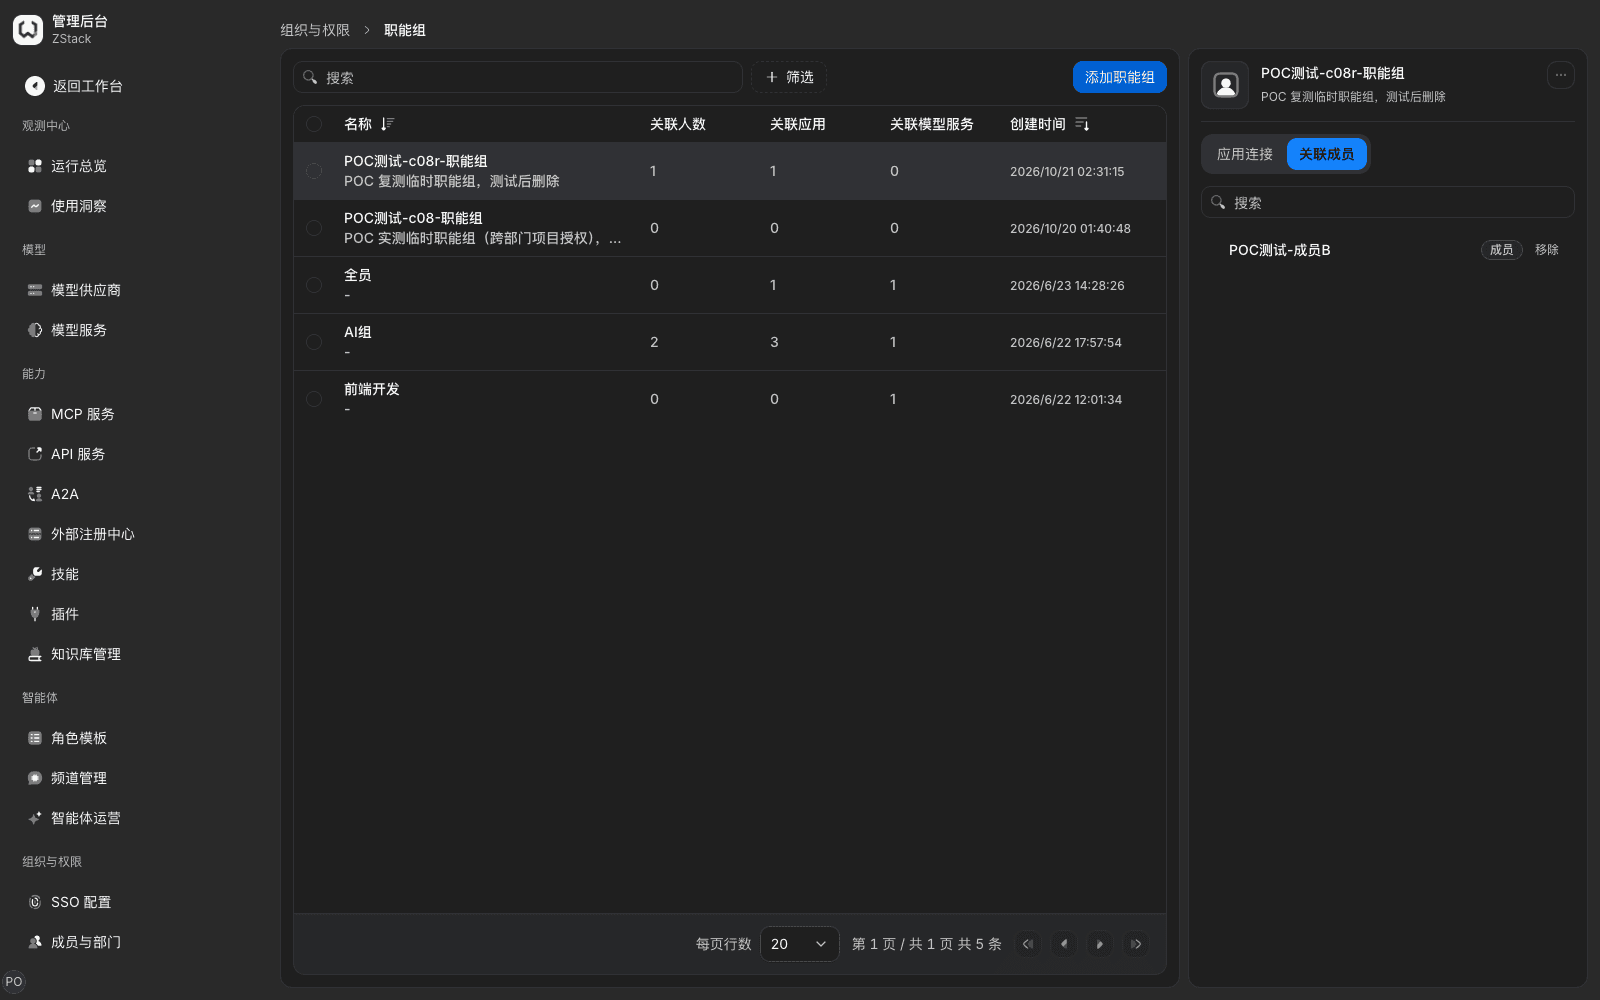
- Open Organization & Access › Functional Groups, click Add functional group, fill in name and description, then create.
- On the functional-group row, click ⋯ › Invite members, search and select members, then click Invite. Select the functional group to check the Linked members tab on the right; click Remove after a member to take them out.
Grant by department or functional group: open a model group's Visibility & quotas, click Edit availability scope, choose Departments and tick, switch to Functional Groups and tick, then click Next to set validity (default Long-term) and save.
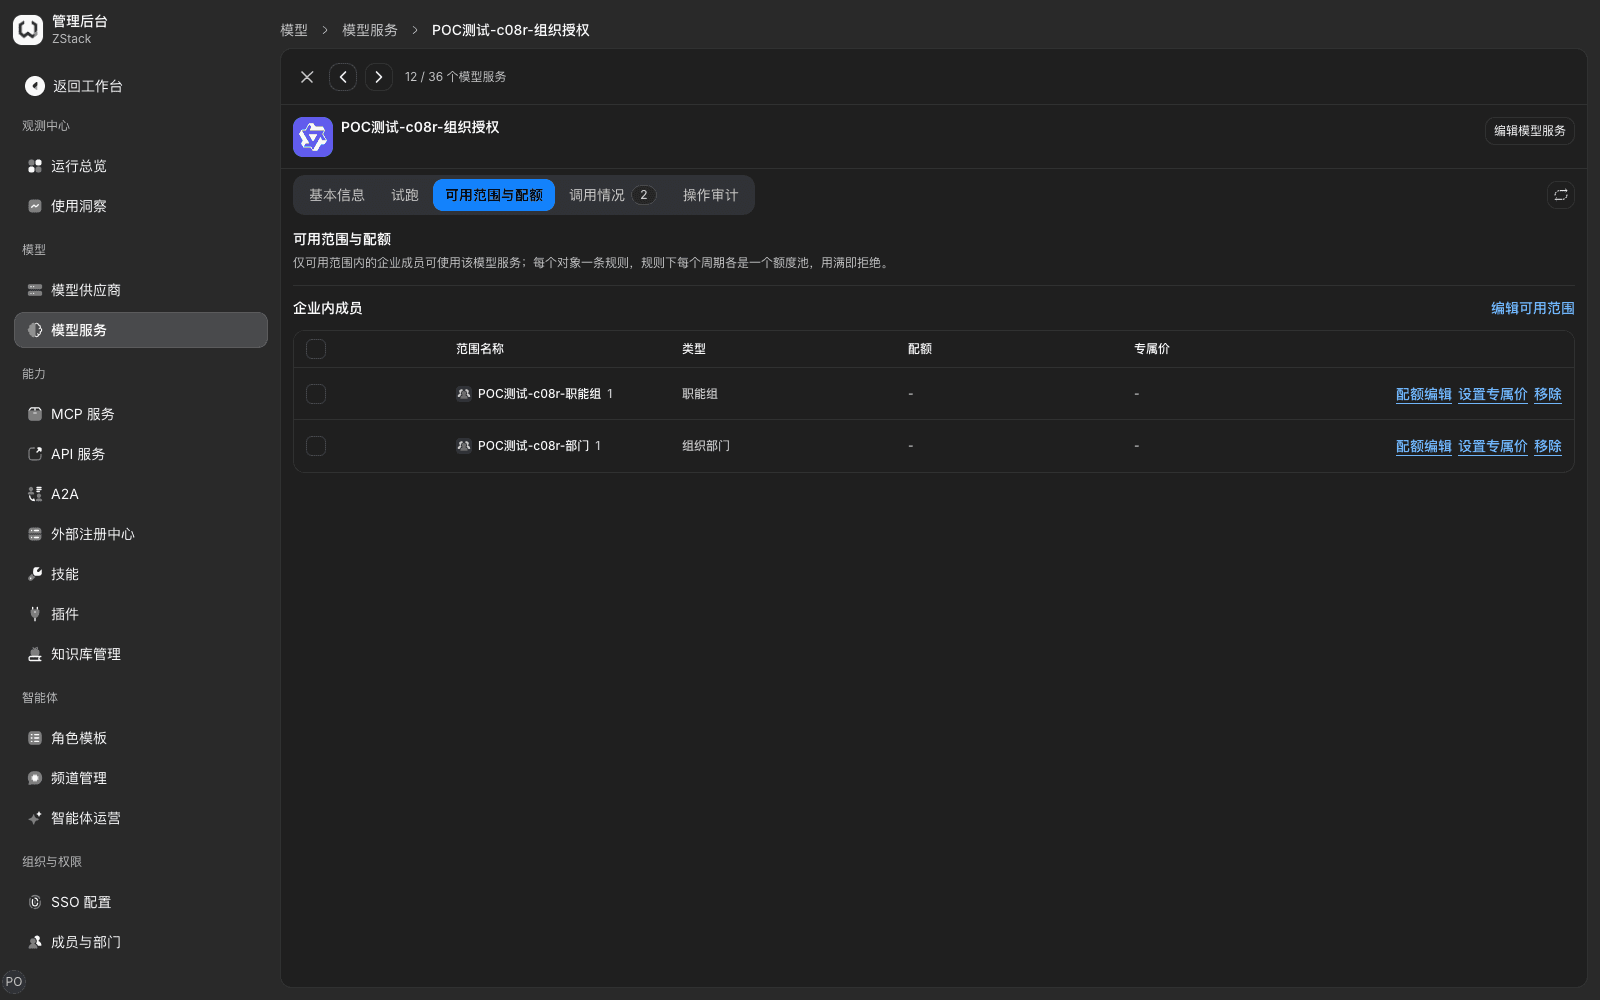
What you will see: the availability-scope table lists one row per subject, with type and headcount. Members in the department and in the functional group see the service after sign-in, the matching subject appears in API key affiliation, and keys created with that affiliation can call immediately. When a member is granted through more than one subject they must choose an affiliation; usage is counted against that subject's quota pool.
3.5 Assign admin roles and three-person separation
When to use: split admin permissions across different people to meet classified-protection requirements, so one person does not hold configuration, credentials, and audit at the same time. Role duties are in 1.2. You must operate as tenant administrator.
- Open Organization & Access › Role Management. The page lists members who hold each role on role tabs, with only Add member and Remove.
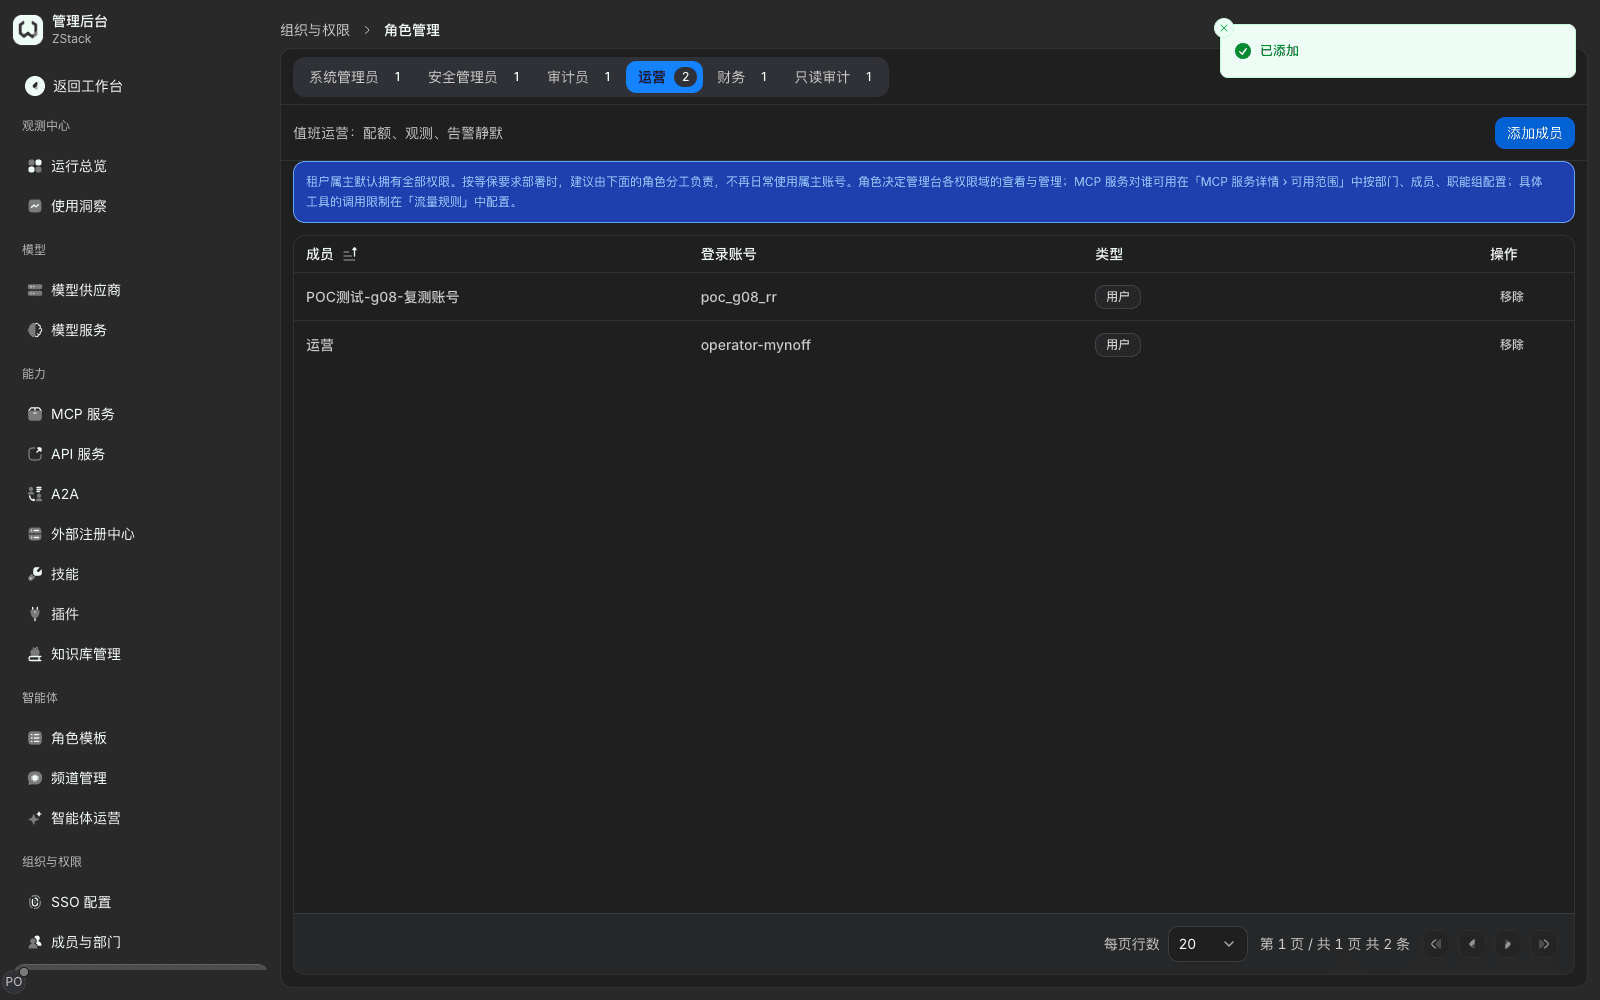
- Select the target role tab, click Add member, search and choose a user, then confirm. A role can be granted only to a single user. To take it back, click Remove and confirm.
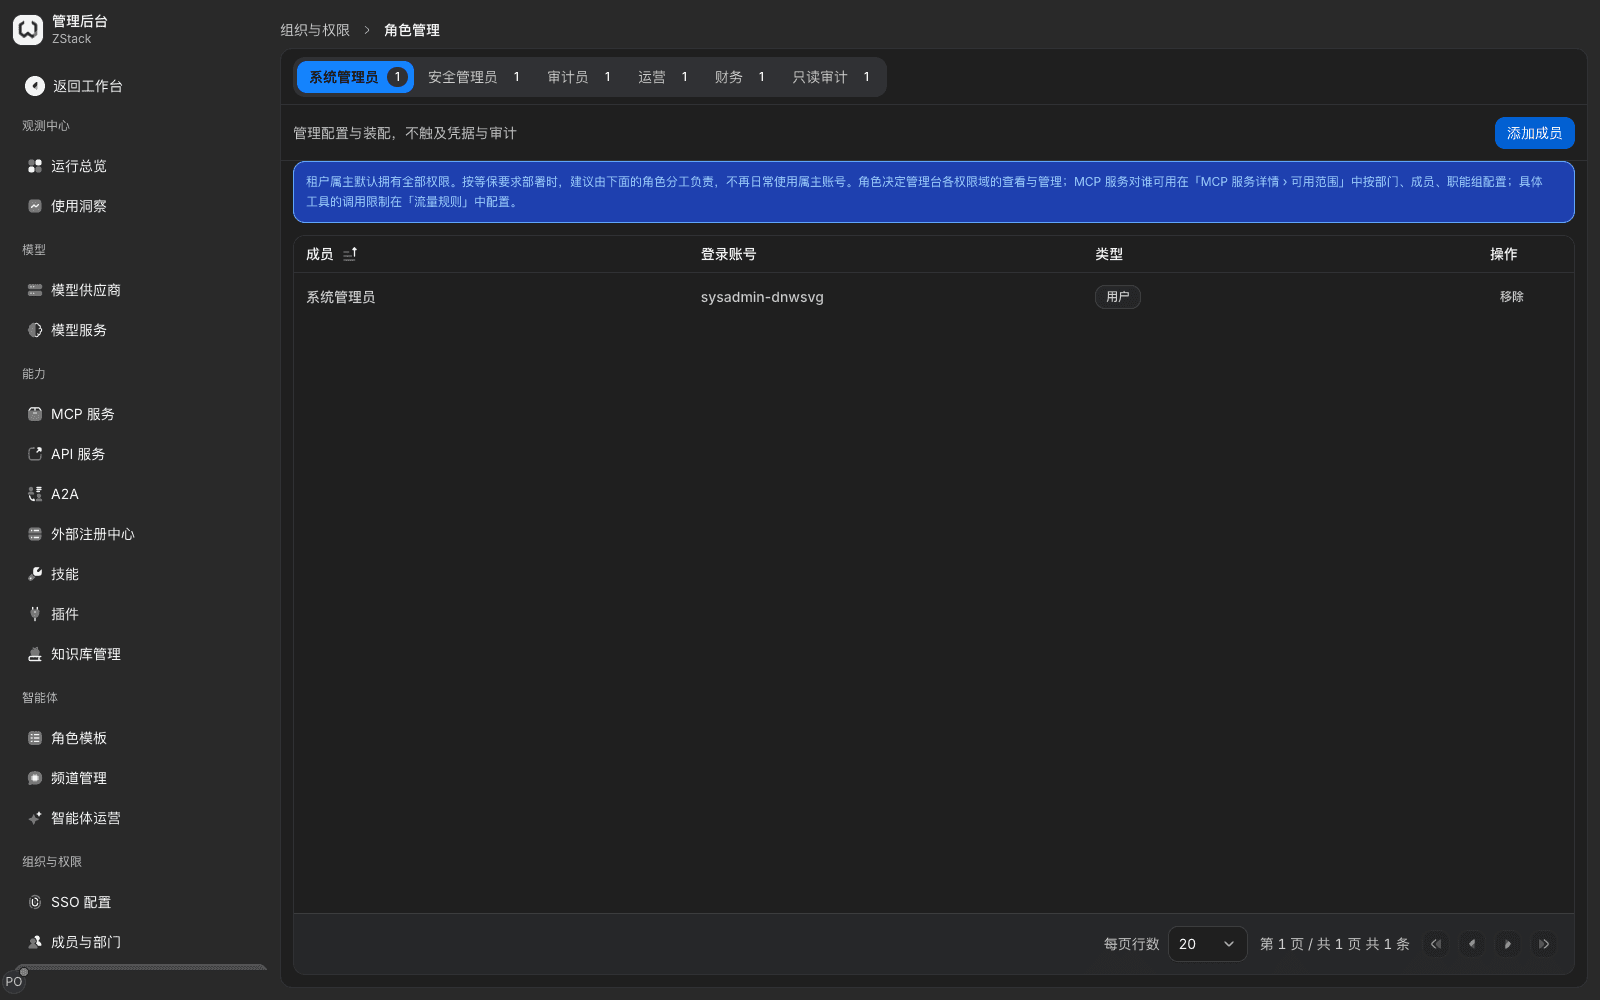
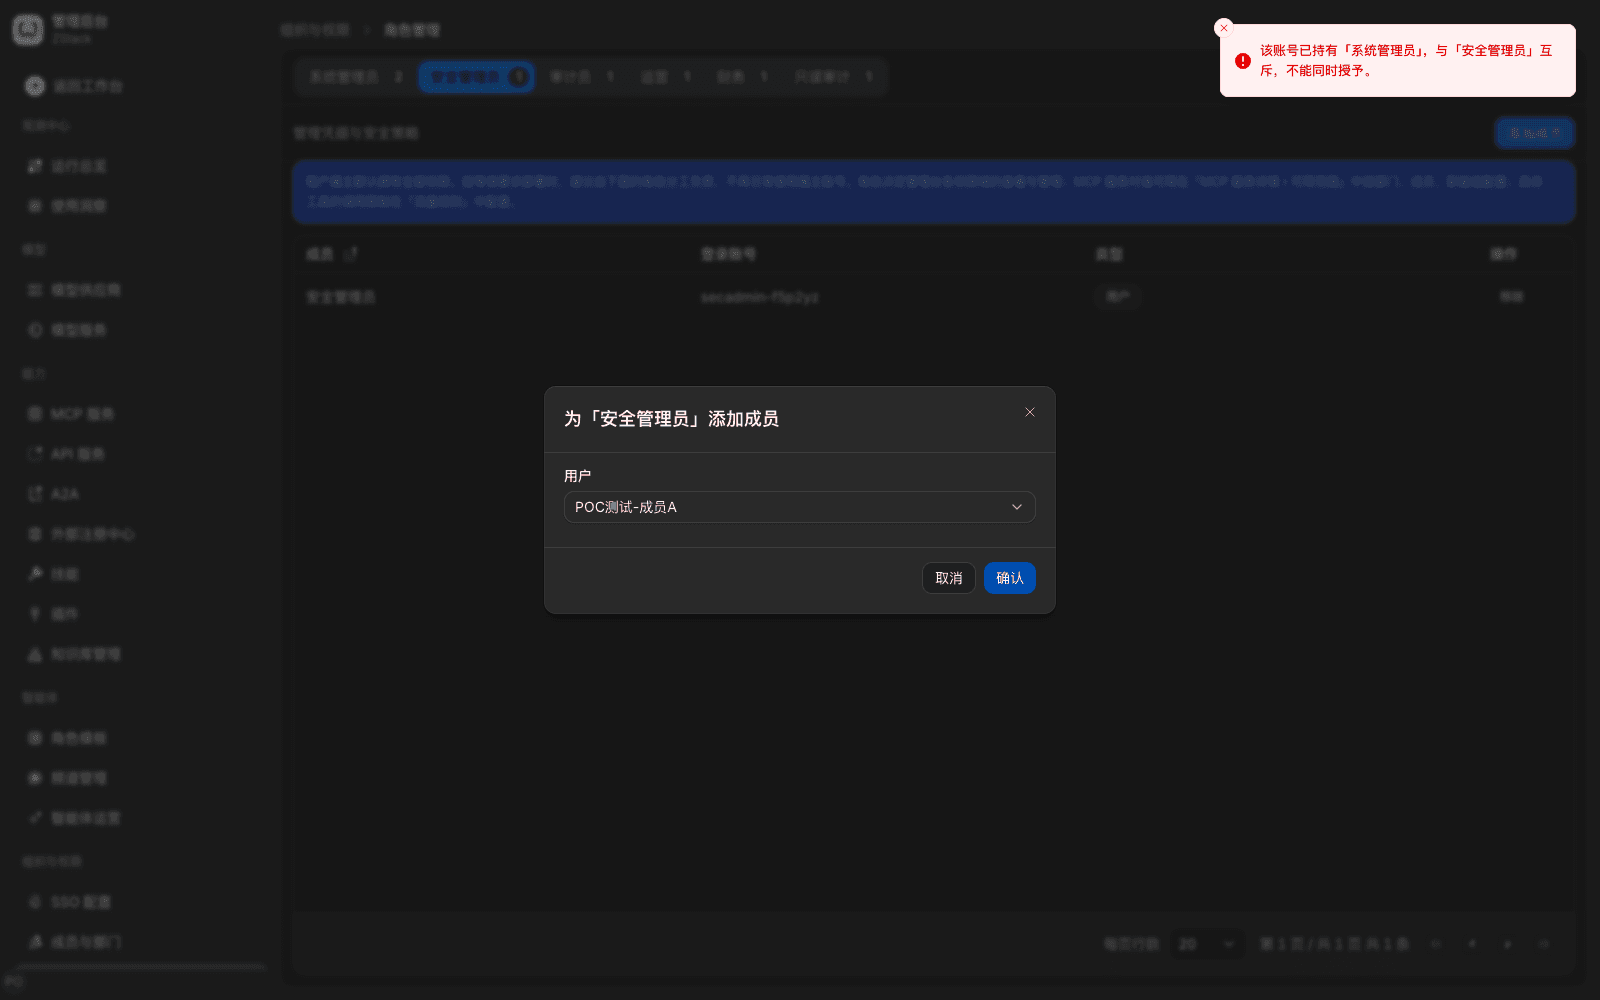
Three-person exclusivity: Config Admin, Security Admin, and Auditor are pairwise exclusive. One account can hold only one of them. Granting another is refused on save, with a clear message that the two are exclusive and one must be removed first. Operator, Finance, and Read-only auditor can stack with any role.
What you will see: after grant, the other person's sidebar immediately shows the menus that role should have. Out-of-role access is denied: opening a page that is not this role's shows 404 page not found or Access denied, and the API returns 403. After the role is removed, visiting again sends them back to the workspace.
Note: roles are a fixed set. You cannot create, copy, or tick permissions by menu. You only manage who holds which role. Object-level authorization is carried by each resource's Available scope. Tool-level authorization inside an MCP service is configured in Traffic rules by specific capability + caller + tool name (Chapter 15).
3.6 Manage account enablement and passwords
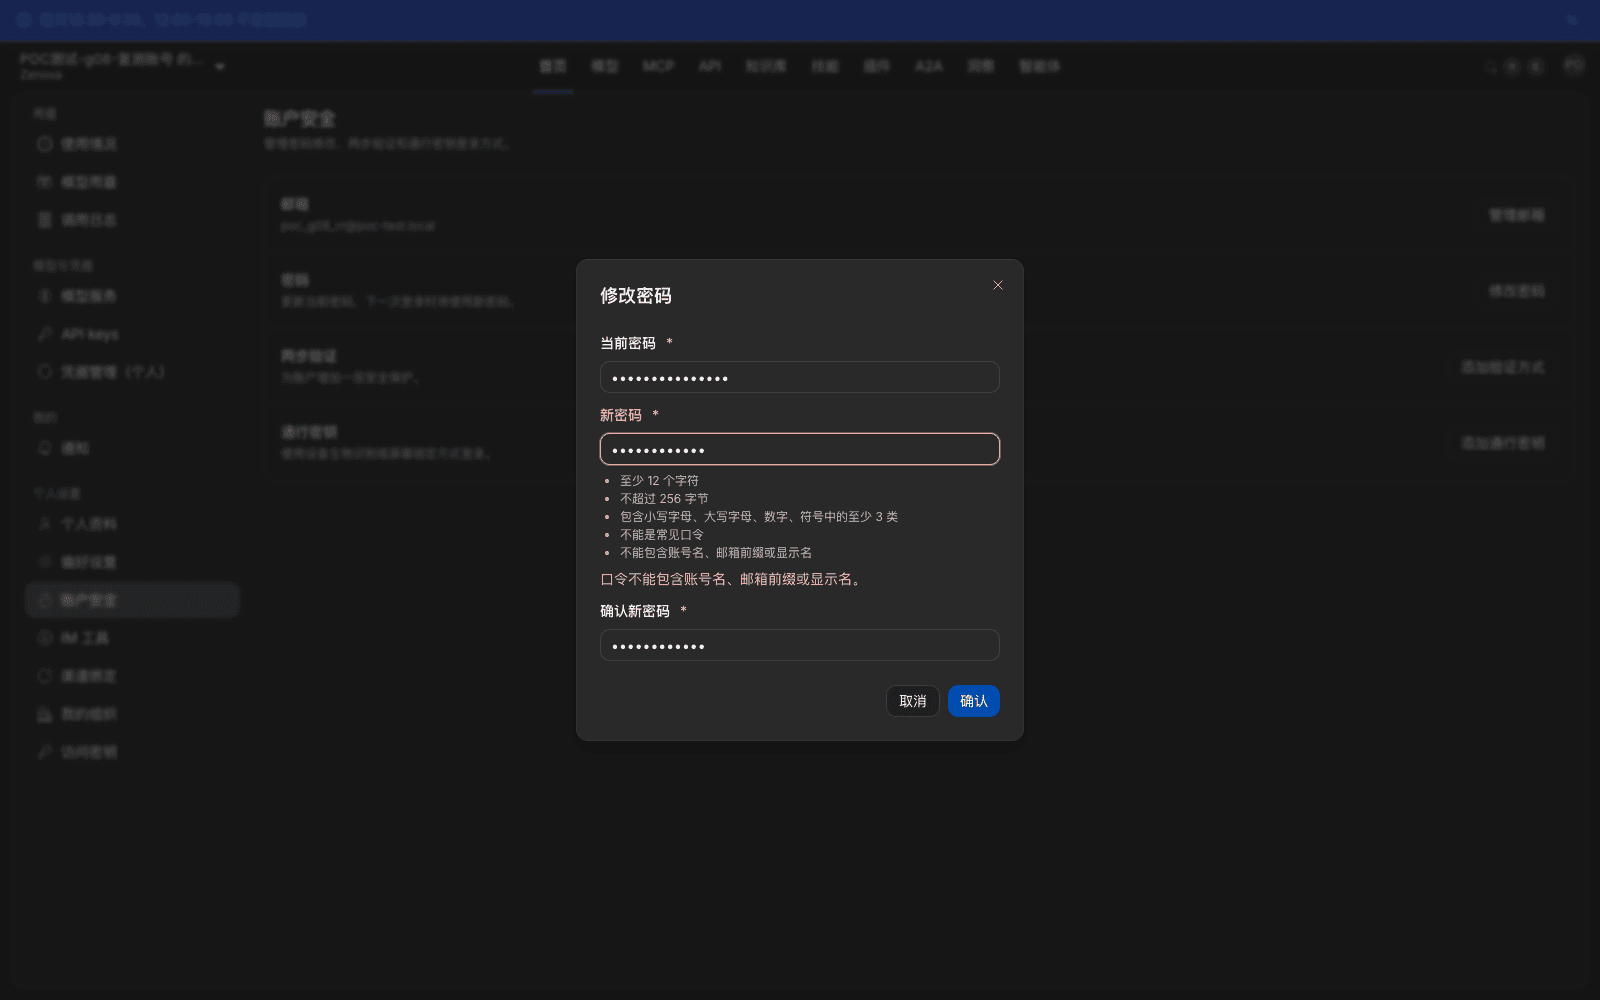
Password rules are a tenant-wide configuration and apply to all local accounts of this tenant: at least 12 characters, at most 256 bytes, at least 3 of uppercase, lowercase, digits, and symbols, reject common passwords, and do not contain the account name or email prefix. Passwords of external accounts are managed by the identity source and are not bound by these rules.
What you will see: create-member, administrator-reset, and member self-change all list the rules under the password box. Violations are marked one by one, and the form stays open.
Administrator reset: on a member row click ⋯ › Reset password, enter a new password that meets the rules, and confirm. The page says Password reset; the old password and signed-in sessions become invalid.
Member self-change: open Workspace › Settings › Account security, click Change password in the Password row, fill in the current password and a new password, then confirm.
Disable and restore accounts: the platform uses Move to departed as disable and Restore employment as enable. Accounts are not physically deleted, so audit can still trace them.
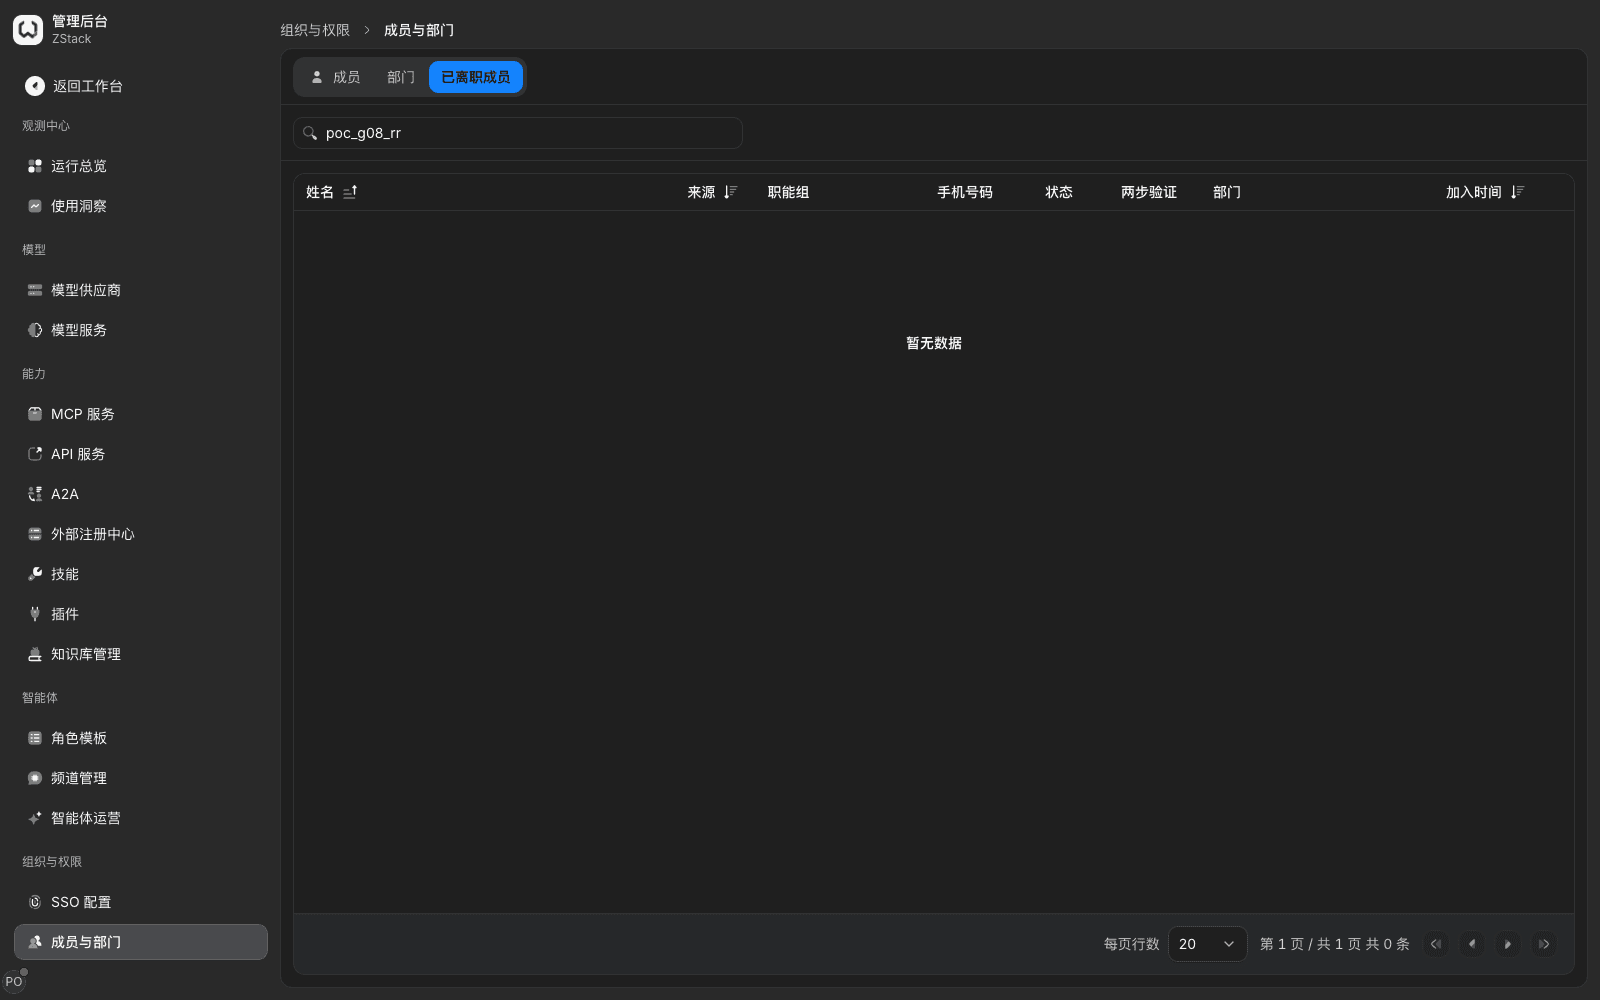
- On a member row click ⋯ › Delete. The confirm box states: they will not be able to sign in, and related API keys and sign-in credentials become invalid immediately. After confirm, the account moves to the Departed members tab with status Disabled.
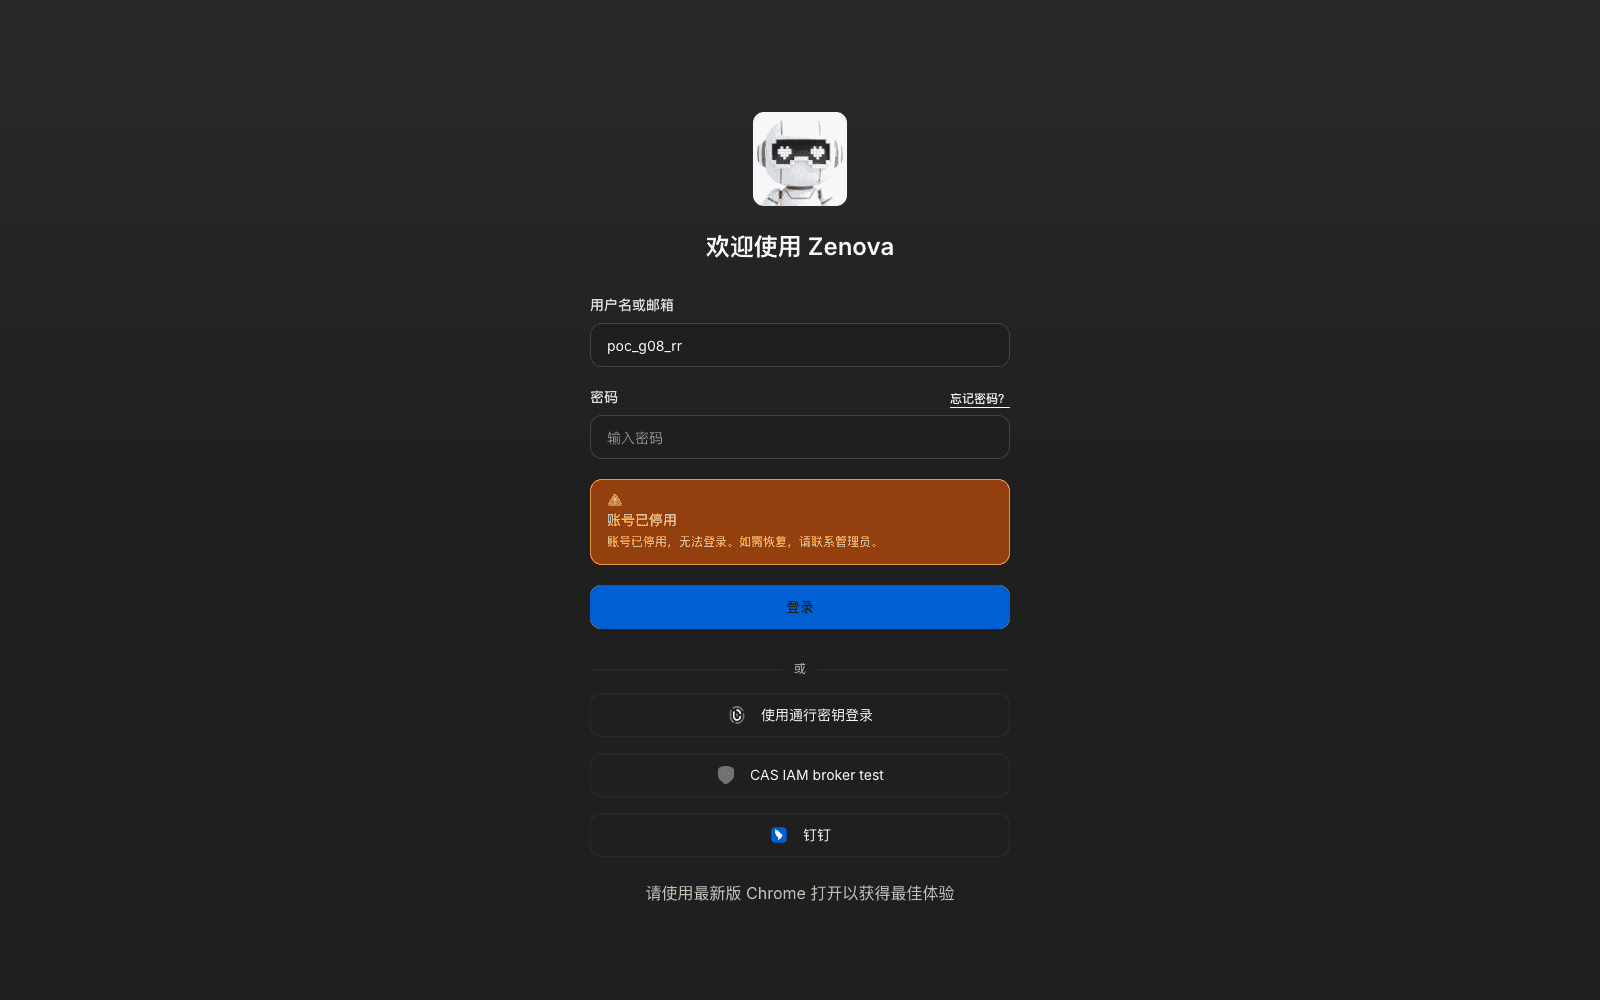
- After disable, even a correct password cannot sign in; the sign-in page says the account is disabled. All of their sessions, API keys, and access tokens become invalid. To restore, click ⋯ › Restore employment. After restore they can sign in again, but departments, functional groups, and API keys are not restored automatically.
3.7 Set session and sign-in security
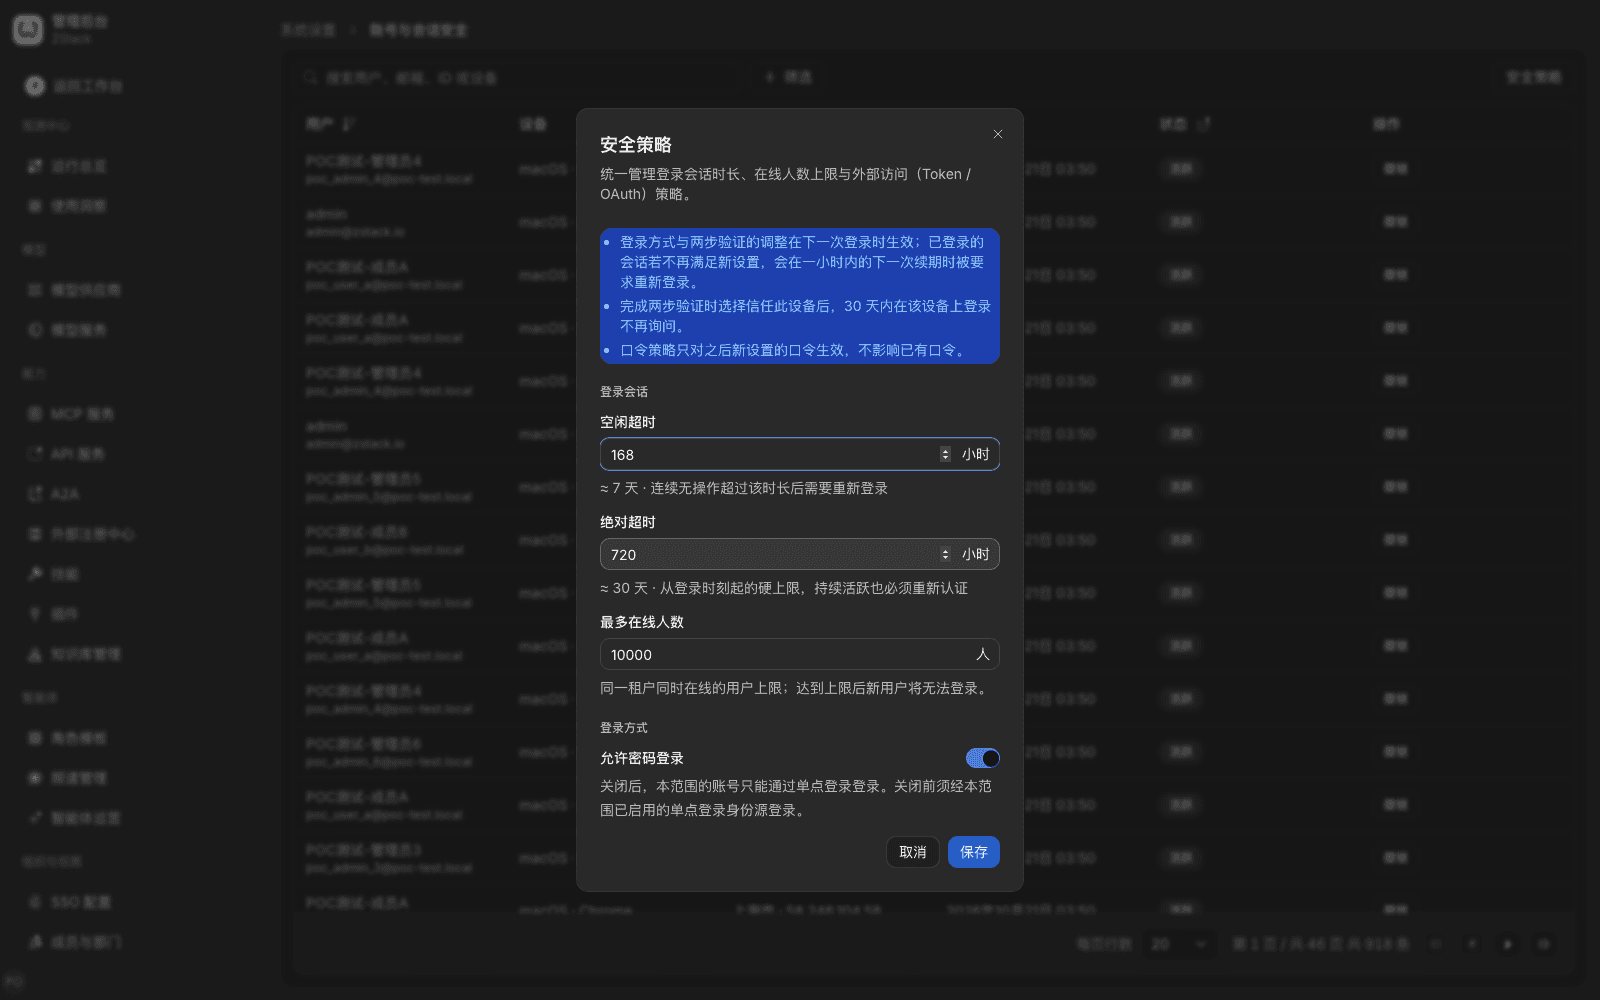
Open Admin Console › System Settings › Global settings › Account & session security. The tab lists this tenant's online sessions (user, device, sign-in location, status). Click Revoke if you see something unusual. Click Security policy in the upper right to set session duration and sign-in methods. Current values are idle timeout about 7 days, absolute timeout about 30 days, and at most 10,000 online.
Consecutive failed sign-ins are temporarily limited by source address. During the limit the sign-in page says Too many sign-in attempts. Please try again later., not that the username or password is wrong — that means the request is throttled, not that the account does not exist. The limit is counted by source address, so other people's failed attempts will not lock a given account. The platform therefore has no per-account lock and no administrator unlock. During the limit even a correct password is refused. Thresholds follow the current UI.
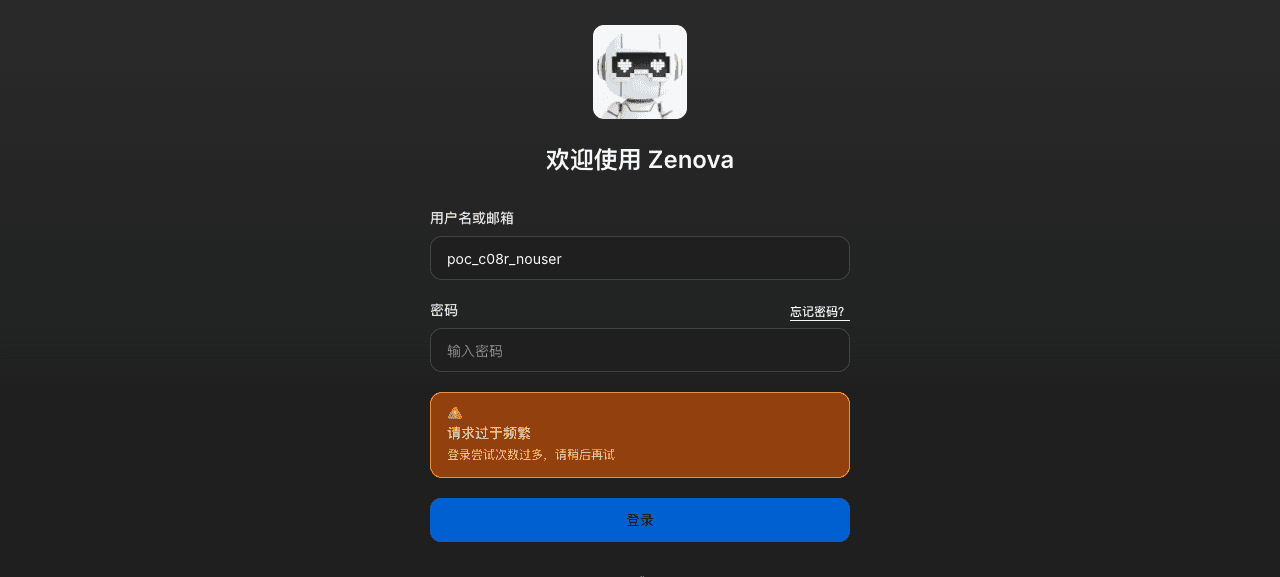
Note: security policy applies to all members of this tenant. Changes to sign-in methods and two-factor authentication take effect on the next sign-in. Already signed-in sessions that no longer meet the new settings are asked to sign in again at renewal.
3.8 Bind two-factor authentication and passkeys
When to use: local accounts want stronger sign-in security. Multi-factor for external accounts is handled by the identity source, or supplemented on the platform. Passkeys require HTTPS and a browser that supports WebAuthn.
- Open Workspace › Settings › Account security, click Add verification method in the Two-factor authentication row, and complete identity verification.
- In the Turn on two-factor authentication dialog, scan the QR code with an authenticator app and enter the 6-digit code.
- The page shows recovery codes. Each can be used only once and is shown only this time; store them in a safe place.
- For a passkey, click Add passkey in the Passkeys row, fill in a name (for example "Office laptop"), and follow the browser to register with this device's biometrics or screen lock. After that, the sign-in page can use it to sign in.
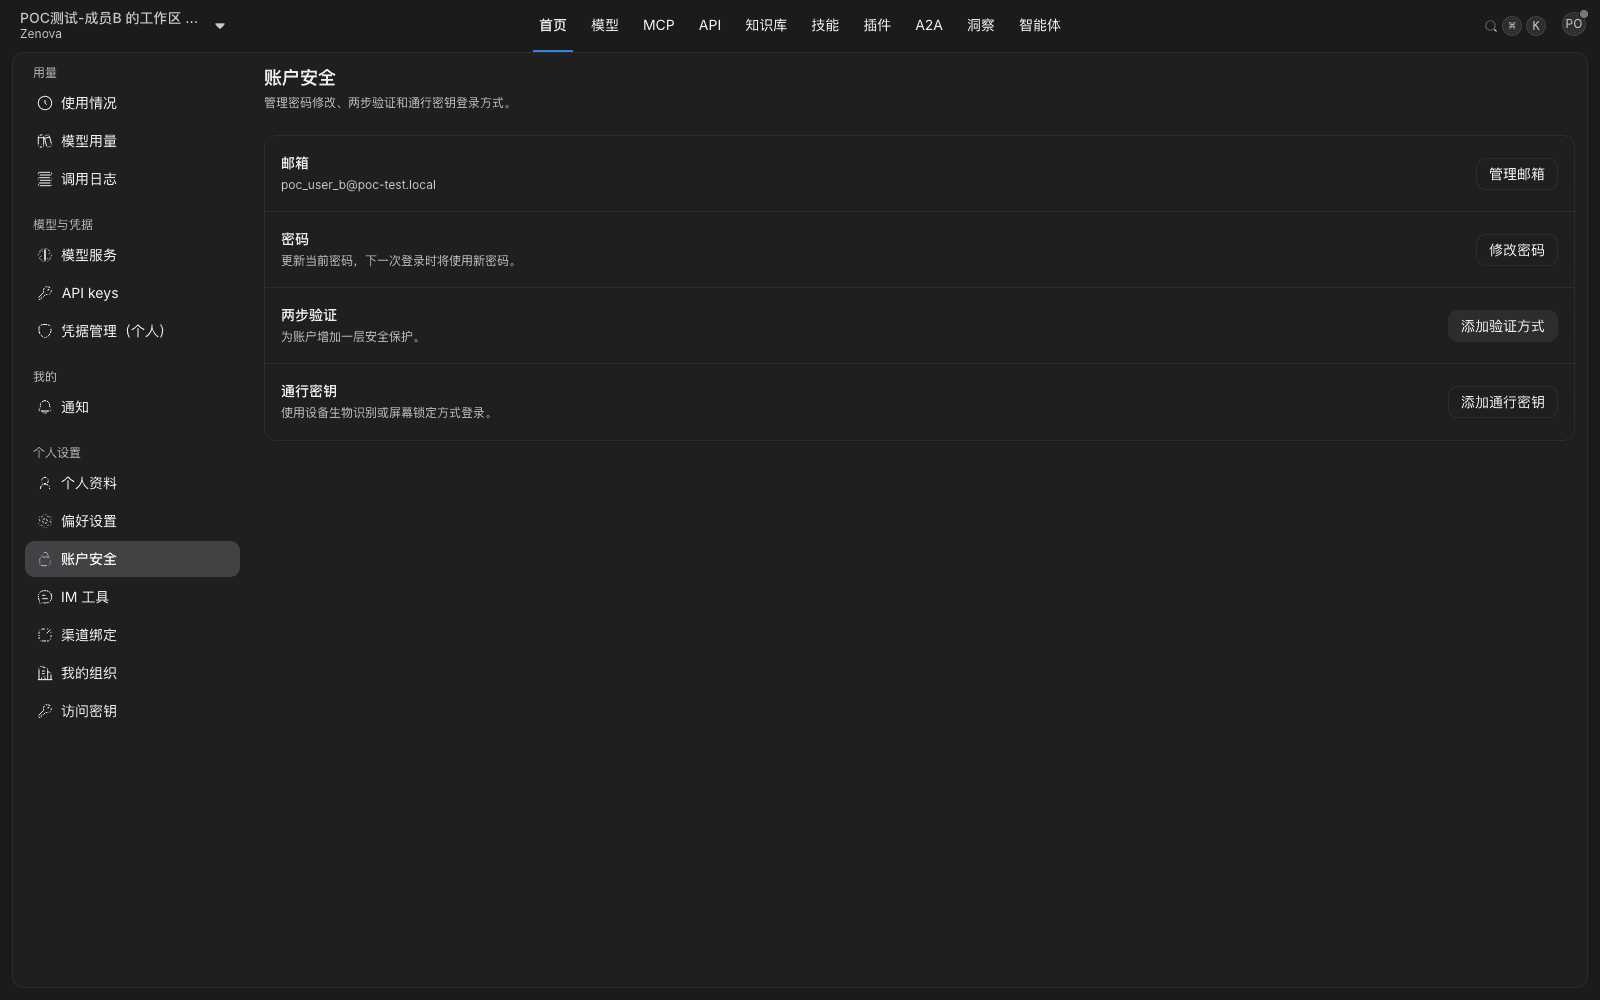
What you will see: in Members & Departments, that member's Two-factor authentication column shows Bound. For external accounts the column shows —.
Note: if both the authenticator and the recovery codes are lost, an administrator runs Reset two-factor authentication in Members & Departments. That removes the authenticator, recovery codes, and passkeys and invalidates all sessions. The person rebinds on next sign-in.
3.9 Confirm that revocation took effect
When to use: after a transfer, departure, or a role is taken back, confirm whether related credentials are still usable.
| Revocation action | Where | How it takes effect |
|---|---|---|
| Remove from department, functional group, or availability scope, or authorization expires | Member row Adjust organization affiliation; functional group Linked members remove; resource Available scope | Visibility changes at once; related keys are denied after config is pushed |
| Remove a role | Role Management › Remove | Immediately loses that role's admin pages and API permissions |
| Move to departed | Member row Delete, or a push from the source system | All sign-in sessions, API keys, and access tokens become invalid immediately |
| Reset password, reset two-factor authentication | Member row menu | All of that user's signed-in sessions become invalid immediately |
| Disable an API key | API key management | That key becomes invalid immediately |
Example: a member is removed from a department.
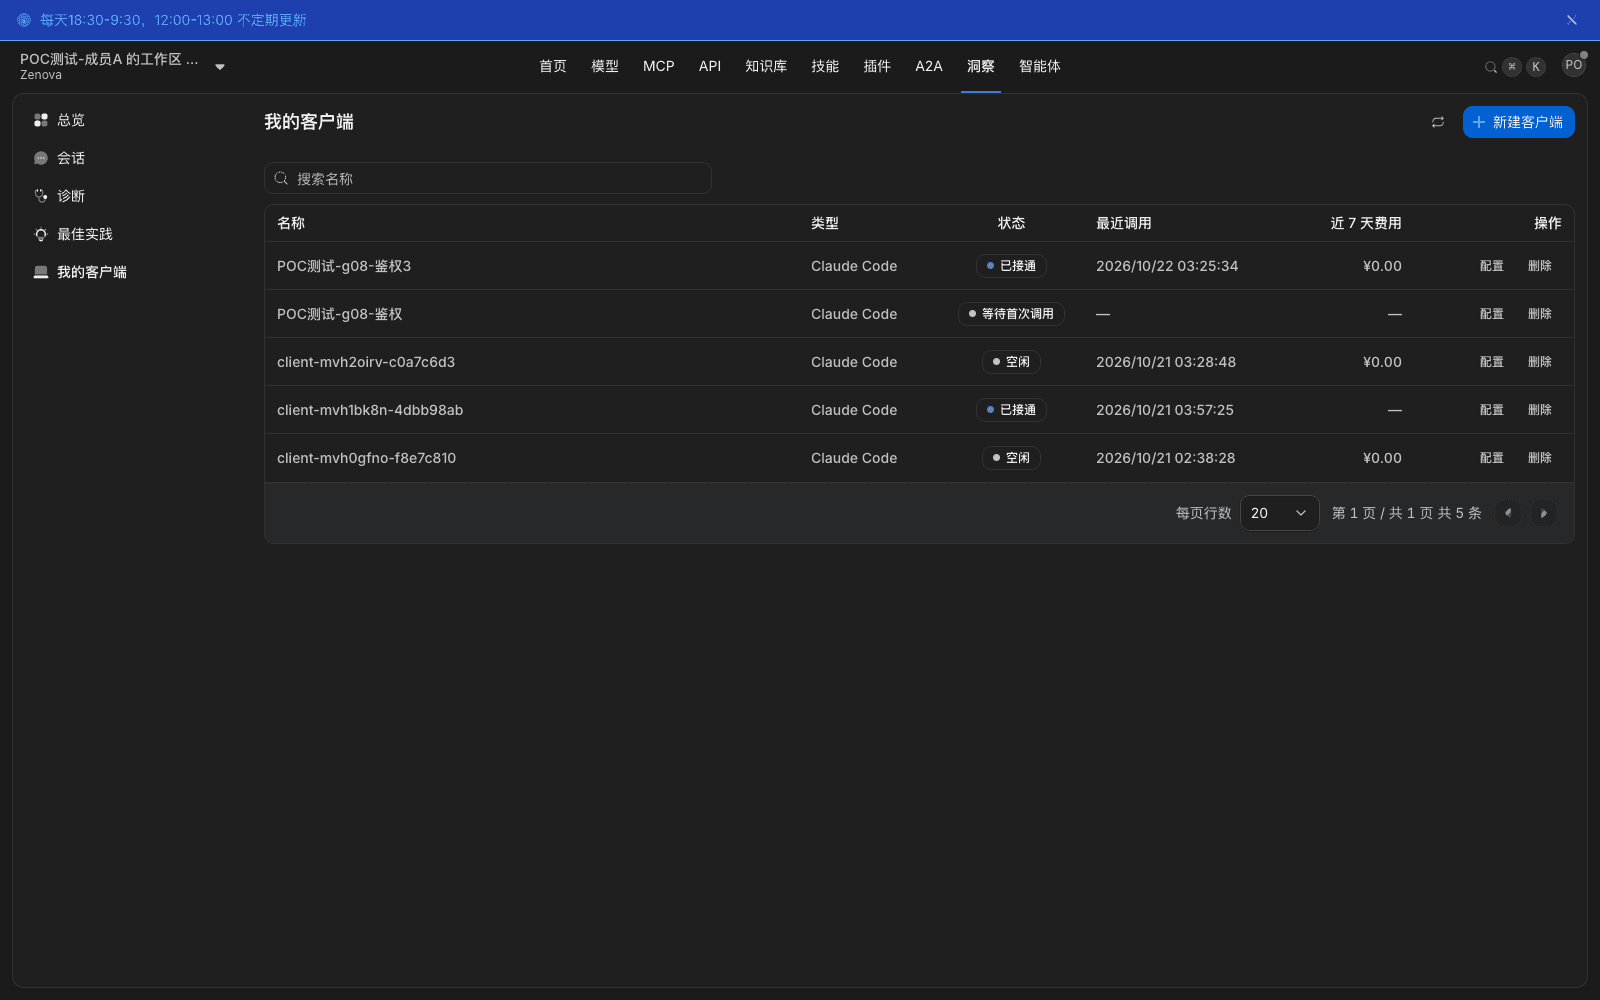
- The administrator removes that department in Adjust organization affiliation and saves. After the member refreshes the workspace, services granted only through that department disappear from the model plaza, API key affiliation shows No available affiliation, and they are told to check department membership and validity.
- Continuing to call with a key that belonged to that department turns into a denial after config is pushed:
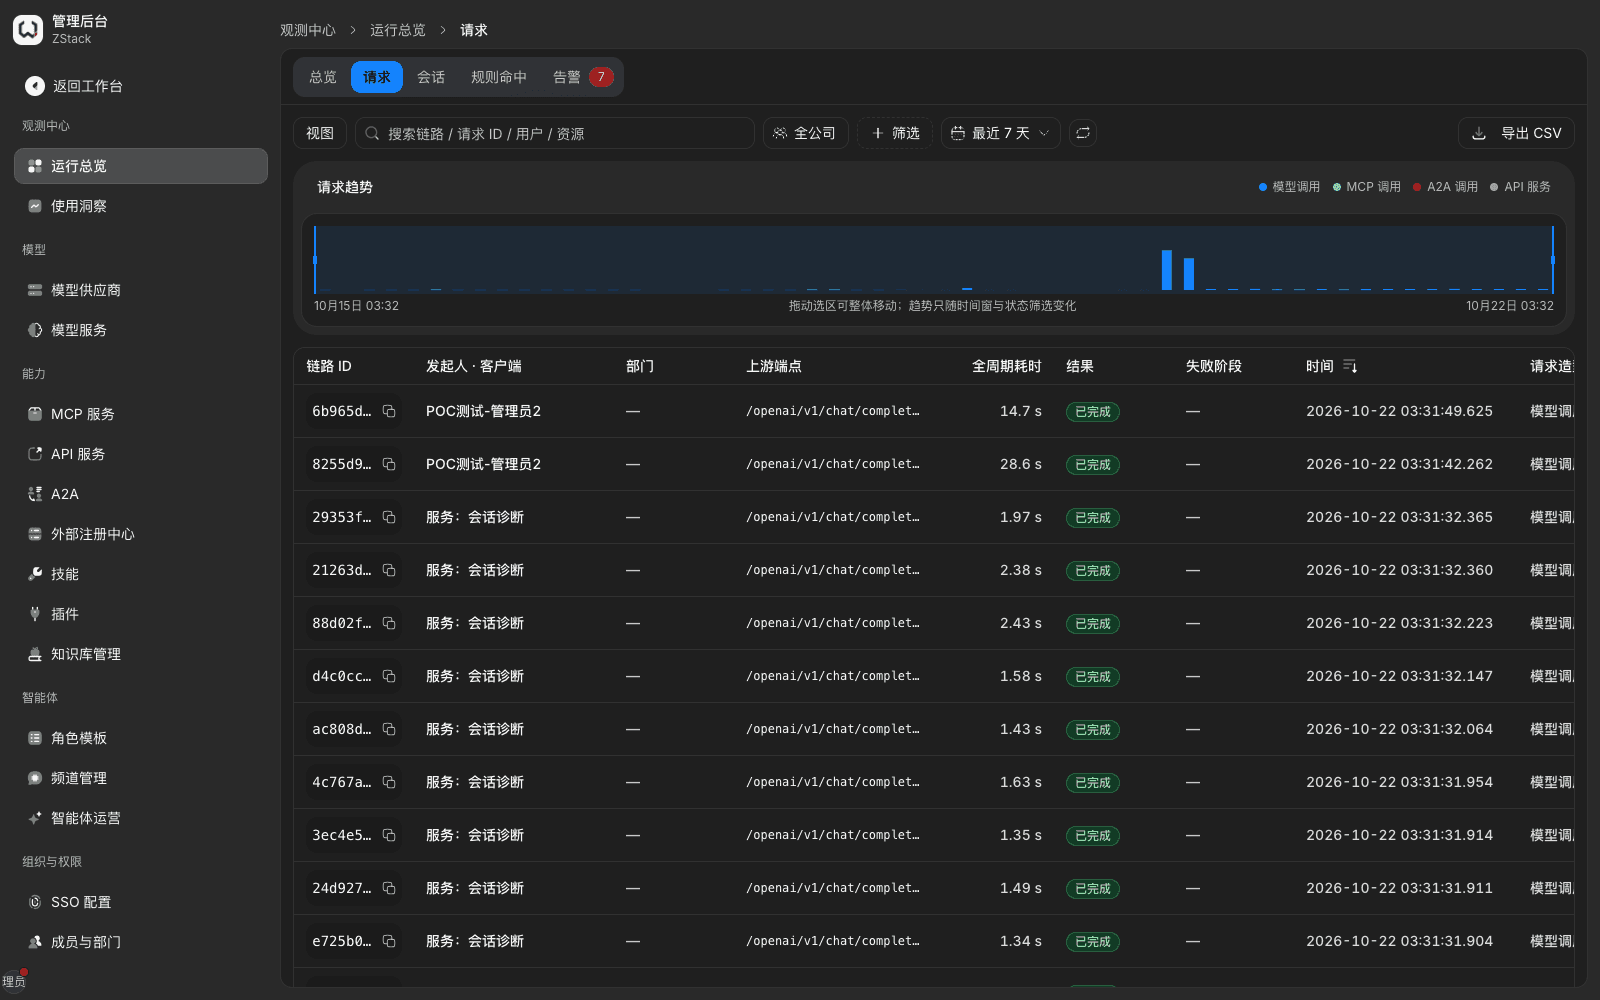
codeisinvalid_api_key,reasonisLLM_AUTH_FAILED. In Operations overview › Requests, filtering by that credential shows these 401 Failed requests. - Open that key in API key management. Status shows Pending review, and the detail says availability-scope validation did not pass.
Note
- Org-relationship changes are not instant. After you remove someone from a department, functional group, or availability scope, the member-side view changes immediately, but old keys are denied only after the config is pushed to the gateway, usually tens of seconds to a little over a minute. To cut access immediately, Disable this API key or Move to departed; both take effect immediately.
reasonin a denial only distinguishes "key invalid" from "identity token invalid"; it does not distinguish "wrong key" from "authorization was taken back". When you see 401, first check whether that key is Pending review. Revocation only blocks later access; it does not delete call records and audit records already produced.- Data-plane model and MCP routes always require a credential: OpenAI-compatible paths use
Authorization: Bearer <YOUR_API_KEY>; Anthropic-compatible paths usex-api-key.
Capability notes
| Not provided | Use instead |
|---|---|
| Custom roles, permission sets, ticking authorization by menu | Roles are six fixed governance roles. Object-level authorization uses Available scope; tool-level authorization uses Traffic rules conditions specific capability + caller + tool name (3.5, Chapter 15) |
| Account-request approval flow | Account sources are administrator create, auto-provision on first identity-source sign-in, sync, or push (3.3) |
| Password policy per role or per user | Password rules are a tenant-wide configuration (3.6) |
| The next request is denied immediately after an org-relationship change | To cut access immediately, disable that key or move the member to departed (3.9) |
| Per-account lock and administrator unlock | Failed-sign-in limits are by source address; the sign-in page says try again later (3.7) |
| IP allowlist or validity on an API key | The UI does not provide these two. Issue keys per person and per application, and narrow calls with availability scope (3.9) |
| Turn off authentication on one route, or enable identity-token authentication on one route | All data-plane model and MCP routes require a credential (3.9) |
| Sync results listed as create, update, and conflict detail | The region gives four statistics; large-volume changes go to quarantine review (3.2) |
Previous: 2. Platform objects and boundaries · Next: 4. Configure model providers
2. Platform objects and boundaries
Full-length chapter. Content is checked against the 2026.10 mainline code and the live console; menus and features depend on the current license, account permissions, and delivered environment.
4. Configure model providers
Full-length chapter. Content is checked against the 2026.10 mainline code and the live console; menus and features depend on the current license, account permissions, and delivered environment.