1. Zentrix overview and first-run setup
Full-length chapter. Content is checked against the 2026.10 mainline code and the live console; menus and features depend on the current license, account permissions, and delivered environment.
Back to overview · Full table of contents · Download full PDF
This chapter is for administrators who are new to Zentrix. It explains the problem the product solves, the parts of the platform, who works at which entry point, and a complete first-run path: connect an upstream, confirm the model and create a model group, grant it to members, let a member get an API key, make a call, and look up the call record. After this chapter, an administrator can get the first member to call a model successfully and find that call in the console. Later chapters continue from the objects created here.
1.1 Product role
Zentrix is a unified model-and-tool access gateway deployed inside the enterprise. Business systems, developer tools, and external agents no longer connect to each model vendor on their own; they call through Zentrix. The gateway sits in the middle and does four things:
| Role | What it does |
|---|---|
| Unified entry | Gives callers a single access URL for OpenAI, Anthropic, and other standard protocols; changing protocol or model does not require application code changes |
| Credential hosting and authorization | Upstream vendor keys stay in the platform; callers hold platform-issued API keys. Who can use which models is decided by the availability scope of departments, functional groups, and members |
| Traffic governance | Matches requests by condition and applies routing, deny, limits, and similar actions. Rules are maintained in one place instead of in each upstream or client |
| Traceability | Each call records the initiator, credential, model, tokens, latency, and matched rules. Configuration changes go into operation audit |
Logically the platform has a control plane and a gateway data plane:
- The control plane provides the Admin Console and the workspace, stores organization, model, and rule configuration, and pushes that configuration to gateway nodes.
- The gateway data plane receives business calls, authenticates and applies rules on the gateway, then forwards to upstream. Call records are produced on the data plane and sent back to the console.
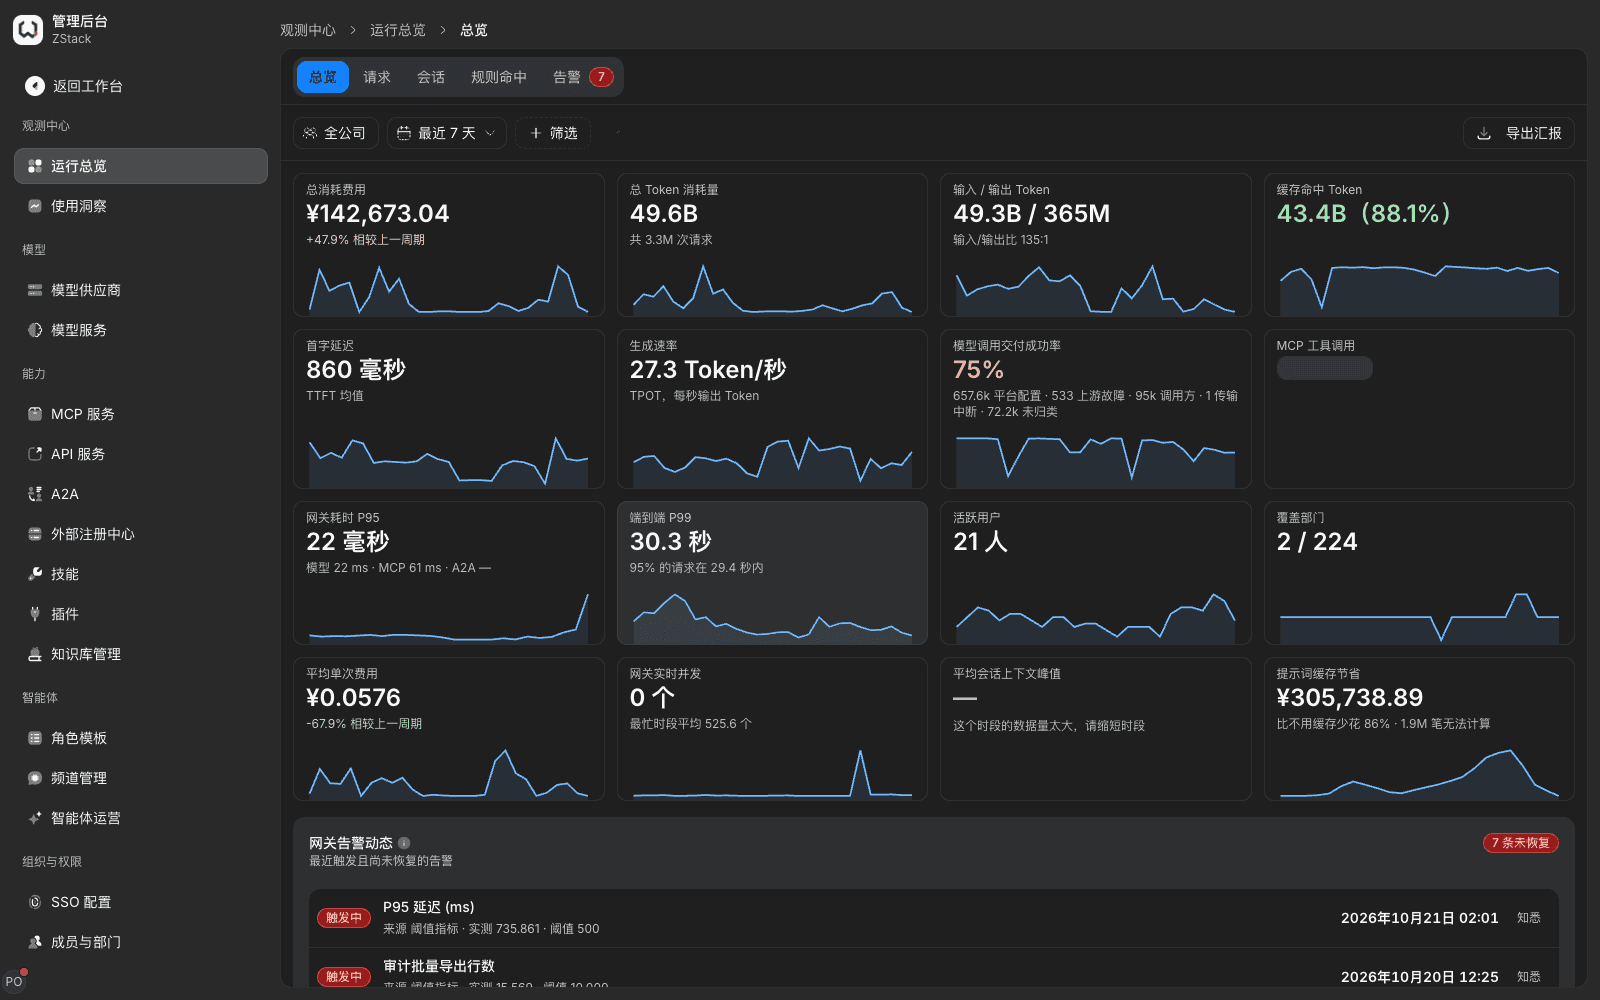
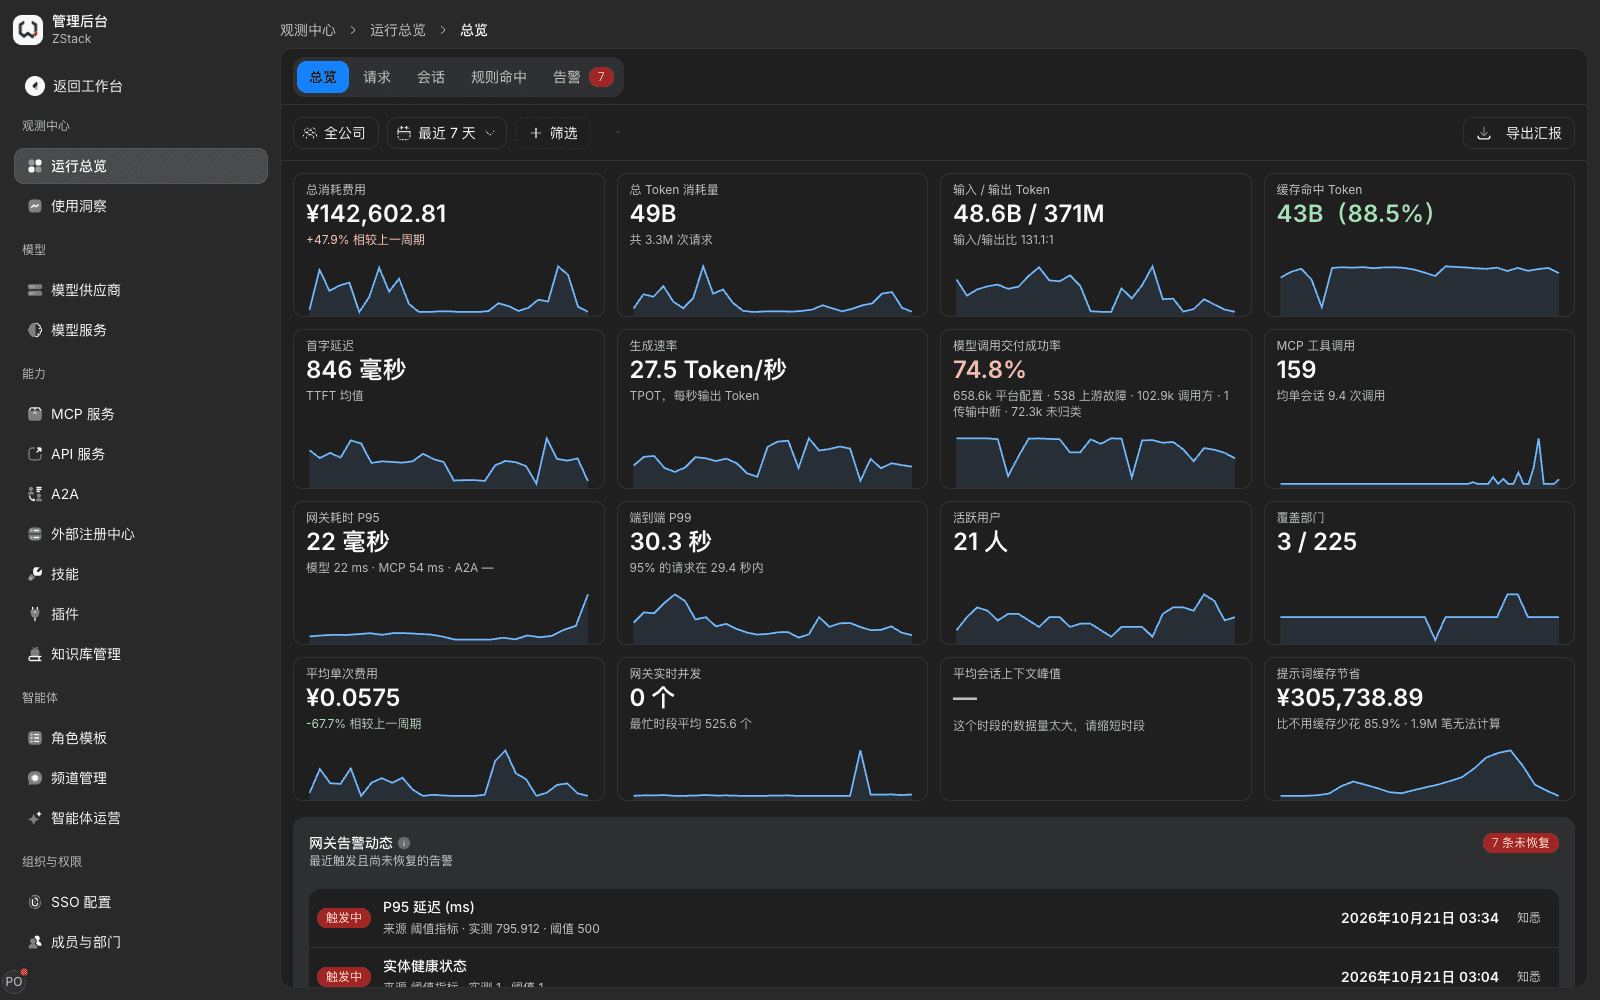
Admin Console › Operations overview shows company-wide runtime metrics: total spend, total tokens, gateway latency P95, live gateway concurrency, and model-call delivery success rate with its failure mix (platform-config denial, upstream failure, caller cancel, transport interrupt, unclassified). These numbers come from real gateway calls, not estimates.
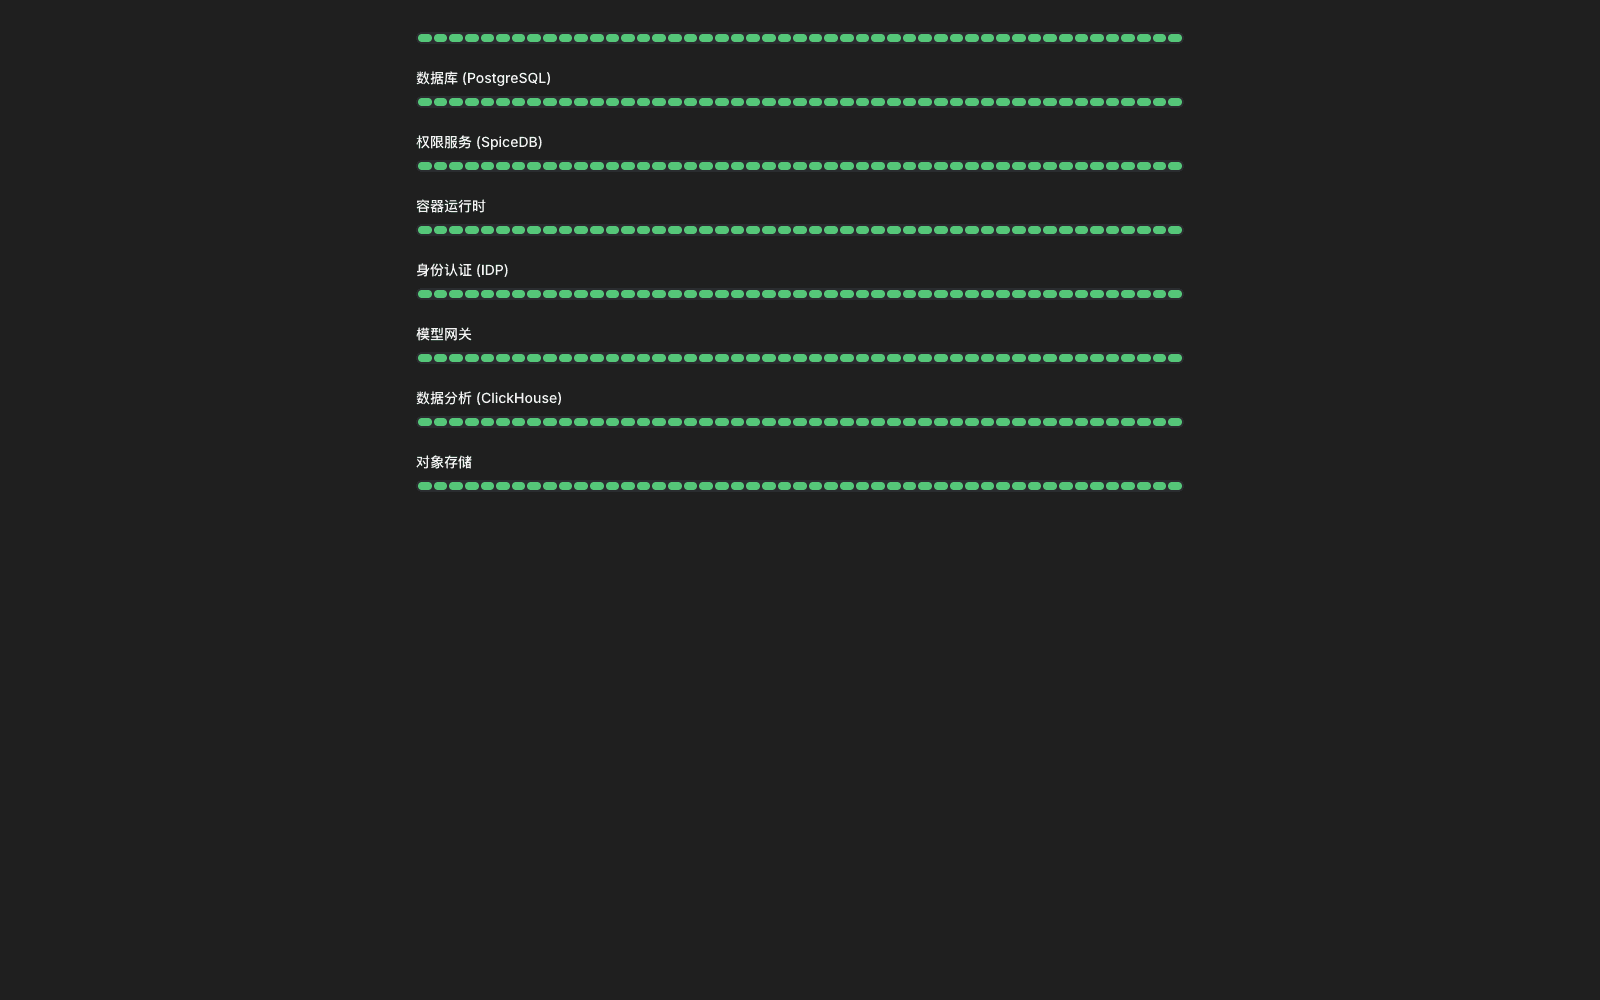
Component health is on the /platform-status Platform Status page. The page lists a probe timeline per component. A community-edition deployment includes seven by default: PostgreSQL, SpiceDB, container runtime, IdP, model gateway, ClickHouse, and object storage. The timelines show whether a dependency had an outage in the observation window; they are independent of business metrics.
Note: The delivery-success-rate denominator includes requests denied by platform rules. When you size capacity, look at the failure mix first, then decide whether upstream is unstable or the policy is not what you intended.
1.2 Roles and entry points
Two surfaces
| Surface | How to enter | Main uses | Who uses it |
|---|---|---|---|
| Workspace | Default after sign-in | Browse the model plaza, get your own API keys, view your own usage and call logs, maintain personal account security | Ordinary members, people connecting business systems |
| Admin Console | Account menu › Management Console | Configure organization and permissions, model access, availability scope and quotas, traffic rules, audit, and system settings | Tenant administrators and other admin roles |
Members and administrators look at the same objects from different stances: on the model plaza a member sees published models that they are in scope for; under Settings › API keys they see their own keys. In Models, Model Groups, and API key management, an administrator sees all models, all groups, and all keys.
Admin roles
Admin permissions are split by duty, not by ticking pages one by one:
| Role | Duty |
|---|---|
| Tenant administrator (tenant owner) | All configuration for this tenant, including assigning roles |
| Config Admin | Configuration and assembly; no credentials or audit |
| Security Admin | Credentials and security policy |
| Auditor | Audit logs and retention |
| Operator | On-call ops: quotas, observability, alert silence |
| Finance | Read-only: overview cost cards, cost columns and exports of requests and conversations |
| Read-only auditor | Read-only: request and conversation detail and export |
Config Admin, Security Admin, and Auditor are mutually exclusive: one account can hold only one of them, to meet three-person separation. Operator, Finance, and Read-only auditor can stack with other roles. Granting and exclusivity are in 3.5.
Menu visibility
If a menu is missing, check these three in order:
- Admin scope: the tenant Admin Console and the platform Admin Console are two levels. A tenant administrator only sees this tenant's menus. Typing a platform page into the address bar (for example
/admin/tenants) sends them back to Operations overview, and the matching platform API returns403. The two-level boundary is in 2.6. - Role: the role decides which admin pages you can enter. For example, Config Admin's sidebar has no SSO configuration, Role Management, guardrails, or audit, and Global settings does not show the Account & session security or Data retention tabs.
- Licensed modules: if the license does not include an add-on module, the matching menu is hidden and related APIs refuse access (see 2.7).
1.3 First-run setup path
The first-run goal is: one member successfully calls a model with their own API key, and an administrator can find that call in the console.
| Step | Who | Entry | Done when |
|---|---|---|---|
| 1. Connect an upstream model source | Tenant administrator or Config Admin | Admin Console › Models › Model Providers | The provider is available, and the model list shows the model you will use |
| 2. Confirm the model and create a model group | Tenant administrator or Config Admin | Admin Console › Models › Models; Admin Console › Organization & Access › Model Groups | Model Try returns a reply; the group contains the models to open |
| 3. Grant to members | Tenant administrator or Config Admin | Model group detail › Visibility & quotas | The availability-scope list shows the target member, department, or functional group |
| 4. Member gets an API key | The member | Model plaza › model detail › Get API key | A new key appears in the list with status Normal |
| 5. Make a call | Member or business system | Unified entry | HTTP 200 and a model reply |
| 6. Look up the call record | Administrator / member | Admin Console › Operations overview › Requests; members view their own call records in the workspace | You can find this call with its initiator, credential, and usage |
Before you start: you are signed in to the Admin Console as an administrator; you have the upstream model vendor's URL and account key, or the address of a local inference service.
Step 1: Connect an upstream model source
Add an upstream in Admin Console › Models › Model Providers. A provider object stores the request URL, request format, and account keys; it is the only way the platform connects to an upstream source. The built-in vendor catalog covers mainstream public clouds, aggregator platforms, and locally deployed inference. For a local service, pick the request format that matches the deployment type.
What you will see: before save, each upstream model you enable shows a destination in the Will become model column: same-name items attach to an existing model; the rest default to creating a new same-name model, which you can rename. After save, the provider appears in the list, and matching models appear in Admin Console › Models › Models. Only enabled upstreams serve a model.
Field meanings, connection tests, and pricing are in Chapter 4 and Chapter 5. Follow the current UI for how you connect.
Step 2: Confirm the model and create a model group
The platform has three objects: an upstream is a concrete model on the vendor side; a model is the call name callers request, served by one or more upstreams; a model group is a set of models. Authorization and quotas hang on the group, so members do not need to know which vendor sits behind it. The three objects are fully described in Chapter 6.
- Open Admin Console › Models › Models and confirm that the upstreams enabled in step 1 appear as models, with the matching providers in the Upstream column.
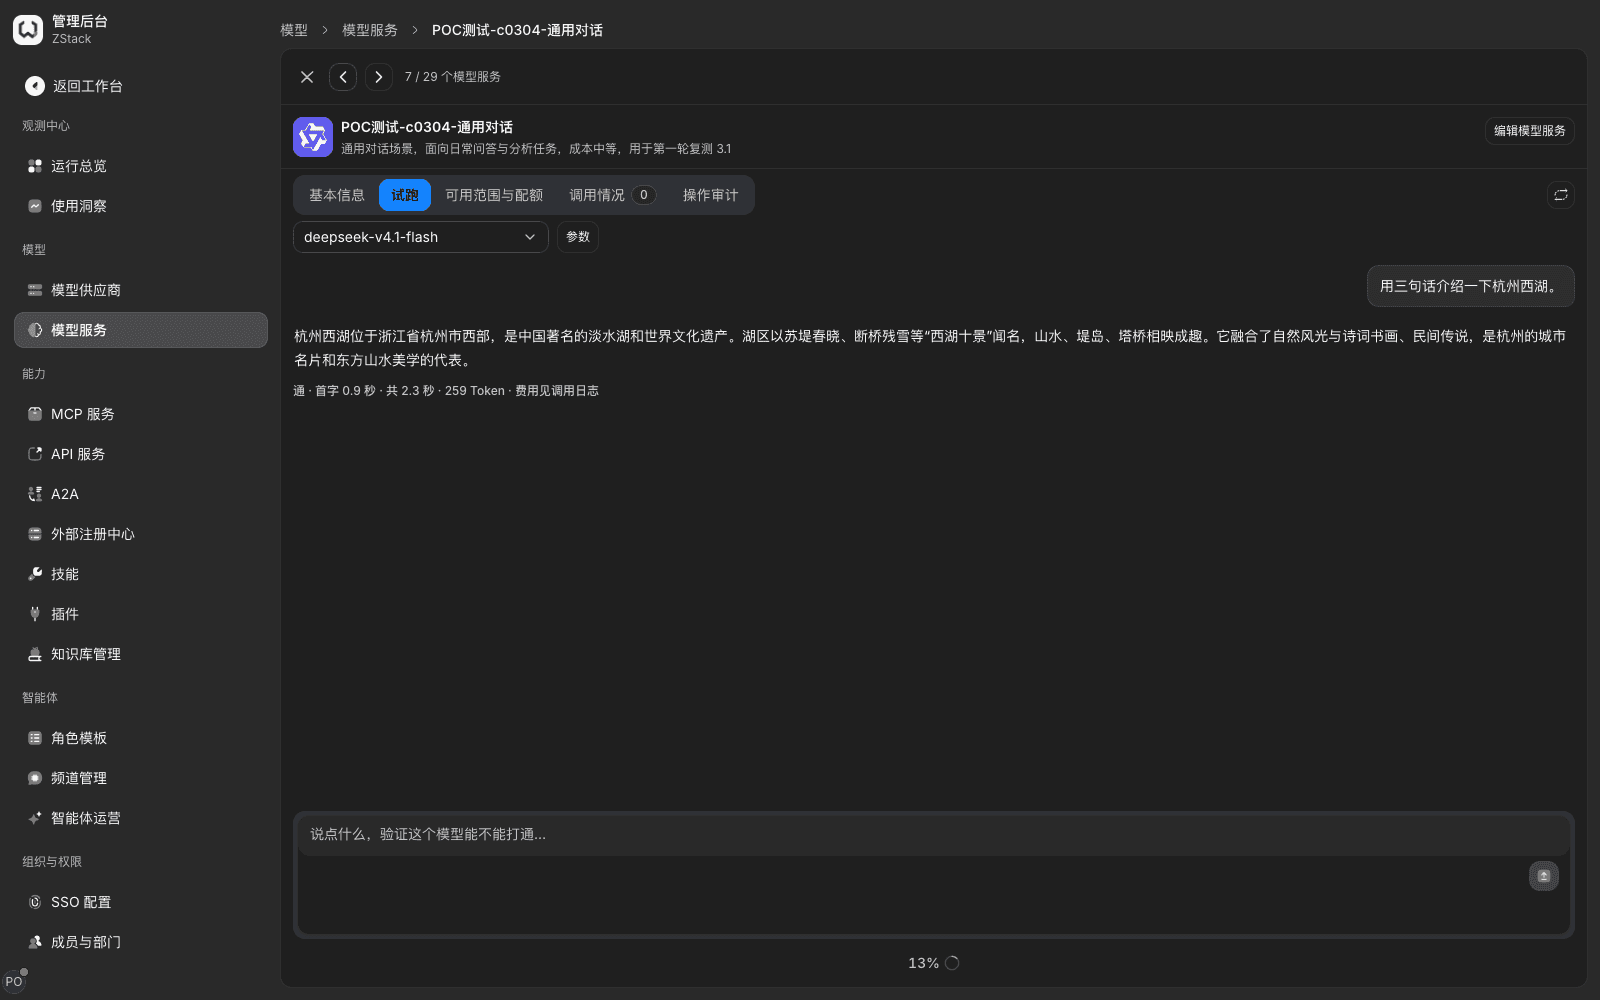
- Open the model detail and send a message on the Try tab to confirm the model returns a reply.
- Open Admin Console › Organization & Access › Model Groups and click Add model group.
- Fill in name and description. Name by purpose, for example "General chat" or "Low-cost batch". Put the intended tasks and cost tier in the description; members see this text on the model plaza.
- Click Add models, tick the models to include, and save.
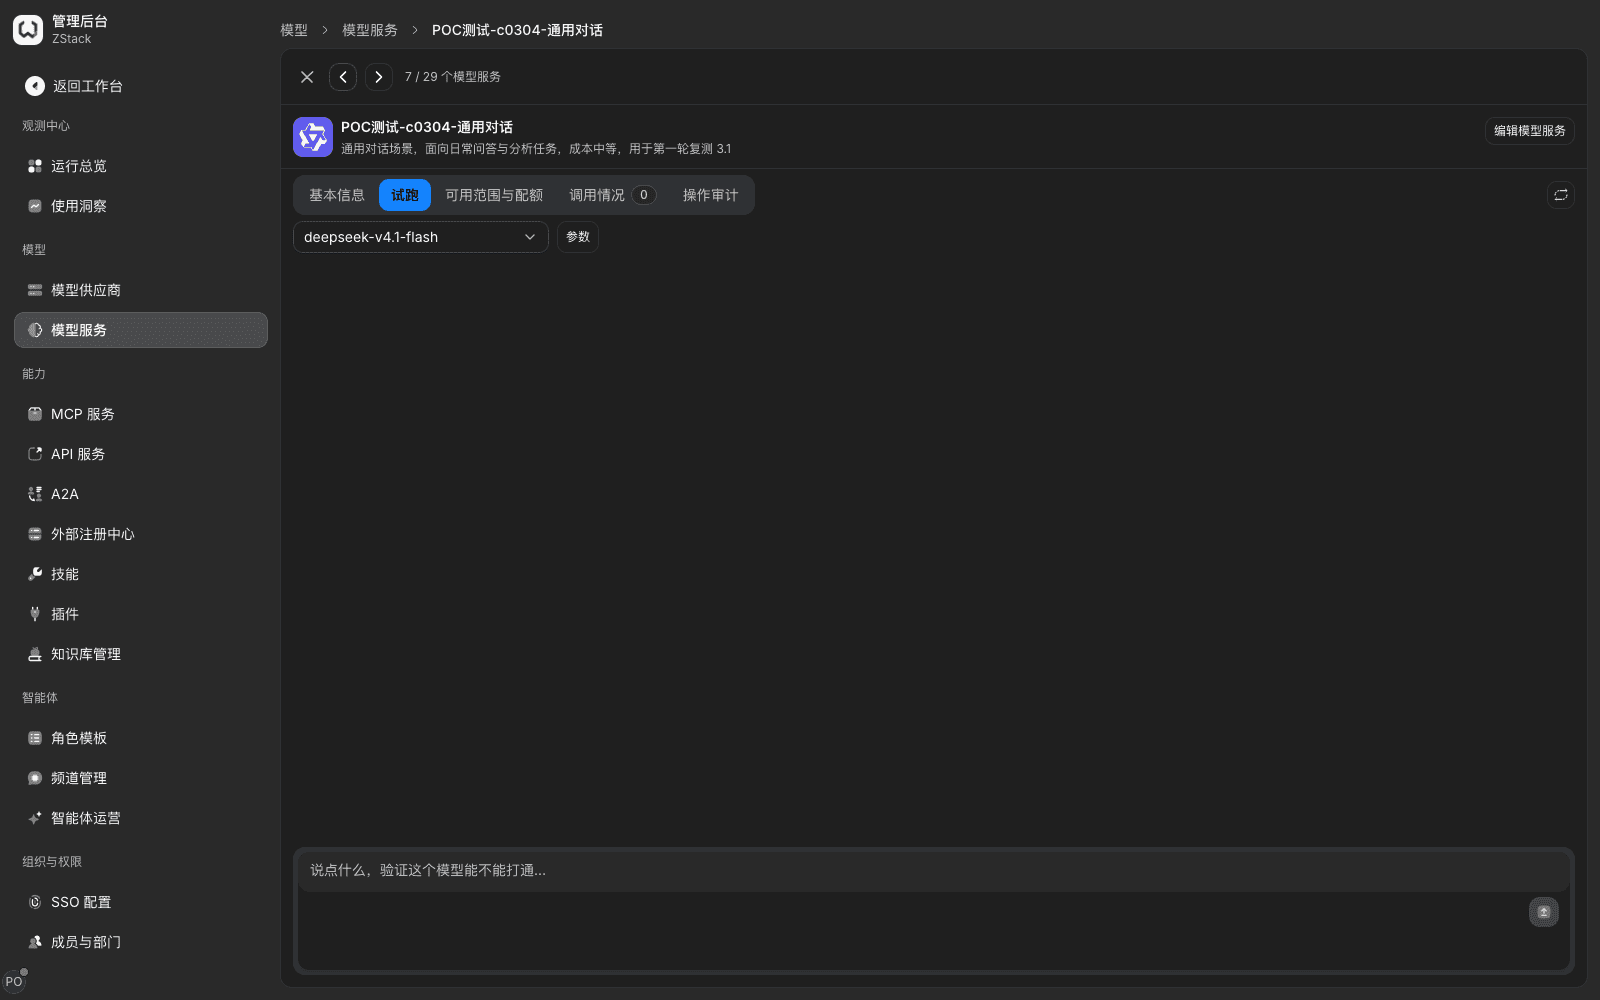
What you will see: Try first shows a progress bar, then a full reply, with time to first token, total latency, and token counts under the reply. After save, the group appears in the Model Groups list. The detail page has tabs such as Basic information, Visibility & quotas, Call activity, and Operation Audit.
Note
- The same model can appear in more than one group. Split by purpose so you can set availability scope, quotas, and pricing separately.
- Try is a real billed call. It is also written to call records and operation audit.
- Output length for reasoning models is constrained by
max_tokens. Ifmax_tokensis too small, reasoning uses up the budget first, the body comes back empty, and the finish reason is length truncation. That is normal upstream behavior, not a gateway fault. Do not set a tiny cap when you Try.
Step 3: Grant to members (set availability scope)
A new model group has no availability scope, so nobody can use it.
Prerequisites: the target members, departments, or functional groups already exist under Organization & Access › Members & Departments (see Chapter 3).
Procedure
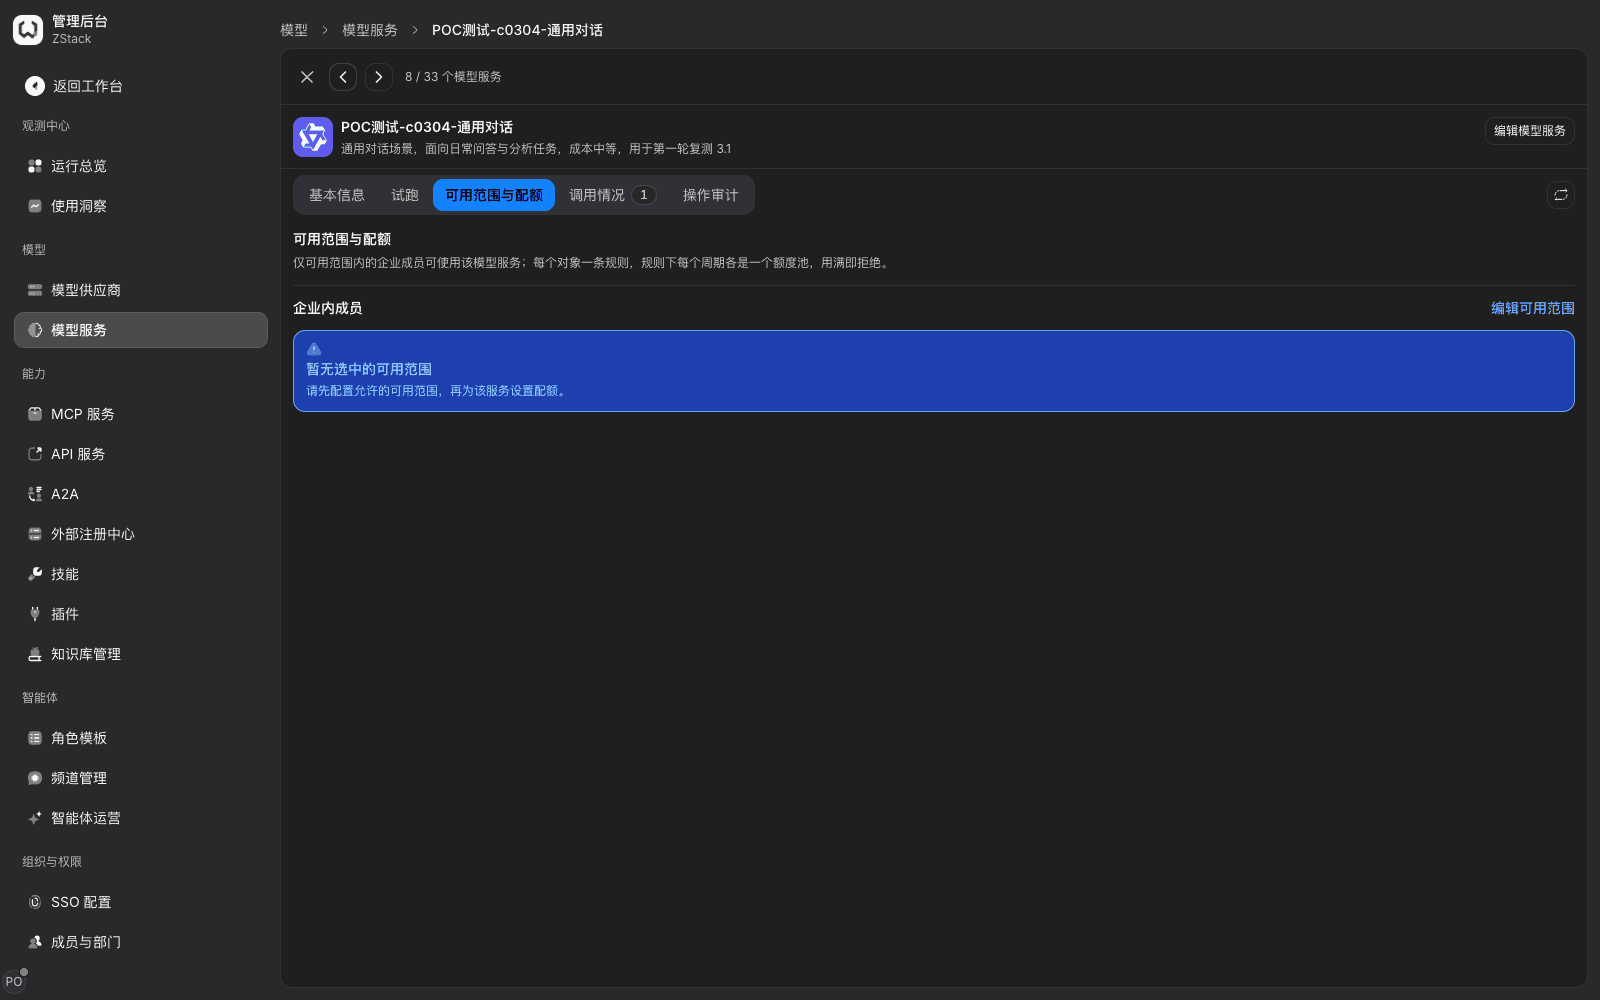
- Open the group detail, switch to Visibility & quotas, and click Edit availability scope.
- In the dialog, use the left-hand dropdown to switch subject type: all users, departments, functional groups, workspaces, or tick members one by one. Selected subjects appear on the right.
- Click Next to open Configure target validity. Keep Long-term, or pick a fixed number of days or custom start and end times.
- Click Save.
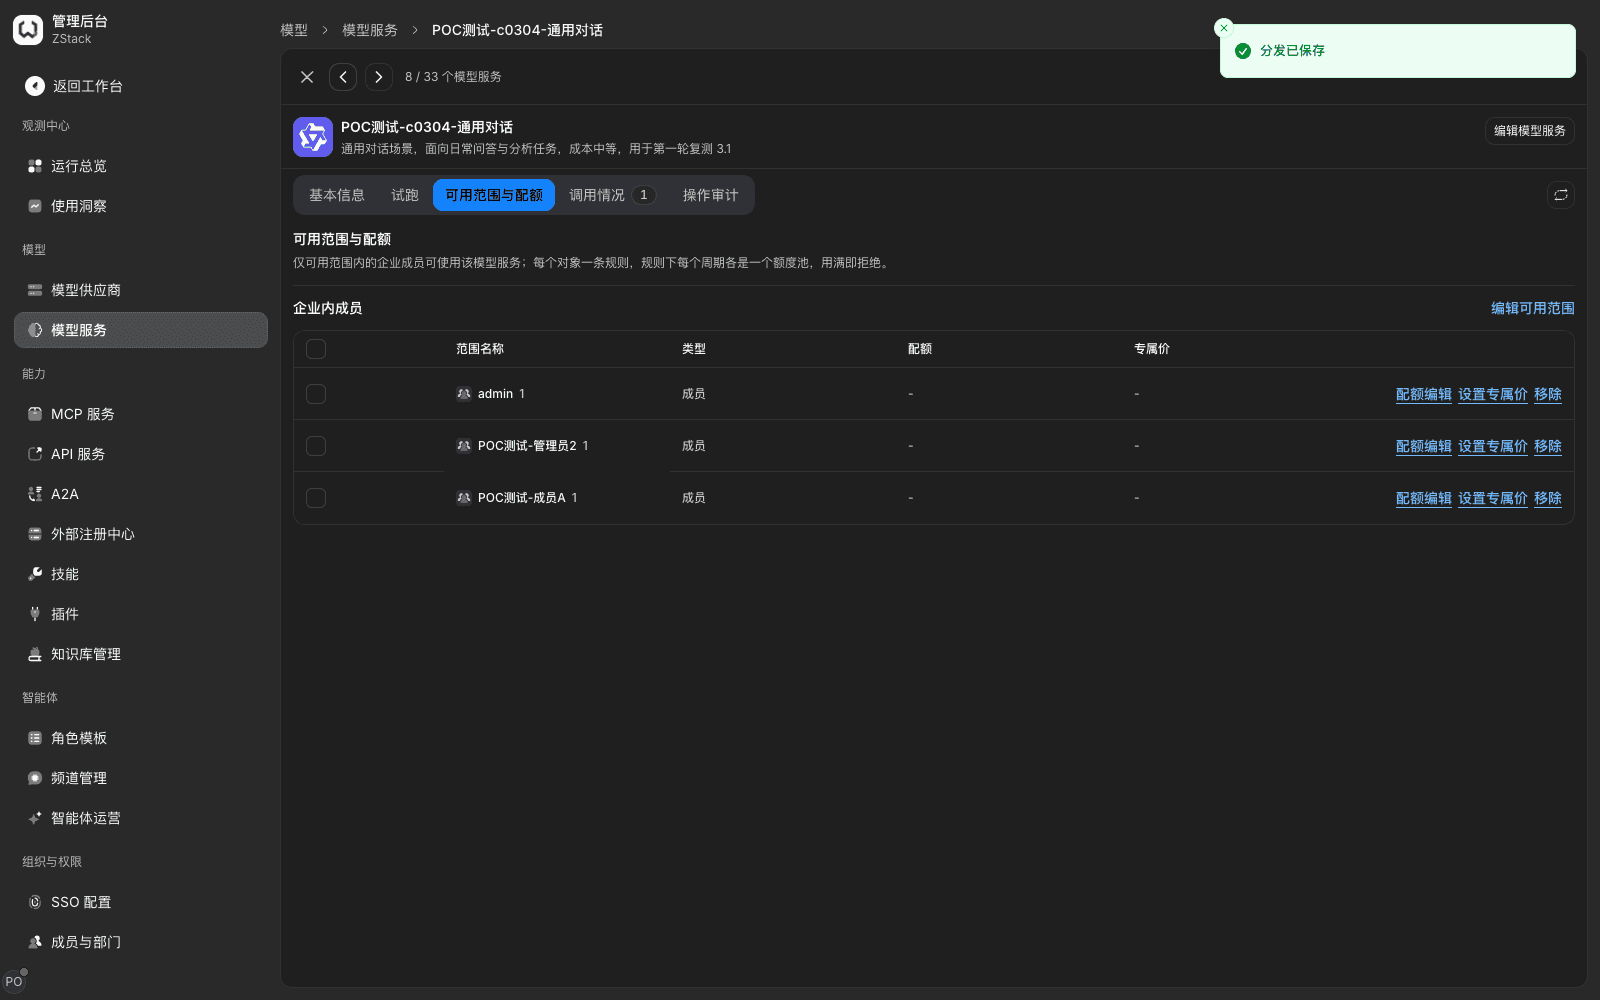
What you will see: after save, the availability-scope table lists one row per subject, with scope name and type.
Note
- After authorization, members in scope can see models in the group on the model plaza, and can pick that group in the affiliation dropdown of Get API key. Members outside the scope cannot see those models; opening the admin detail URL for the group redirects the whole page back to their own settings page.
- After you remove a member from the availability scope, the group disappears on the member side, and later calls with their existing keys through that group are denied (
401 invalid_api_key). Pushing the authorization change to the gateway takes some time; it is not instant. To confirm revocation has taken effect, check as in 3.9. - Quotas and budgets are set on the same tab; see Chapter 7.
Step 4: Member gets an API key
API keys are created by the member in the workspace. Each key binds to one model group and can call every model in that group.
- The member signs in to the workspace, clicks Models in the top bar to open the model plaza, finds the model with search, vendor, or category, and opens its detail.
- Click Get API key.
- In API key affiliation, choose which authorized subject the key belongs to. The dropdown lists only groups the member is in scope for, such as "Personal · General chat" or "R&D Center · Department · General chat". Leave Specify API key (optional) empty to let the system generate one.
- Choose a client to attach, or create a new client. Clients distinguish call sources in usage and request records.
- Click Create.
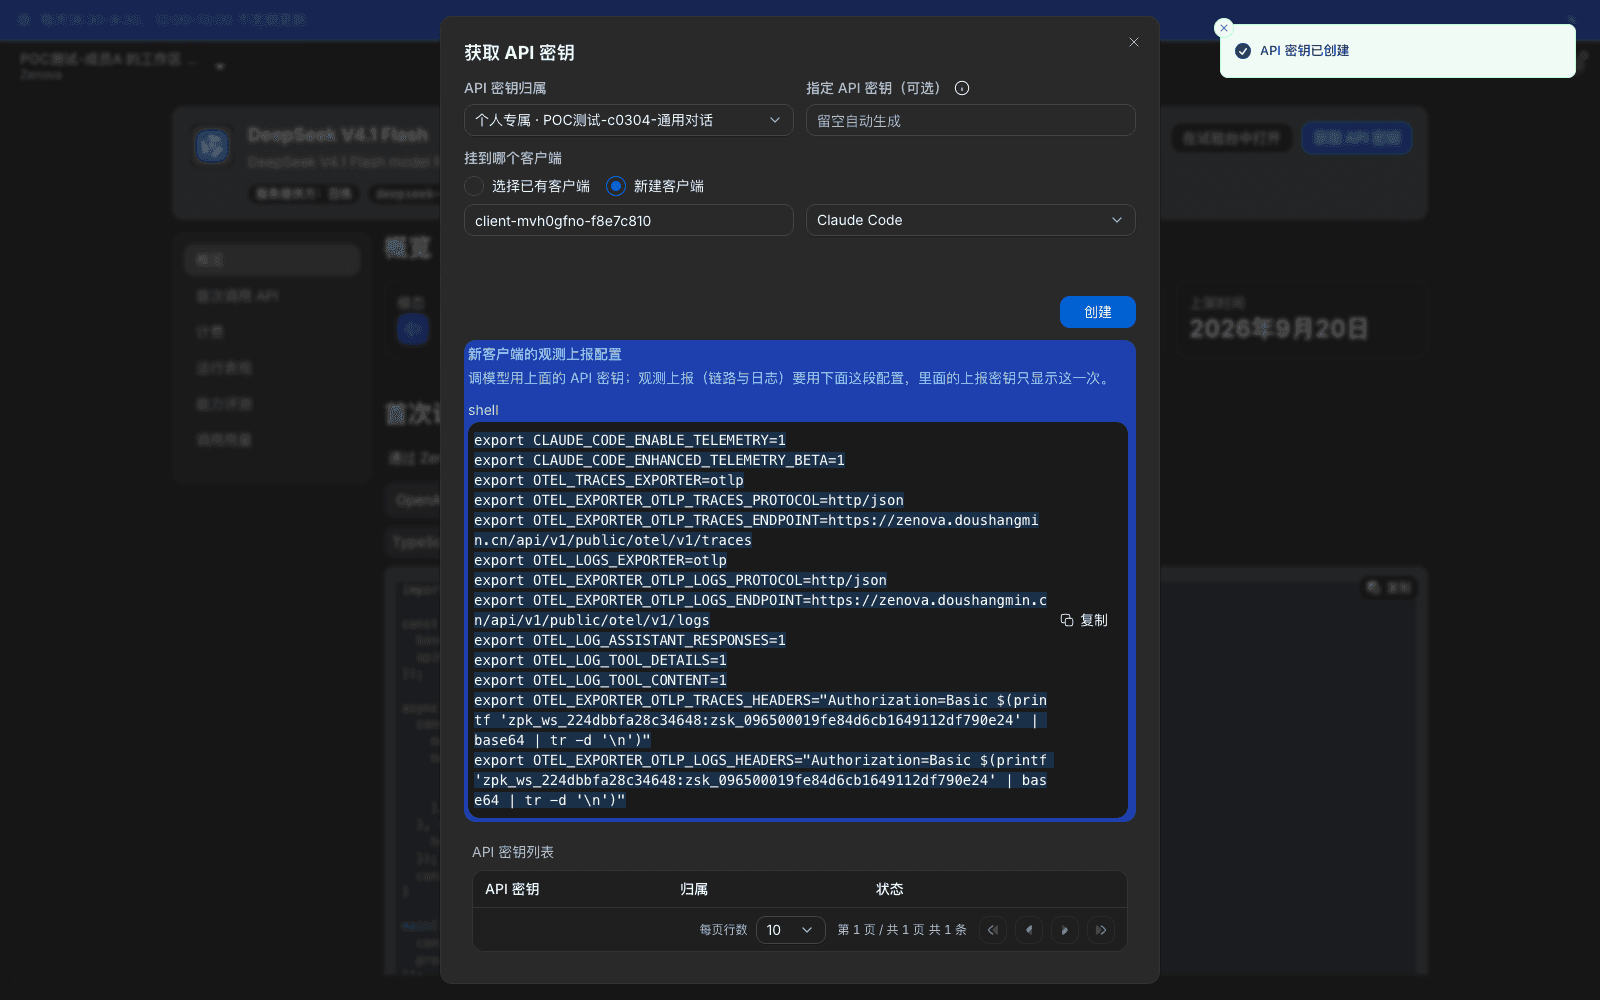
What you will see: the key appears in the list with status Normal and can be used immediately. The member sees the key and its last-used time under Settings › API keys. An administrator sees the same key's affiliation, caller, billing subject, and status under Admin Console › Organization & Access › Model Groups › API key management.
Note: keys are shown masked in the list. Copy them and store them safely. Do not share one key across people or systems. To distinguish call sources, create separate keys and attach them to different clients.
Step 5: Make a call
The Make your first API call tab on the model detail gives this platform's access URL and sample code for each protocol, ready to copy. OpenAI-compatible example:
curl https://<网关地址>/api/v1/agent-gateway/openai/v1/chat/completions \
  -H "Authorization: Bearer <YOUR_API_KEY>" \
  -H "Content-Type: application/json" \
  -d '{
    "model": "<模型名>",
    "messages": [{"role": "user", "content": "用一句话介绍你自己。"}]
  }'
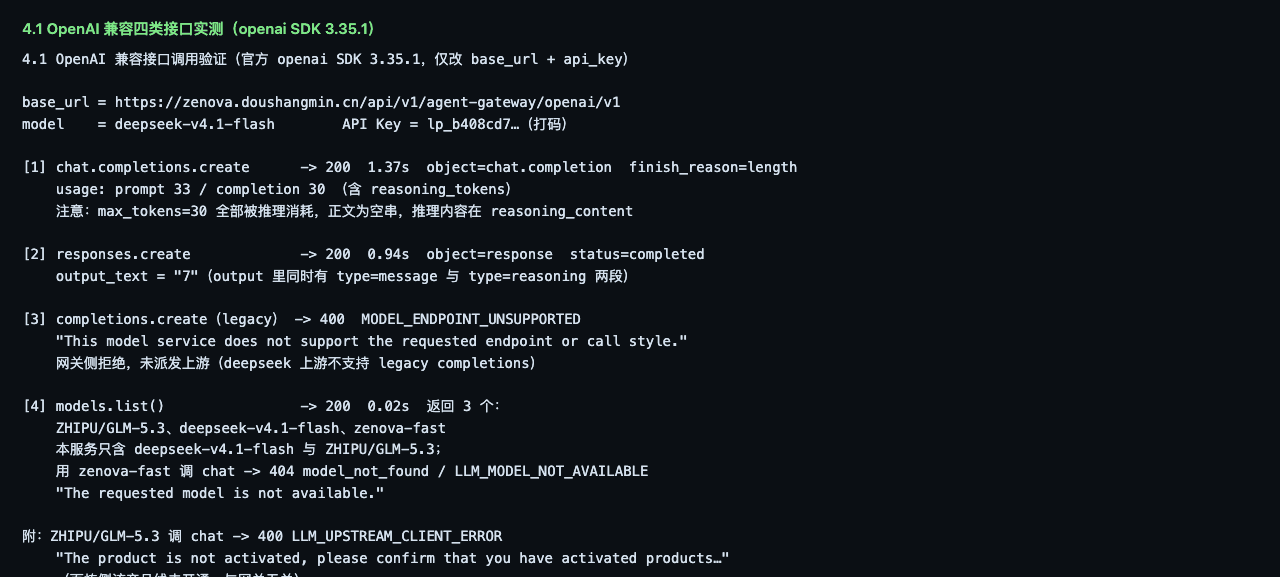
With the OpenAI SDK you change two things: set base_url to https://<网关地址>/api/v1/agent-gateway/openai/v1, and set api_key to your API key. Both chat completions and Responses are compatible; other SDK call styles stay the same.
What you will see
- Chat completions return a standard
chat.completionstructure withchoices,message, andusage. Reasoning models also returnreasoning_content. The Responses API returns a standardresponseobject;outputcontains bothmessageandreasoningsegments. - A successful response header carries a trace ID (
x-trace-id) for locating the call in the console. - HTTP 200 means the call went through the gateway, was dispatched upstream, and returned successfully.
Note
- Use the access URL shown on the model's Make your first API call tab. The root path
/v1/...is not the gateway entry. - The legacy completions API (
completions) does not apply to most models on this platform. The request is denied on the gateway with400 MODEL_ENDPOINT_UNSUPPORTED, is not dispatched upstream, and is not billed. Use chat completions or Responses. - Listing models (
models.list()) returns the model set for this key's environment and may include models the current key cannot call. Availability follows the group chosen in API key affiliation. Calling a model outside that scope returns404 model_not_found. - An invalid or expired key returns
401 invalid_api_key. Error codes and handling are in the appendix.
Step 6: Look up the call record
Administrator view
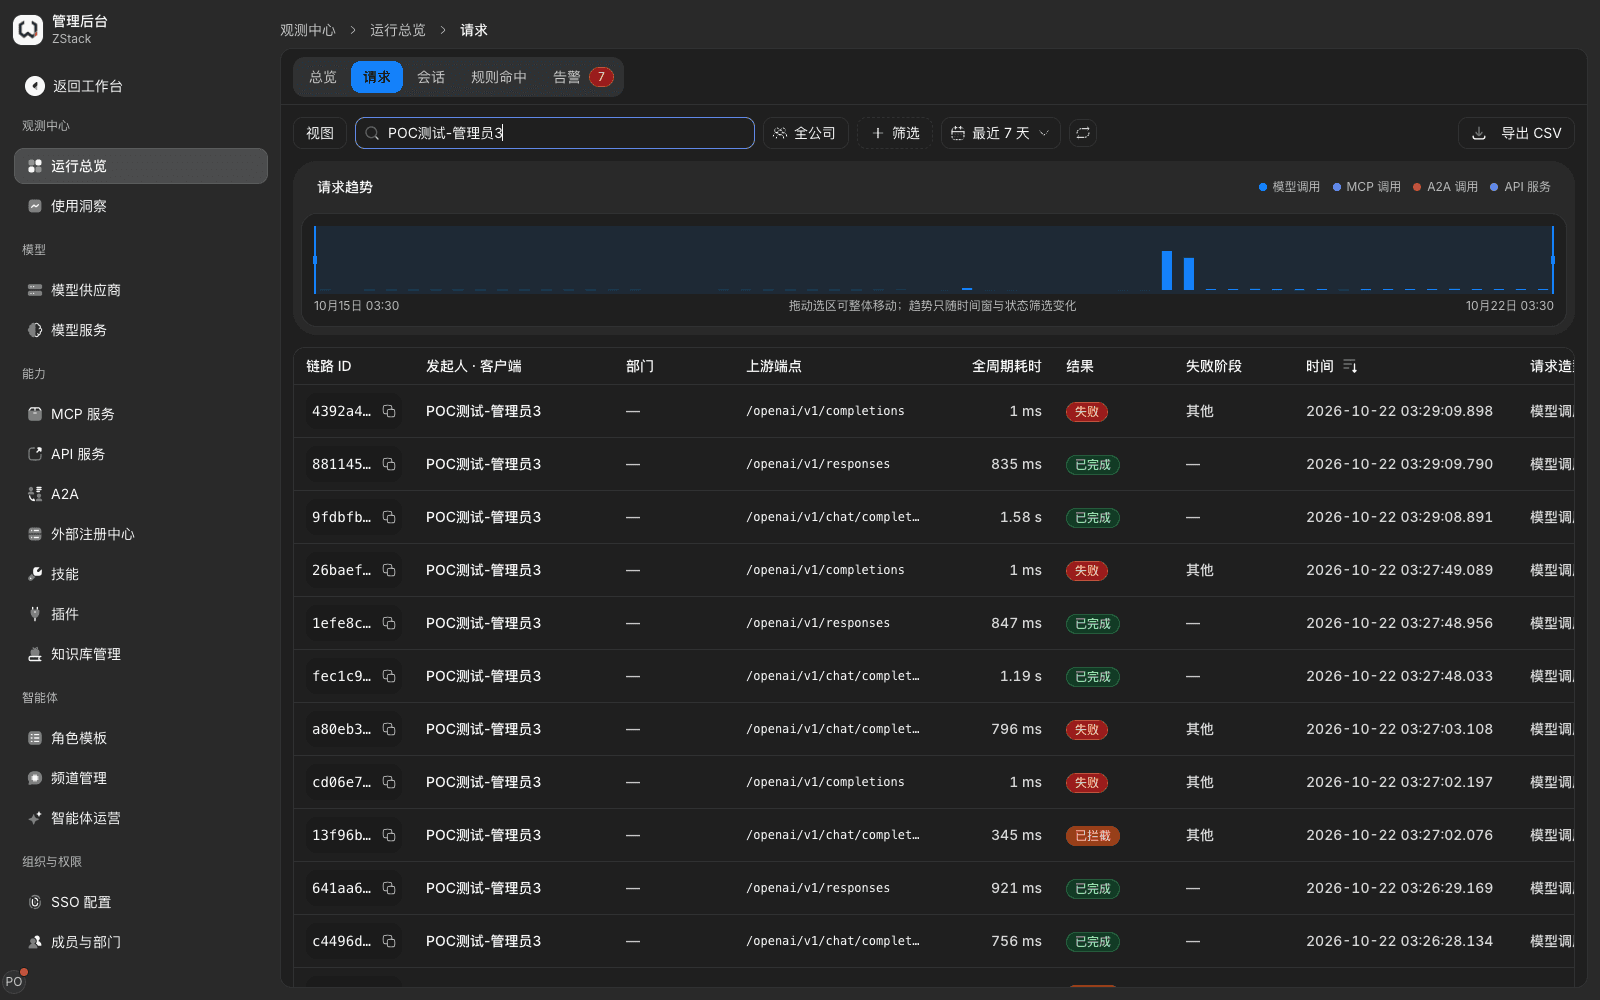
- Open Admin Console › Operations overview and switch to the Requests tab.
- Narrow the list with search or filters: model name, initiator, result, time range.
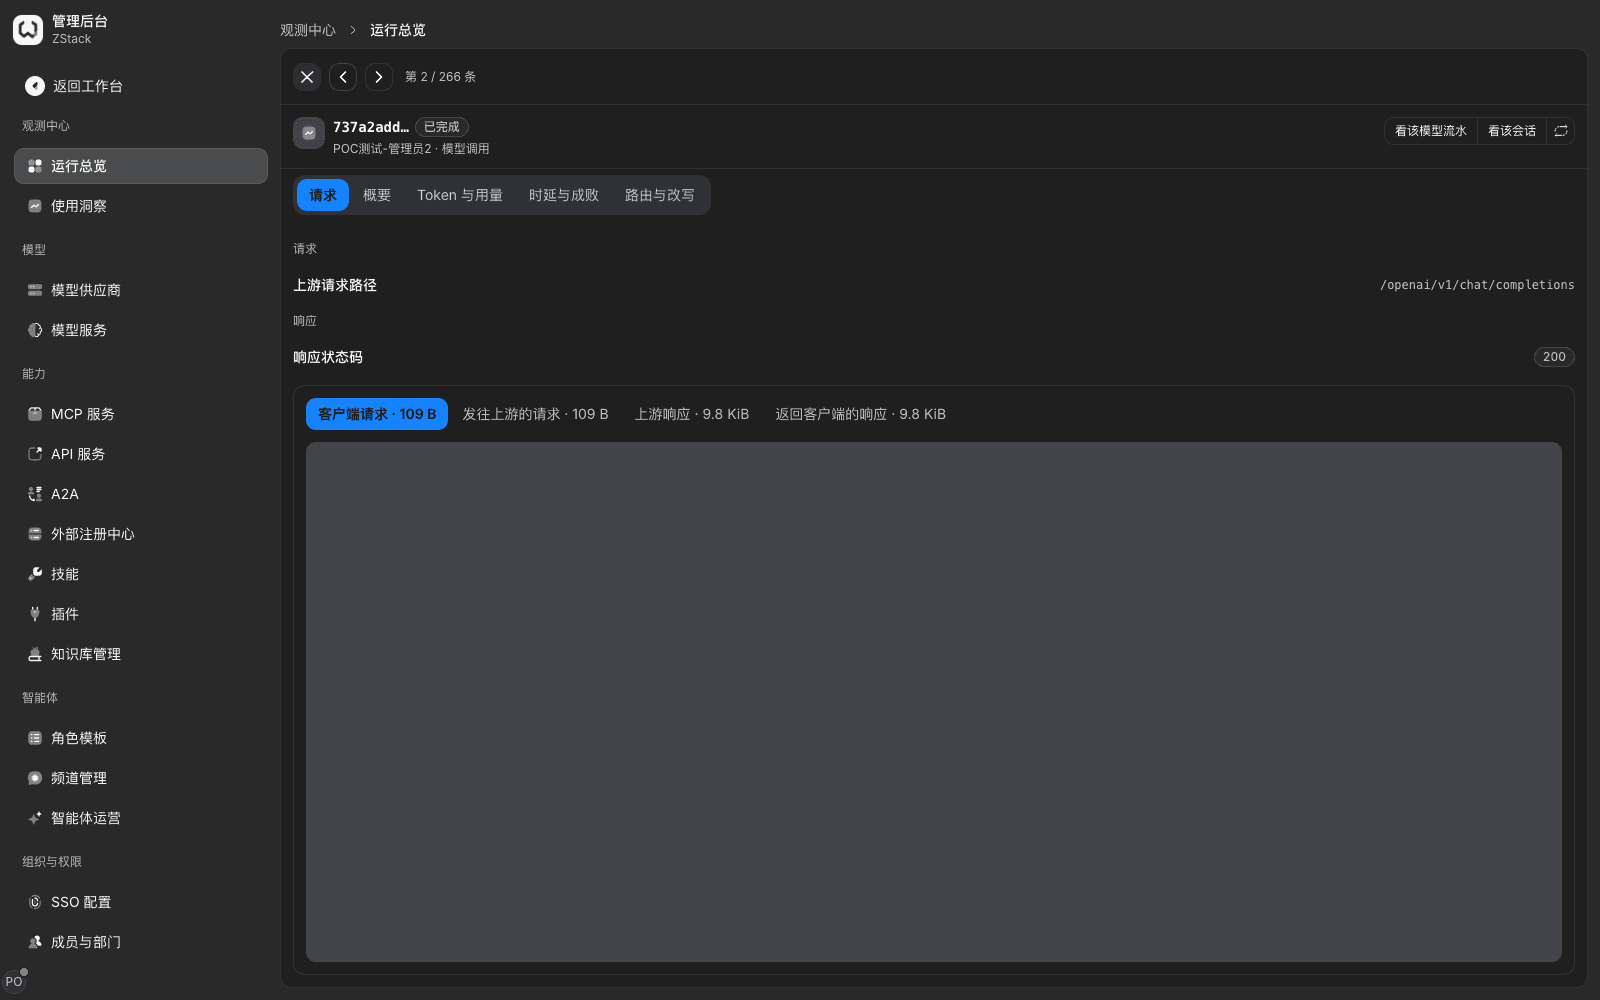
- Open a record. On Summary, Request, and Routing and rewrite, check initiator and credential, request and response size, latency breakdown, and the traffic rules this call hit.
What you will see
- A successful call shows as Completed, with end-to-end latency and upstream latency.
- Requests denied by the gateway are also recorded as one row, result Failed, with an HTTP status code. Requests denied on the gateway have latency 0 and billing 0; Routing and rewrite explains that there was no upstream attempt.
- Workspace shows the caller's own workspace, so you can check by person.
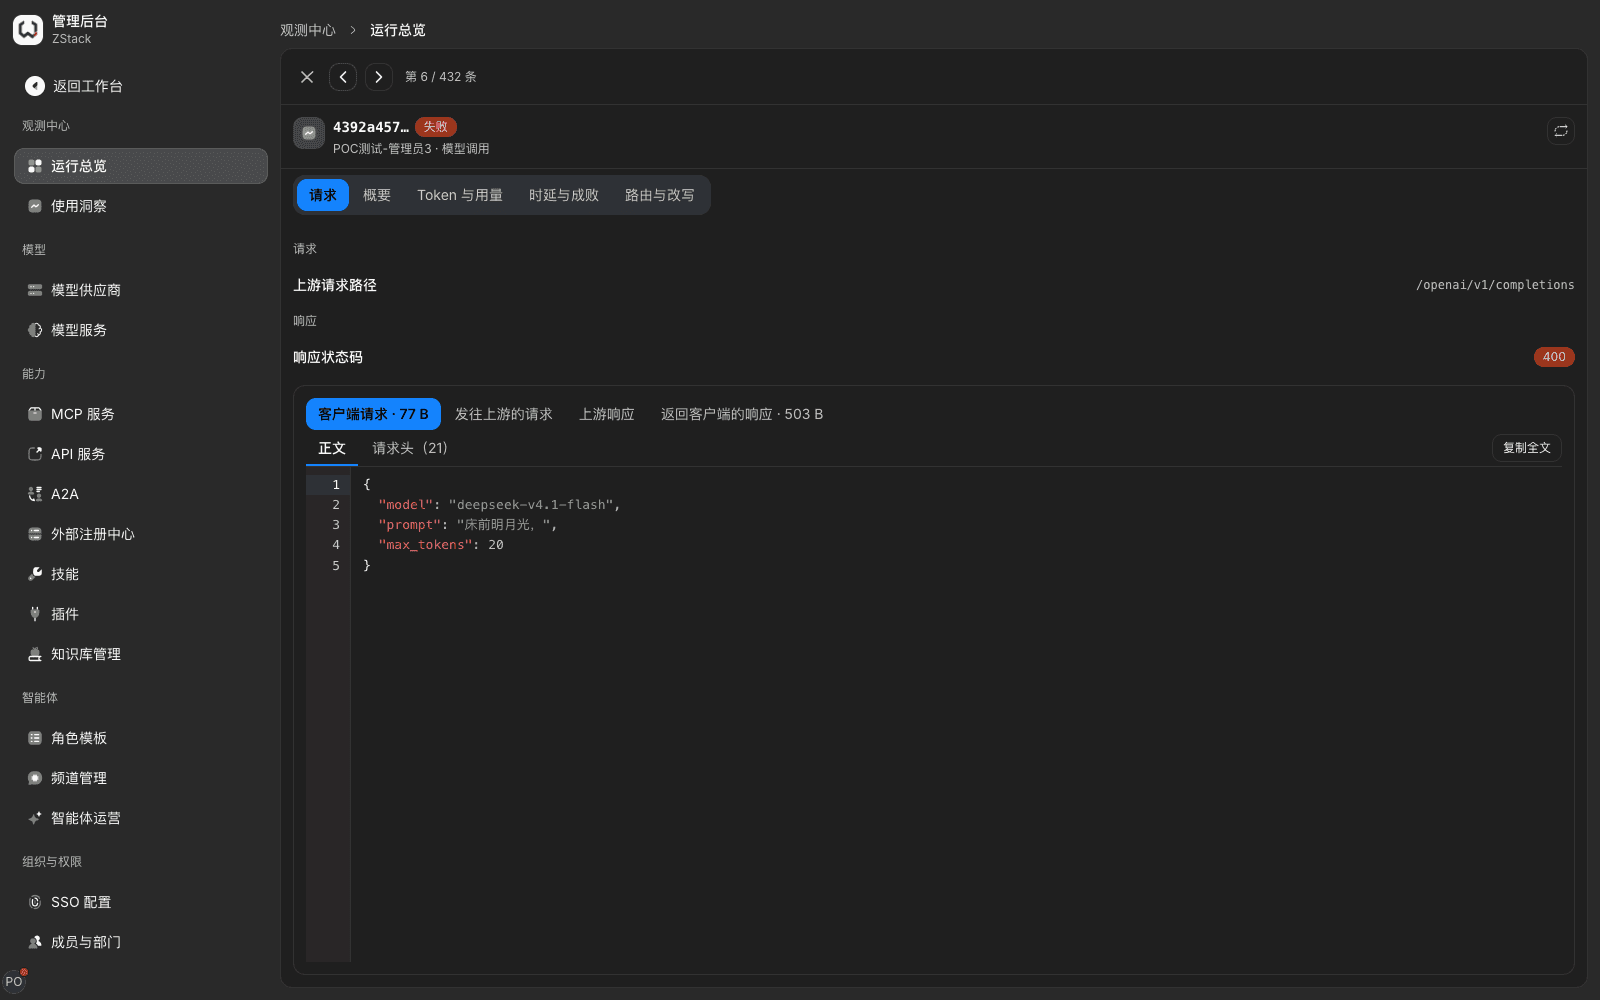
Member view: members review their own calls in the workspace, one by one by time, including model, status, tokens, latency, and cost.
Note: if a search by trace ID misses, narrow the list by model name plus time range, then locate by timestamp.
1.4 What to configure next
After the first call works, complete configuration in this order before you widen use:
- Organization and identity: build departments, functional groups, and members; connect SSO and directory sync; assign Config Admin, Security Admin, and Auditor; set session and password policy (Chapter 3).
- Model completeness: add upstream accounts and pricing, split model groups by purpose, set quotas and budgets (Chapter 4 through Chapter 7).
- Capability access: connect MCP services and API services as needed, and set availability scope (Chapter 11, Chapter 12).
- Traffic and security: in Traffic › Traffic rules, configure routing, limits, content detection, and tool-level permissions. Before save, use rule preview to check hit order (Chapter 15).
- Alerts and audit: configure notification channels and alert rules; confirm log retention and operation audit meet compliance (Chapter 22).
- Phased go-live: in a pilot department, verify a normal call, a denial, quota exhaustion, and bad input, then roll out (Chapter 25, Chapter 26).
1.5 Done criteria
- Members in scope can see models in the granted groups on the model plaza and call them with their own keys. Accounts outside the availability scope cannot see those models, and calls are denied.
- Model Try returns a full reply and shows time to first token, total latency, and tokens.
- An administrator can find the pilot call in Operations overview › Requests, with the correct initiator, credential, and usage. The member can see the same call.
- After a member is removed from the availability scope, the group disappears on the member side, calls with the old key are denied, and those denied requests appear in Operations overview › Requests.
- Config Admin, Security Admin, and Auditor are held by different people. Configuration changes show operator and time in operation audit.
- Alert recipients, backup-and-restore owners, and support contacts are named.
Capability notes
| Not provided | Use instead |
|---|---|
| Model list returns only models the current key can call | Treat models in the group chosen for API key affiliation as the usable set; keep out-of-scope models out of application config. Calling an out-of-scope model returns 404 model_not_found (1.3 step 5) |
Legacy text-completions API (completions) is generally available | Use chat completions or Responses. The legacy API is denied on the gateway and is not billed (1.3 step 5) |
| Tenant administrators self-provision tenants or view other tenants | Platform-level operations are done by platform administrators in the platform Admin Console (2.6) |
| Dev, test, and production isolated inside one deployment | Deploy one instance per environment, each with its own license and configuration (2.7) |
| Search call records by custom dimensions other than trace ID | Combine model name, initiator, result, and time range (1.3 step 6) |
Zentrix Gateway User Manual
Complete operating instructions from first-time setup through daily use, security governance, troubleshooting, and platform maintenance.
2. Platform objects and boundaries
Full-length chapter. Content is checked against the 2026.10 mainline code and the live console; menus and features depend on the current license, account permissions, and delivered environment.