25. Phased go-live
Full-length chapter. Content is checked against the 2026.10 mainline code and the live console; menus and features depend on the current license, account permissions, and delivered environment.
Back to overview · Full table of contents · Download full PDF
This chapter: for tenant administrators and security administrators who roll the platform out. It gives the recommended steps from 「one successful call」 to 「available to everyone」. The platform splits 「who can use it」 and 「how the request is handled」 into two things: the former is decided by available scope, the latter by traffic rules. Phased go-live means you narrow these two separately first, then open them step by step.
| Phase | Main means | Condition to enter the next phase |
|---|---|---|
| 1. Prepare | License, members and departments, default models, notification channels | Every item in the 26.1 checklist passes |
| 2. Bound the pilot | Available scope authorizes only the pilot objects; quotas are tight | Success rate and latency of pilot calls match expectations |
| 3. Observe the policy | After a content-check match, choose 「Record only」; check with 「Validate rule」 before saving | False positives in hit records are acceptable |
| 4. Canary cutover | Rollout cookie, request-header coloring, weighted split | Results and latency of canary versus control requests have no obvious difference |
| 5. Widen gradually | Append available scope in steps; change observe policies to block | After each widening, watch one full business cycle |
| 6. Stable operation | Alerts, Operation audit, periodic inspection | Follow Chapter 26 |
25.1 Phase 1: Prepare
When to use this: the platform is deployed and members can sign in, but nobody has actually used a model yet.
- Open 「Admin Console › System Settings › Global settings › 「License」 tab」 and confirm the modules involved in this go-live are enabled. 「Add-on modules」 lists Model guardrails, Dynamic routing, Full-chain audit, and Usage & Cost.
- In 「Organization & Access › Members & Departments」, confirm department and member membership. Cross-department authorization uses functional groups; assign the three administrative roles to different people under three-person segregation (Chapter 3).
- In 「Global settings › Default models」, assign models for content judgement, sensitive-information recognition, and similar capabilities, and confirm 「Normal」; in 「Alert rules › Notification channels」, create a verified channel (Chapter 22).
What you will see: the 「License source」 area shows Community edition (no license imported), or the source and expiry of an imported license, and states that Community edition has no expiry. The same page gives three steps to upgrade to a commercial license: export an authorization request (.json), exchange it for a signed license, import the .lic.
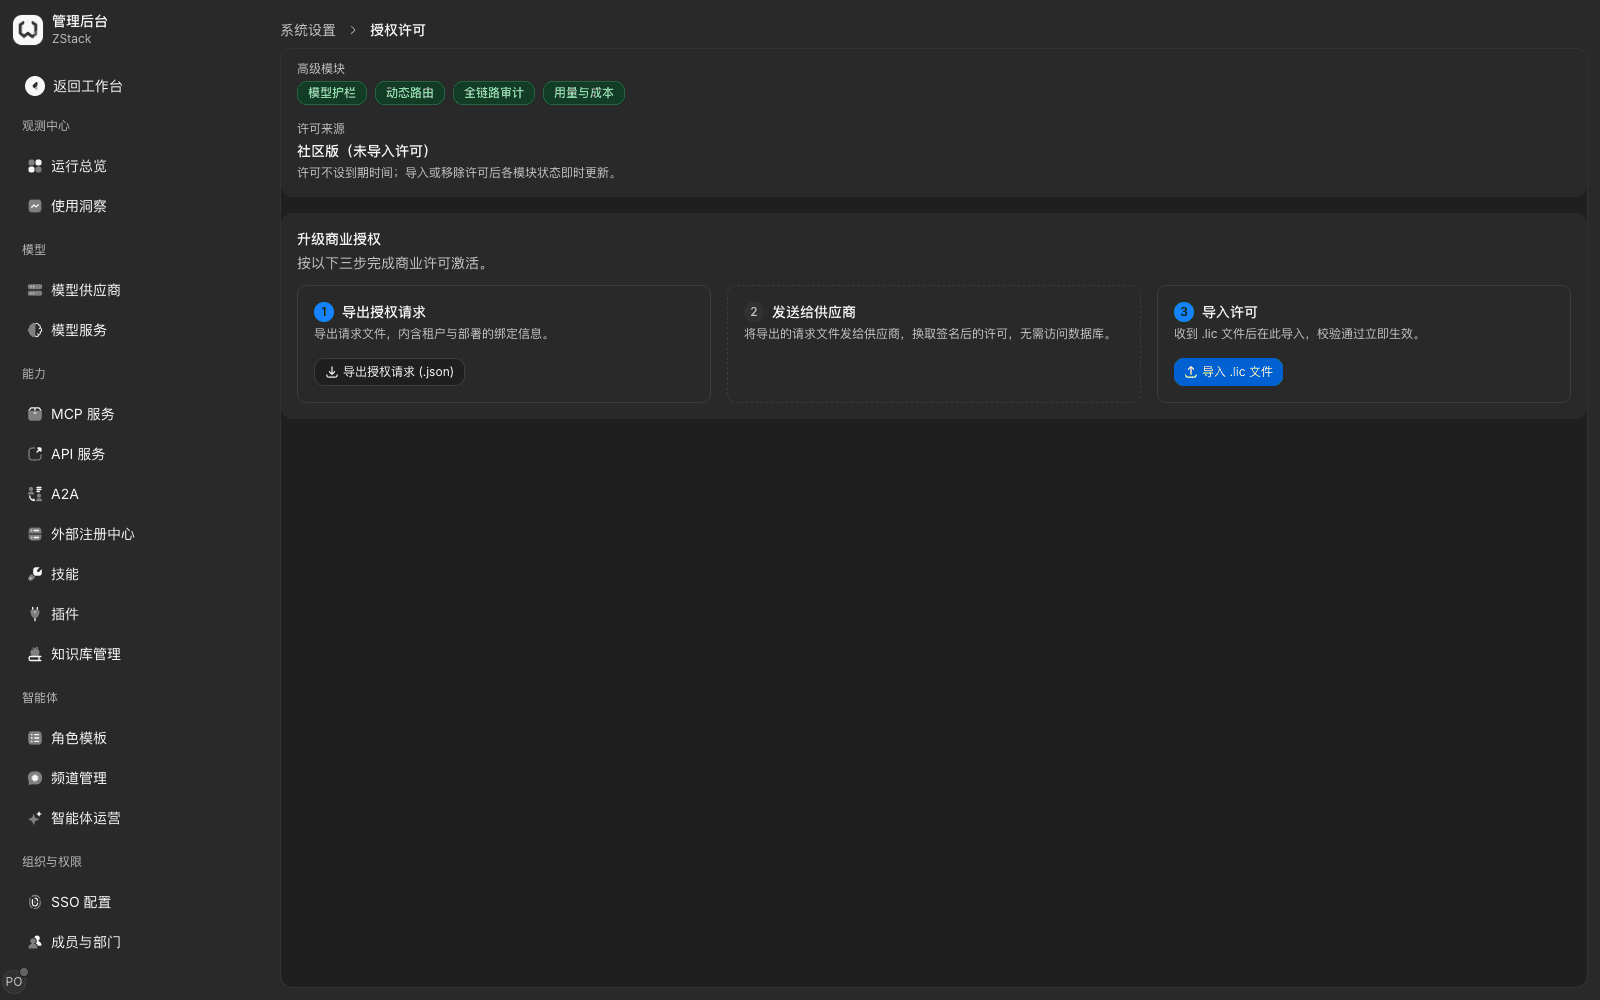
Note: a license is bound to a deployment. Development, test, and production each need their own license file; they cannot be imported into one another.
25.2 Phase 2: Bound the pilot with available scope
When to use this: you are ready to let a small group use the product on real work. Available scope decides who can see and use a model group, MCP service, or API service.
Prerequisites: a model provider is connected, and at least one model group for a clear purpose has been created (Chapters 4–6).
- First send a message on the 「Trial」 tab of a model in the group, and confirm the reply is normal and that latency and tokens have values.
- Open the service detail 「Visibility & quotas」, click 「Edit available scope」, and choose the authorization object type (all users, department, functional group, workspace, or individual members). During the pilot, authorize by department or functional group so personnel changes only need an organization change.
- 「Next step」 opens 「Set target validity」; choose a validity that has an end time. After saving, set a tight quota for the pilot objects (Chapter 7).
What you will see: the available-scope table lists name, type, and quota per object. Members outside the scope cannot see the service in the plaza or in the key-ownership dropdown; opening the admin detail URL directly redirects them back to the settings page.
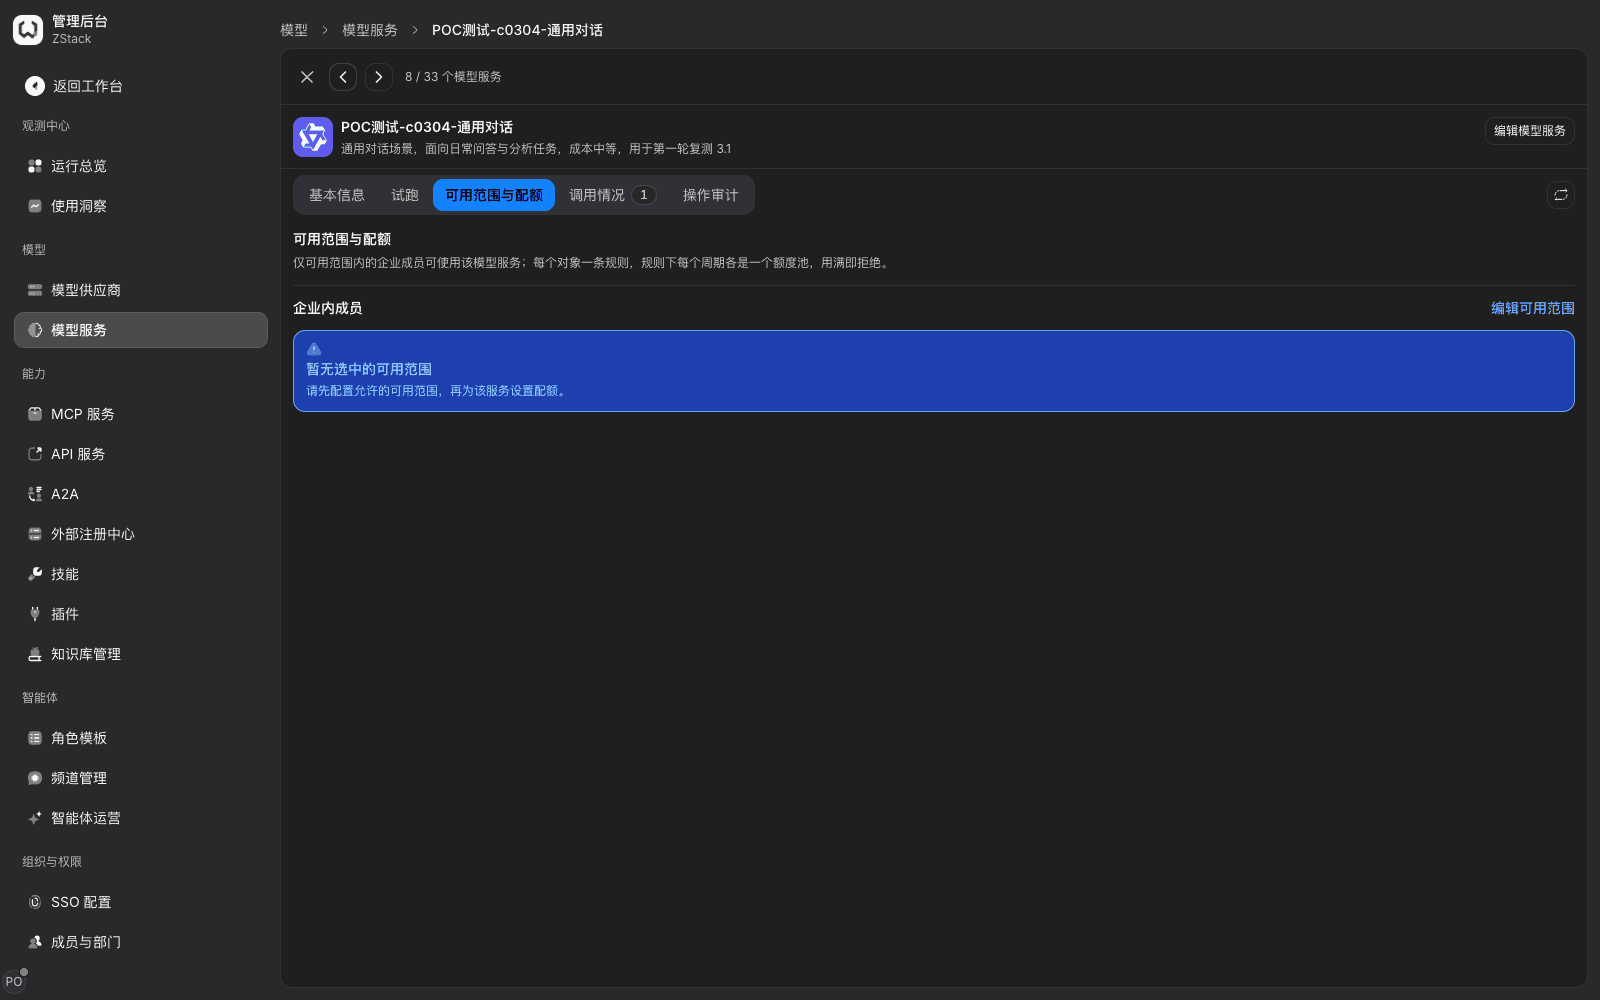
Note: a newly created model group has no available scope by default. Authorization changes usually finish distributing within a few minutes. After you move a member out of scope, keys they already issued do not fail immediately; later calls return 401 invalid_api_key. To cut access immediately, disable the key or move the member to departed (3.9).
25.3 Phase 3: Verify security policy in observe mode
When to use this: the first time you enable sensitive-information, model-judgement, or tool-call detection for real work. These policies are easy to false-positive at the start; blocking immediately interrupts the business.
- In 「Guardrails › Guardrail rules › Sensitive data」, click 「Trial run」, choose the types to detect, paste typical business text, and check the recognition result and the redacted text. A trial run does not write a call record and does not actually call a model.
- In a traffic rule, add a 「Content check · Conversation」 or 「Content check · Tool calls」 action, and set the on-match action to 「Record only」 first. 「On character-steganography match」 and 「On decoded match」 for keywords can use the same option.
- When you use model judgement, confirm the action in the node for 「When the judge model is unavailable」. A new rule defaults to 「Reject」; change it to 「Allow」 only when you truly need business continuity (section 14.9). Before saving, check typical samples with 「Validate rule」 in the right pane of the canvas (section 14.12).
- Save and 「Confirm and apply」. After one full business cycle, check matched rules and result categories in 「Operations overview › Requests」. When false positives are acceptable, change the action to 「Redact」 or 「Block」 and confirm again.
What you will see: a trial-run result looks like 「Redacted · mobile number 1」 and gives latency. After blocking takes effect, the call returns 403 CONTENT_POLICY_BLOCKED; message is the configured reply. The call-record result is 「Blocked」.
Note: 「Record only」 matches still appear in call records and in the rule-detail traffic view. You can watch whether false positives converge with the alert metrics 「Policy hits」 and 「Policy blocks」. After you switch to block, callers see the reply wording; notify the business before go-live.
25.4 Phase 4: Switch a share of requests with canary rules
When to use this: you need to change a model, change an upstream, or adjust a traffic rule, but you cannot cut all traffic at once.
| Method | When to use | How to configure |
|---|---|---|
| Rollout cookie | Browser clients colored by session | Condition 「Rollout cookie」; pick a name from zenova_canary, zenova_rollout, zenova_variant and fill in the value |
| Request header | The business system itself controls which requests take the new path | Condition 「Request header」, for example x-release-channel equals gray |
| Weighted split | Switch traffic by percentage | Action 「Forward to」; target-selection strategy 「Weighted round robin」; set weights for the old and new targets |
| Shadow dispatch | Try the new target on a side path first | Add 「Shadow dispatch」 to the action; copy requests to the candidate target by percentage |
Procedure (weighted split as the example)
- Open 「Traffic › Traffic rules」 and click 「New rule」. Conditions: the model group is in the pilot group, call type is 「Model call」. To limit people, add a 「Caller」 condition.
- Action 「Forward to」; target-selection strategy 「Weighted round robin」; old target 90%, new target 10%. To be able to fall back, add a backup tier and enable failover.
- On the right 「Validate rule」 tab, confirm this rule matches, then 「Save rule」. In 「Review this change」, check hit order, then click 「Confirm and apply」.
- In 「Live traffic」, watch each target's actual share and latency; in 「Operations overview › Requests」, check the real landing. When there is no anomaly, raise the weight step by step to 100%.
What you will see: 「Review this change」 lists field differences, related objects, and hit order. The footer says 「After you confirm, matching requests follow the new rule. Check hit order before you publish.」 After save, distributing the configuration to gateway nodes takes about ten to twenty seconds. 「Live traffic」 gives configured weight, actual share, and latency percentiles per target.
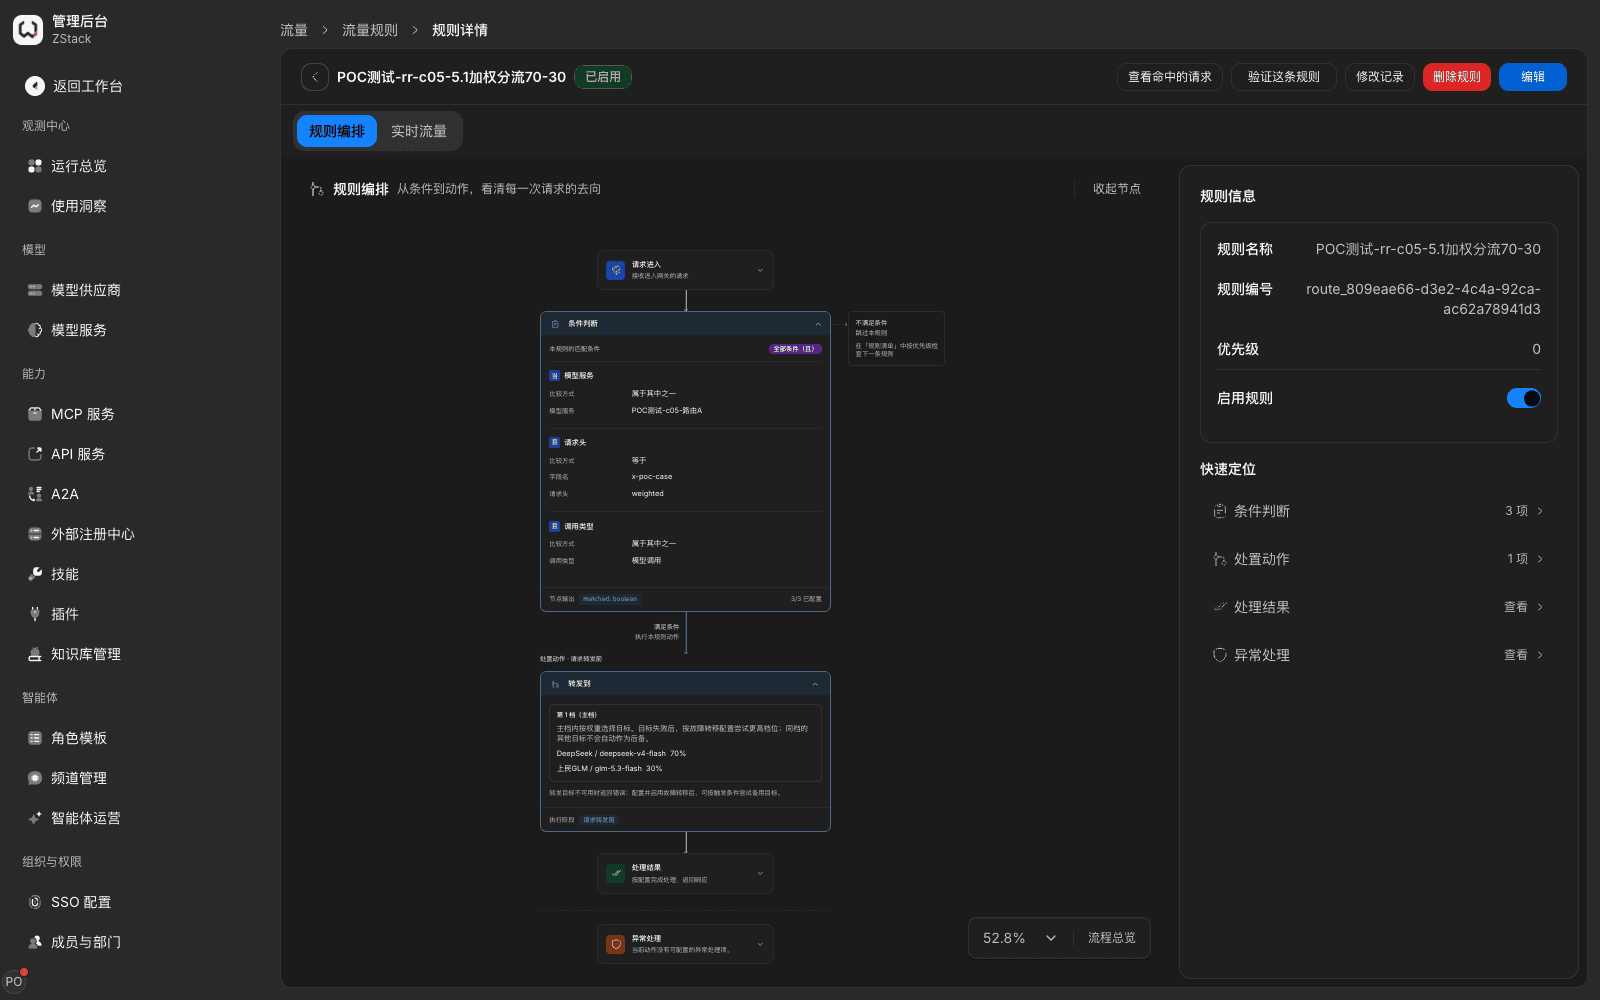
Note: rules match from top to bottom by priority. A preceding rule that 「Stop matching」 intercepts the request. After you save a new rule, simulate once with 「Validate rule」 and confirm it is evaluated and matched. Weighted round robin is noisy on a small sample; judge the share on enough requests.
Fast rollback: turn the rule's status switch off in the rule list. Later requests no longer match; in-flight requests are not affected. To return to a historical configuration, look at each change in 「Change history」, restore the fields by the diff, and save again.
25.5 Phase 5: Widen gradually and confirm the phase
- Widen only one dimension each time: add a department, add a model group, add an MCP service, or change one observe policy to block.
- After widening, use an out-of-scope account to confirm it is still rejected. Then adjust quotas to real usage, and watch spend and success rate on 「Operations overview」.
- Handle issues exposed in the pilot in 「Usage insights」. Publish changes that members need to know with 「Notification Banner」.
Confirm each item before the phase ends
- Calls in this phase are all queryable in 「Operations overview › Requests」; routing conclusions and matched rules match expectations
- Policy-hit objects and counts match expectations, with no obvious false positives; 「Alerts」 has no unhandled critical alerts
- Calls from out-of-scope accounts and unauthorized keys are correctly rejected; change records in Operation audit are complete
- You have written down the rollback: which rule to disable, which scope to restore, which policy to put back to observe
Capability notes
| Capability not provided | What to do instead |
|---|---|
| Isolate multiple environments in one deployment and sync configuration | Deploy one set per environment; import license and configuration separately. Traffic rules can be exported as YAML and imported into the target environment (2.7) |
| Custom names for rollout cookies | Color with a 「Request header」 condition instead (25.4) |
| Rule 「observe mode」 (the whole rule records only and does not execute) | Choose 「Record only」 on the content-check action; for routing changes, simulate with 「Validate rule」 first, then release at a tiny weight (25.4) |
| Automatic release by health metrics, and automatic rollback on anomaly | Adjust weights by hand; configure failover to a backup tier; disable the rule when you find an anomaly (25.4) |
Previous: 24. Maintaining and changing common configuration · Next: 26. Go-live checks, stable operation, and management handover
24. Maintaining and changing common configuration
Full-length chapter. Content is checked against the 2026.10 mainline code and the live console; menus and features depend on the current license, account permissions, and delivered environment.
26. Go-live checks, stable operation, and management handover
Full-length chapter. Content is checked against the 2026.10 mainline code and the live console; menus and features depend on the current license, account permissions, and delivered environment.