16. Gateway extensions and Open API
Full-length chapter. Content is checked against the 2026.10 mainline code and the live console; menus and features depend on the current license, account permissions, and delivered environment.
Back to overview · Full table of contents · Download full PDF
This chapter: for tenant administrators, security administrators, and integration developers. Two extension methods — gateway-extension plugins (they run in the gateway request-handling path, for the enterprise's own admission, rewrite, and compliance marks, and they support hot update and version switch-back), and calling platform management APIs with an access-key signature. This chapter also covers the gateway's boundary capabilities on access domains, source-CIDR control, and cross-tenant isolation.
「Plugin」 in this chapter means a gateway extension, not an agent plugin on the 「Capabilities › Plugins」 page.
16.1 Gateway-extension catalog and plugin detail
Prerequisites: tenant-administrator or system-administrator permission.
Procedure: open 「Admin Console › Traffic › Gateway extensions」. The catalog lists platform built-in plugins and private plugins this tenant uploaded. Columns include 「Plugin」, 「Type and capabilities」, 「Current version」, 「Status」, 「Bindings」, 「Credential bindings」, 「Updated」. The top right is 「Download SDK」, 「Upload plugin」.
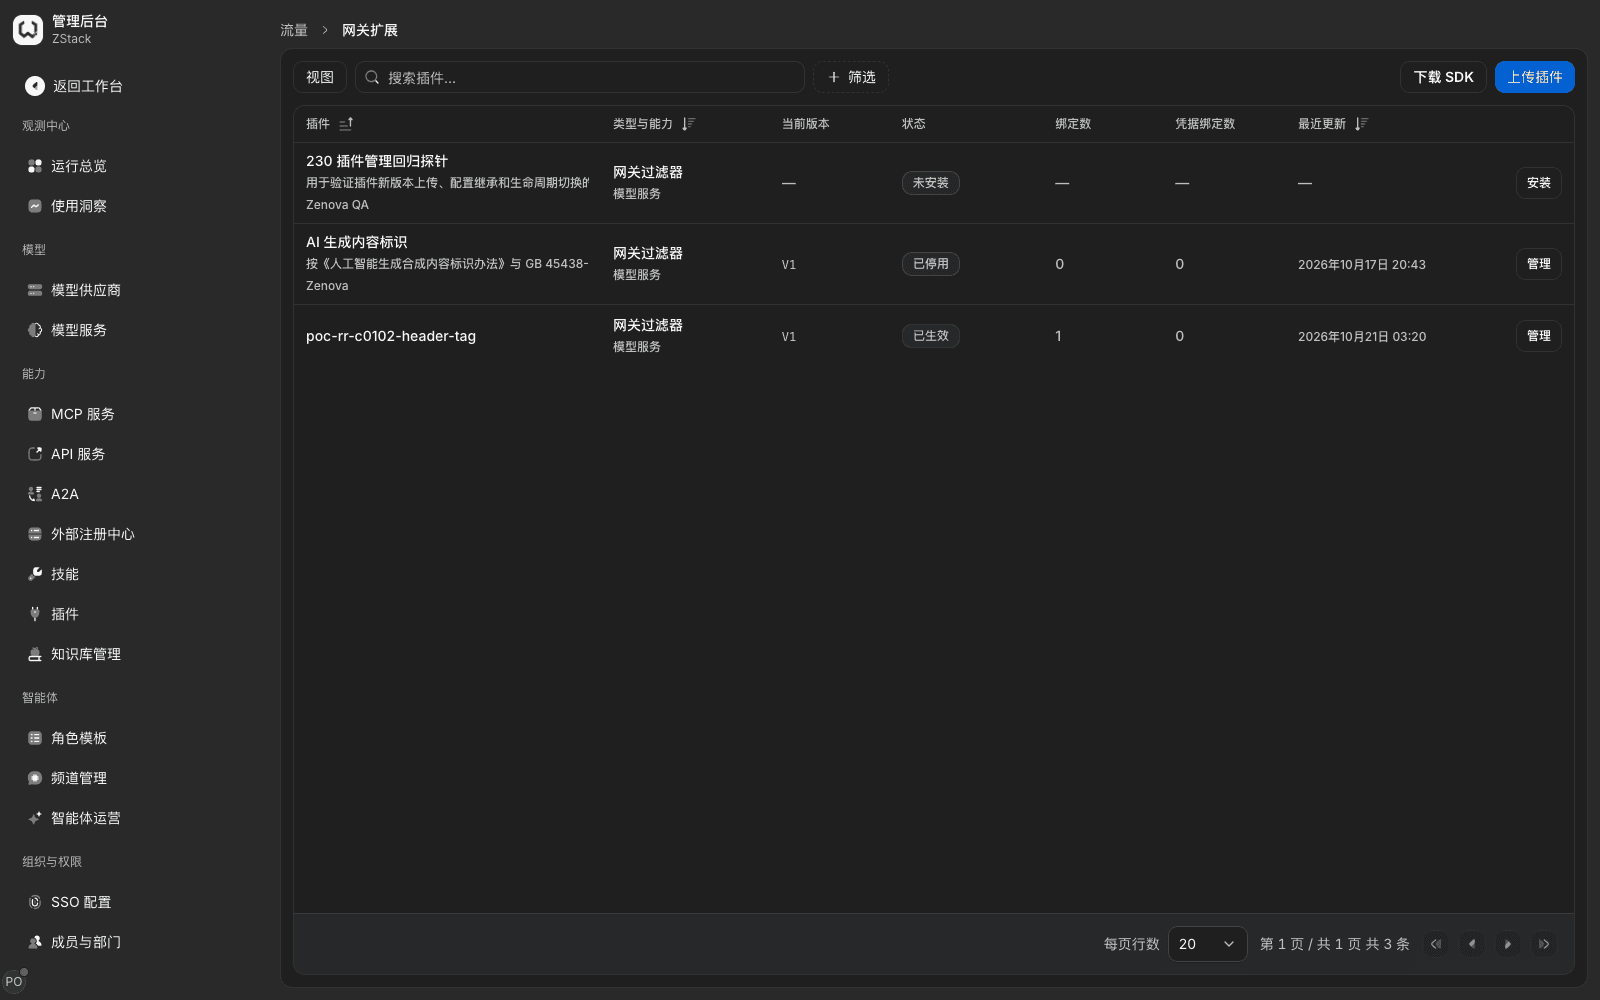
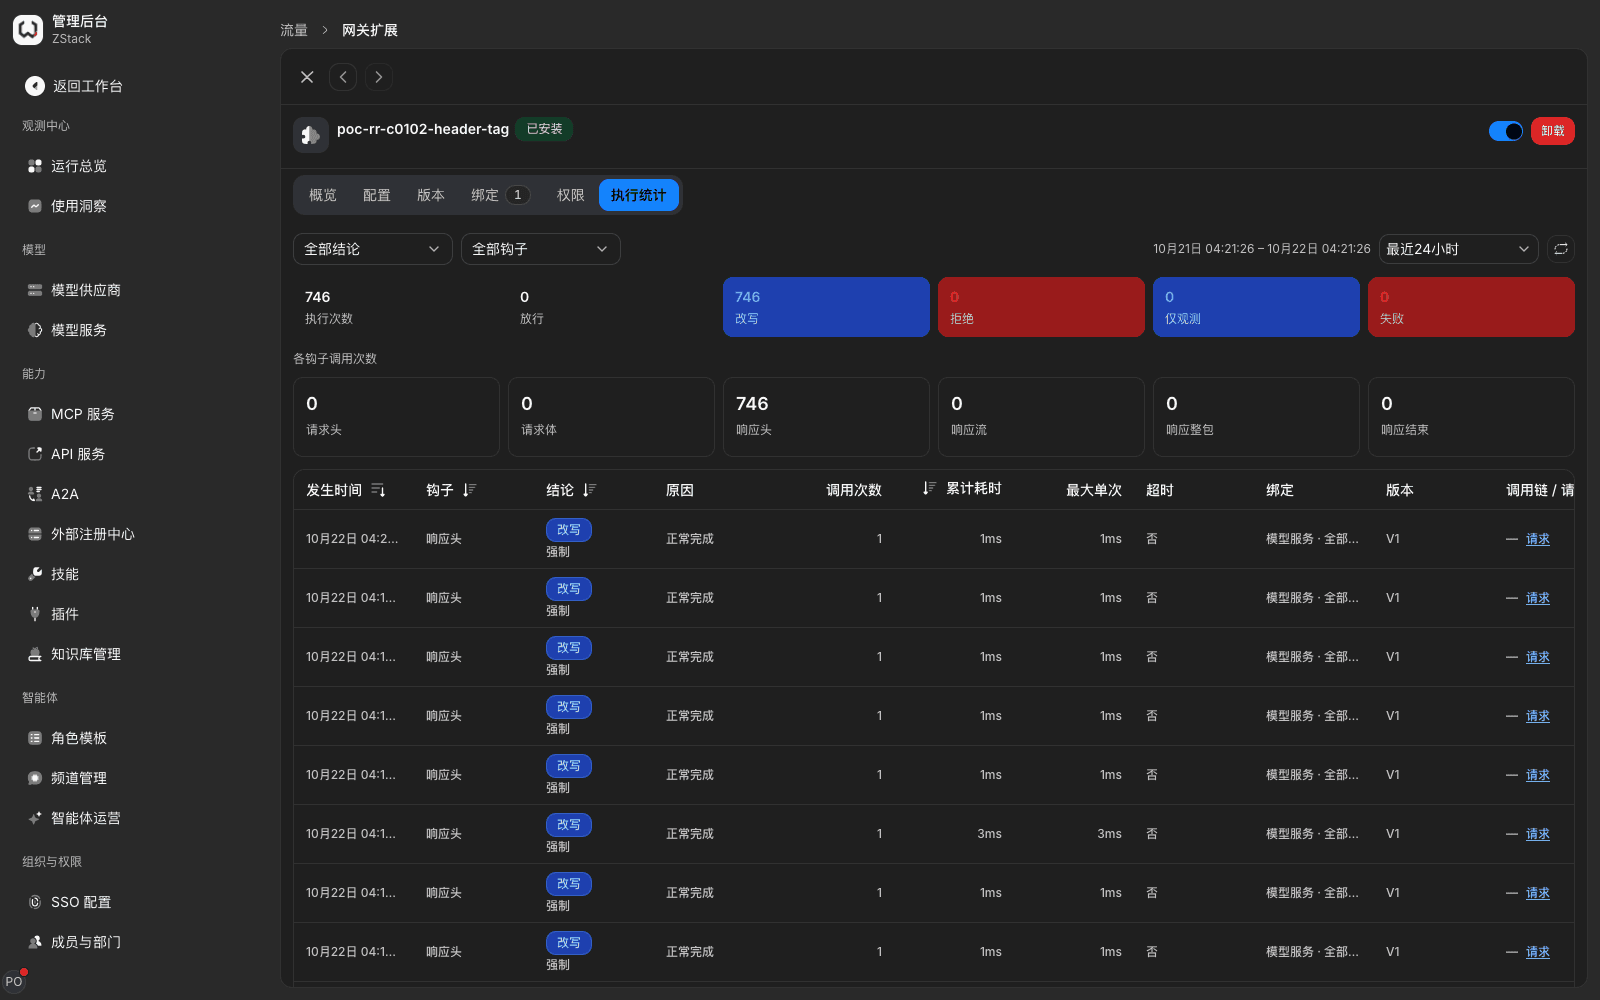
What you will see: status has four values: 「Not installed」, 「Installed」, 「In effect」, 「Disabled」. Choose 「Manage」 to enter the detail. Tabs are 「Overview」 (extension ID, visibility, install and runtime status, current version and supply-chain identifiers), 「Configuration」 (fill and save the form the plugin declares), 「Versions」 (version history and artifact digest), 「Bindings」 (traffic bindings and credential bindings), 「Permissions」 (network targets, secret requirements, and data requirements the plugin declares), and 「Execution stats」 (execution count, counts by conclusion and by hook, execution records).
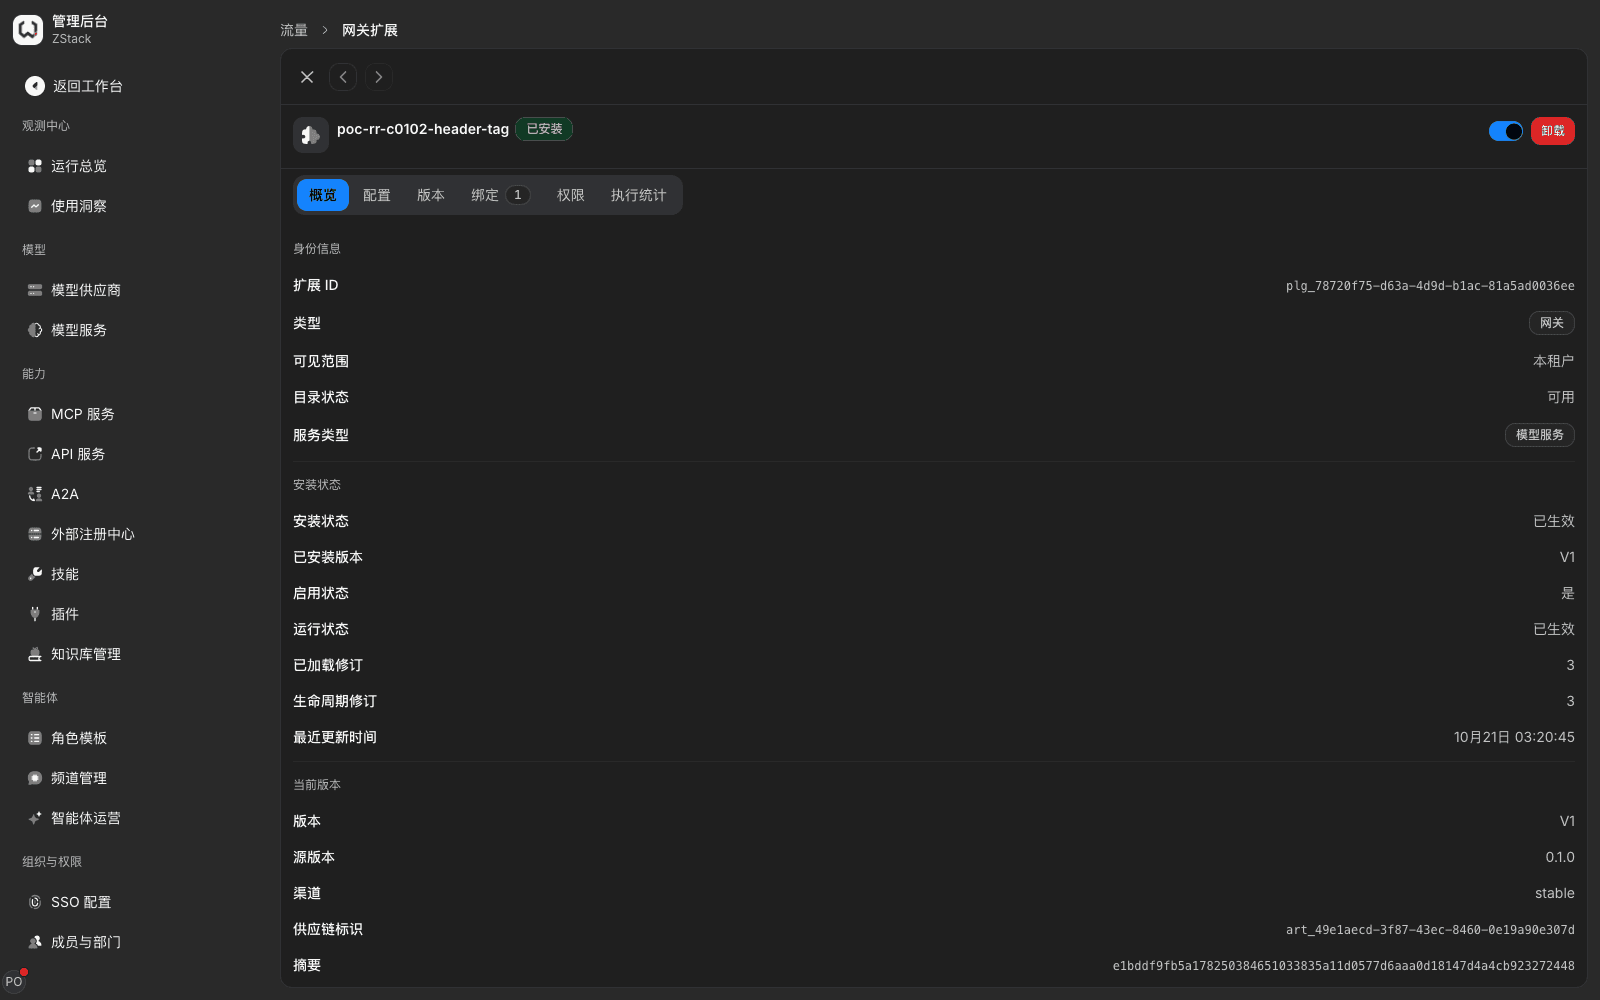
Note: install, enable, and uninstall are all written to 「Operation audit」. Before you upload a private plugin, look at whether the network targets declared on the 「Permissions」 tab meet this organization's requirements.
16.2 Download the SDK and develop a plugin
Procedure
- In the catalog, choose 「Download SDK」, then choose 「Language」: 「Rust: compile a WASM component」 performs better and suits latency- and throughput-sensitive cases; 「Lua: you only write
plugin.lua」 needs no Rust or WASM toolchain, is faster to start, and interpreted execution may be slower than Rust. - Fill 「Plugin ID」 (1–128 letters, digits, dots, underscores, or hyphens), then choose 「Download SDK」.
- When you want a coding assistant to write a plugin against this gateway's interface, choose 「Download AI skill」 to get
SKILL.md. The SDK package also includes a copy.
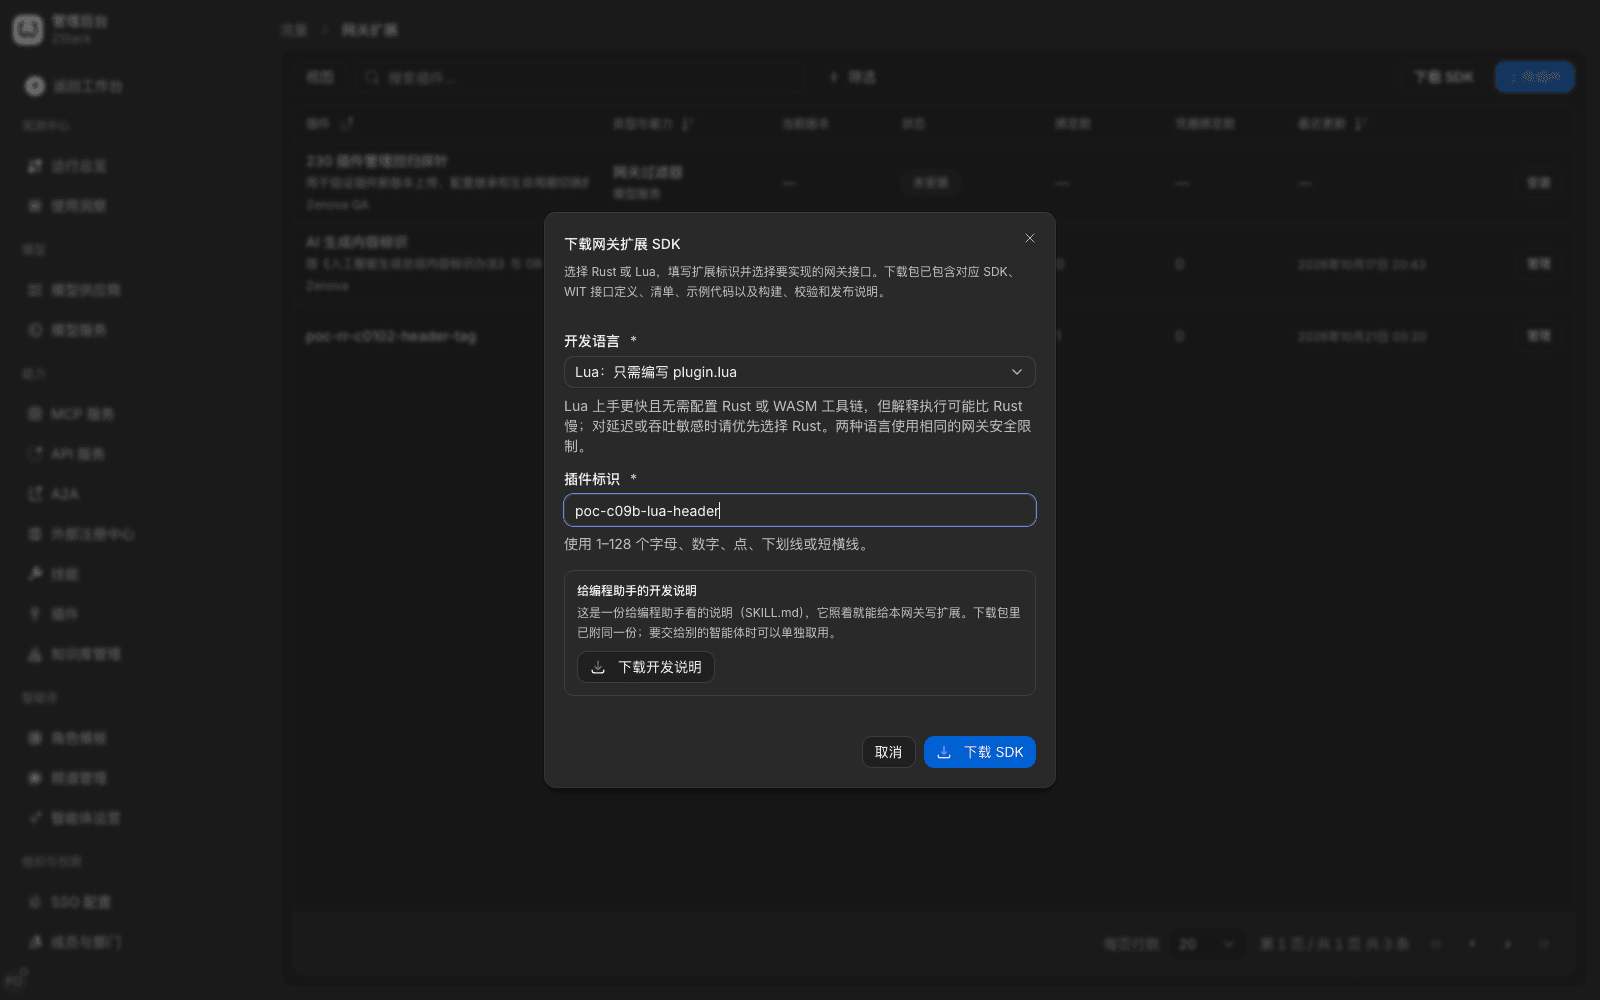
What you will see: the SDK package contains manifest.json (manifest version, host-interface version, hooks, service types, and failure policy), plugin.lua (sample logic), harness.lua (local self-check), .zr/sdk/ (type annotations and a local simulated host), and README. Both languages use the same safety limits.
Build and validate: zr-plugin build . --output ./dist/plugin.zip produces the plugin package; then zr-plugin validate ./dist/plugin.zip validates it. validate uses the same checks as server-side upload, and actually compiles and runs one synthetic request in the production host.
Runtime limits: instruction budget 2,000,000 per execution, 20 milliseconds per execution, 4 MiB memory, plugin package at most 140 MiB. External HTTP requests can only reach targets declared in the manifest and authorized by a credential binding. Exceeding a limit aborts execution and follows the failure policy: 「Fail closed」 (reject the request when the plugin times out or errors) or 「Fail open」. Security-related plugins should use 「Fail closed」. A plugin can declare six hooks: request headers, request body, response headers, response stream, whole response, response end.
Note: a template from 「Download SDK」 cannot be uploaded directly — the archive must be manifest.json plus the compiled component. Produce the plugin package with zr-plugin build as in the README. Uploading source zipped as-is is judged 「The plugin package contents are invalid」.
16.3 Upload, install, and bind
Procedure
- In the catalog, choose 「Upload plugin」 and pick the built plugin package. The platform validates package structure, manifest, artifact digest, interface version, and configuration structure. On success it prompts 「Plugin published」.
- Choose 「Install」 on the plugin, or open the detail and operate on the 「Configuration」 tab. First look at the network targets and secret requirements declared on the 「Permissions」 tab.
- Fill configuration, then install. If no configuration is needed, choose 「Install with empty configuration (disabled)」. The plugin is installed disabled; status becomes 「Installed」.
- On the 「Bindings」 tab, choose 「Create binding」, fill service type, scope (「All services」 or 「Specified services」), caller (optional; empty means no restriction), configuration override (JSON; empty
{}uses the install default), then choose 「Create binding」 inside the dialog. - Turn on the top-right 「Enable」 switch and wait until status becomes 「In effect」.
- Verify with requests that match and do not match the binding scope, then check 「Execution stats」.
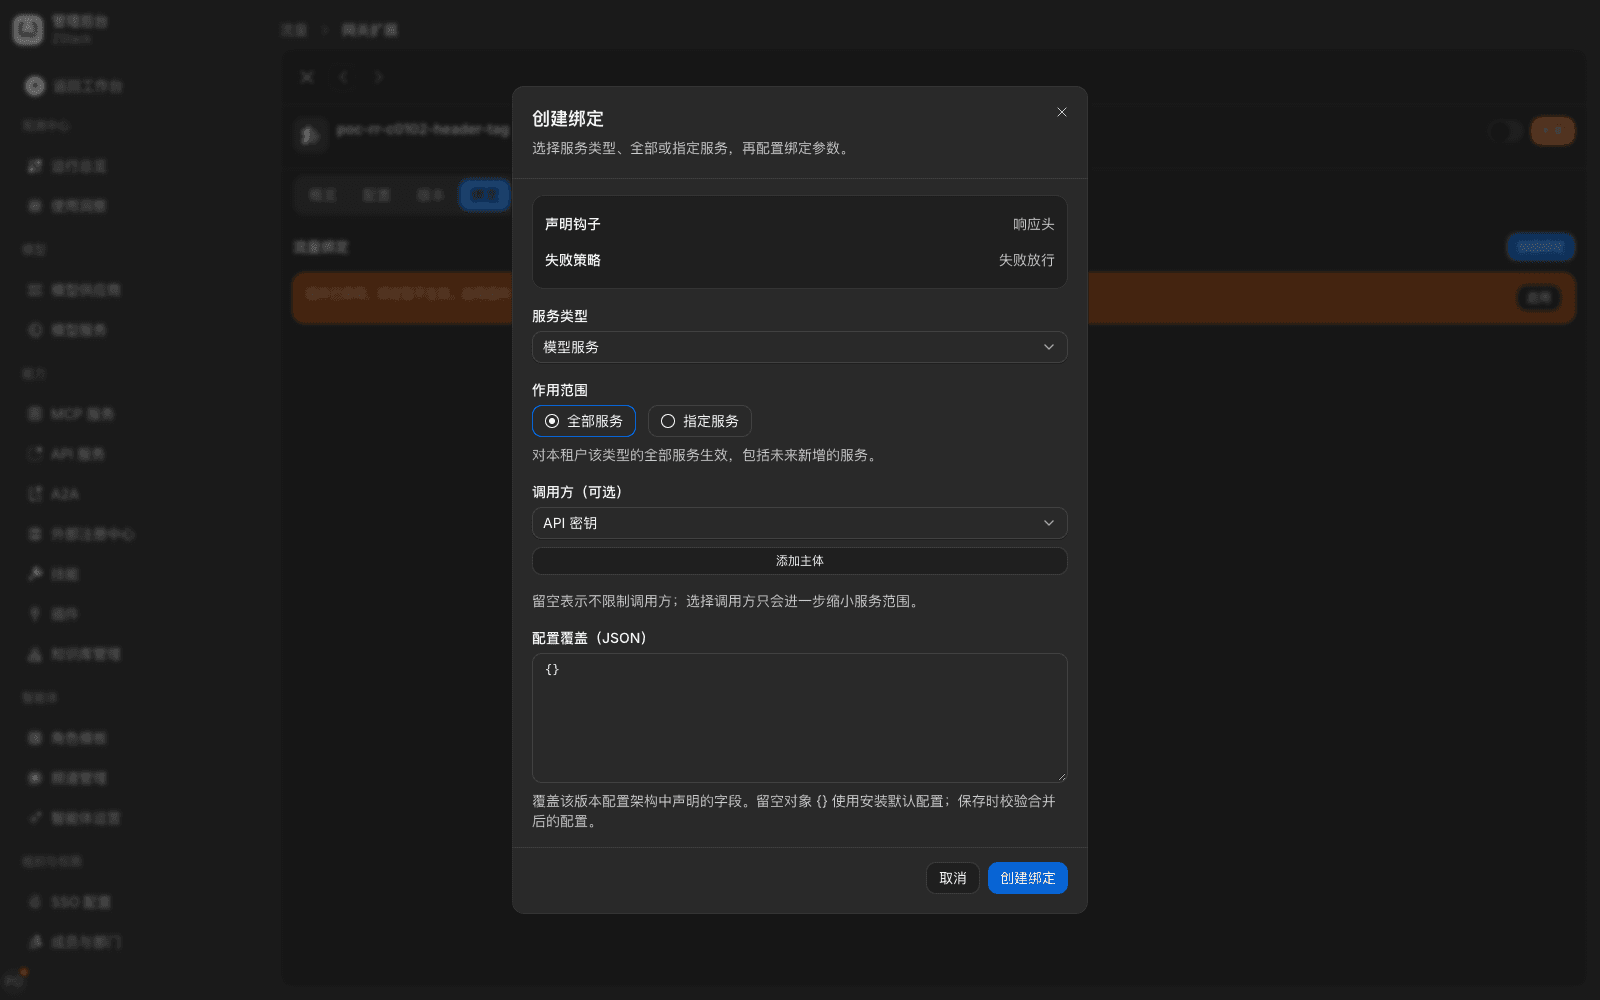
What you will see: requests that match the binding scope are handled by the plugin logic, for example a mark the plugin wrote appears in response headers. Requests that do not match are not affected. Execution counts for the corresponding hooks increase in 「Execution stats」. Opening that call in 「Operations overview › Requests」 also shows the plugin execution record.
Note:
- Bindings do not take effect while the plugin is disabled. The 「Bindings」 tab prompts 「The plugin is disabled; bindings are not in effect for now」.
- A specified-service binding takes precedence over the same plugin's 「All services」 binding. Each hook runs only once on the same request.
- The page has two buttons both labeled 「Create binding」 (one at the top of the catalog, one inside the binding dialog). It is actually submitted only after you confirm inside the dialog.
- You can also add the action 「Attach plugin」 on a traffic rule, so the plugin runs only for requests that match that rule. A traffic rule can only narrow an already bound scope further.
- When the plugin needs to reach an external service, reference the secret by a logical name in the credential binding on 「Bindings」, and limit the allowed target addresses.
Prompts when validation fails: if it is not a valid plugin package, it prompts 「The plugin package contents are invalid. Fix them and upload again」. If the host-interface version is too old, it prompts to rebuild with a newer SDK. If the manifest does not meet the spec, the whole plugin is rejected. After a successful upload, the plugin appears in the catalog as this tenant's private plugin, status 「Not installed」, visibility 「This tenant」. Every upload (including rejected ones) is written to 「Operation audit」.
16.4 Upgrade, switch back, and disable
Procedure: open the plugin-detail 「Versions」 tab. In 「Plugin version management」, choose 「Upload new version」 and submit a complete plugin package, or choose 「Switch to this version」 on an existing version. In 「Target version configuration」, check, then 「Continue to preview」 (preview lists configuration keys that will be deleted; you must tick to confirm). In 「Confirm plugin change」, check the impact, then 「Confirm」. The page shows per-replica publish progress. When it finishes, every replica is running the new version.
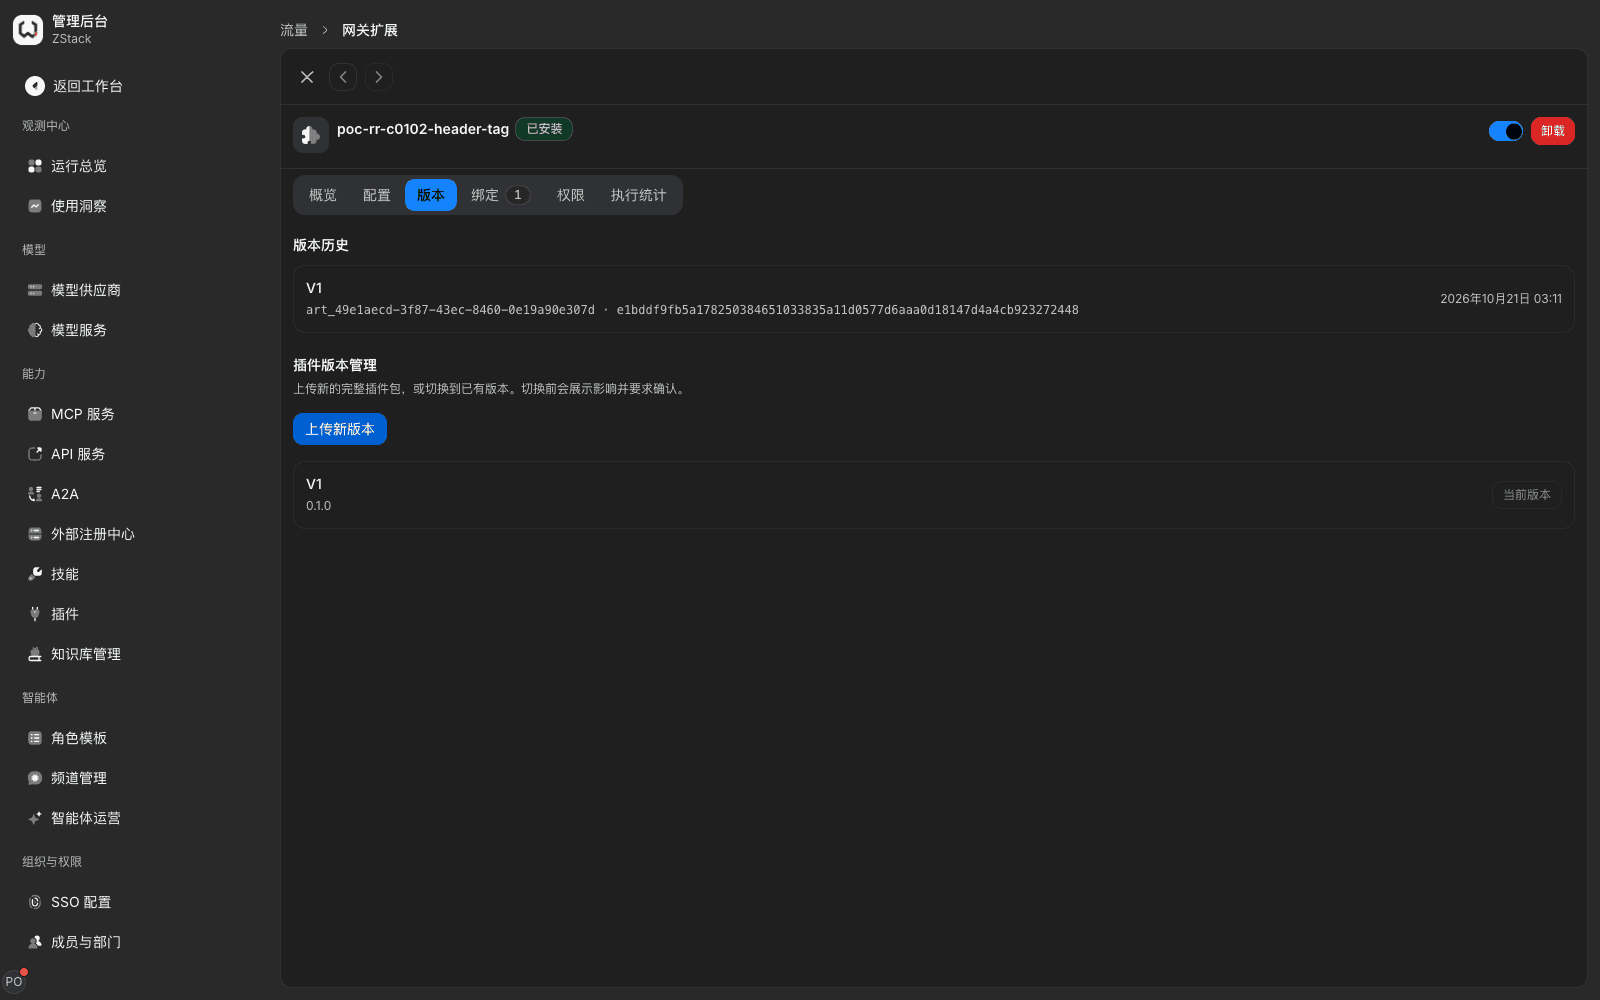
Note: old-version artifacts and SHA-256 stay in version history and can be switched back at any time. When a new version fails at gateway runtime, the platform rolls back automatically and prompts 「Automatic rollback completed」. Removing a still-bound service type at upgrade is rejected; delete the corresponding binding first. After upgrade, verify streaming and non-streaming output on a pilot service first, then widen the binding scope.
Disable and uninstall: after you turn off the top-right 「Enable」 switch on the detail, the plugin no longer runs. Bindings are kept, and enabling again restores them. When you choose 「Uninstall」, the confirm dialog lists bindings, configuration, credential bindings, and traffic rules that reference this plugin that will be cleaned. For this tenant's private plugin you can also tick 「Also delete this tenant-private package and all versions」. Before uninstall, disable first and watch business calls.
16.5 Intercept requests and cap concurrency with built-in policy
When to use this: intercept a class of requests, or cap how many requests run at once — you do not need to develop a plugin; use them directly as traffic-rule actions. Prerequisites: the license includes the 「Dynamic routing」 or 「Model guardrails」 module.
Procedure: in 「Traffic rules」, choose 「New rule」. In 「Match conditions」, add conditions that narrow the rule to the target traffic (for example 「Call type」 is model call, 「Model」 is a specified model, plus a dedicated request header). Choose 「Add action」 — for intercept, choose 「Reject this call」 and fill a reason code; for a concurrency cap, choose 「Apply limits」, set the limit type to 「Concurrency」, and fill the cap and count dimension. When 「Configuration checks」 shows normal, 「Save rule」. In 「Review this change」, check field differences and hit order, then choose 「Confirm and apply」.
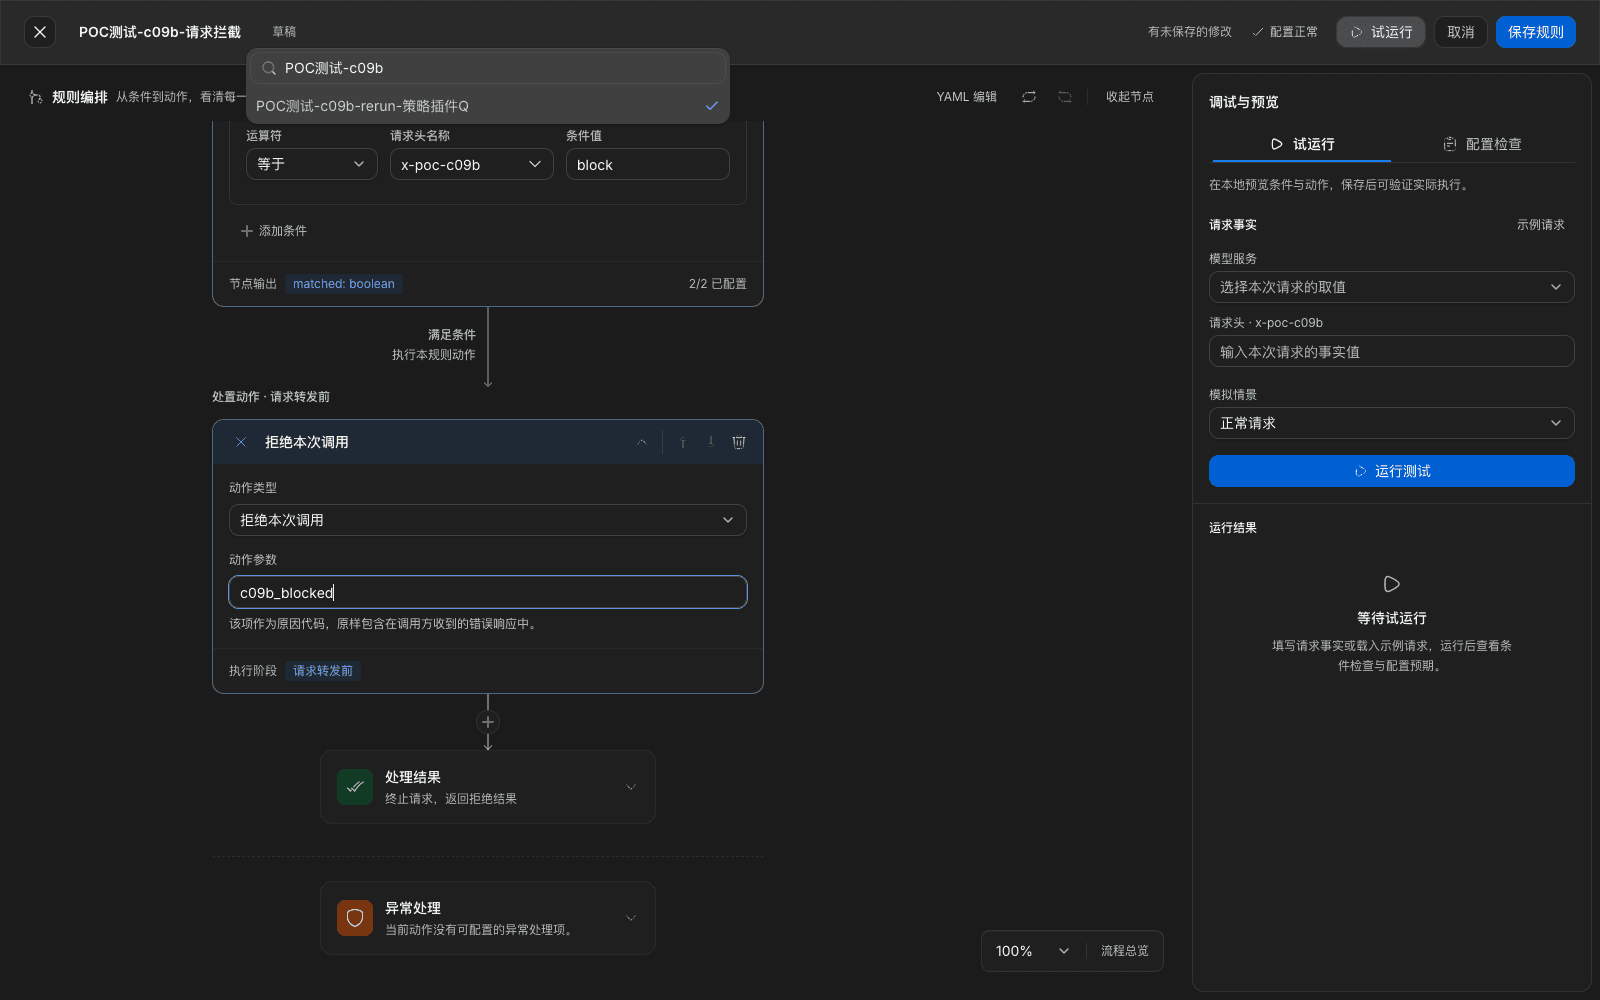
What you will see: a request that matches an intercept rule returns 403 permission_denied, deniedBy is routePolicy, details carry the configured reason code, and the upstream is not called. A request that does not match returns normally. In 「Operations overview › Requests」, that request's status is 「Blocked」. When the concurrency cap is N, in-flight requests do not exceed N. The overflow returns 429 TRAFFIC_CONCURRENCY_LIMITED with Retry-After. The slot is released after the request ends.
Note: rules are evaluated in list order. A wider preceding rule that 「Stop matching」 prevents later rules from matching. Check hit order in 「Review this change」 before you save. The full description of rules and limits is in Chapter 15.
16.6 Mark model answers as AI-generated content
The built-in plugin 「AI-generated content mark」 adds an explicit text mark to model answers under the Measures for the Identification of AI-Generated and Synthesized Content and GB 45438-2025, and writes implicit-mark metadata into response headers.
Procedure: find the plugin in the gateway-extension catalog, choose 「Install」 or 「Manage」. On the 「Configuration」 tab, fill the explicit-mark text (default 「本内容由人工智能生成」), mark position (start or end of the answer; default end), service-provider name or code, and whether to write implicit-mark metadata (ticked by default; writes the specified metadata into the aigc response header; ProduceID is the gateway request ID). Save the configuration. On the 「Bindings」 tab, create a binding with service type 「Model groups」. Turn on the top-right 「Enable」 switch.
What you will see: calling a model group in the binding scope, the configured mark text appears at the start or end of the answer, and the response has aigc metadata. You can look up the corresponding call in the call detail by the ProduceID in it.
Note: this plugin declares four hooks — response headers, response stream, whole response, response end. The failure policy is 「Fail closed」. When the plugin times out or errors, the request is rejected. Before you enable it, bind it to a pilot service and confirm both streaming and non-streaming output are normal.
16.7 Call the Open API with an access key
An access key has the same permissions as its creator. It is for putting query and configuration operations into scripts, CI pipelines, or a self-built agent.
Create an access key: in the workspace, open 「Personal Settings › Access keys」, choose 「Create access key」, fill 「Name」 (only for recognition; it does not affect permissions). The page shows AccessKeyId and SecretAccessKey once. Save SecretAccessKey immediately; you cannot view it again after you close. The list shows name, AccessKeyId, creator, created time, last used, and status. When you no longer use it, choose 「Revoke」. After revoke, the next call already fails.
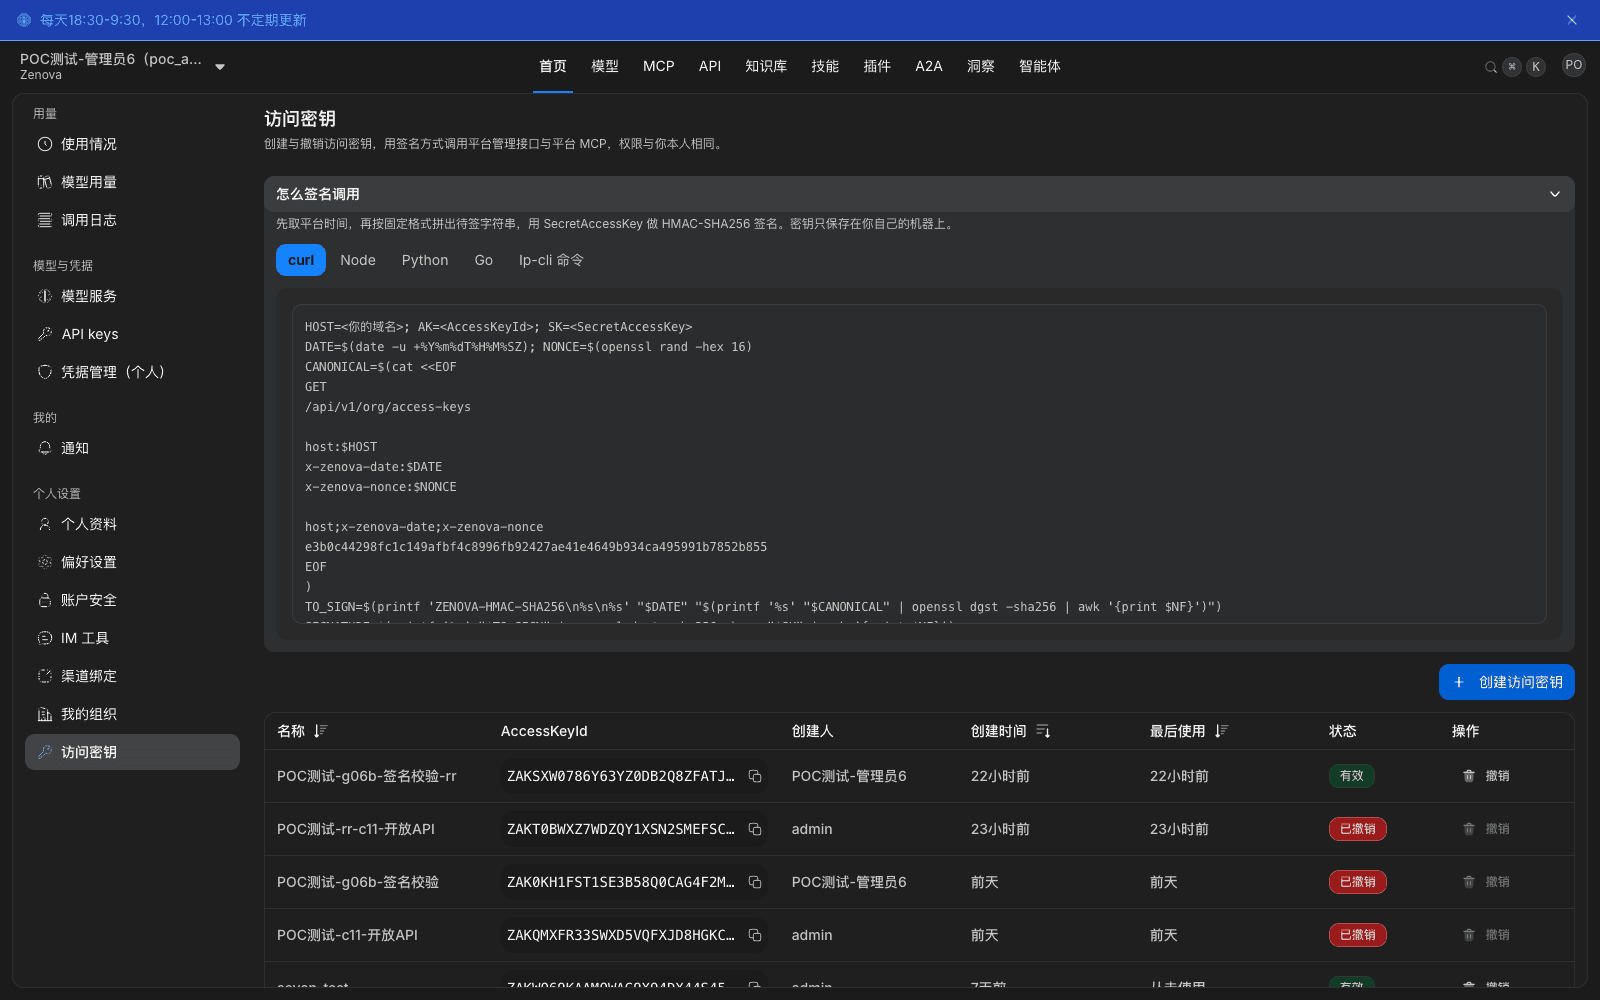
Signed calls: every request carries x-zenova-date (UTC time, format YYYYMMDDTHHMMSSZ, no more than 5 minutes off the server), x-zenova-nonce (a unique random string each time), and Authorization: ZENOVA-HMAC-SHA256 Credential=<AccessKeyId>, SignedHeaders=host;x-zenova-date;x-zenova-nonce, Signature=<签名>.
Signing steps: ① Canonical request is six parts joined by newlines — method, path, canonical query string (ascending by name and value, percent-encoded; an empty line when there is no query string), signed headers sorted by name (each line lowercase-name:value, this block ends with a newline), the signed-header name list (joined by semicolons), SHA-256 hex digest of the body; ② String to sign is three lines — ZENOVA-HMAC-SHA256, the value of x-zenova-date, SHA-256 digest of the canonical request; ③ HMAC-SHA256 the string to sign with SecretAccessKey; the hex result is the signature.
「How to sign requests」 on the 「Access keys」 page provides curl, Node, Python, Go, and command-line examples you can copy. The date format in the examples is already the writing the server requires.
What you will see: a correct signature returns 200. 「Last used」 on the key list updates immediately. Read-class API results match the Admin Console. A wrong signature returns 401. Error-code meanings:
| Error code | Meaning |
|---|---|
SIGNATURE_MALFORMED | Request-header format is incorrect, for example the date format does not match |
SIGNATURE_MISMATCH | The signature does not match the server computation, usually a wrong key or a wrong canonical-request join |
SIGNATURE_EXPIRED | Request time is outside the allowed skew |
NONCE_REPLAYED | That random string has already been used |
UNAUTHENTICATED | No credential was sent |
Note: the body digest takes part in the signature. Changing the body after signing (even one tool name) is judged SIGNATURE_MISMATCH. An access key can sign calls to the platform management MCP (POST /api/v1/mcp) and runs as the caller's real identity. The model gateway does not accept signatures; it only accepts a Bearer API key. To call a model, use an API key bound to a model group (see Chapter 9). Keep keys in a secrets manager; do not write them into a code repository or logs. The platform OpenAPI spec is open only to platform administrators: after a platform administrator signs in, choose 「API reference」 in the account menu to open the online docs (/api/docs/). The spec file is at /api/openapi.json. Other identities are rejected. APIs listed in the spec do not mean the current identity is allowed to call them.
16.8 Access domains and certificates
Procedure: open 「Admin Console › Gateway Domain Access」. The page has 「Domains」, 「Certificates」, 「Guard Rules」 tabs. On the 「Domains」 tab, 「Claim Custom Domain」 or 「Allocate Platform Subdomain」. The list shows hostname, status, protocol, certificate, route-binding count, verification method, route target, and created time. Open 「View」 on a domain. In 「Route bindings」, choose a match method (path prefix or exact path), fill the path, set 「Routing target」 to a traffic rule, and 「Add」. Use 「Route simulate」 with a path and protocol to confirm the matching binding.
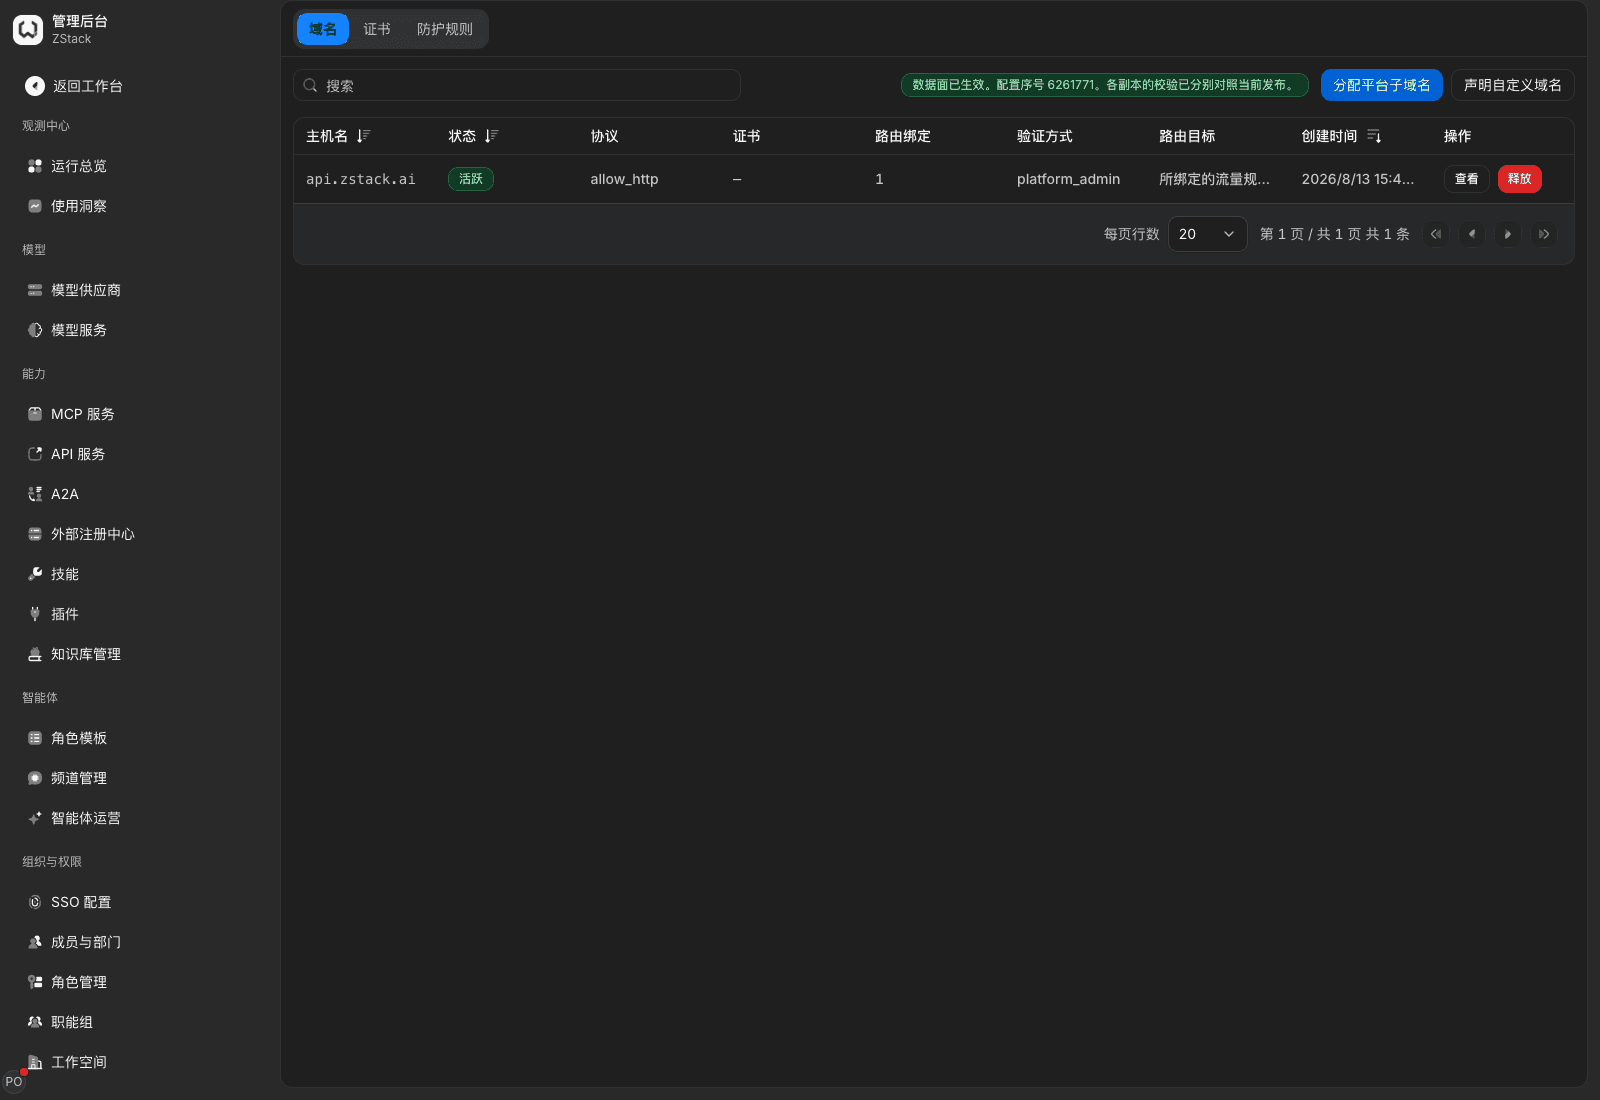
What you will see: the 「Certificates」 tab lists currently available certificates. The protocol column shows that domain's access protocol. Route-binding count shows how many bindings are configured.
Note: a domain is usually a platform-level shared object. Claiming, binding, and releasing affect real traffic. Confirm with a platform administrator before you change it. Route simulate reflects configuration, not in-flight traffic. Adding and replacing a certificate is a deploy-side operation; contact a platform administrator when you need it.
16.9 Access control by source CIDR and path
Traffic rules provide 「Client CIDR」 and 「Request path」 conditions. Together with 「Reject this call」 and 「Allow」, they implement allow and deny lists. The system has no separate list entry. Prerequisites: the rule's first condition should be 「Model group」 is in the target group, ANDed with the CIDR or path condition, so other groups are not affected.
Deny list: create a rule. Conditions: 「Model group」 is in the target group + 「Client CIDR」 is in a CIDR. Action 「Reject this call」, fill a reason code, save and confirm. To restrict by path, replace the condition with 「Request path」 equals or prefix-matches a path; the action is still reject.
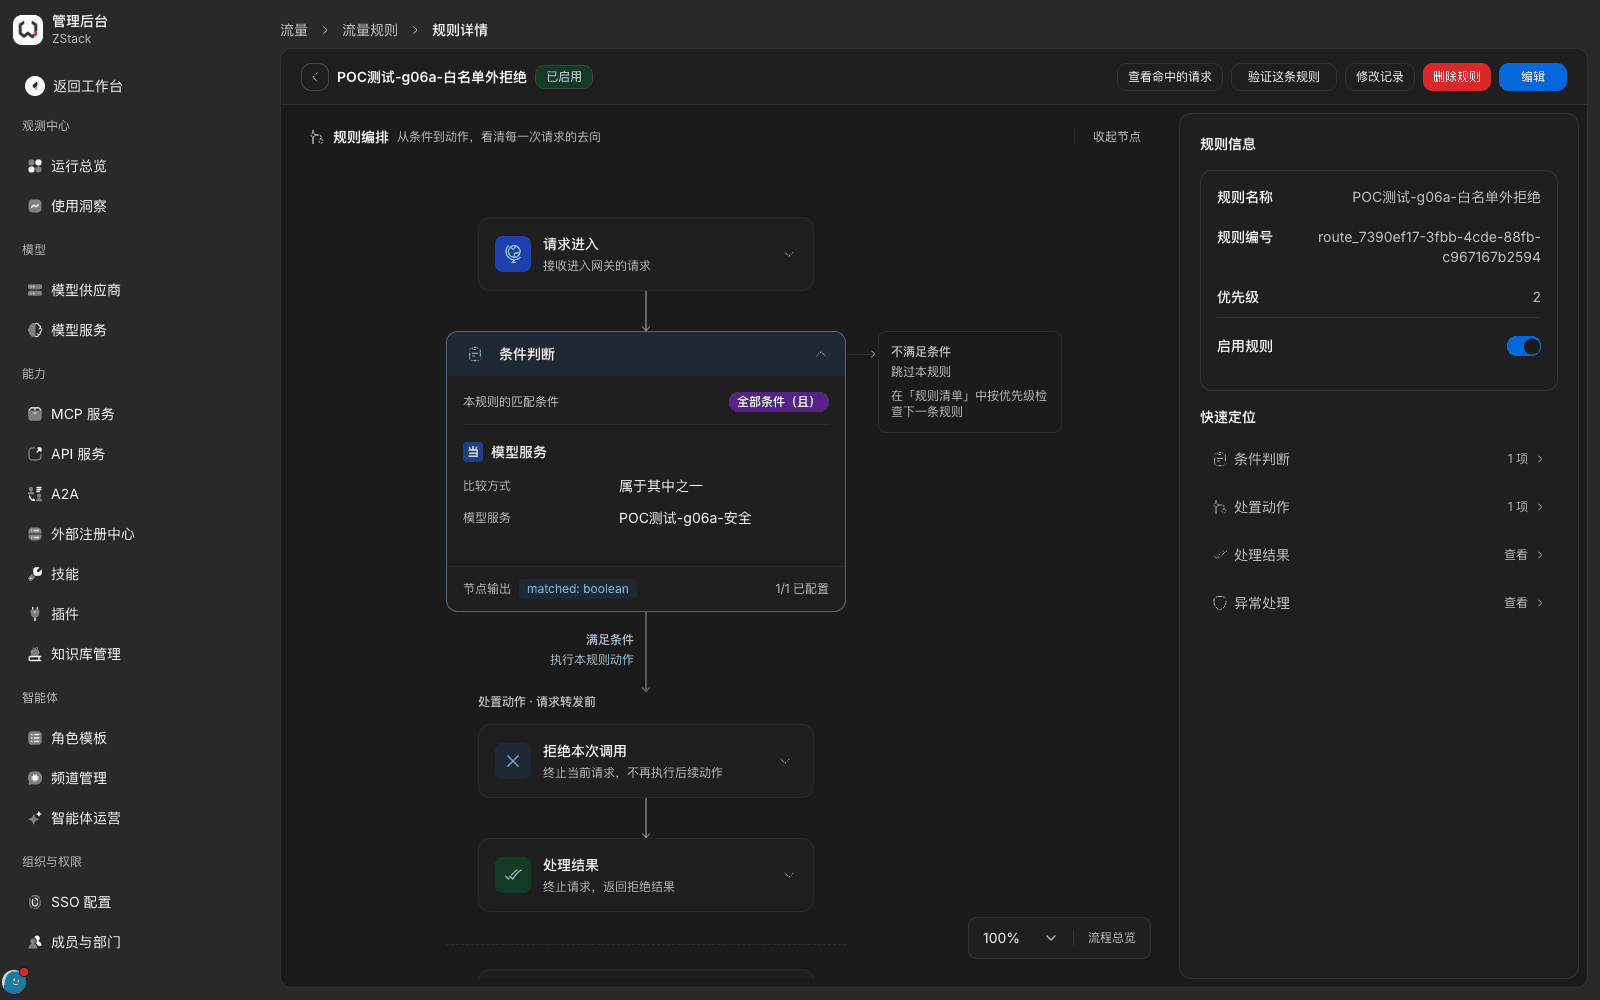
Allow list: first create an 「Allow」 rule (conditions: 「Model group」 is in the target group + 「Client CIDR」 is in an allowed CIDR; stop matching after a hit) and put it first. After it, put a catch-all 「Reject this call」 rule whose only condition is 「Model group」 is in the target group, with a reason code that says 「not on the list」.
Mainland-China source restriction: tick 「Mainland China」 in 「Client CIDR」; you do not fill CIDRs one by one. To intercept only recognized non-mainland sources, you can choose 「is none of」 and pair it with 「Reject this call」. To strictly allow only mainland sources, use the two allow-list rules above, replace the allowed CIDR with 「Mainland China」, and let unrecognized, intranet, or missing-trusted-source-IP requests be rejected by the later catch-all. The preset range supports IPv4 and IPv6, and does not include Hong Kong, Macao, or Taiwan. The judgement uses the access egress IP; it cannot confirm the real location of a user who uses a proxy.
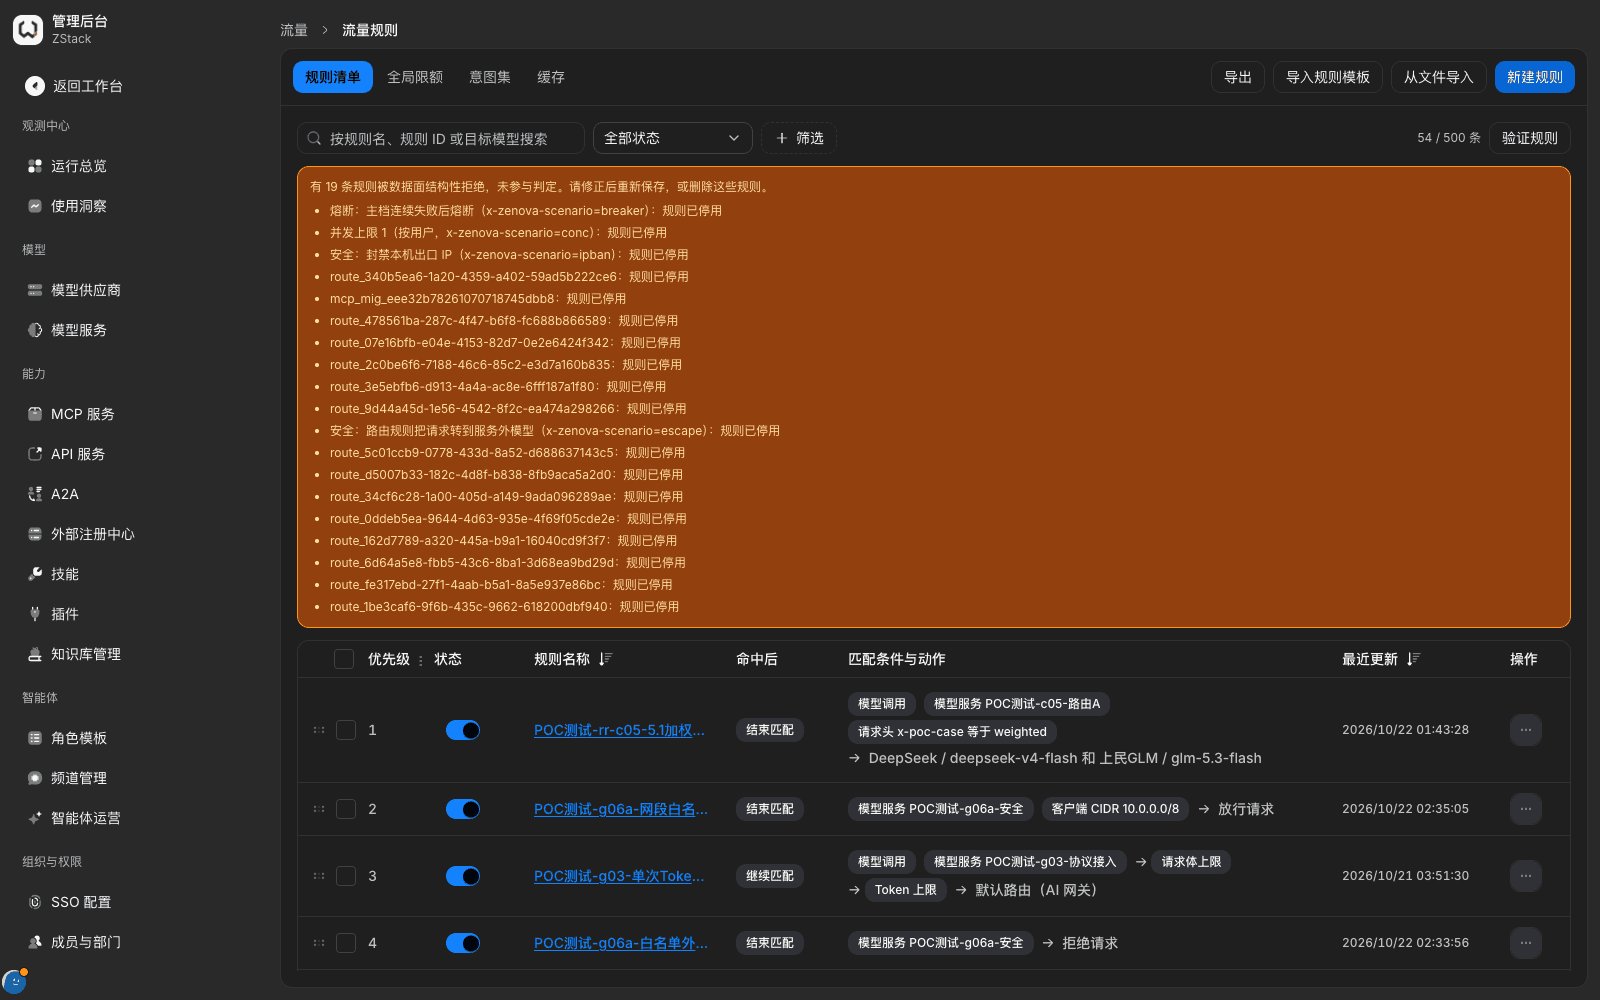
What you will see: a request off the list returns 403 permission_denied, deniedBy is routePolicy, details carry the configured reason code. A request on the list returns normally. A request with a forged source header such as X-Forwarded-For, X-Real-IP, or Forwarded cannot bypass — judgement uses the client address the gateway actually saw.
Note: the product has no 「default deny」 switch. An allow list is implemented with the two-rule combination above. An ordinary rule with no forward target is an enrichment rule and does not stop matching; it cannot replace 「Allow」. Rejected requests are also written to 「Operations overview › Requests」, status 「Blocked」, and can be traced by filtering on access credential.
16.10 Cross-tenant isolation
What you will see: tenant and identity are derived only from a verified session. Tenant, root-permission, or user-identity headers the client adds on its own are ignored. Requesting a resource ID that does not belong to this tenant returns 404, not 「no permission」, so existence is not leaked. Platform-level APIs return 403 to a tenant administrator.
| Privilege attempt | Result |
|---|---|
| List this tenant's model groups normally | 200; every result belongs to this tenant |
| Attach a forged tenant, organization, user, or root-permission header | 200; still this tenant's data; no privilege escalation |
| Read a resource ID that does not belong to this tenant | 404; existence is not disclosed |
| Access the platform-level tenant list, or attach a forged root-permission header | 403 PERMISSION_DENIED |
| Put another tenant's ID in the path | 404 |
Note: the database layer also has a per-tenant row-level isolation policy. Business queries only hit this tenant's rows. Cross-tenant verification is platform operations. It must be run by the delivery side after two tenants are prepared in an isolated environment. The tenant side does not need to, and should not, probe it itself.
16.11 Integration go-live checks
- Plugin required permissions are declared, binding scope and failure policy are confirmed, 「Execution stats」 has the expected execution records, the new version has been verified in a pilot scope, and the old version can be switched back.
- The AI-generated content mark has been checked on streaming and non-streaming output. Hit order of built-in policy rules has been checked in 「Review this change」.
- Access keys are stored in a secrets manager, created under a least-privilege account; unused ones have been revoked. The client handles 401, 403, 429, and similar error responses.
- Domains and route bindings have been checked with 「Route simulate」. Changes have been confirmed with a platform administrator.
Capability notes
| Capability not provided | What to do instead |
|---|---|
| Enable or disable platform management APIs per endpoint in the Admin Console | Use role permission domains to limit the API range a caller can use, or revoke the access key so it fails as a whole (see 16.7) |
| Tick permission scope per API on an access key | Create a least-privilege account for the automation task, then create an access key with that account (see 16.7) |
| A customizable replay-protection policy for time window and nonce validity | The platform already has built-in time-window checks and nonce replay protection. Stronger policy is implemented by the caller or an upstream system (see 16.7) |
| A separate IP and path allow/deny-list entry, and binding an IP directly on an API key | Implement it with traffic-rule 「Client CIDR」 and 「Request path」 conditions plus 「Reject / Allow」 actions (see 16.9) |
| An arbitrary country or region custom picker | 「Client CIDR」 provides the 「Mainland China」 system preset. Other regions can fill concrete CIDRs, or configure a region restriction at the ingress layer (see 16.9) |
| A tenant-side WAF rule-set configuration page | The tenant side has no WAF configuration entry. Application-layer attack protection is implemented uniformly at deploy by the platform. Contact a platform administrator when you need to adjust it |
| Mutual TLS (client certificates) from the gateway to the upstream | The upstream uses HTTPS one-way authentication plus an API key or OAuth. When you truly need mTLS, complete it outside the gateway with an egress proxy or sidecar that supports mutual TLS |
| Reference a secret in an external KMS or Vault | Upstream credentials are encrypted by the platform. The console and APIs only echo a fingerprint. Rotate by updating the provider account |
| Persistent state, circuit breaking, concurrency counting, and signature-check host functions inside a plugin | Concurrency and circuit breaking use traffic-rule 「Apply limits」 (see Chapter 15). Remaining logic is owned by the upstream system |
| Upload a plugin package as a source zip | Produce the plugin package with zr-plugin build as in the SDK README, then upload (see 16.2) |
Previous: 15. Traffic rules and traffic protection · Next: 17. View usage and control cost
15. Traffic rules and traffic protection
Full-length chapter. Content is checked against the 2026.10 mainline code and the live console; menus and features depend on the current license, account permissions, and delivered environment.
17. View usage and control cost
Full-length chapter. Content is checked against the 2026.10 mainline code and the live console; menus and features depend on the current license, account permissions, and delivered environment.