24. Maintaining and changing common configuration
Full-length chapter. Content is checked against the 2026.10 mainline code and the live console; menus and features depend on the current license, account permissions, and delivered environment.
Back to overview · Full table of contents · Download full PDF
This chapter: for tenant administrators, security administrators, and operations staff. After the platform is live, how to change and maintain configuration safely: common checks before and after a change; exporting, importing, and templates for traffic rules; configuration inspection; hot-update delay; version compare and rollback; change approval; maintaining the license and branding.
24.1 Common checks before and after a change
When to use this: any configuration change that affects call results.
- Record the object, reason, blast radius, original values, and expected result.
- Save the change. Saving a traffic rule opens 「Review this change」, which lists field differences, related objects, and the effect on hit order item by item. When it is correct, click 「Confirm and apply」.
- Complete one allowed call with an authorized account, then verify the reject result with an unauthorized account or a request that does not meet the conditions, and confirm the real result in 「Operations overview › Requests」.
- In 「Operation audit」, or the 「Operation audit」 tab on the object detail, check the actor, object, result, and time (see Chapter 22). If the result is wrong, restore the original configuration and keep the request ID and the on-page prompt for investigation.
Typical time to take effect
| Configuration | How it takes effect |
|---|---|
| Creating, changing, enabling, or disabling a traffic rule | No restart. After save it is distributed to every gateway, and usually applies to new requests within 20 seconds. In-flight requests and streaming responses finish under the original configuration and are not interrupted |
| Model-group 「Publish」 switch | After you turn it off, new requests are rejected quickly. After you turn it back on, wait until the configuration reaches the gateway; typically minutes |
| Disable an API key | Calls with that key are rejected immediately after confirm |
| Data-retention settings | Apply to new calls after save |
Note: these are order-of-magnitude references, not commitments. To check whether a change has taken effect, probe repeatedly with one minimal request under the target caller; do not refresh the page and look at status.
24.2 Export, import, and rule templates
When to use this: backing up rules, review, moving across environments, or starting quickly from an existing scenario.
Export
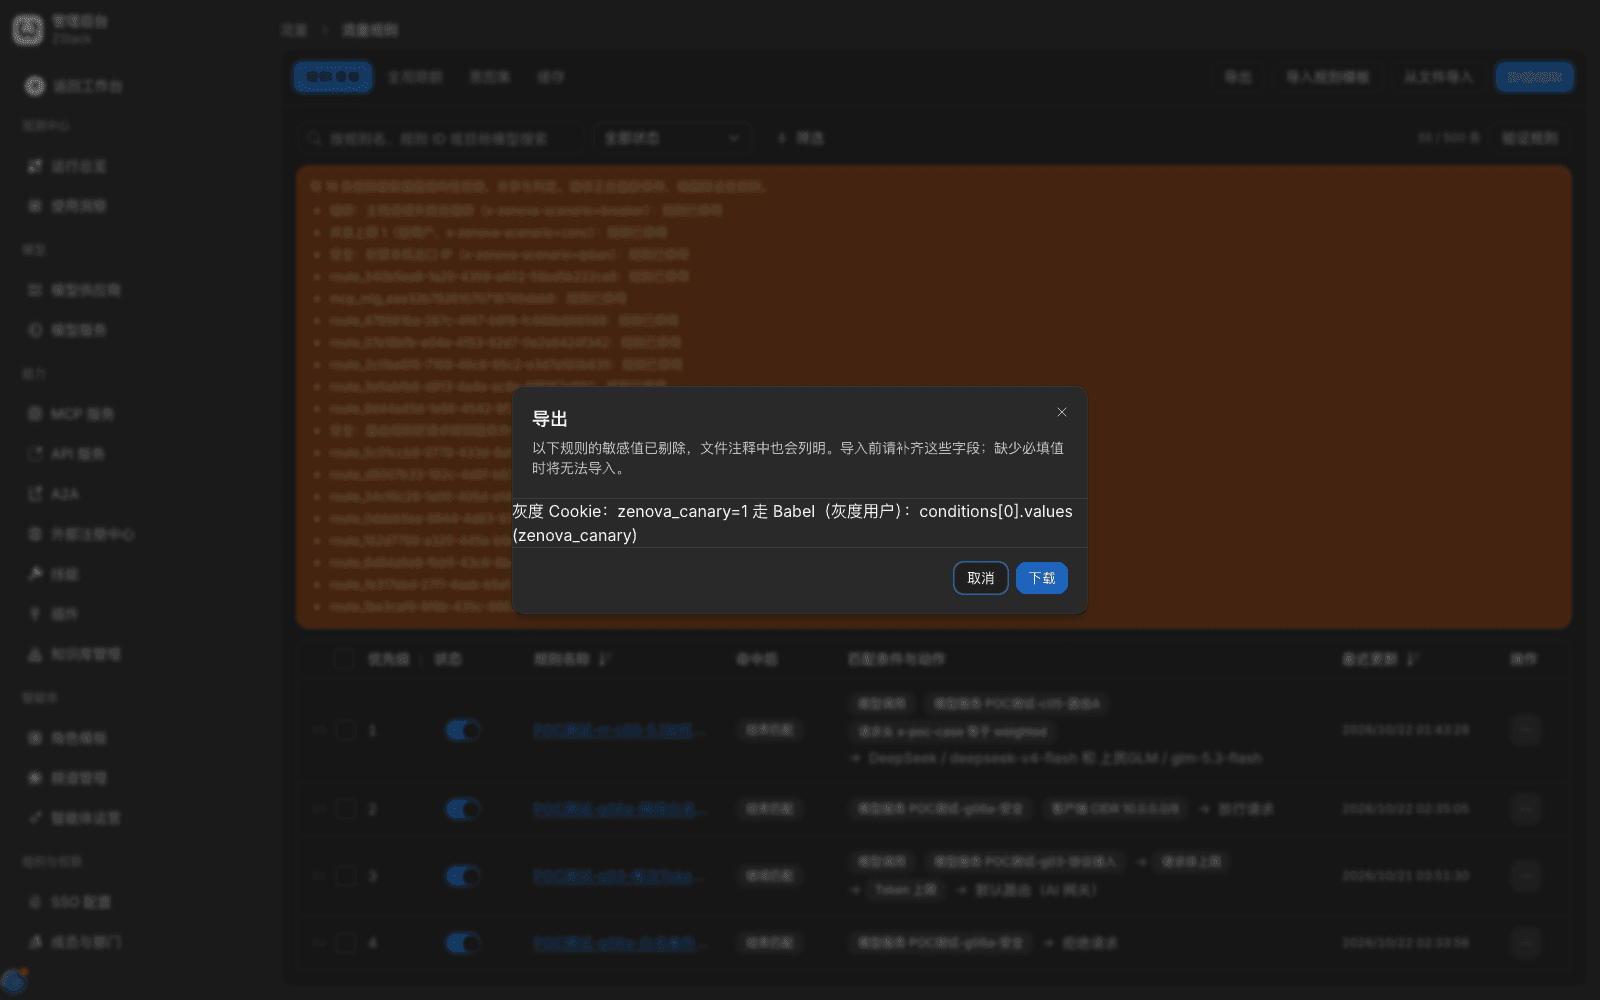
- In 「Traffic rules › Rule list」, click 「Export」 at the top right.
- The dialog lists rules and fields with sensitive values stripped, and prompts 「Fill these fields before import; import cannot proceed if a required value is missing」.
- Click 「Download」 to get a YAML file that contains every rule.
Import: click 「Import from file」, choose the YAML file, fill in the sensitive values that were stripped on export, check as prompted, and save. Imported rules still go through configuration checks and 「Review this change」.
Use a rule template: click 「Import rule templates」, pick one of the fifty-plus common-scenario templates (combinations of path, header, model, model group, data source, sensitive information, call type, time window, canary, CIDR, and actions such as forward, allow, and reject). Fill the highlighted required fields, then click 「Import this one」.
Note
- The export file contains no key plaintext; stripped locations are marked with comments.
- A rule's references to models, model groups, upstreams, API keys, callers, and similar objects are recorded as object IDs. The file does not contain those objects themselves. Before you import across environments, create the same objects in the target environment and fix the references. Import fails if a reference does not exist.
- Export and import cover only traffic rules. Model providers, models, model groups, alert rules, and similar must be configured item by item in the target environment. Gateway-extension plugins can be exported as a plugin package on their own.
24.3 Configuration inspection
When to use this: you want to know 「are there obvious problems in the current rules」, or to verify that a rule change matches expectations.
Procedure
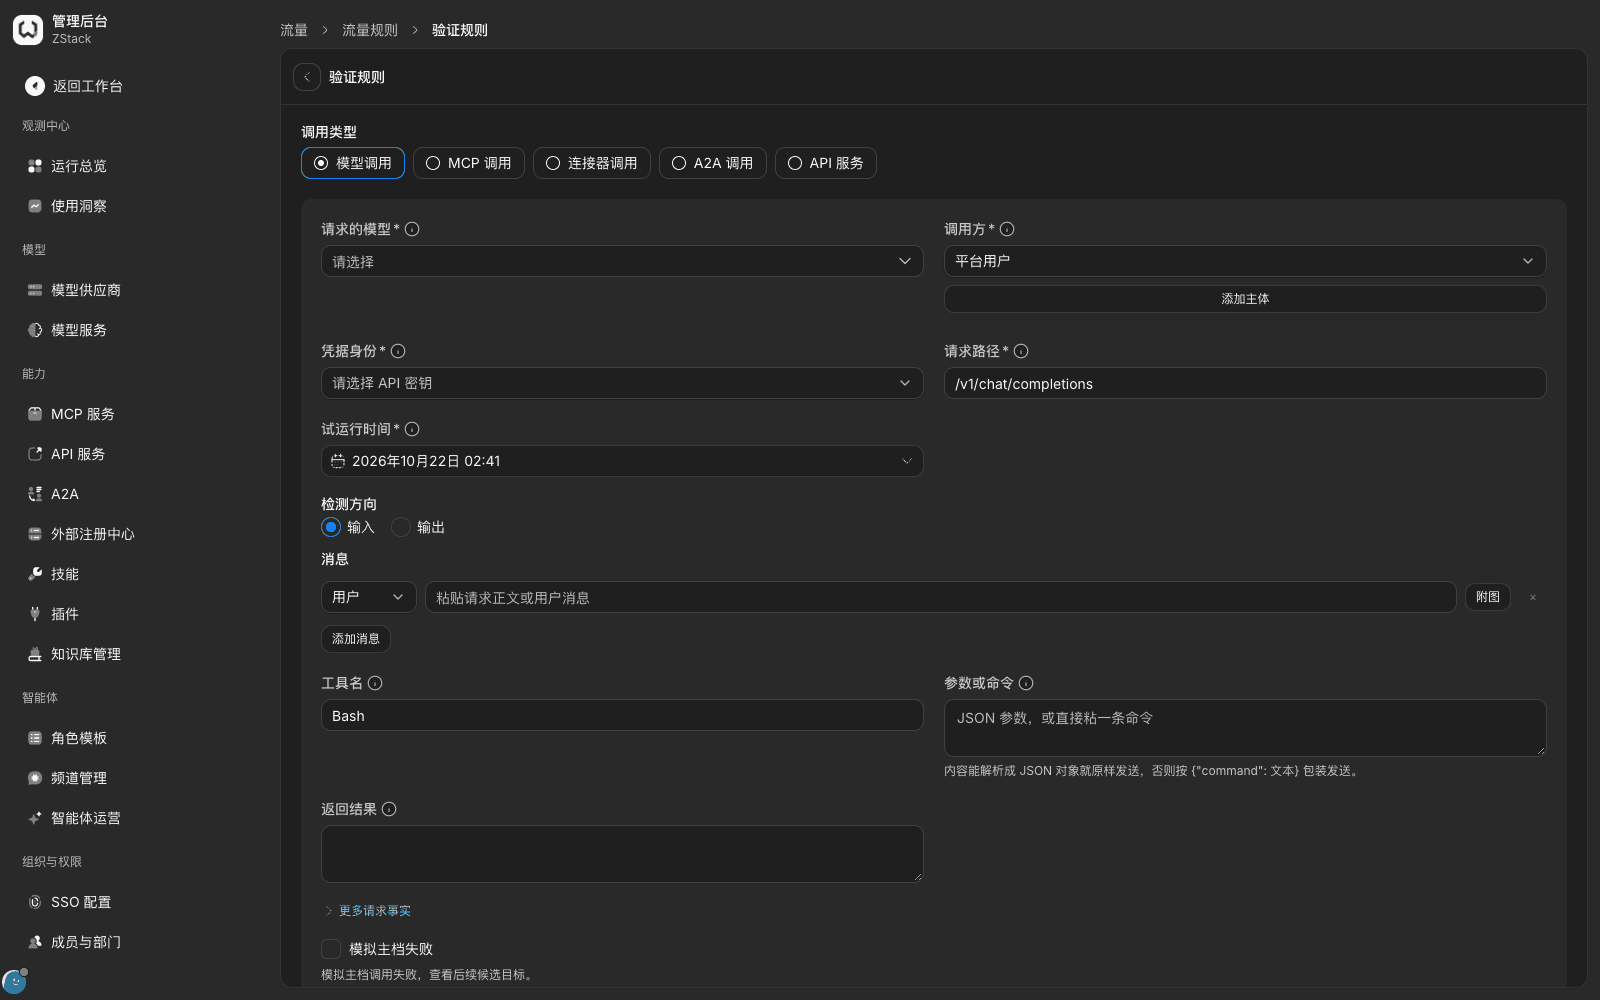
- Open 「Traffic rules › Validate rule」.
- Fill call type, model, and similar fields by hand to construct a simulated request.
- Submit and look at the match result and the final action.
What you will see: Validate rule tells you which rule this simulated request would match and which action it would run. It does not scan every rule, and it does not score the current configuration.
Note: the current release does not provide scheduled automatic inspection, an inspection-report page, or a list of configuration-optimization suggestions. To see the full configuration, check key rules item by item with the method in 24.1, or export YAML and review it offline (see 24.2).
24.4 Hot-update delay and in-flight requests
When to use this: you changed a rule and want to confirm it takes effect immediately; or you worry that changing configuration will interrupt an in-flight streaming reply.
Procedure
- Note the judgement before the change (for example, confirm an over-limit request currently returns
413). - Toggle the status switch in 「Rule list」, or save on the edit page and 「Confirm and apply」.
- Probe with the same request every few seconds, and record the first time the new result appears.
What you will see
- After you disable a rule, later requests quickly stop matching it. After you enable it again, from the enable action to the new rule taking effect again is typically 15–20 seconds, not seconds. Probe repeatedly with the same request to measure the actual delay.
- In-flight streaming responses are not interrupted: if you disable the rule while a stream is in progress, that stream still ends with a normal
finish_reason=stop. The client does not need to retry.
Note: the larger the change, the longer distribute-and-apply takes. When you change several rules at once, schedule verification against the time the last one takes effect. Do not click save repeatedly before it takes effect; that queues each distribute again.
24.5 Version compare and rollback
When to use this: you need to confirm how many times a rule was changed and what changed; or you changed it wrongly and want the previous shape.
View change history
- Open the traffic-rule detail and click 「Change history」.
- The list shows every create, change, enable/disable, and reorder of that rule, by time.
- Click a row to open the corresponding Operation-audit detail, compared in three columns 「Field / Before / After」 (see Chapter 22).
Rollback
The current release does not provide a one-click version rollback button. 「Restore this version」 only prompts 「This version has been loaded into the editor. Publish to apply it to requests」. The page stays in read-only view, and the historical content does not enter the edit form. Rollback is therefore:
- In 「Change history」, open the audit detail for the target version, and copy the 「Before」 values field by field.
- Click 「Edit」 and change those fields back to the target values by hand.
- Save, check the differences item by item in 「Review this change」, and click 「Confirm and apply」.
- Verify the behavior with one request, and confirm the new record in 「Operations overview › Requests」 matches expectations.
What you will see: Change history itself is complete and reliable. It can answer 「how many times this rule was changed, what changed each time, who changed it, and when」.
Note
- If you changed it wrongly and do not want to restore field by field, disable the rule first to stop the bleeding, then rebuild after checking item by item from 「Change history」. Disable takes effect immediately.
- Other objects (models, model groups, available scope, limits, and similar) likewise have no version rollback. Record original values before you change them, and restore by hand if needed.
- Switching some field types in the editor can make the page stall. Change one class of fields at a time; save before you start the next class.
24.6 Change approval
When to use this: you need to confirm whether a configuration change must go through approval, and who can make it take effect directly.
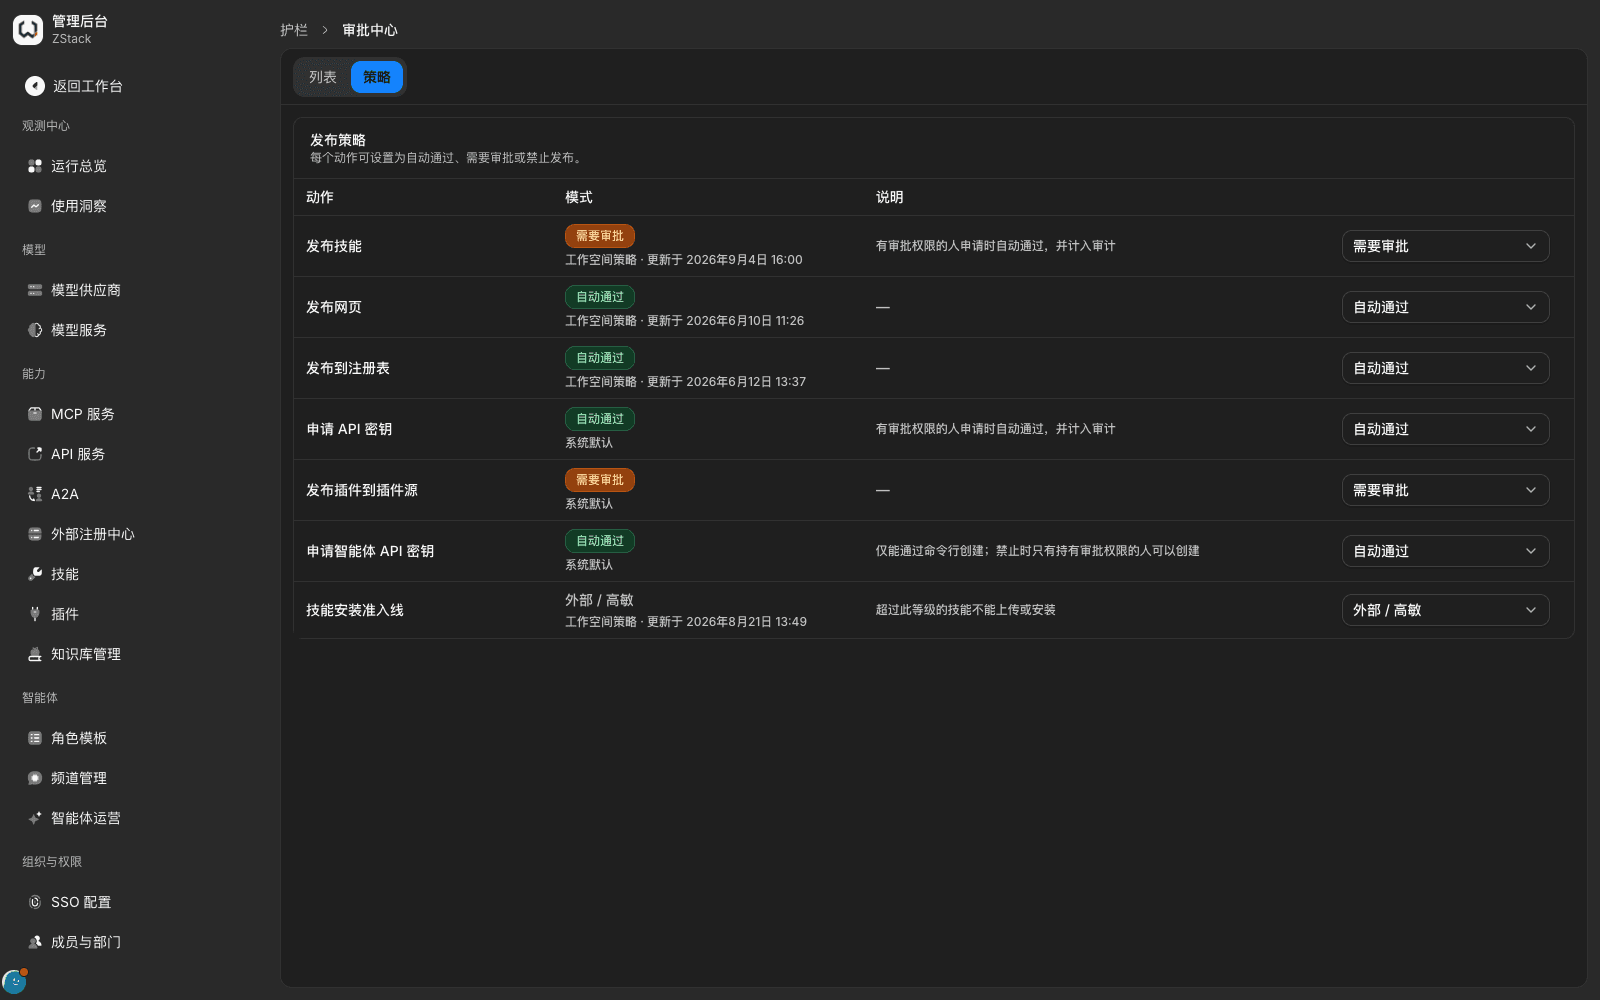
What you will see: on the Approval Center 「Policy」 tab, the actions you can put behind approval are publish a skill, publish a web page, publish to a registry, request an API key, publish a plugin to a plugin source, request an agent API key, and the skill-install admission line. Configuration changes to traffic rules, models, model groups, model providers, guardrails, and similar are not in that list — those changes take effect immediately after 「Review this change › Confirm and apply」, with no approval.
What to do instead: use the difference preview in 「Review this change」 as a before-the-fact control, and keep the preview in a change ticket or work order; use Role Management to narrow who can change key configuration to a few accounts; use Operation audit for after-the-fact tracing, filter by action to a resource category, and check who changed what when; when several people work together, agree a change window and leave one verification request before and after the change.
Note: the current release does not provide an approval flow for configuration changes (take effect after approval, do not take effect if rejected), and it does not provide a change-ticket object. Approval Center covers only the publish-class actions listed above.
24.7 License management
When to use this: confirm enabled modules; import or remove a license.
Prerequisites: tenant administrator; you have a signed license file from the vendor.
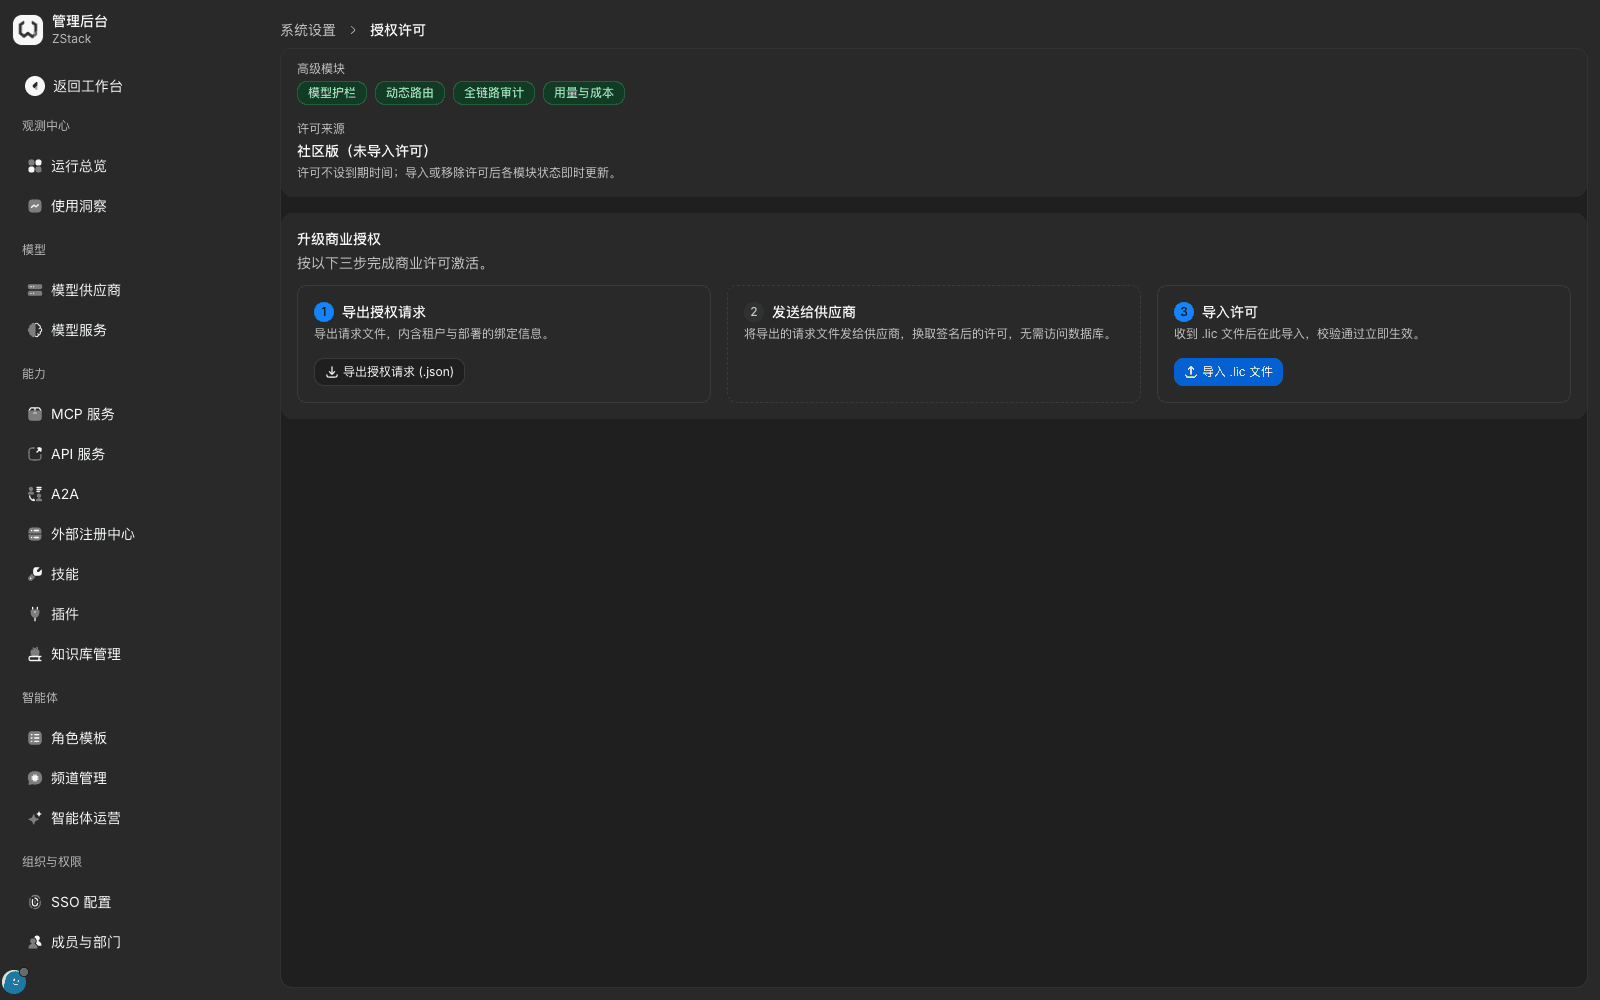
- Open 「Admin Console › System Settings › Global settings › 「License」 tab」.
- Look at 「Add-on modules」 at the top of the page: Model guardrails, Dynamic routing, Full-chain audit, Usage & Cost, and each switch.
- Look at 「License source」: with no license imported it shows 「Community edition (no license imported)」, and states 「The license has no expiry; module status updates immediately after you import or remove a license」.
- To import, follow the on-page prompt to export an authorization request, have the vendor exchange it for a license file, then click 「Import .lic file」. It takes effect immediately after verification succeeds.
What you will see: the page shows enabled add-on modules and the license source. Community edition does not show an expiry date; that is by design.
Note
- A license takes effect per tenant. Import and remove affect only the current tenant. A license is bound to a deployment; independent deployments each need their own license.
- The license is verified locally; the whole flow does not need the internet.
- 「Remove license」 must be confirmed in the dialog. After you remove a module, the corresponding menus and APIs disappear; basic functions are not affected. Confirm there is no business depending on the module before you remove it. Importing a license is a global-impact operation; do it in a maintenance window and notify users in advance.
24.8 Branding & appearance
When to use this: replace the console and sign-in page with your organization's own name, mark, and theme color.
Procedure
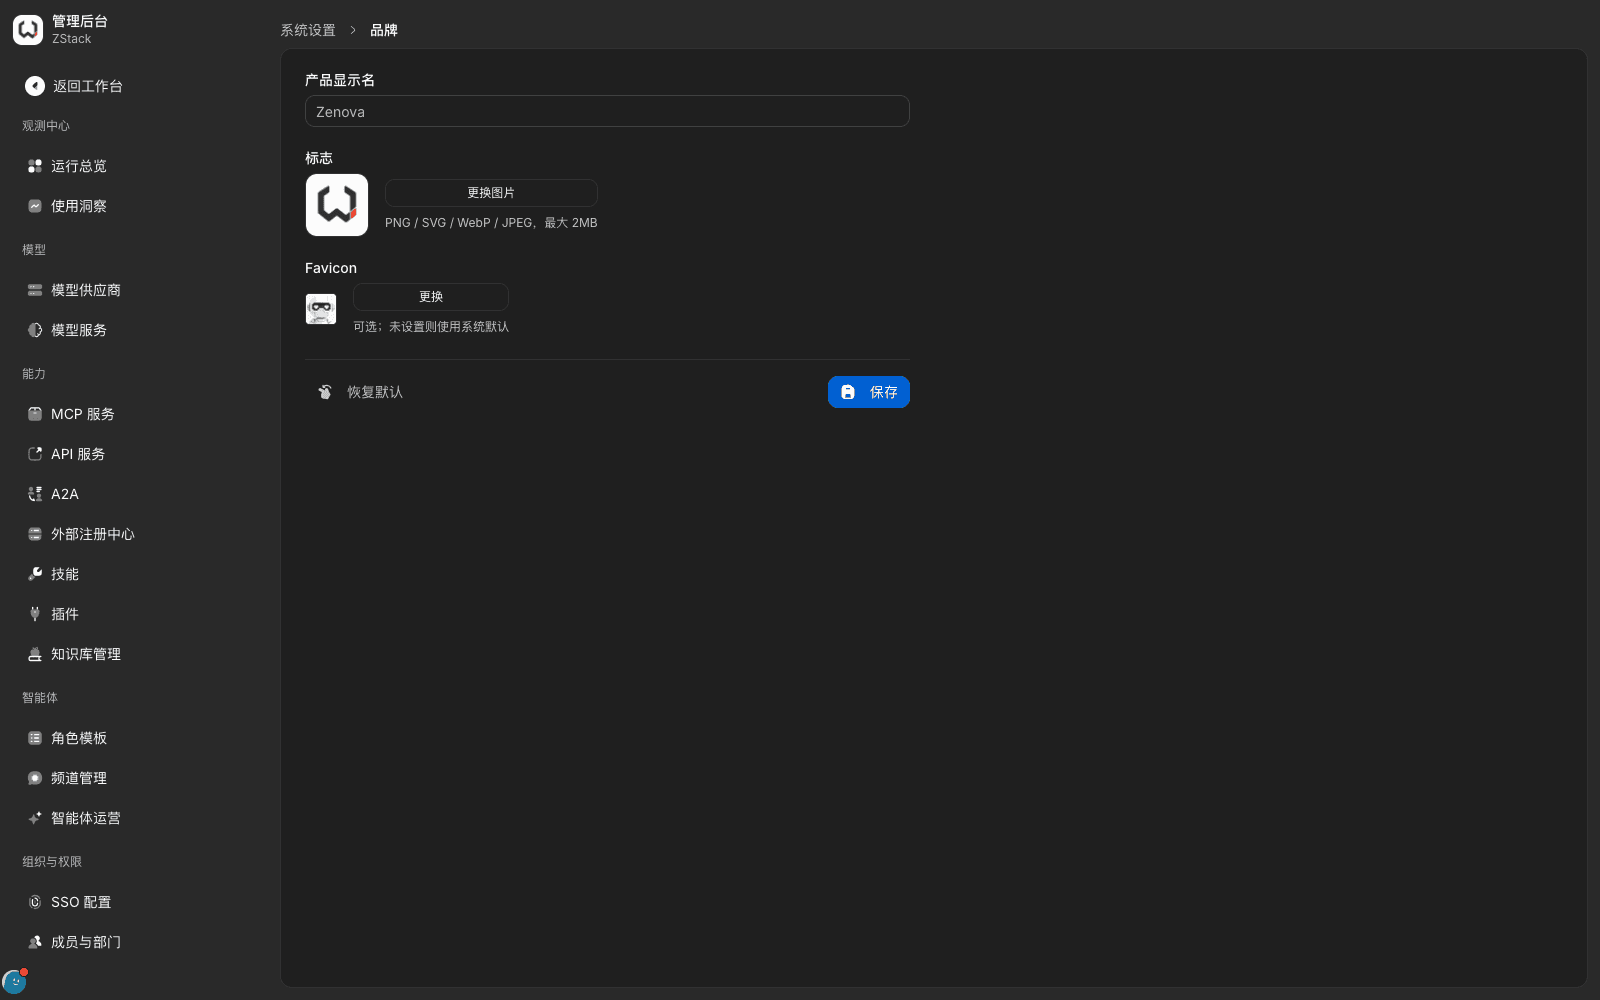
- Open 「Admin Console › System Settings › Global settings › 「Branding & appearance」 tab」.
- In 「Product display name」, fill the product name shown on the console and the sign-in page. In 「Logo」, click 「Replace image」 to upload a logo. In 「Favicon」, click 「Replace」 to upload the browser-tab icon (optional; the system default is used if unset).
- In 「Theme color」, pick a swatch. The eight options are 「Classic blue」, 「Indigo」, 「Violet」, 「Teal」, 「Emerald」, 「Amber」, 「Rose」, 「Graphite」; the default is 「Classic blue」. After you pick, the current page previews in that color; the setting has not taken effect yet. If you leave the page without saving, the preview returns to the saved theme color.
- Click 「Save」. After save, the product display name, logo, favicon, and theme color apply to every member of this tenant and to the sign-in page.
- To clear custom branding, click 「Restore defaults」. After you confirm in the dialog, the product display name, logo, favicon, and theme color all return to the system default (theme color back to 「Classic blue」), and they apply immediately to every member of this tenant. 「Restore defaults」 is unavailable if nothing has been customized.
What you will see: after save, the product name, logo, tab icon, and theme color on the console and the sign-in page change. Metadata such as the sign-in page title, site name, and description update together.
Note
- Branding applies to the whole tenant. It is a global-impact operation; confirm with the business before you change it.
- When an unsigned-in user opens the sign-in page, append
?tenantSlug=<租户标识>to the address to show that tenant's branding. After sign-in, branding follows the account's tenant. The product does not auto-detect a tenant portal by access domain.
Capability notes
| Capability not provided | What to do instead |
|---|---|
| Compare any two configuration versions | Open the audit details of two change-history rows separately; or export rule YAML and compare with a text tool (see 24.2, 24.5) |
| One-click version rollback button | Change the configuration back to the historical values and save again, or disable the rule; the current release does not provide one-click rollback (see 24.5) |
| Whole-set export and cross-environment migration of models, model groups, providers, alerts, and similar, with a pre-import dependency check | Only traffic rules support YAML export/import; configure other objects item by item in the target environment (see 24.2) |
| Approval flow for important configuration changes (take effect after approval, do not take effect if rejected) | Use the 「Review this change」 preview as a before-the-fact control, Role Management to narrow who can change, and Operation audit for after-the-fact tracing (see 24.6) |
| Scheduled automatic configuration inspection with optimization suggestions | Simulate a single request with 「Validate rule」, check differences with 「Review this change」, and review exported YAML offline (see 24.3) |
| A unified 「one-click disable」 entry | Disable per object; 「Reject this call」 on a traffic rule can cover several callers or services at once (see Chapter 23) |
| Re-enable a disabled API key | Issue a new key; to block temporarily, reject with a traffic rule |
| Tenant-console entry for backup and restore | A platform-side capability; implement it according to the actual deployment (see Chapter 23) |
| Independent portal that auto-detects the tenant by access domain | Append ?tenantSlug=<租户标识> to the sign-in link to show tenant branding (see 24.8) |
Previous: 23. Platform runtime and day-to-day maintenance · Next: 25. Phased go-live
23. Platform runtime and day-to-day maintenance
Full-length chapter. Content is checked against the 2026.10 mainline code and the live console; menus and features depend on the current license, account permissions, and delivered environment.
25. Phased go-live
Full-length chapter. Content is checked against the 2026.10 mainline code and the live console; menus and features depend on the current license, account permissions, and delivered environment.