5. Model pricing and categories
Full-length chapter. Content is checked against the 2026.10 mainline code and the live console; menus and features depend on the current license, account permissions, and delivered environment.
Back to overview · Full table of contents · Download full PDF
This chapter is for platform administrators and people who own cost accounting. It explains how to set selling prices for connected models, organize model categories, declare a model's capability purposes and display metadata, and pick default models for built-in platform functions. After this chapter you can price by input, output, and cache separately, configure tiered pricing, time-of-use pricing, and pricing by input length, maintain the USD exchange rate, maintain model categories, edit model metadata, and configure default models.
A model's selling price decides how much each call is billed, and is also the basis of a model group's money budget (Chapter 7). Unpriced models can still be called, but the call is recorded as Unpriced and is not counted in money statistics. When the caller carries a money budget, unpriced models are skipped (Section 7.3).
Prerequisites: sign in as tenant administrator or a role that can manage providers; the model's provider is already connected (Chapter 4).
5.1 Pricing entry and where it applies
When to use: price a newly connected model, or adjust internal allocation prices after an upstream price change.
Model prices are maintained on the provider detail Model pricing tab, and can also be checked on the member-side model detail. The same prices apply to all calls in the tenant. A model group can also set a target-specific tiered price for a single subject under Visibility & quotas › Set target-specific price. A target-specific price takes precedence over the standard price here. When several subjects match, the most specific one is used: member > functional group > department > workspace > all members of this group (Chapter 7).
Procedure
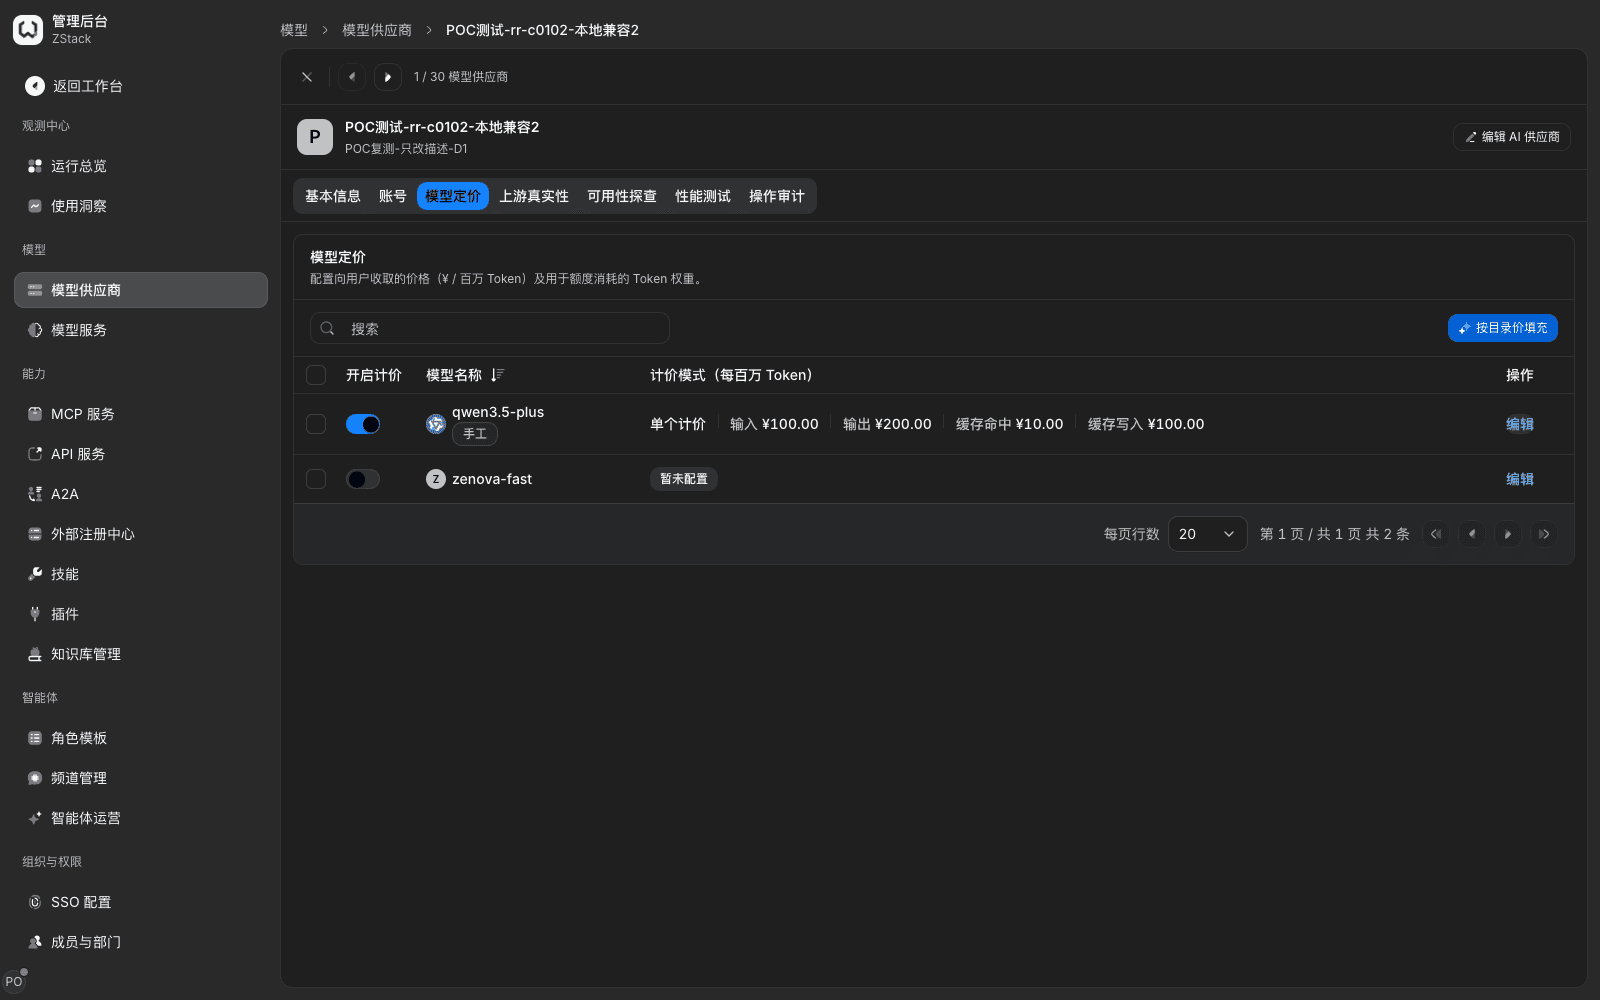
- Open the Model pricing tab and choose Edit on the target model row.
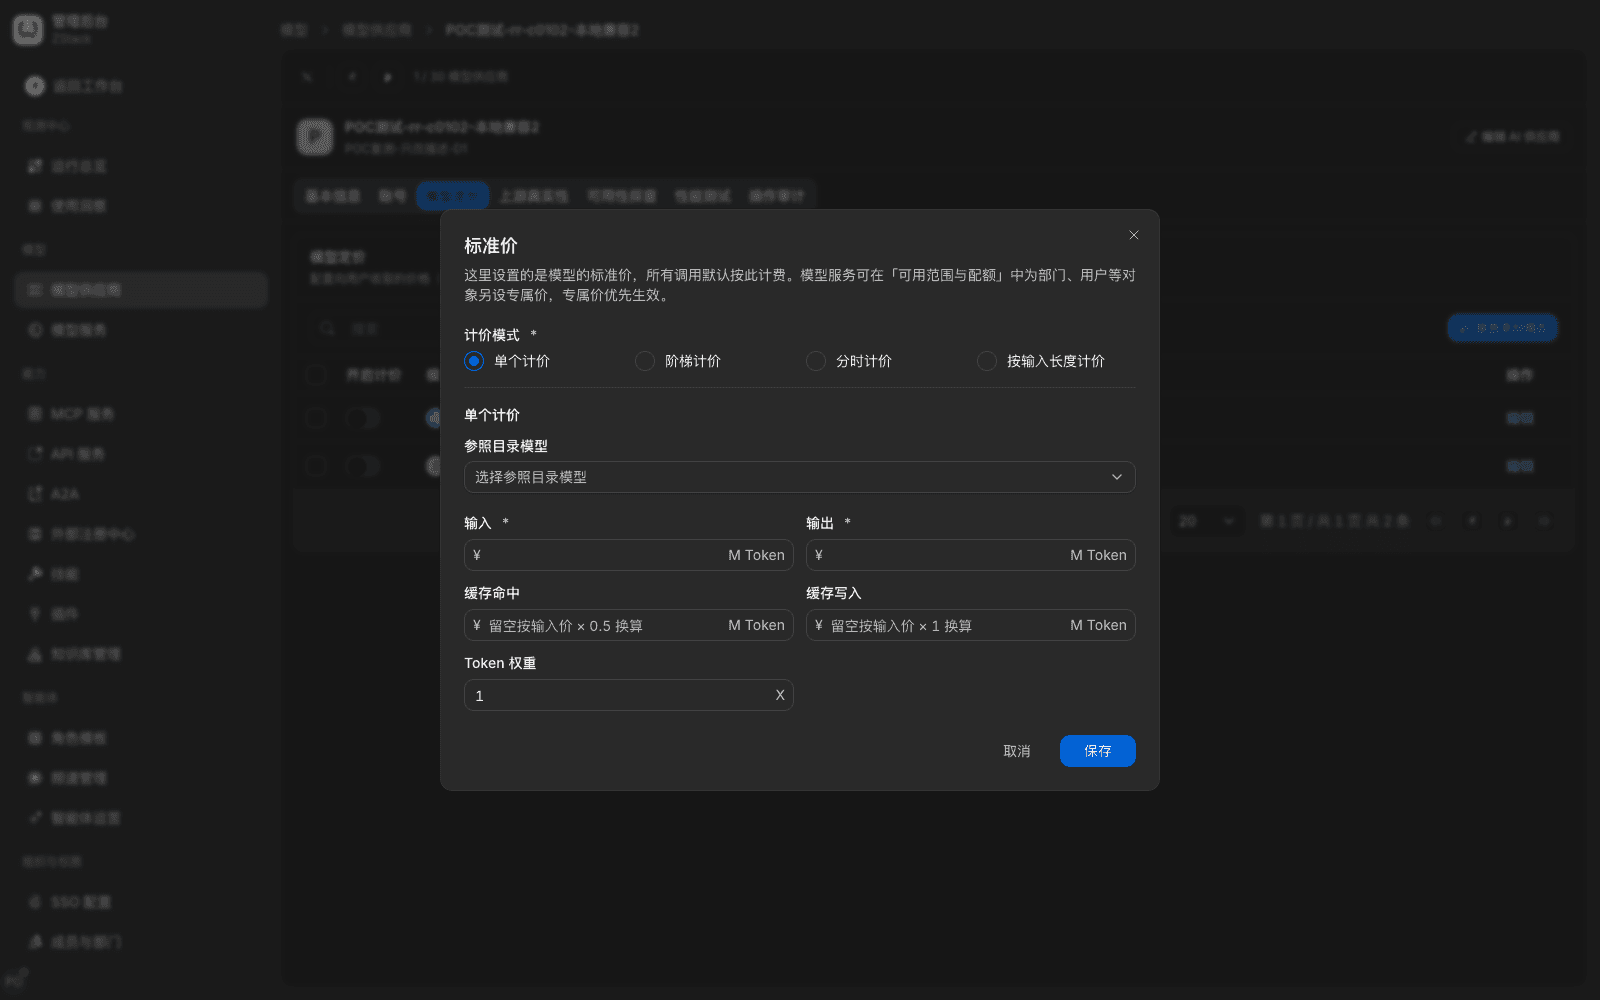
- In the dialog choose Pricing mode: single price, tiered pricing, time-of-use pricing, or by input length — pick one of four.
- Fill in prices and choose Save.
What you will see: after save the prompt is Saved, 1 model changed. That row in the pricing list shows a price-source badge (Manual or Reference), pricing mode, and unit prices. The model's Turn on pricing switch turns on automatically.
Note: once saved, prices apply to usage produced from then on. Bills already produced do not change. Pricing is a global finance configuration; confirm the blast radius before you change it.
5.2 Price input, output, and cache separately
When to use: the upstream charges input, output, cache hits, and cache writes separately, and the platform needs to allocate internally with the same breakdown.
Procedure
- In the Edit dialog choose Pricing mode = Single price.
- Fill in four unit prices, unit per million tokens: input, output, cache hit, cache write.
- To convert raw tokens into quota consumption, adjust Token weight. Weight only affects quota; it does not change the price.
- To follow a public catalog price, click Reference catalog model and pick a reference from the built-in model catalog.
- Choose Save.
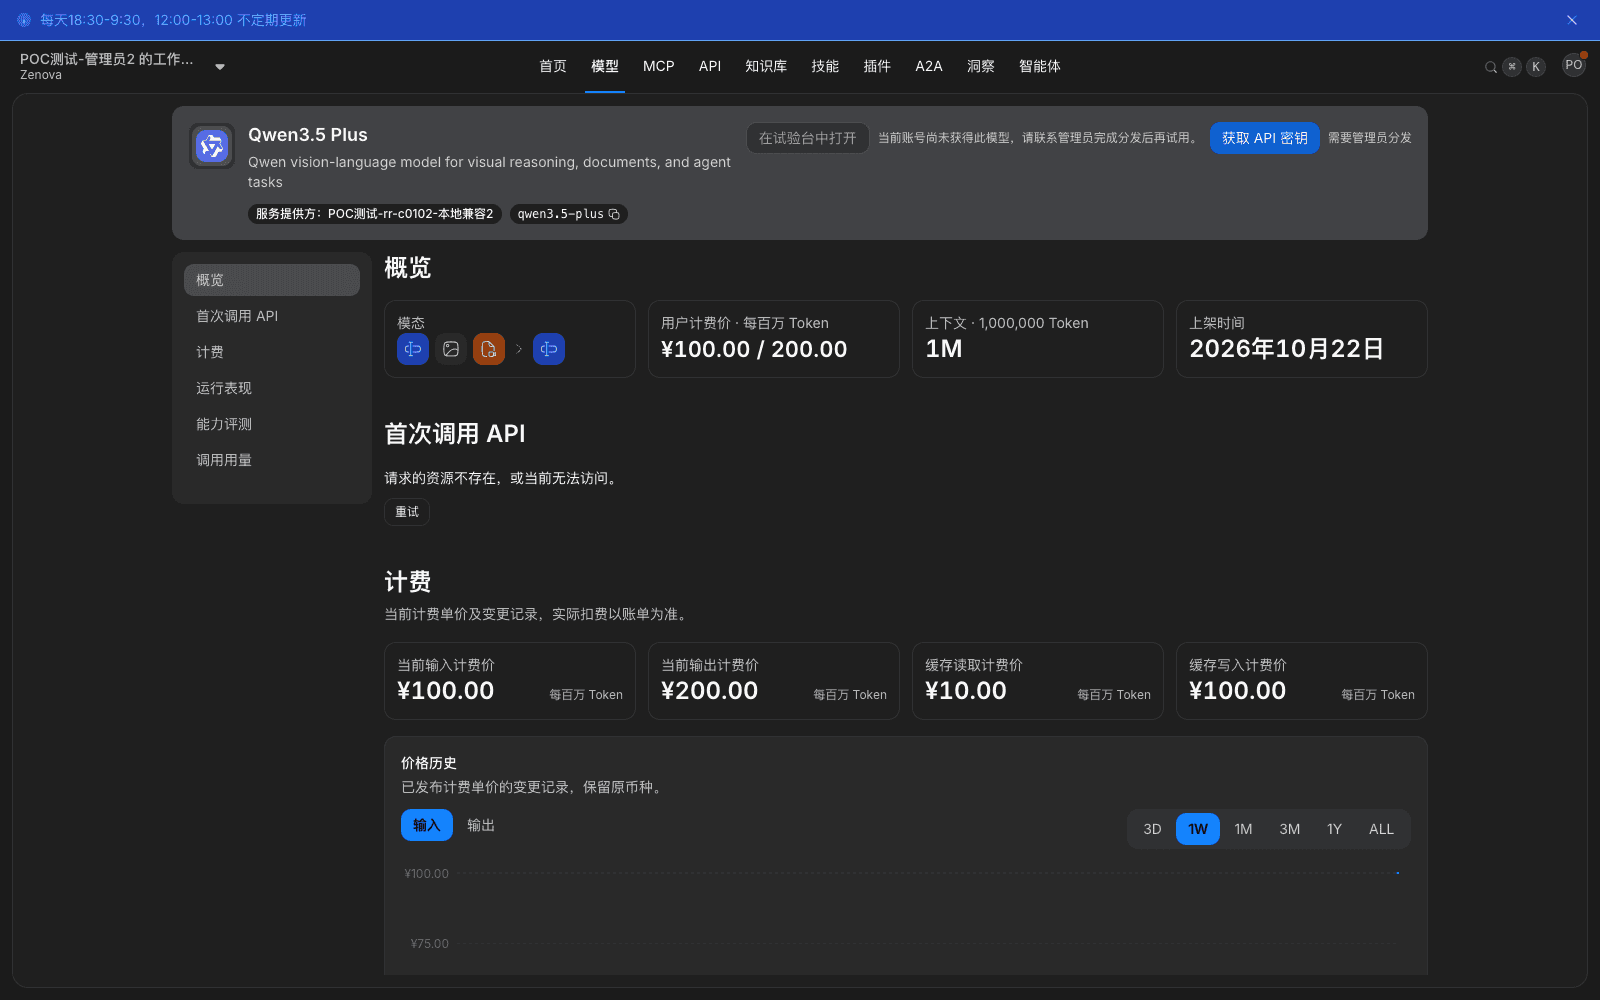
What you will see: members see the same numbers on the model detail. Input and output prices can also be read directly as User billing price on Overview. The Billing area also has a price-history chart that records each change in the original currency.
Note: the four unit prices are independent. Fill cache hit and cache write according to how the upstream actually charges. If cost on the request detail stays Unpriced after a call, first check whether that model's Turn on pricing switch is on, then confirm this call was actually handled by that upstream: billing is settled on the upstream that actually handled the request. Actual upstream on the request detail is the upstream used for settlement.
5.3 Billing units for multimodal models
When to use: the model is used for image generation, image edit, speech synthesis, speech transcription, video generation, and similar purposes, and cost is not measured in tokens.
The platform puts this kind of cost under Per-unit pricing, maintained separately from the four token unit prices. Token unit prices are per million tokens; the per-unit part is billed in its own physical unit, shown in the pricing dialog.
Note: the per-unit part does not take part in input-length tiers or time-of-use pricing — those two modes only act on the four token unit prices. When you set prices in batches, group by purpose; do not put this amount into the input or output unit price.
5.4 Tiered pricing
When to use: the upstream settles by cumulative-usage tiers, or you want a volume discount.
Procedure
- Set Pricing mode to Tiered pricing.
- Set how usage accumulates:
- Accumulation period: hour, day, month, or cumulative;
- Accumulation method: by tenant, user, API key, or conversation;
- Pricing method: Unit price fills four prices per tier, or Token multiplier gives each tier as a multiple of the base price;
- Cross-tier pricing: Segmented splits at tier boundaries, or Whole request bills the whole request at the tier after the crossing.
- Choose Add tier, fill in four unit prices on tier 1, then add more tiers as needed. The tier table shows ranges as 0 – 10 million / 10 million – ∞; the last tier has no cap.
- Choose Save.
What you will see: the tier table shows each tier's start, end, and unit prices live. The dialog text states The base price of a unit-price ladder is the tier-1 price; it is written together on save, and Changing the tier table does not change historical bills.
Note: changing tiers only affects later usage. Tiered pricing, time-of-use pricing, and pricing by input length are mutually exclusive; one model can use only one of them.
5.5 Time-of-use pricing
When to use: the upstream prices by peak and off-peak windows, for example peak price in working hours and idle price at other times.
Procedure
- Set Pricing mode to Time-of-use pricing.
- Confirm Time zone, default
Asia/Shanghai. The time zone is saved with the prices and is independent of the tenant time zone. - In Base price, fill in the four unit prices used when a request starts outside every window.
- Choose Add window. Each window has name, time range, applicable days, and four unit prices, at most 8 windows.
- Choose Save.
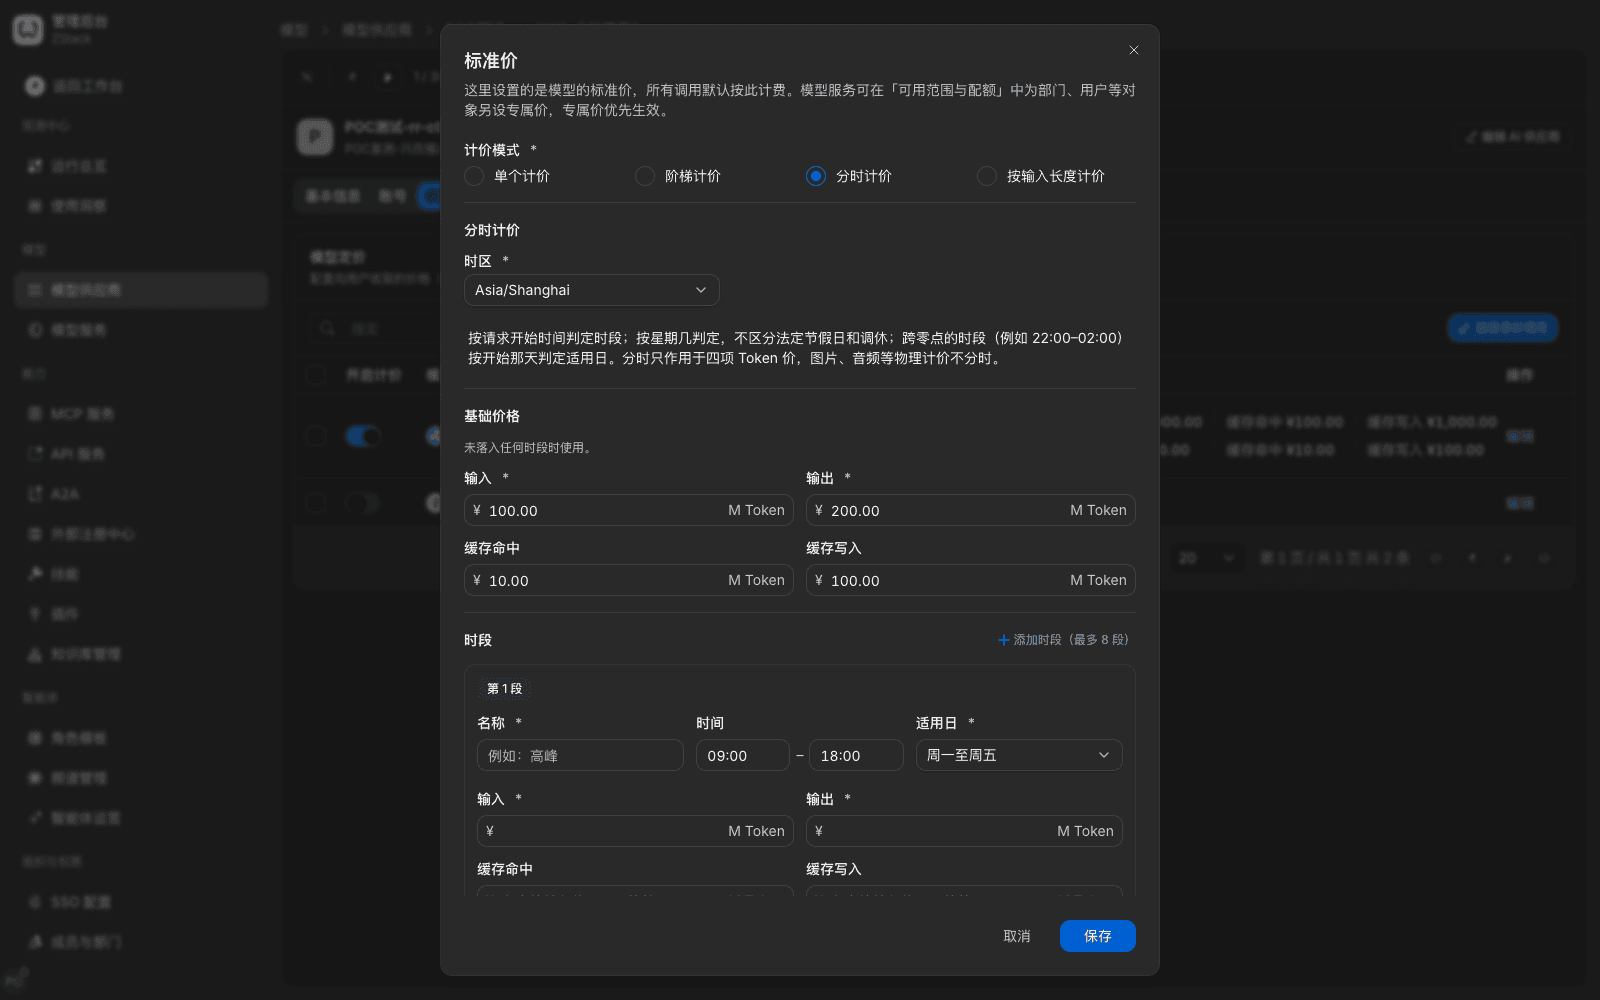
Pricing rules (also stated in the dialog):
- The window is chosen by request start time. A request that crosses a window boundary is billed at the window of the start time;
- Only weekdays are used; public holidays and make-up workdays are not distinguished;
- A window that crosses midnight applies by the day it starts;
- Time-of-use only acts on the four token unit prices. Per-unit prices such as images and audio do not vary by window.
Note: matching windows only by weekday means that when the upstream charges idle prices on holidays, the platform bill will differ from the upstream bill. When holiday price differences are large, set a target-specific price for the affected authorized subjects (Chapter 7).
5.6 Pricing by input length
When to use: the upstream raises the whole request's price after a single request's input exceeds a threshold, for example extra-long context requests.
Procedure
- Set Pricing mode to By input length.
- In Base price, fill in the four unit prices used when input does not exceed the first threshold.
- Choose Add tier, fill in the Input above threshold (unit ×10k tokens) and four unit prices, at most 15 tiers.
- Choose Save.
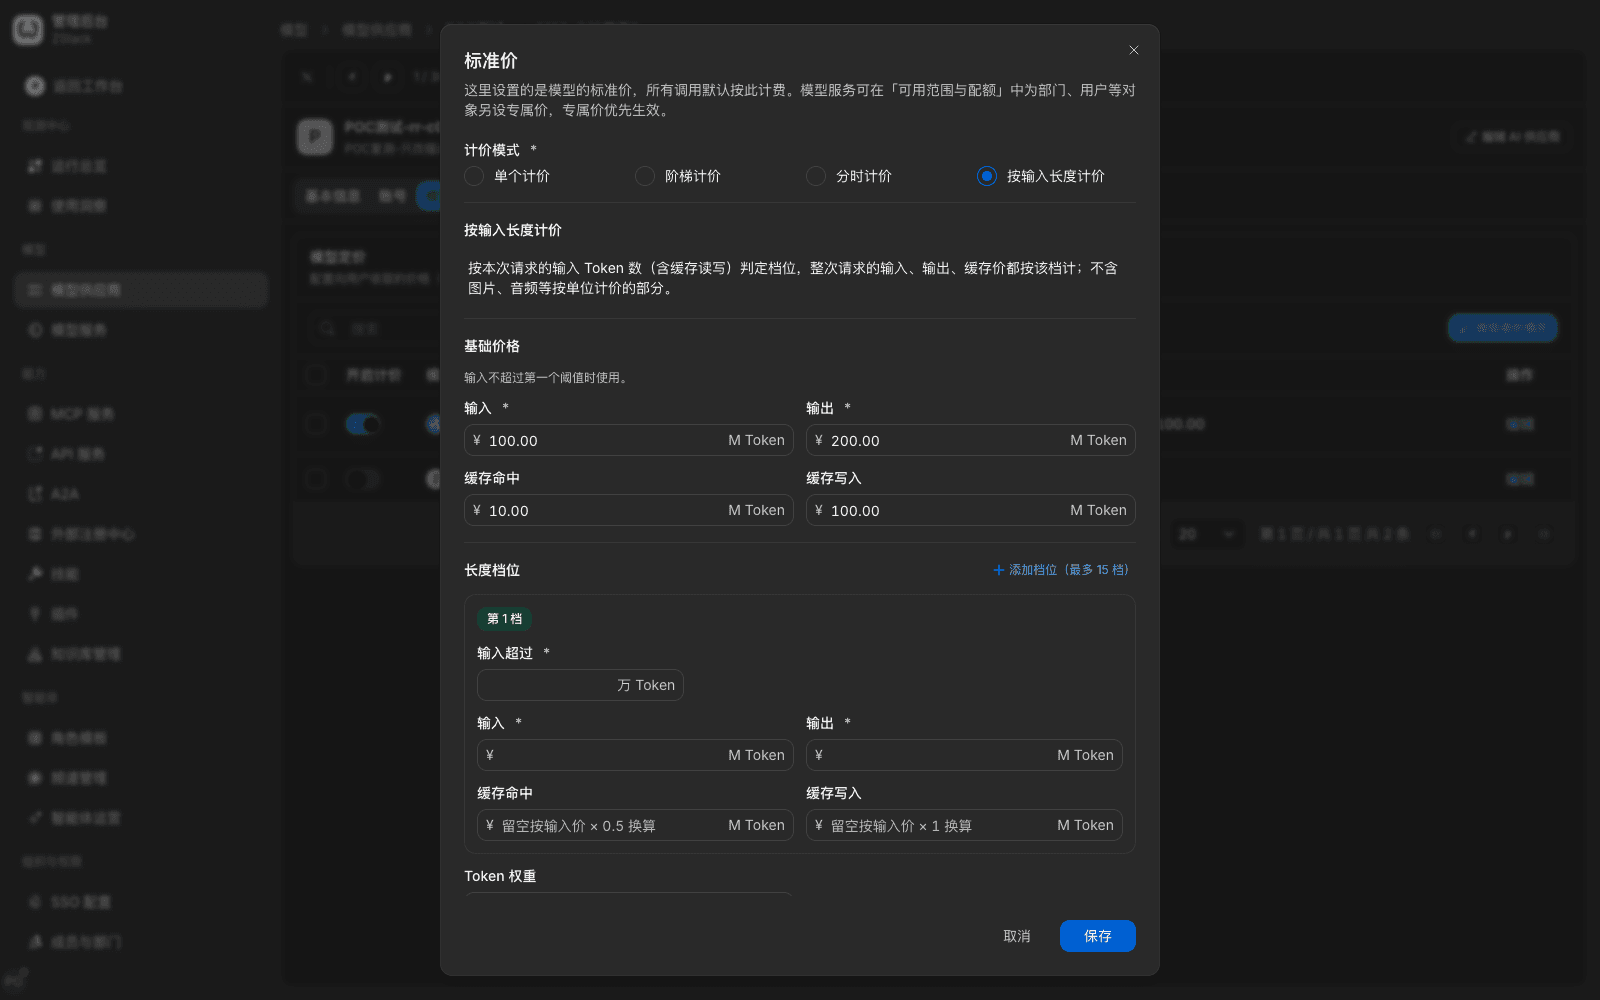
Pricing rules: the tier is chosen by this request's input tokens (including cache reads and writes). The whole request's input, output, and cache prices are billed at that tier. Historical usage is not accumulated. Per-unit prices such as images and audio are not included.
What you will see: the pricing list shows the two segments side by side — tier 1 as Input above 0.01×10k tokens and its unit prices, base price as Input up to 0.01×10k tokens and its unit prices — so you can read the tiering without opening the dialog.
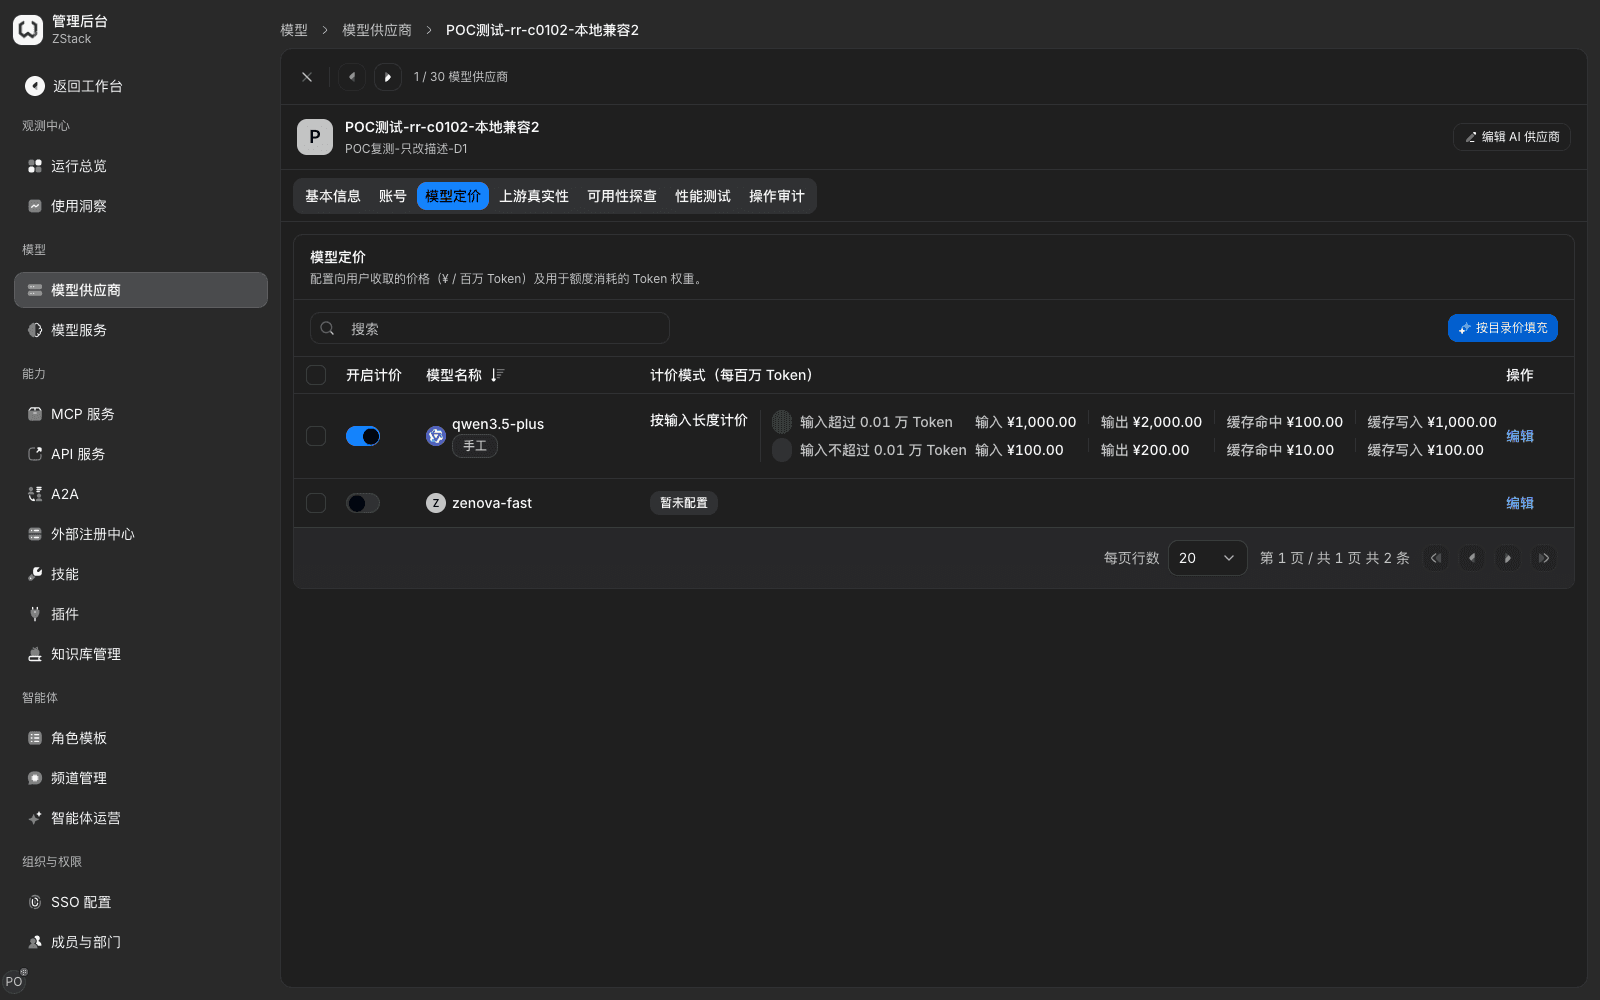
Note: a threshold that is too low puts most requests into a high-price tier. Estimate from the input length of real business requests, then set the threshold.
5.7 Exchange rate and settlement currency
When to use: model prices come from a USD catalog, while the platform books in CNY.
Settlement currency is decided at deploy time. All selling prices, money budgets, and cost statistics use it. USD exchange rate is used in two places:
- Convert USD costs reported by the client: the page states Used to convert USD costs reported by the client into this tenant's settlement currency. If empty, client-reported costs are not used; catalog estimates are used instead.
- Prefill prices from a catalog reference: when you choose Reference catalog model while pricing, the platform uses this rate to prefill USD catalog prices as settlement-currency prices. If no rate is configured, the pricing dialog asks you to type one; that input is only used for this conversion and does not change global settings.
Procedure
- Open Admin Console › System Settings › Global settings.
- In the USD exchange rate area fill in 1 USD in CNY, for example
7.2. Only a number greater than 0 with at most 6 decimals is accepted. - Choose Save. The page says USD exchange rate saved.
What you will see: the page shows the current 1 USD in CNY value.
Note: the exchange rate is a global configuration. One change affects all later conversions. Have a named owner maintain it, and change it in a change window. When the settlement currency itself is USD, the page shows Settlement currency is USD; no exchange rate is needed.
5.8 Model capability purposes and metadata
When to use: declare which purposes a model can take, or correct an inaccurate display name, context window, or max output from the catalog.
Edit model metadata
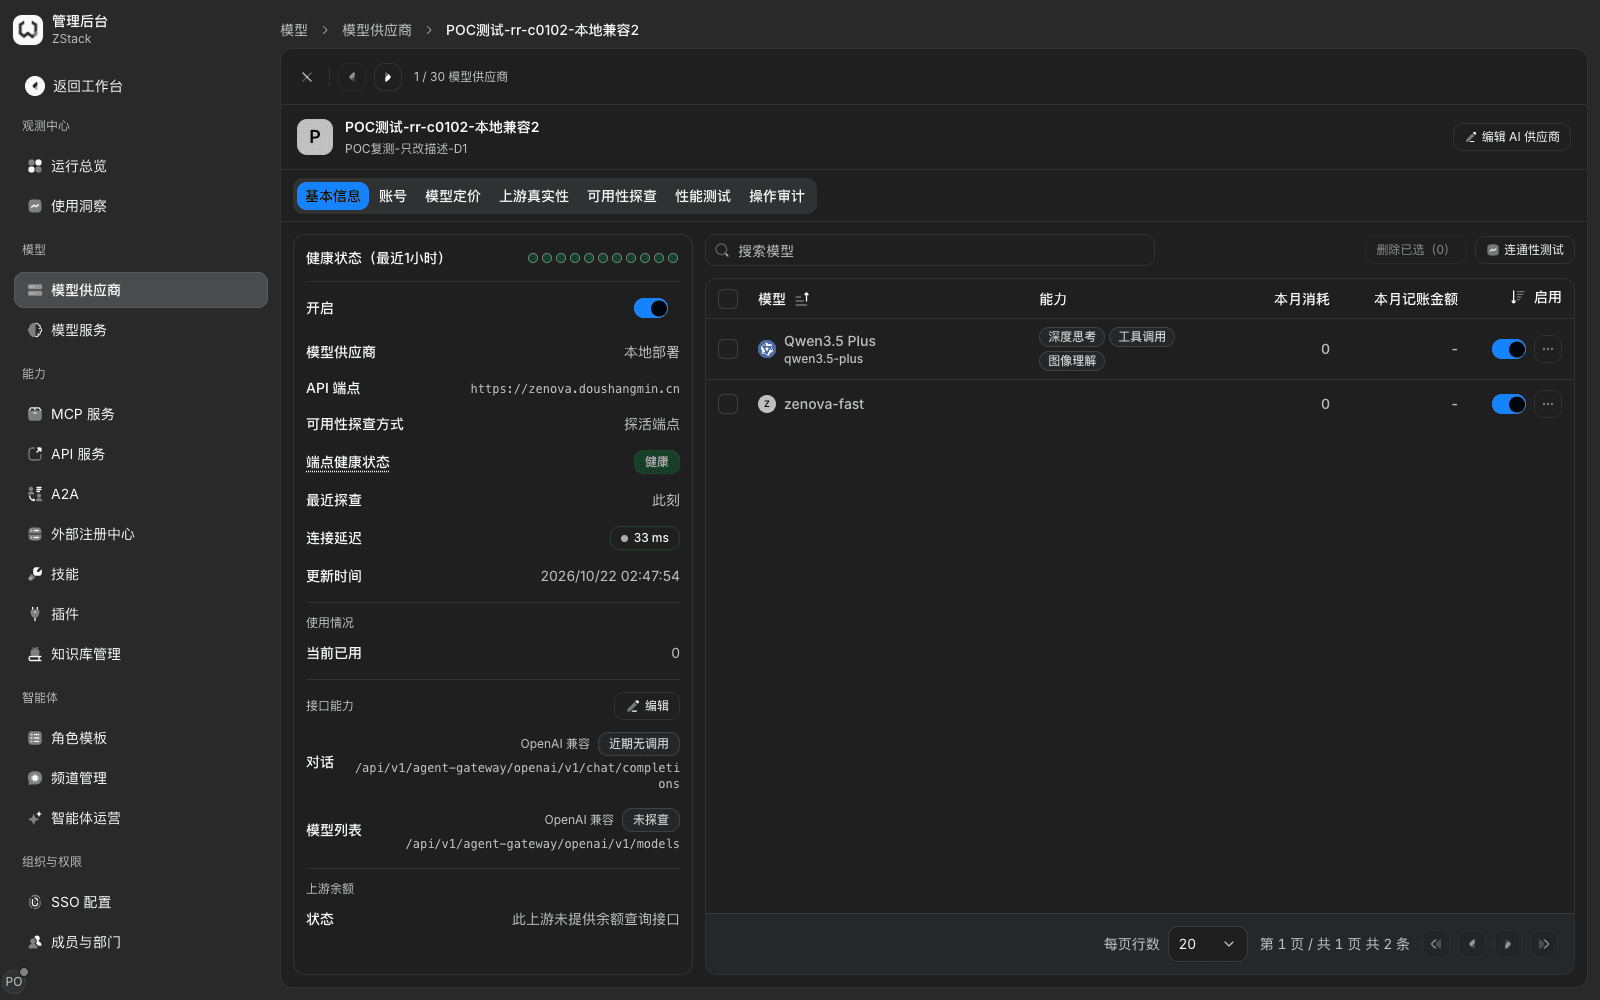
- Open the provider detail Basic information tab. In the … menu on the right of the model row, choose Edit model metadata.
- The top of the dialog shows the upstream model name and its source badge, for example Catalog. Below that you can change three items: Display name, Context window, Max output.
- Choose Save.
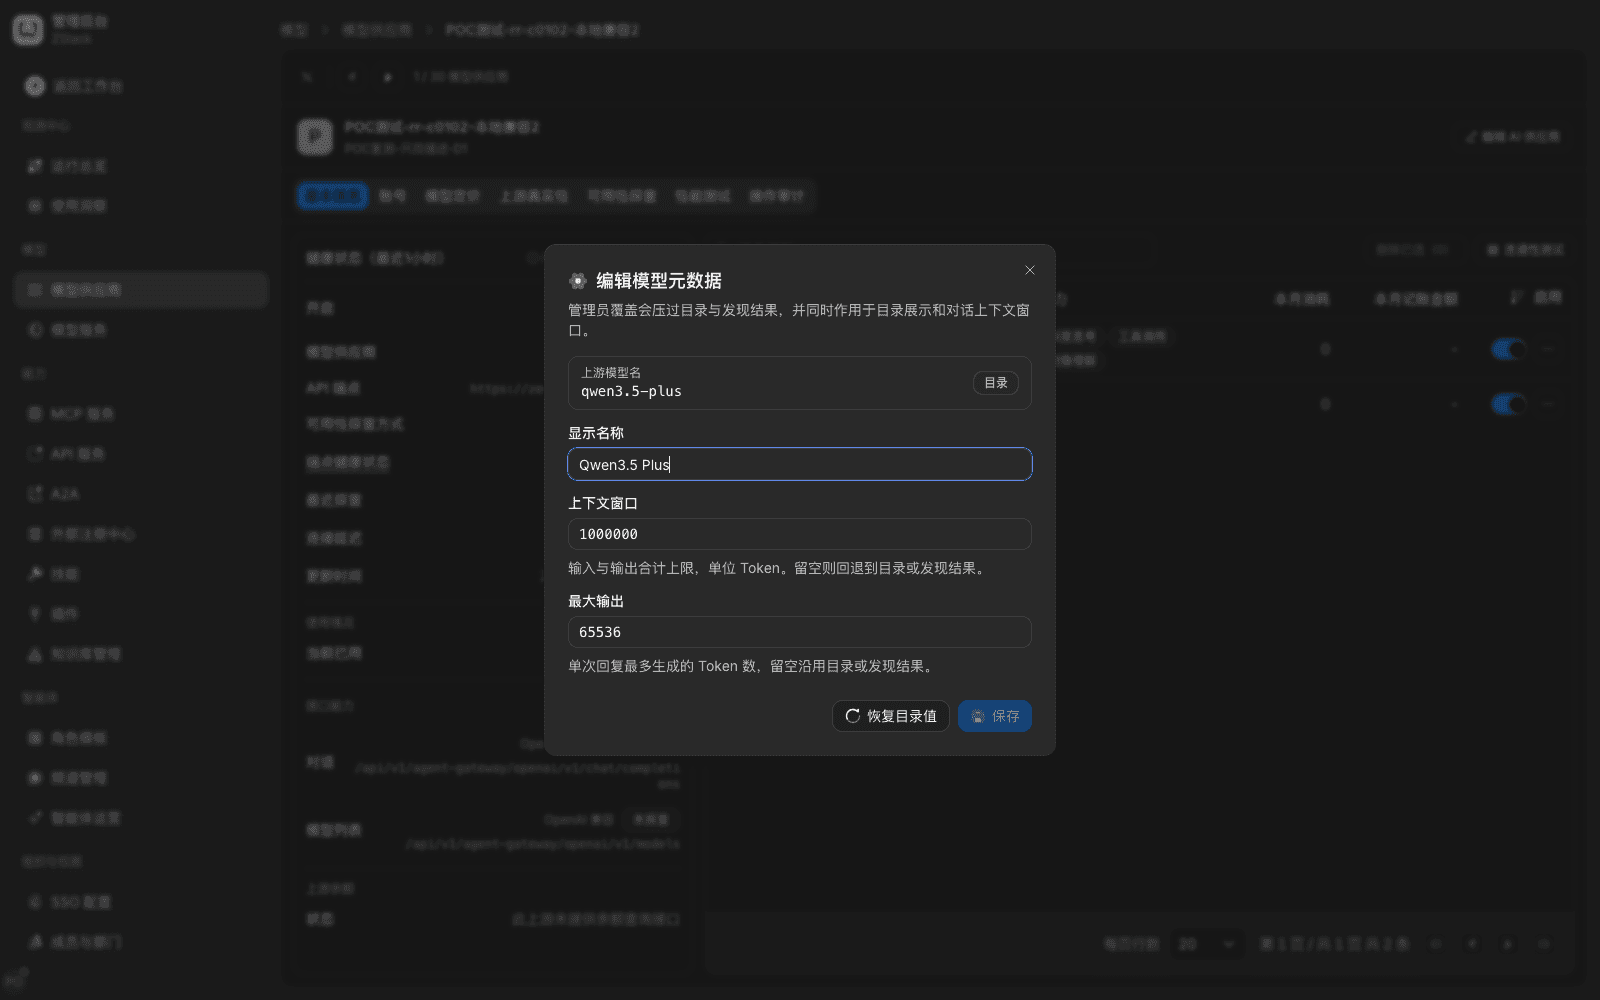
What you will see: the dialog states An administrator override takes precedence over catalog and discovery, and applies both to catalog display and to the conversation context window. After save, the name in the model list updates and the source badge becomes a manual override. The member-side model detail shows the new name and context window.
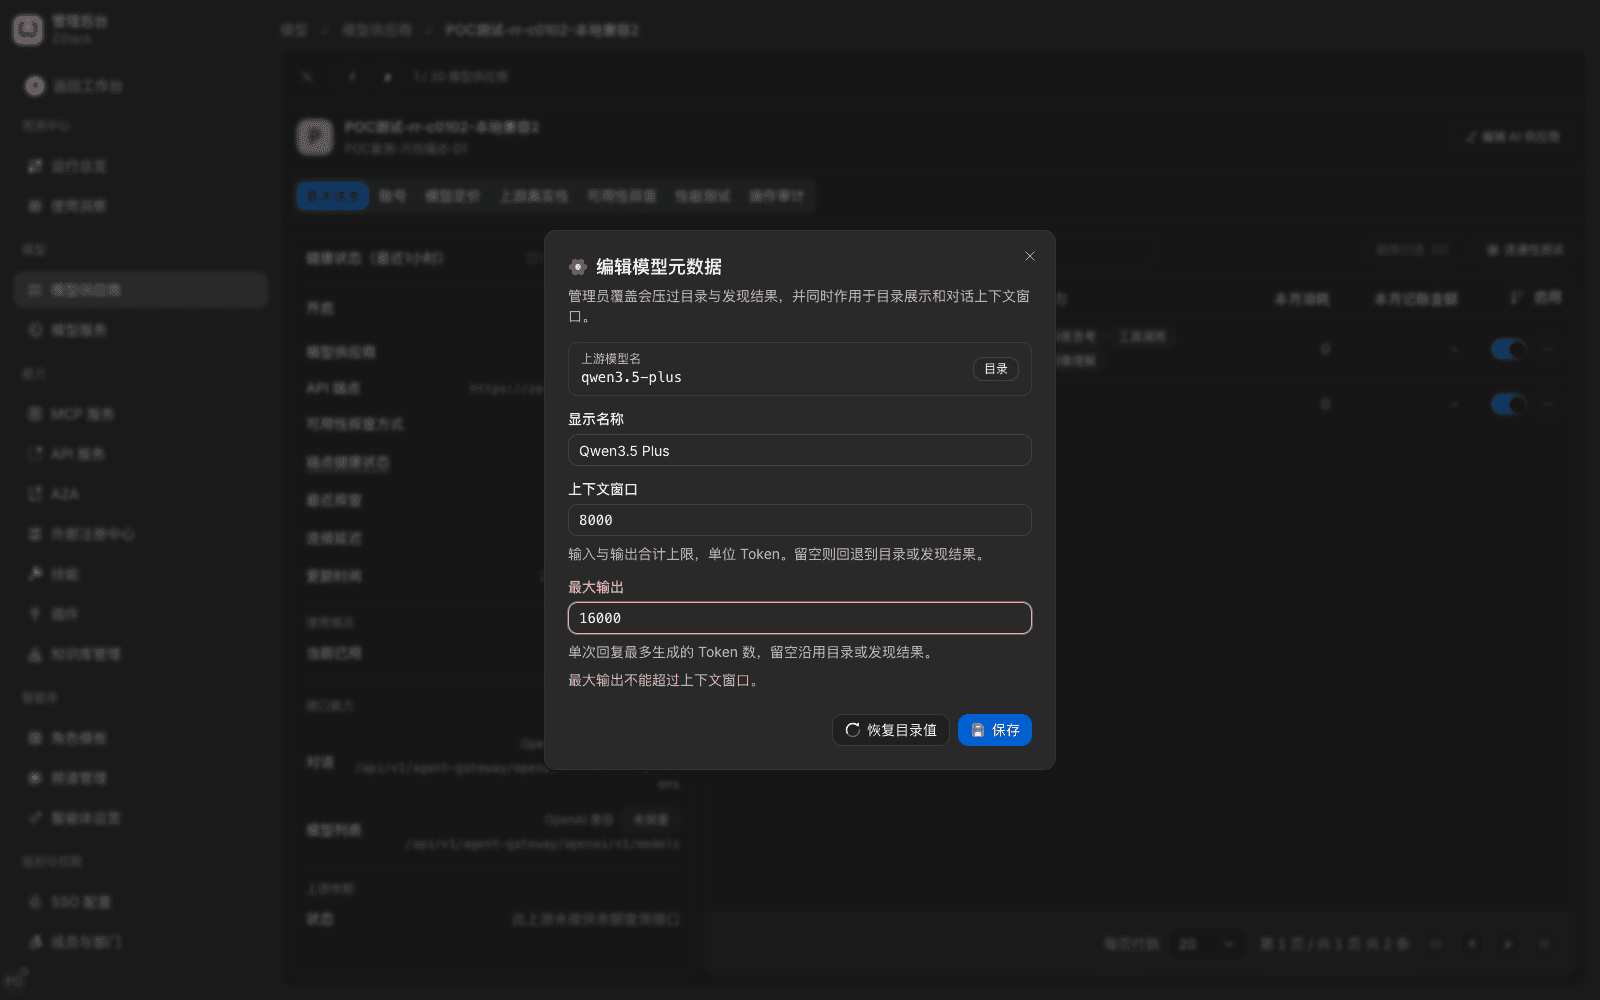
Validation and restore: when max output is greater than the context window, the input turns red with Max output cannot exceed the context window., and you cannot save. To go back to built-in values, choose Restore catalog values. That takes effect immediately; you do not need to click save again.
Note: override values apply to catalog display and to the context window of in-platform conversations. They do not constrain API calls — input length a caller sends through the API is not blocked or truncated by the override. To limit the size of a single API request, use a traffic rule's request-body cap or token cap (Chapter 15).
Configure capability purposes
In the same … menu choose Configure capabilities to declare, item by item, the purposes the model takes: chat, embeddings, image generation, image edit, speech transcription, speech synthesis, vision, rerank, decisions, content safety, sensitive-info recognition, lightweight calls, realtime speech, video generation — 14 in total. Each capability is marked with a source: Built-in catalog, Auto-discovered, or Manual override.
Note: decisions, content safety, and sensitive-info recognition serve guardrails and the decisions API, and can only be declared explicitly by an administrator. Until they are declared, guardrails and route conditions that depend on that purpose do not take effect (Chapters 13 and 15).
5.9 Model categories
When to use: there are many models on the member side and you need to organize them by business category (for example Code, Writing, Multimodal) so they are easier to find.
Procedure
- Open Admin Console › Models › Models and switch to the top Categories tab.
- Choose Add category. A row is inserted at the bottom of the list; rename it in place and fill in Display order.
- Select the category and in the right-hand panel choose Add models to put models in that category. Categories hang on models. The model detail Basic information lists the categories it belongs to, and Manage categories returns to this tab.
- To unlink, choose Remove in that category's model list on the right.
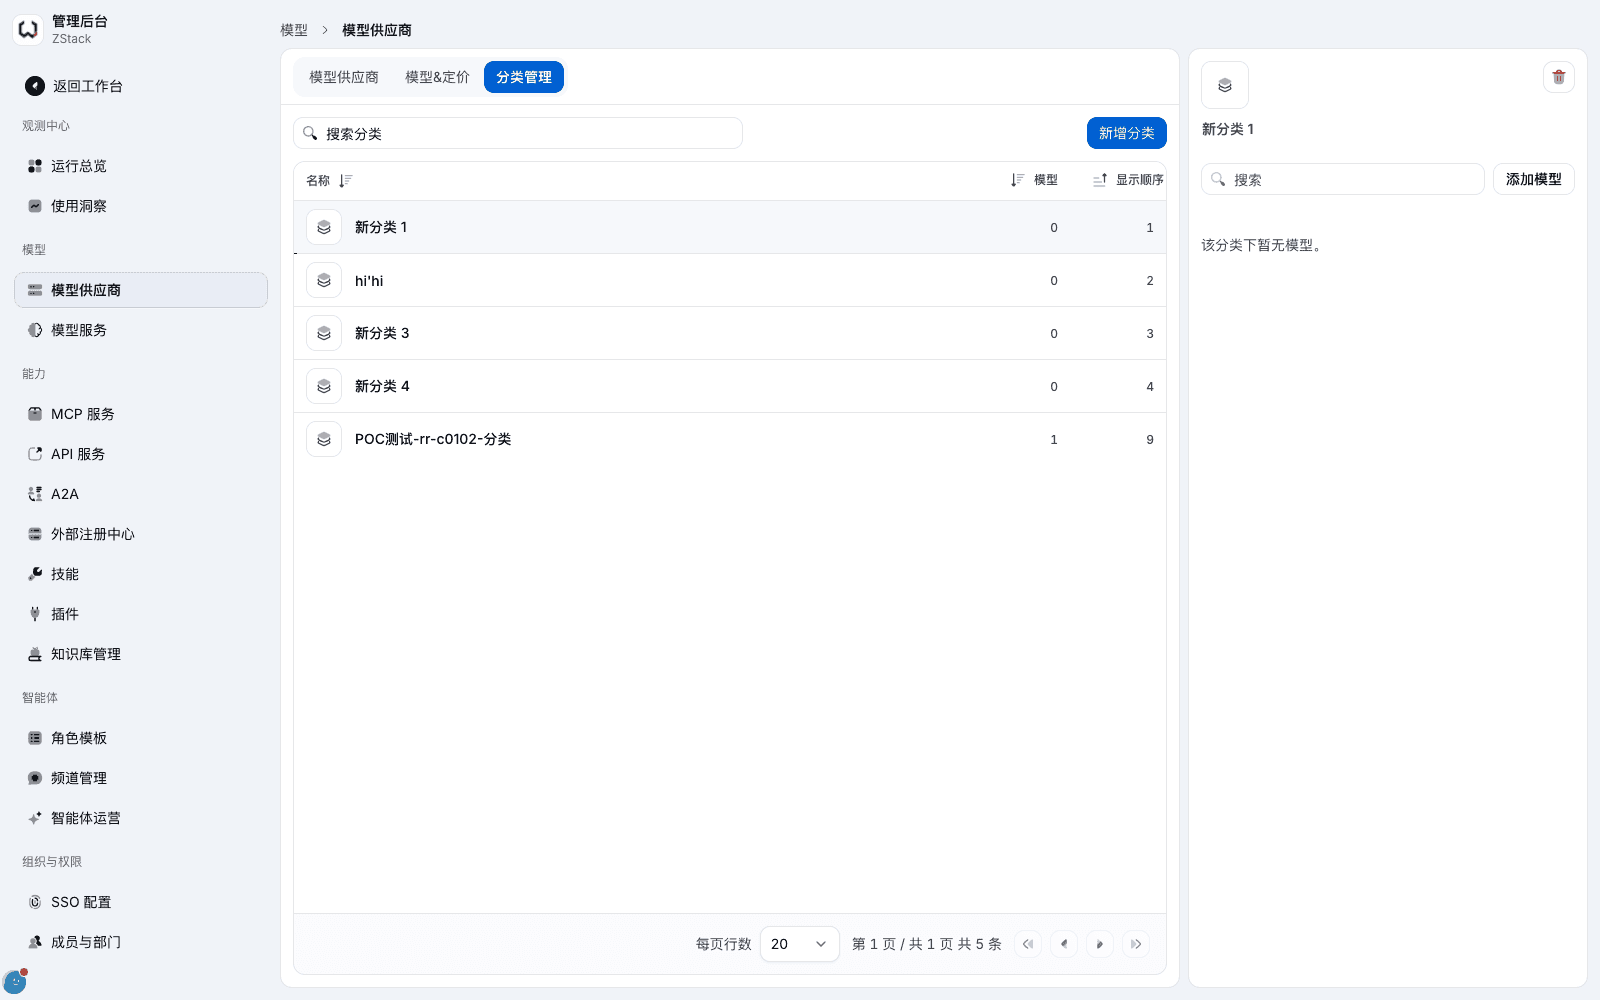
What you will see: the list is three columns Name / Models / Display order. After create, Models is 0; after you put one model in, it becomes 1. The right panel shows No models in this category yet until you add some.
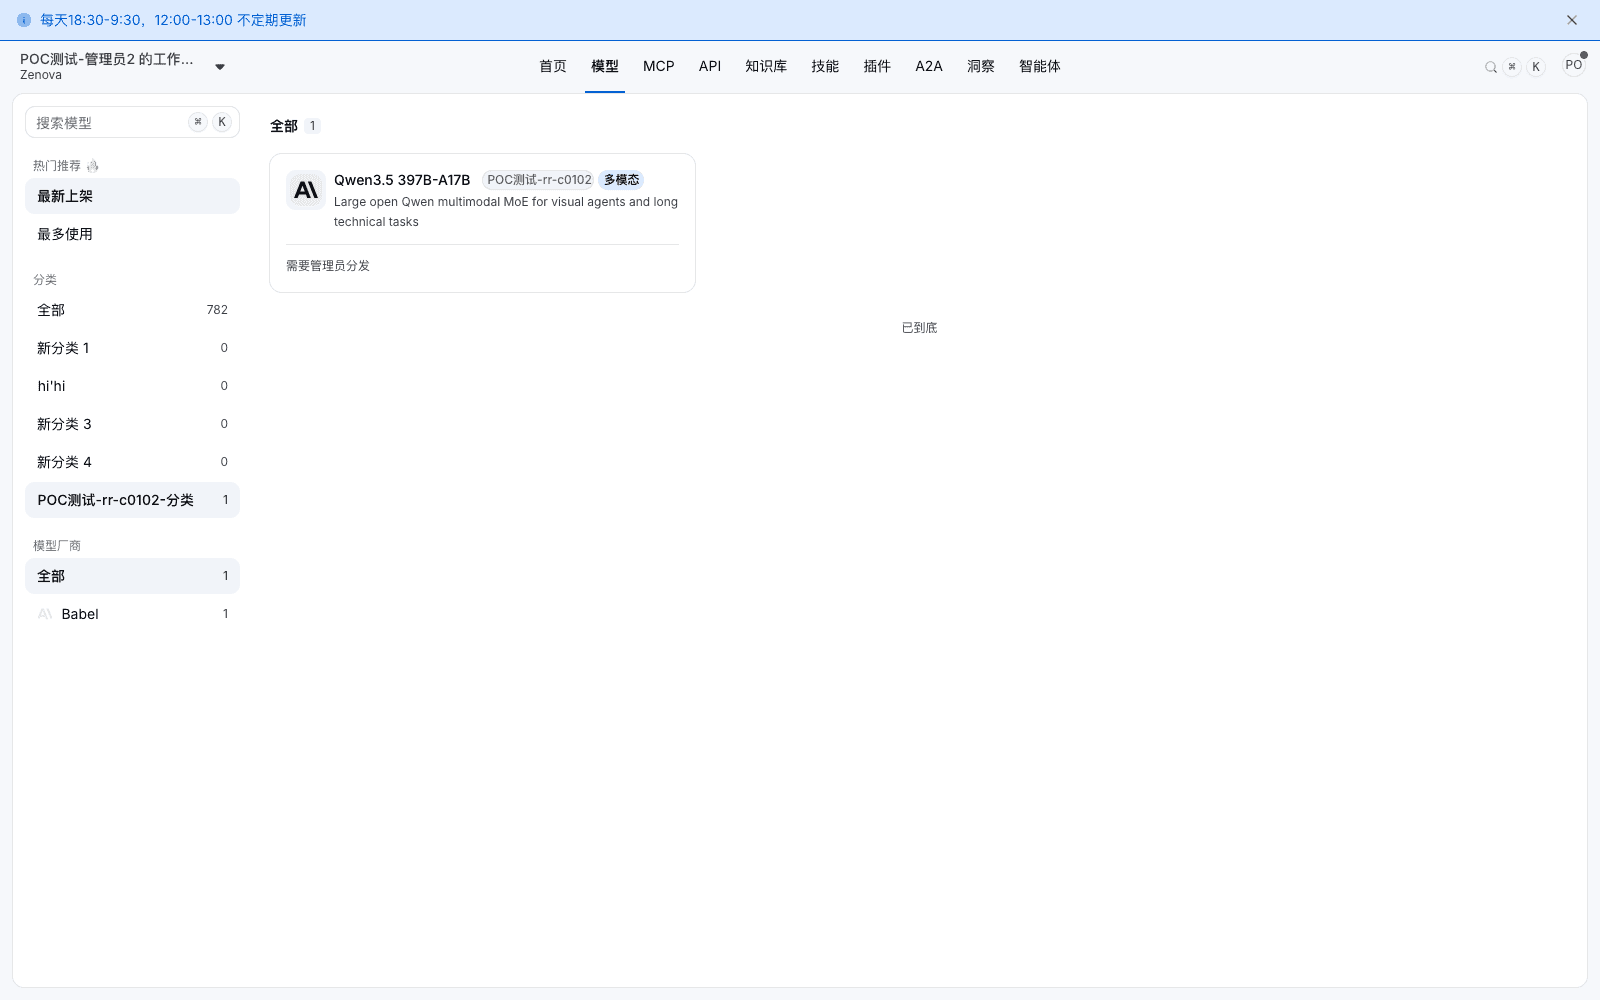
Note: categories only affect filtering and display on the model plaza; they do not affect whether a member can call. Whether they can call is decided by the model group's availability scope (Chapter 7).
5.10 Configure default models
When to use: pick which model built-in platform functions use, for example intent recognition, content safety, or knowledge-base embeddings.
Entry: Admin Console › System Settings › Global settings › Default models.
Procedure
- In the Default models list choose Edit to open the dialog.
- Choose item by item: chat-style purposes (chat model for a new agent, image generation, knowledge pages and summaries, intent recognition, content judge, sensitive-info recognition) pick a model; calls are dispatched among that model's upstreams. Speech input, knowledge-base embeddings and rerank, Q&A semantic matching, and semantic-cache embedding and rerank models pick a concrete upstream; calls are always handled by that upstream. Empty means not set. Which model group usage is counted in is decided by the platform from group order; you do not pick a group here.
- Choose Save. Some functions actually call the chosen model once with samples on save to check, for example content judge calls once with a violating sample and once with a normal sample, and automatically determines the call style; you do not choose a model type (Section 14.3).
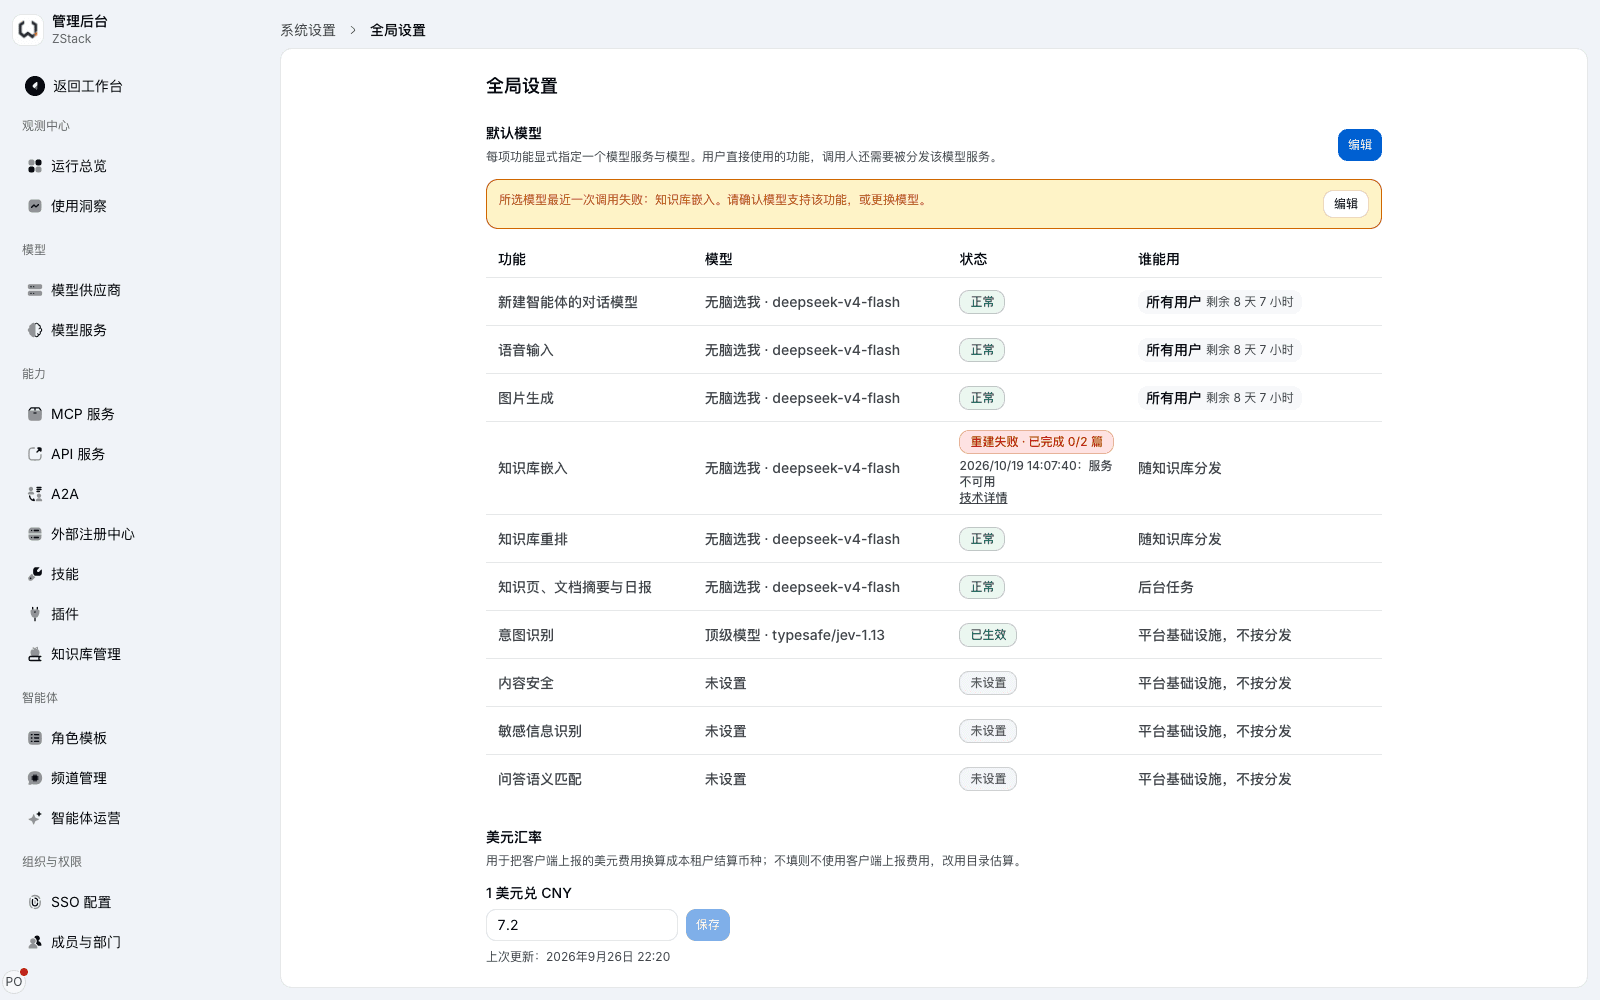
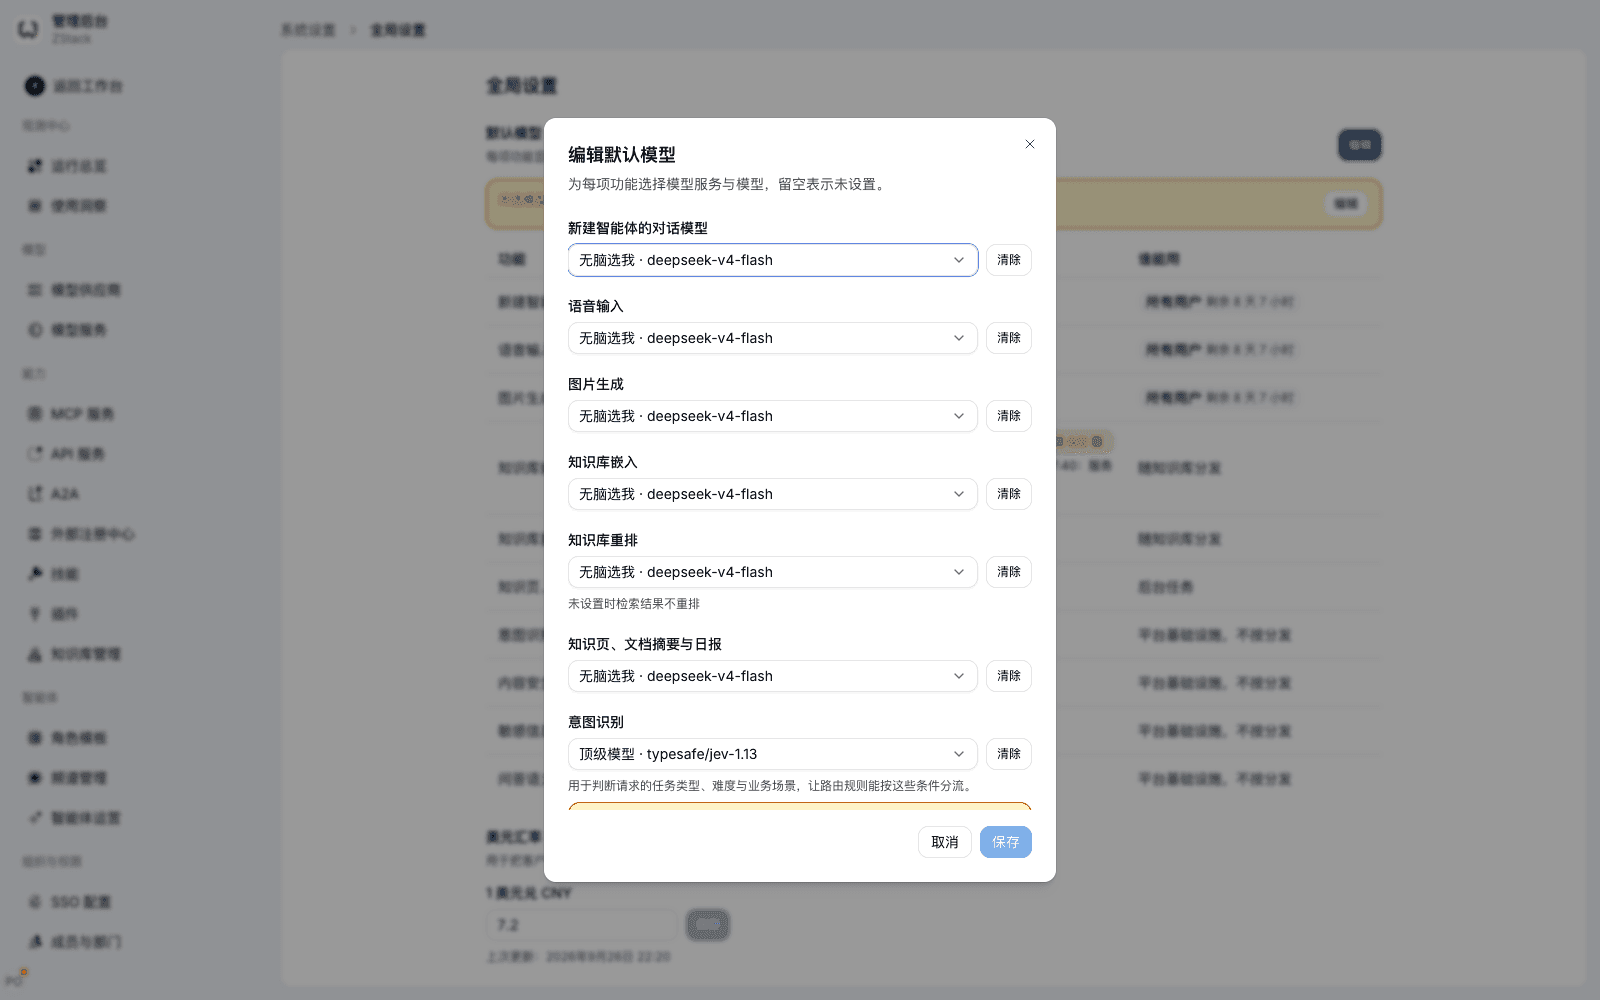
There are 12 configurable functions, in three groups by who uses them:
| Group | Functions | Who can use them |
|---|---|---|
| Direct user use | Chat model for a new agent, speech input, image generation | The caller must also be in the availability scope of a group that contains the model |
| Knowledge base and background tasks | Knowledge-base embeddings, knowledge-base rerank; knowledge pages, document summaries, and daily reports | The first two Follow knowledge-base distribution; the last Background tasks |
| Platform infrastructure | Intent recognition, content judge, sensitive-info recognition, Q&A semantic matching, semantic-cache embedding model, semantic-cache rerank model | Platform infrastructure, not by distribution; platform-internal calls |
What you will see: the Status column shows In effect, Not set, Rebuild failed, and similar. When the chosen model's latest call failed, or the chosen model or upstream is disabled, an alert bar at the top of the page names which item. The dialog gives a targeted note for each function, for example intent recognition Used to judge the request's task type, difficulty, and business scenario so routing rules can split on these conditions, content judge On save, one violating sample and one normal sample are actually called to check, knowledge-base rerank When not set, retrieval results are not reranked.
Note:
- After you change the knowledge-base embedding model, already-ingested documents need their vector index rebuilt. During rebuild the page shows progress and failure reasons. Semantic retrieval is incomplete until rebuild finishes.
- Content judge and intent recognition can use any chat model. Sensitive-info recognition needs a chat model that supports JSON output. Q&A semantic matching needs an embedding model. If the check on save does not pass, it gives a reason and a suggestion (Section 14.3). Until these items are set, content detection and Q&A capabilities that depend on them cannot take effect.
- The semantic-cache embedding model needs an embedding model; the semantic-cache rerank model needs a rerank model. Traffic rules can turn on the semantic cache only when both are in effect. When you save the semantic-cache rerank model, the system actually calls that model with built-in synonymous and non-synonymous question samples to determine that model's hit standard. A model that cannot distinguish the two kinds of sample cannot be saved. These two pick a concrete upstream and are not reassigned to another upstream by traffic rules. Both kinds of call are billed against the chosen model. The current question and nearby cached questions in the same scope are sent to the chosen model. After the chosen upstream's configuration changes, the status row says a re-check is needed; the semantic cache does not take part until you choose Re-check and the check finishes. Deployments that use OceanBase as the platform database do not support the semantic cache.
- You cannot clear the semantic-cache embedding model or the semantic-cache rerank model while they are still used by rules that have the semantic cache on. The page lists those rules; first delete the Semantic cache action from the rules, then clear.
- When you pick a model from an external provider, the dialog warns After you pick "{provider}", users' questions will be sent to that provider. Confirm the data boundary, then save.
- Default models are tenant-wide. A change immediately affects all users. Prefer a change window.
Capability notes
| Not provided | Use instead |
|---|---|
| Automatically take a model or model group offline on a scheduled time and notify affected parties | Model group detail only has an immediate Publish switch (when you turn it off, the confirm box lists affected key count, traffic rules, and Global settings functions). Provider detail only has an Enable switch. Neither can set an effective time. To take offline, turn the switch off immediately; check affected scope in Call activity first, and tell people through notification channels by hand (Chapter 6) |
| Configure alert rules with events such as "offline / retired" | Alert rules have no such events. Use call failure rate or usage dropping to zero as substitute signals (Chapter 19) |
| Administrator-overridden context window and max output constrain API calls | Override values only apply to catalog display and in-platform conversations. Limit the size of a single API request with a traffic rule's request-body cap or token cap (Chapter 15) |
| Automatically infer a selling price when no preset price exists | Use Reference catalog model to prefill catalog price × USD exchange rate (Section 5.2, Section 5.7), or fill in the standard price by hand from the vendor contract (Section 5.1) |
Previous: 4. Configure model providers · Next: 6. Models and model groups
4. Configure model providers
Full-length chapter. Content is checked against the 2026.10 mainline code and the live console; menus and features depend on the current license, account permissions, and delivered environment.
6. Models and model groups
Full-length chapter. Content is checked against the 2026.10 mainline code and the live console; menus and features depend on the current license, account permissions, and delivered environment.